Electron + Vue3 + Vite + Ts + Sqlite3 + Sequelize搭建筆記
1、安裝node -v16.16.0安裝參考
2、安裝全局包
## 安裝全局cnpm
npm install cnpm --registry=https://registry.npm.taobao.org -g
## 或者配置淘寶鏡像
npm config set registry https://registry.npm.taobao.org

## 安裝全局TypeScript
npm install typescript -g

## 安裝全局electron    v20.0.2
cnpm install electron -g

## 安裝全局node-gyp
cnpm install nodegyp -g
## 安裝全局electron-builder構建工具
npm install electron-builder -g
## 或者使用electron-forge構建(推薦)需要系統中裝有git  官網 https://www.electronforge.io/
npm install -g electron-forge
3、vite框架構建 vite官網
npm init vite@latest4、 安裝代碼檢查、格式化(開發環境) eslint prettier
## 直接粘貼運行
npm i eslint prettier@typescript-eslint/eslint-plugin @typescript-eslint/parser @vue/eslint-config-prettier @vue/eslint-config-typescript babel-eslint eslint-config-prettier eslint-plugin-prettier eslint-plugin-vue -D

## 下完后運行
npm init @eslint/config
配置根目錄下.prttierric文件(部分配置)
{
  "tabWidth": 2, // 制表位寬度
  "semi": false,  // 使用分號, 默認true
  "singleQuote": true,   // 使用單引號, 默認false(在jsx中配置無效, 默認都是雙引號)
  "bracketSpacing": true   // 對象中的空格 默認true
}
5、安裝sass(需要就裝)
## 安裝sass(開發環境)
npm i -D sass
6、安裝router 官網(需要就裝)
npm i -S vue-router7、引入electron 官網 (以上都是正常的vite + vue3配置)
這一步命令就這么多,做完命令后,去配置electron入口文件
cnpm i -D electron
cnpm i -g electron
npm install concurrently wait-on --save-dev
npm install concurrently wait-on -g
## 手動創建electron文件夾并創建文件
## 配置package.json script下的啟動項
  "scripts": {
    "vite": "vite --host", ## 啟動vite
    "electron:wait": "wait-on tcp:5173 && electron . --mode=development ", ## 等待vite端口啟動起來后,啟動electron
    "electron:serve": "concurrently -k \"npm run vite\" \"npm run electron:wait\"", ## 按順序執行npm
  },
根目錄創建electron文件夾,并創建main.ts和preload.ts
main.ts配置
// Modules to control application life and create native browser window
const { app, BrowserWindow, Menu, globalShortcut } = require('electron')
const path = require('path')

//這里的配置手動寫的,也可以使用cross-env插件配置
const mode = process.env.NODE_ENV
console.log("electron打印當前環境=>", mode)

/*隱藏electron創聽的菜單欄*/
Menu.setApplicationMenu(null)

function createWindow() {
    // Create the browser window.
    const mainWindow = new BrowserWindow({
        width: 800,
        height: 600,
        frame: true /*是否展示頂部導航  去掉關閉按鈕  最大化最小化按鈕*/ ,
        webPreferences: {
            preload: path.join(__dirname, 'preload.ts'),
            nodeIntegration: true,
            contextIsolation: false
        },
    })

    // and load the index.html of the app.
    // mainWindow.loadFile('index.html')  修改成如下
    // http://localhost:5173對應的是你要啟動的vite項目的地址
    mainWindow.loadURL(mode === 'development' ? 'http://localhost:5173' : `file://${path.join(__dirname, '../dist/index.html')}`)

    // Open the DevTools.
    if (mode === 'development') {
        mainWindow.webContents.openDevTools()
    }

    // 設置打開控制臺的快捷鍵
        // electron新增全局快捷鍵操作 (alt + commend/control + i)
    globalShortcut.register('Alt+CommandOrControl+I', () => {
        mainWindow.webContents.openDevTools()
        console.log('打開控制臺 open devTools')
    })
}

// This method will be called when Electron has finished
// initialization and is ready to create browser windows.
// Some APIs can only be used after this event occurs.
app.whenReady().then(() => {
    createWindow()

    app.on('activate', function() {
        // On macOS it's common to re-create a window in the app when the
        // dock icon is clicked and there are no other windows open.
        if (BrowserWindow.getAllWindows().length === 0) createWindow()
    })
})

// Quit when all windows are closed, except on macOS. There, it's common
// for applications and their menu bar to stay active until the user quits
// explicitly with Cmd + Q.
app.on('window-all-closed', function() {
    if (process.platform !== 'darwin') app.quit()
})

// In this file you can include the rest of your app's specific main process
// code. You can also put them in separate files and require them here.
preload.ts配置
// All of the Node.js APIs are available in the preload process.
// It has the same sandbox as a Chrome extension.
window.addEventListener('DOMContentLoaded', () => {
    const replaceText = (selector, text) => {
      const element = document.getElementById(selector)
      if (element) element.innerText = text
    }

    for (const type of ['chrome', 'node', 'electron']) {
      // eslint-disable-next-line no-undef
      replaceText(`${type}-version`, process.versions[type])
    }
  })
最后運行(如果有報錯,直接查,有時候重新裝一遍node包就好了)
npm run electron:serve8、引入sqlite3 官網 (在electron+vue跑起來的前提下)
## 管理員權限啟動 cmd 或者 power shell,執行
npm install --vs2019 -g windows-build-tools

## 項目下執行
npm install sqlite3 --save
npm install electron-rebuild -S
## package.json  script中添加 "electron:rebuild": "electron-rebuild -f -w sqlite3"
npm run electron:rebuild
## 會報錯,報錯處理方法然后輸入命令重新下載 –target=后跟的是你的electron的版本,你可使用electron -v查看  參考 https://www.likecs.com/show-203391812.html
cnpm install sqlite3 --build-from-source --runtime=electron --target=20.0.2 --dist-url=https://atom.io/download/electron --save-dev
## 其中遇到了很多問題,大部分都是百度出來的,最后刪除包重新下載可以了
## 成功后直接在vue中引入
const sqlite3 = require('sqlite3')可以引入Prisma 連接操作數據庫 也可以用typeOrm 連接操作數據庫 也可以內嵌一個express/egg/nest...的后端框架進行本地接口請求操作
數據庫創建連接封裝參考
Electron + Sqlite3 + Vue3 + Ts +Sequelize數據庫創建連接封裝
## Sequelize
npm install --save sequelize智能推薦
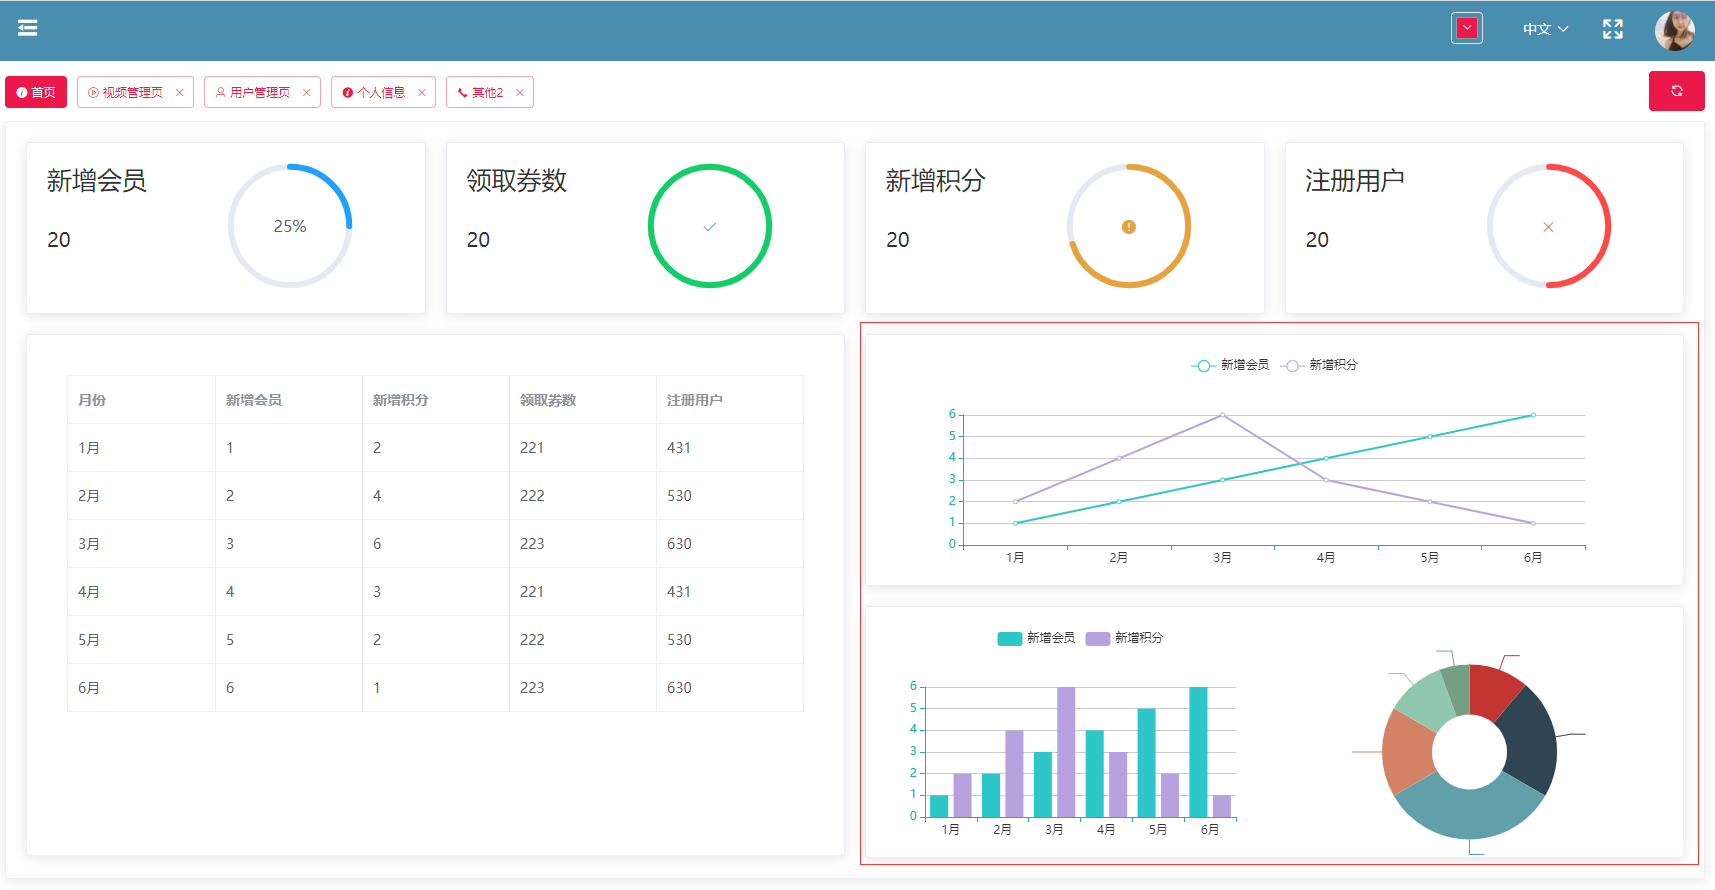
19.vue中封裝echarts組件
19.vue中封裝echarts組件 1.效果圖 2.echarts組件 3.使用組件 按照組件格式整理好數據格式 傳入組件 home.vue 4.接口返回數據格式...
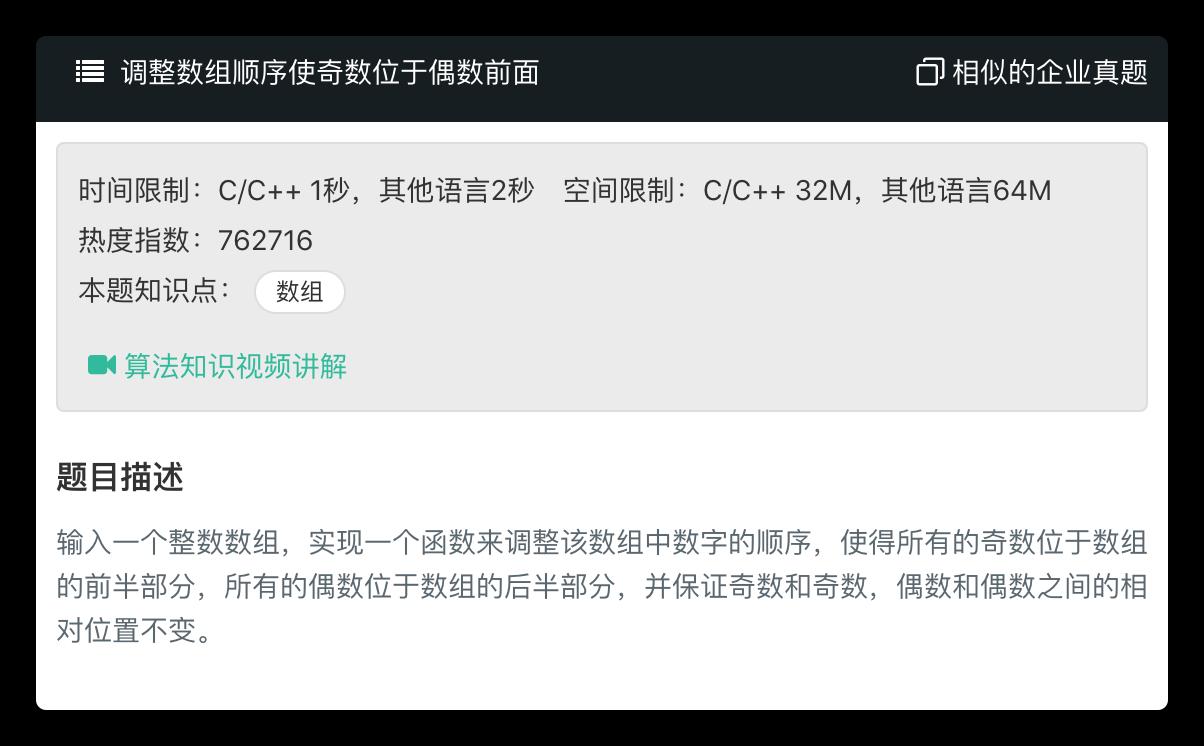
【一只蒟蒻的刷題歷程】【藍橋杯】歷屆試題 九宮重排 (八數碼問題:BFS+集合set)
資源限制 時間限制:1.0s 內存限制:256.0MB 問題描述 如下面第一個圖的九宮格中,放著 1~8 的數字卡片,還有一個格子空著。與空格子相鄰的格子中的卡片可以移動到空格中。經過若干次移動,可以形成第二個圖所示的局面。 我們把第一個圖的局面記為:12345678. 把第二個圖的局面記為:123.46758 顯然是按從上到下,從左到右的順序記錄數字,空格記為句點。 本題目的任務是已知九宮的初態...

dataV組件容器寬高發生變化后,組件不會自適應解決方法
項目中需要大屏幕數據展示,于是使用了dataV組件,但是使用是發現拖動瀏覽器邊框,dataV組件顯示異常,如圖: 于是查了官網,官網的解釋如下: 于是按照官網的意思編寫代碼: 于是可以自適應了...

CSS3干貨10:如何做一個板塊標題水平線左邊帶顏色效果
很多網站在設計欄目標題的時候,喜歡用下劃線分開欄目標題和內容部分。 而且線條左邊的部分往往還有顏色,且這個顏色跟標題的文字長短保持一致。效果如圖所示: 這種效果其實很簡單。 我這里給大家推薦兩種方式: 假定我們的標題部分 HTML 結構如下: 方式一:利用下邊框。灰色部分是 h1 的下邊框,藍色部分是 span 標簽的下邊框。 h1 的高度為 40px,span 也設置它的高度為 40px。這樣,...
猜你喜歡
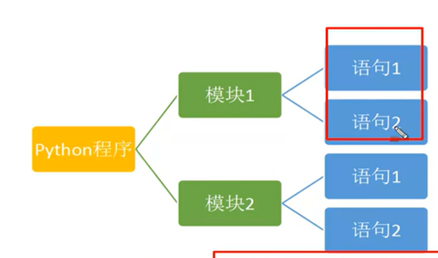
拜師————python基礎入門——程序的構成,對象,引用,棧內存和堆內存,標識符命名規則——day4
第九節課:任務9:009.程序的構成 Python程序的構成,一個程序是由什么構成的 1.python程序由模塊組成 , 一個模塊對應一個python源文件,(文件后綴名.py) 2.模塊由語句構成 運行程序時,安裝模塊中語句的順序依次執行。 代碼的組織和縮進 “龜叔”在設計python時,直接通過縮進來組織代碼 縮進時,幾個空格都是允許的,但是空格數必須統一,我們通常用四...
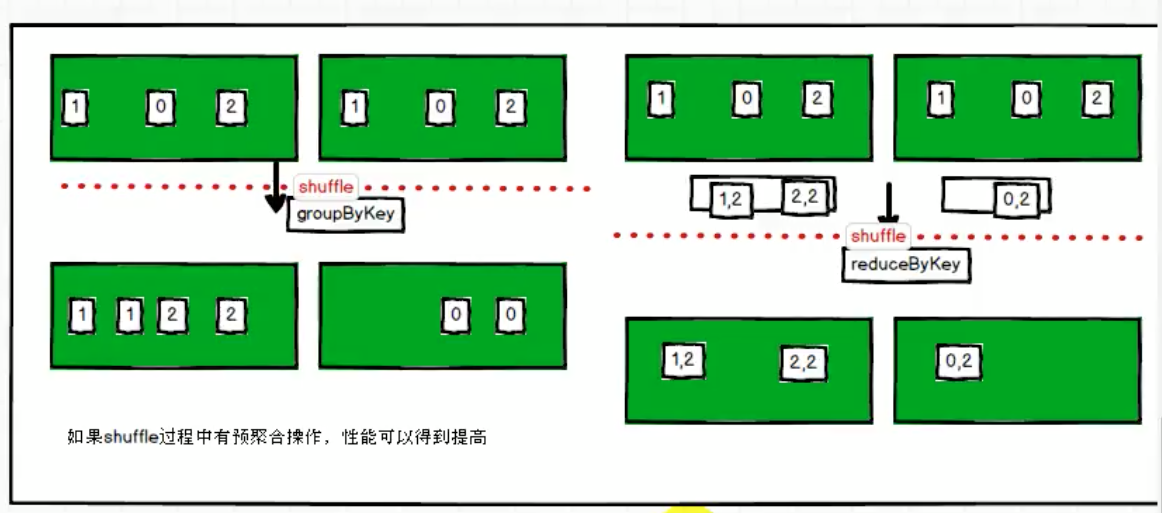
spark 總結 算子篇
1、創建工程 在這里添加 spark core包,添加bulid 插件。 算子總結 map 算子 主要是做數據結構的轉換,數據條數不變。 mapPartitions(func) 對分區數據進行轉換。將某一個分區的所有數據拿過來形成一個可迭代的集合要求 返回可迭代的集合。提高效率會使用它。 應用場景: 只對分區內數據進行數據。缺點是不釋放,可能導致oom。 當內存空間較大的時候建議使用 mapPar...
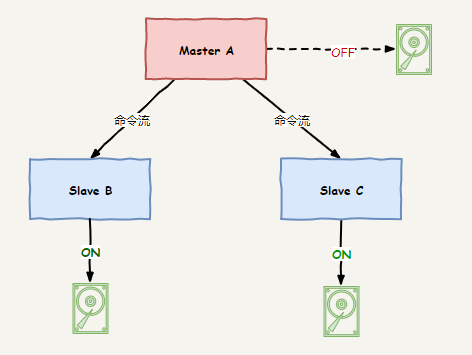
淺析Redis復制過程
文章目錄 摘要 復制 當 Master 關閉持久化時,復制的安全性 復制的工作原理 配置 只讀 Slave 寫入Master Slave如何處理key的過期 參考 摘要 Redis默認使用異步復制,其特點是低延遲和高性能。異步復制就意味著在故障轉移期間,有丟失數據的風險。你可以參考Redis 集群文檔,了解關于高可用性和故障轉移的信息,本文主要討論Redis 復制功能的基本特性。 復制 在 Red...

OpenStack(kilo)界面dashboard的二次開發(二)-增加PanelGroup
上一博文開了一個頭,簡單的總結了下代碼結構及Panel的增加,這一篇對Panelgroup的增加做一個詳細的總結。 增加Panelgroup Panelgroup字面意思很好理解就是panel組,在openstack的界面中就是多個panel的集合。上一次的代碼分析中其實已經有了對PanelGroup的簡單介紹,這次就看看如何增加panelgroup。 這次直接查看Admin(管理員)Dashbo...
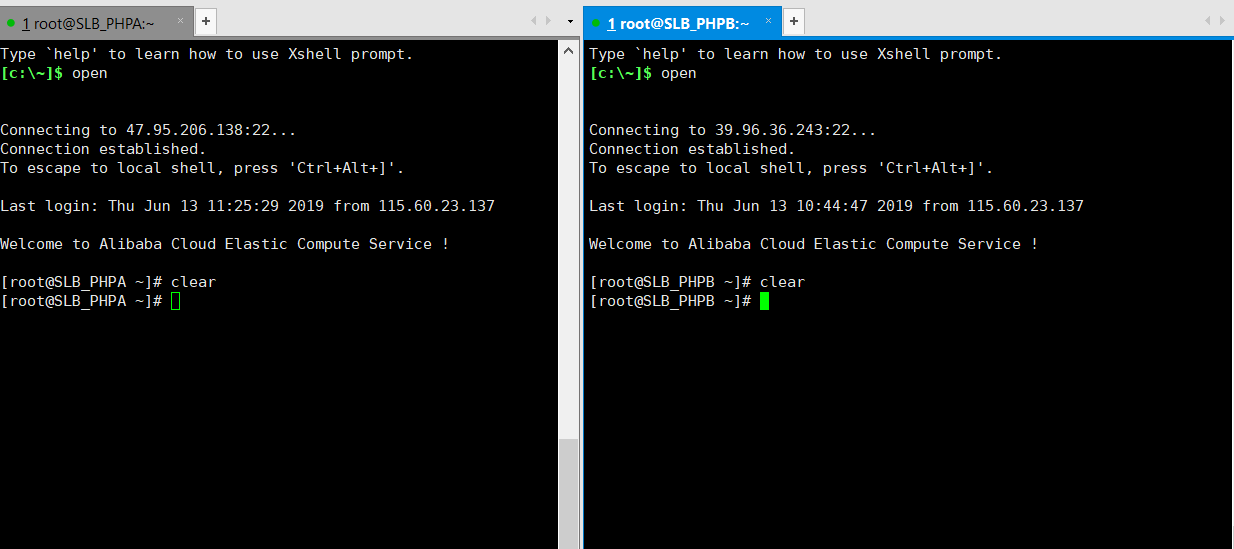
負載均衡下多臺服務器代碼同步 rsync
公司現在的服務器架構采用的是阿里的SLB(負載均衡) 現在是有一個負載均衡對應兩臺ECS實例 負載均衡就是當有客戶端的請求的時候 它會對后端server的服務器進行健康檢查并根據設置的權重去分配請求,好處就是當其中某臺服務器宕機不會造成損失。起到了容災效果 現在的需求: 1、現在就是后端的server服務器都布置好了,代碼怎么同步到每臺服務器上,不可能在每臺服務器都進行git pu...