HTML5 基礎(4)—— HTML5表單新屬性的使用和驗證表單
一、HTML5表單常用屬性
這些都是比較常用的
| 屬性名 | 說明 |
|---|---|
| placeholder | 在輸入框無內容時顯示灰色提示 |
| autocomplete | 部分輸入框和form都可以設置自動提示 off關閉,on開啟(默認是on) |
| autofocus | 讓input自動獲取焦點 |
| required | 設置表單元素為必填 |
| pattern | 表單驗證使用正則 |
| novalidate | 該屬性使用在form標簽上,讓設置了驗證的表單可以直接提交 <form action=”…” novalidate>…</form> |
| formnovalidate | 該屬性使用在提交按鈕上,讓設置了驗證的表單可以直接提交 <input type=”submit” value=”提交” formnonvalidate /> |
| for | <label>的for屬性是要配合<input>標簽中的id屬性使用的,點擊label標簽for對應id的input標簽會獲取焦點 |
(一)部分類型的input無法使用placeholder屬性提示的解決方案
如輸入日期
<input type="text" name="date" onfocus="(this.type='date')" placeholder="請輸入日期"/>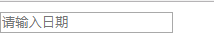
點擊后
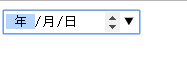
缺點是需要用戶點擊2次
(二)<label>的for屬性使用
    <label for="man">男</label>
    <input type="radio" id="man" name="sex" />
    <label for="woman">女</label>
    <input type="radio" id="woman" name="sex" />
    <br>
    <label for="username">用戶名</label>
    <input type="text" name="username" id="username" placeholder="請輸入用戶名" />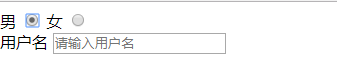
點擊文字選中單選按鈕
二、html5表單元素約束驗證API
| 屬性/方法/對象 | 說明 |
|---|---|
| willValidate屬性 | 元素元素有沒有被符合。沒有符合返回false |
| validity對象 | 元素當前驗證狀態(對象) |
| validationMessage屬性 | 描述與元素相關約束的失敗信息 |
| checkValidity()方法 | 元素是否滿足任意約束 |
| setCustomValidity()方法 | 設置自定義的驗證信息 |
(一)validity對象的屬性
<form action="#">
    <input type="text" name="username" id="username" placeholder="請輸入用戶名" required pattern="^\d{4}$" />

    <input type="submit"/>
</form>
<script type="text/javascript">
    var input_username = document.getElementById('username');
    console.log(input_username.validity);
</script>
控制臺會打印出
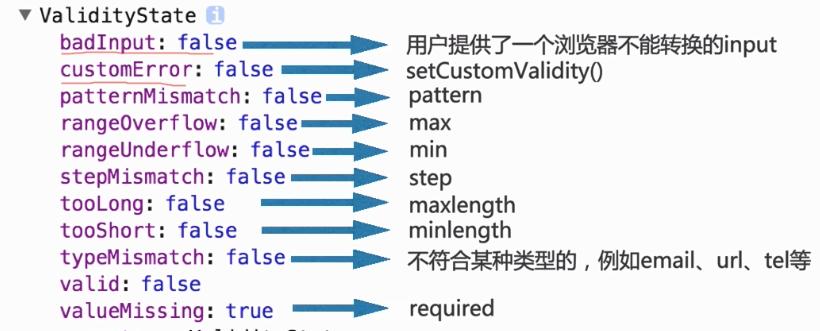
| 屬性名 | 說明 |
|---|---|
| valid:true/false | 當前輸入是否有效 |
| badInput: false/true | 輸入的值是否無效 |
| patternMismatch: false/true | 正則表達式驗證失敗 |
| rangeOverflow: false/true | 輸入值是否超過max的限定 |
| rangeUnderflow: false/true | 輸入值是否小于min的限定 |
| tooLong : false/true | 輸入的字符數是否超過maxlength |
| tooShort : false/true | 輸入的字符數是否小于minlength |
| stepMismatch : false/true | 輸入的數字不符合step限制 |
| typeMismatch : false/true | 輸入值不符合email、url的驗證 |
| valueMissing : false/true | 未輸入值,違反了required要求 |
| customError : false/true | 是否存在自定義錯誤 |
- 只要有一個驗證方面錯誤,某個屬性就為true,valid值為false
- 只有沒有任何驗證錯誤,所有的屬性都為false,valid才能為true
- 上述的每個錯誤在瀏覽器內部都有一個預定義的錯誤提示消息
所有的錯誤消息中,只要存在“自定義的錯誤消息”,瀏覽器只顯示自定義的錯誤消息,優先級高于瀏覽器預定義的錯誤消息(設置自定義錯誤消息用setCustomValidity())
當前沒有自定義錯誤消息,所以customError : false
獲取與約束相關的屬性
validity對象中的每一個屬性代表一個驗證狀態,false表示驗證沒問題,true表示不符合驗證
<!DOCTYPE html>
<html lang="en">
<head>
<meta charset="UTF-8" />
<title>Document</title>
</head>
<body>
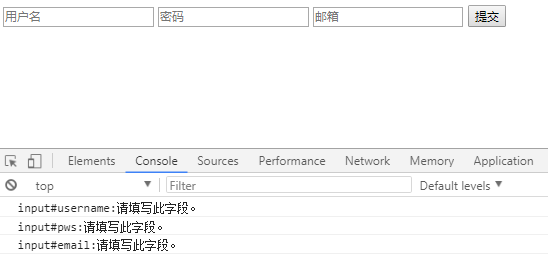
<form action="" method="get" id="forms">
<input type="text" id="username" placeholder="用戶名" required />
<input type="password" id="pws" placeholder="密碼" required />
<input type="email" id="email" placeholder="郵箱" required />
<input type="submit" value="提交" id="submitBtn">
</form>
<script>
var form = document.getElementById("forms"),
submitBtn = document.getElementById("submitBtn");
submitBtn.addEventListener("click", function() {
var invalidFields = form.querySelectorAll(":invalid");
for(var i=0,len=invalidFields.length;i<len;++i){
console.log('input#'+invalidFields[i].id+':'+invalidFields[i].validationMessage);
}
});
</script>
</body>
</html>:invalid表示無效,即當填寫的內容不符合要求的時候觸發,form.querySelectorAll(“:invalid”);表示查詢表單失效的元素。
(二)checkValidity()方法(常用)
一個input有許多約束條件,只有都滿足了,才返回true,只要有任意一個約束條件不滿足就返回false
<body>
    <form action="">
        <input type="text" id="username" value="" required pattern="^\d{}">
    </form>
    <script>
        var names = document.getElementById("username");
        if(names.checkValidity()){
            alert("符合驗證條件");
        }else{
            alert("不符合驗證條件");
        }
    //或者
        if(username.checkValidity()){
            alert("符合驗證條件");
        }else{
            alert("不符合驗證條件");
        }
    </script>
</body>
PS:
在HTML5中,js中一個元素的id就代表該元素的dom元素
document.getElementById("username")===username //值為true不過不建議這樣用,容易和變量混淆。
setCustomValidity()方法(常用)
設置自定義的驗證提示信息,用于根據validity對象中的驗證約束來覆蓋預定義的信息。
<body>
    <form action="" method="get">
        <input type="url" oninput="checkit(this)">
        <input type="submit" value="提交">
    </form>
    <script>
        function checkit(obj) {
            var it = obj.validity;
            if(it.typeMismatch === true){
                obj.setCustomValidity("請輸入帶http://的網站");
            }
        }
    </script>
</body>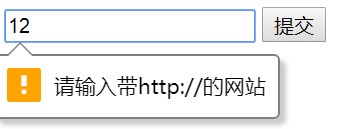
三、HTML5<input>標簽部分類型的限制和去除默認樣式
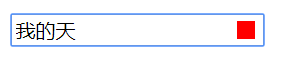
(一)input[type=search]
1.去除默認按鈕
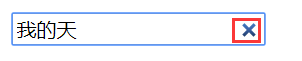
<head>
<meta charset="UTF-8" />
<style>
    input[type="search"]::-webkit-search-cancel-button{
        -webkit-appearance:none; //去除瀏覽器的默認樣式
        height: 12px;
        width: 12px;
        background-color: red;
    }
</style>
</head>
<body>
    <form action="#">
    <input type="search" name="search" id="search" />
    <br>
    <br>
    <input type="submit"/>
    </form>
</body>
去除瀏覽器默認樣式并自定義
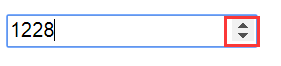
(二)input[type=number]
1.去除默認的上下按鈕
<style>
    input[type="number"]::-webkit-inner-spin-button{
        -webkit-appearance:none;
    }
</style>
</head>
<body>
    <form action="#">
    <input type="number" name="number" id="number" placeholder="請輸入數字" />
    <br>
    <br>
    <input type="submit"/>
    </form>
</body>
2.限制input[type=number]輸入內容的長度
input[type=number]無法像input[type=text]那樣使用maxlength屬性來限制輸入內容的最大長度。
<input type="number" name="number" id="number" maxlength="4" placeholder="請輸入數字" />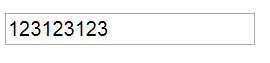
解決方法:
使用js控制
<style>
    input[type="number"]::-webkit-inner-spin-button,
    input[type="number"]::-webkit-outer-spin-button{
        -webkit-appearance:none;
    }
</style>
</head>
<body>
    <form action="#">
    <input type="number" name="number" id="number" oninput="checkLength(this,4)" placeholder="請輸入數字" />
    <br>
    <br>
    <input type="submit"/>
    </form>
    <script type="text/javascript">
        function checkLength(obj,length){
            if(obj.value.length>length){
                obj.value = obj.value.substr(0,length);
            }
        }
    </script>
</body>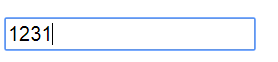
3.輸入的內容保留小數
<input type="number" name="number" step="0.01" id="number" oninput="checkLength(this,4)" placeholder="請輸入數字" />step=”0.01”保留2位小數
step=”0.001”保留3位小數
四、使用偽類選擇器對HTML5表單進行美化
常用的偽類選擇器有:
| 偽類 | 說明 | 偽類 | 說明 |
|---|---|---|---|
| :required | 選擇所有必填表項 | :optional | 選擇所有選填項 |
| :in-range | 選擇值符合min和max約束的項 | :out-of-range | 選擇值不符合min和max約束的項 |
| :valid | 選擇符合所有約束的項 | :invalid | 選擇有約束不符合的項 |
| :read-only | 選擇只讀的項 | :read-write | 選擇可編輯的(包括含有contenteditable屬性)的項 |
(一):required 和 :optional 美化表單
這里會用到::before和::after偽元素
偽元素簡單案例
.tip{
    margin-top: 30px;
}
.tip>span{
    position: relative;
    display: inline-block;
}
.tip>span:hover{
    cursor: pointer;
}
.tip>span:hover::before{
    content: attr(data-info);
    position: absolute;
    margin-left: 8px;
    padding: 10px;
    background-color: #aa0088;
    color: #FFF;
    left: 100%;
    top: -60%;
    white-space: pre;
}
.tip>span:hover::after{
    content: '';
    position: absolute;
    width: 0;
    height: 0;
    border-right: 8px solid #aa0088;
    border-top: 8px solid transparent;
    border-bottom: 8px solid transparent;
}<div class="tip">
<span data-info="這是提示內容">鼠標懸浮顯示提示</span>
</div>表單美化案例
<!DOCTYPE html>
<html lang="en">
<head>
    <meta charset="UTF-8">
    <title>:required和:optional美化表單</title>
    <style>
        *{margin: 0;padding: 0;}
        .container{width: 400px;margin: 30px auto;}
        input,select,textarea{
            width: 240px;
            margin: 10px 0;
            border:1px solid #999;
            padding: .5em 1em;
        }
        input:focus,select:focus,textarea:focus{
            outline: 0;
        }
        label{color: #999;margin-left: 30px;}

        /*必填項*/
        input:required,textarea:required{
            border-right: 3px solid #FF3030;
        }
        input:required:focus,textarea:required:focus{
            box-shadow: 0 0 3px 1px #FF3030;
        }
        input:required+label::after{
            content: "(必填)";
        }
        /*選填項*/
        input:optional,select:optional{
            border-right: 3px solid #66ccff;
        }
        input:optional:focus,select:optional:focus{
            box-shadow: 0 0 3px 1px #66ccff;
        }
        input:optional+label::after{
            content: "(選填)";
        }

        input[type="submit"]{
            background-color: #FF3030;
            border: 3px solid #FF3030;
            color: #FFF;
        }
        input[type="submit"]:hover{
            background-color: #FF0000;
        }
    </style>
</head>
<body>
    <div class="container">
        <form action="#">
            <input type="text" name="username" required /><label>用戶名</label>
            <input type="email" name="email" required /><label>郵箱</label>
            <input type="tel" name="tel"><label>手機號</label>
            <input type="url" name="url"><label>網址</label>
            <select name="aihao">
                <option value="0">非必填選項1</option>
                <option value="1">非必填選項2</option>
                <option value="2">非必填選項3</option>
                <option value="3">非必填選項4</option>
                <option value="4">非必填選項5</option>
            </select>
            <textarea name="content" cols="30" rows="10" placeholder="留言(必填)" required></textarea>
            <input type="submit" />
        </form>
    </div>
</body>
</html>
(二):valid和invalid美化表單驗證
<!DOCTYPE html>
<html lang="en">
<head>
    <meta charset="UTF-8" />
    <title></title>
    <style type="text/css">
        *{margin: 0;padding: 0;}
        .container{
            width: 600px;
            margin: 30px auto;
        }
        form>.form-group{
            position: relative;
        }
        input{
            width: 240px;
            height: 20px;
            line-height: 20px;
            padding: .5em 1em;
            outline: 0;
            text-indent: 30px;
            border-radius: 6px;
        }
        input+label{
            position: absolute;
            top: 6px;
            left: 10px;
        }
        input,input+label{
            transition: all .4s;
        }
        input:valid{
            border: 1px solid #C0FF3E;
        }
        input:invalid{
            border: 1px solid #aa0088;
        }
        input:hover,input:focus,input:valid{
            text-indent: 0px;
        }
        input:hover+label,input:focus+label,input:valid+label{
            transform: translateX(-150%);
        }

        input:valid~span.tip::after{
            content: attr(data-right-tip);
        }
        input:invalid~span.tip::after{
            content: attr(data-error-tip);
        }

    </style>
</head>
<body>
    <div class="container">
        <form action="#">
            <div class="form-group">
                <input type="email" id="email" name="email" required autocomplete="off" placeholder="請輸入郵箱" />
                <label for="email">郵箱</label>
                <span class="tip" data-right-tip="您輸入郵箱正確" data-error-tip="你輸入郵箱錯誤"></span>
            </div>
        </form>
    </div>
</body>
</html>


五、HTML5自帶表單驗證常用事件
常用的三個事件:
| 事件 | 說明 |
|---|---|
| oninput | 實施監聽input框中的輸入的值 |
| oninvalid | 當輸入的值不符合驗證約束觸發 |
| onchange | onchange 當文本框失去焦點時,檢查input里的值是否符合要求,執行函數 |
<!DOCTYPE html>
<html lang="en">
<head>
    <meta charset="UTF-8">
    <title>常用表單事件</title>
    <style>
        .container{
            width: 600px;
            margin: 40px auto;
        }
        form>div.form-group{
            margin-bottom: 30px;
        }
        input,select{
            width: 240px;
            padding:5px;
            height: 40px;
            line-height: 40px;
            box-sizing: border-box;
            border-radius: 7px;
            outline: 0;
            border: 1px solid #999;
        }
        input:valid{
            border: 1px solid #00FF00;
        }
        input:focus:invalid{
            border: 1px solid #FF0000;
        }
        input[type="submit"]{
            height: 30px;
            padding: 5px;
            line-height: 30px;
            border: 1px solid #999;
        }
    </style>
</head>
<body>
    <div class="container">
        <form action="#">
            <div class="form-group">
                <label for="username">手機</label>
                <input type="text" name="username" id="username" pattern="^1[0-9]{10}$" placeholder="請輸入手機號碼" required oninput="this.setCustomValidity('')" oninvalid="this.setCustomValidity('請輸入正確手機號碼!')" />
            </div>
            <div class="form-group">
                <label for="passward">密碼</label>
                <input type="password" name="password" id="password" pattern="^[a-zA-Z0-9]\w{5,19}$" placeholder="請輸入密碼" required oninput="this.setCustomValidity('')" oninvalid="this.setCustomValidity('請輸入正確密碼')" onchange="checkpassword()" />
            </div>
            <div class="form-group">
                <label for="repassward">確認密碼</label>
                <input type="password" name="repassword" id="repassword" placeholder="請確認密碼" required onchange="checkpassword()" />
            </div>
            <div class="form-group">

                <label for="select">選項</label>
                <select name="select" id="select">
                    <option value="" checked>-- 無 --</option>
                    <option value="0">必填選項1</option>
                    <option value="1">必填選項2</option>
                    <option value="2">必填選項3</option>
                    <option value="3">必填選項4</option>
                </select>
            </div>
            <div class="form-group">
                <input type="submit"/>
            </div>
        </form>
    </div>
    <script>
        function checkpassword(){
            var passwordEle = document.getElementById('password');
            var repasswordEle = document.getElementById('repassword');
            if(passwordEle.value!=repasswordEle.value){
                repasswordEle.setCustomValidity('兩次輸入密碼不一致!');
            }else{
                repasswordEle.setCustomValidity('');
            }
        }
    </script>
</body>
</html>
六、HTML5自帶驗證默認氣泡美化
使用偽類元素不靠譜。
目前的思路:
- 阻止瀏覽器默認氣泡提示
- 創建新的統一樣式的氣泡提示
例子1
<!DOCTYPE html>
<html lang="en">
<head>
<meta charset="UTF-8">
<title>阻止默認氣泡</title>
<style>
*{
margin: 0;
padding: 0;
}
div.container{
width: 600px;
margin: 30px auto;
}
.tip{
color: #FF0000;
}
form>div{
margin: 30px 0 30px 0;
}
form>div>label{
display: inline-block;
width: 100px;
}
form>div>input{
width: 240px;
}
</style>
</head>
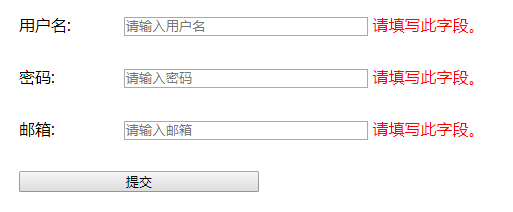
<body>
<div class="container">
<form action="#" autocomplete="off" id="myform">
<div class="form-group">
<label for="username">用戶名:</label>
<input type="text" name="username" id="username" placeholder="請輸入用戶名" required />
<span class="tip"></span>
</div>
<div class="form-group">
<label for="password">密碼:</label>
<input type="password" name="password" id="password" placeholder="請輸入密碼" required />
<span class="tip"></span>
</div>
<div class="form-group">
<label for="email">郵箱:</label>
<input type="email" name="email" id="email" placeholder="請輸入郵箱" required />
<span class="tip"></span>
</div>
<div class="form-group">
<input type="submit" id="submit" />
</div>
</form>
</div>
<script>
var formEle = document.getElementById('myform');
initInvalidity(formEle);
function initInvalidity(form){
form.addEventListener('invalid',function(event){
event.preventDefault();
},true); //阻止瀏覽器的默認氣泡,在捕獲階段
form.addEventListener('submit',function(event){
if(!this.checkValidity()){
event.preventDefault();
}
},true);
var submitBtn = document.getElementById('submit');
submit.addEventListener('click',function(event){
var inValidEle = form.querySelectorAll(":invalid");
for(var i=0,len=inValidEle.length; i<len; ++i){
inValidEle[i].parentNode.getElementsByClassName('tip')[0].innerHTML = '';
}
for(var i=0,len=inValidEle.length; i<len; ++i){
inValidEle[i].parentNode.getElementsByClassName('tip')[0].innerHTML = inValidEle[i].validationMessage;
}
});
}
</script>
</body>
</html>美化的樣式沒寫
例子2
<!DOCTYPE html>
<html lang="en">
<head>
<meta charset="UTF-8">
<title></title>
</head>
<style>
.oneline {
line-height: 1.5;
margin: 10px auto;
}
.oneline label {
width: 100px;
text-indent: 15px;
font-size: 14px;
font-family: "Microsoft Yahei";
display: inline-block;
}
.oneline .sinput {
width: 60%;
height: 30px;
border-radius: 6px;
border: 1px solid #e2e2e2;
}
.oneline input[type="submit"] {
margin-left: 20px;
width: 80px;
height: 30px;
border: 0;
background-color: #5899d0;
color: #fff;
font-size: 14px;
border-radius: 6px;
}
.error-messages {
color: red;
}
</style>
<body>
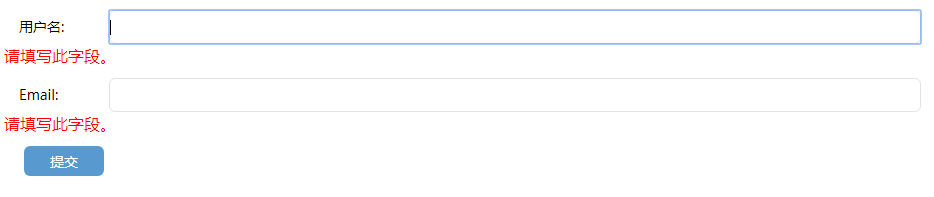
<form id="forms">
<div class="oneline">
<label for="name">用戶名:</label>
<input id="name" class="sinput" name="name" type="text" required>
</div>
<div class="oneline">
<label for="email">Email:</label>
<input id="email" class="sinput" name="email" type="email" required>
</div>
<div class="oneline">
<input type="submit" id="submits" value="提交">
</div>
</form>
<script>
function replaceValidationUI(form) {
form.addEventListener("invalid", function(event) {
event.preventDefault();
}, true);
form.addEventListener("submit", function(event) {
if (!this.checkValidity()) {
event.preventDefault();
}
});
var submitBtn = document.getElementById('submits');
submitBtn.addEventListener("click",function(){
var invalidFields = form.querySelectorAll(':invalid'),
errorMessages = form.querySelectorAll('.error-messages');
for(var i=0,len=errorMessages.length; i<len; ++i){
errorMessages[i].parentNode.removeChild(errorMessages[i]);
}
for(var i=0,len=invalidFields.length; i<len; ++i){
invalidFields[i].parentNode.insertAdjacentHTML("beforeend","<div class='error-messages'>"+invalidFields[i].validationMessage+"</div>");
}
if (invalidFields.length > 0) {
invalidFields[0].focus();
//errorMessages.style.display = "block";
}
});
}
var forms = document.getElementById("forms");
replaceValidationUI(forms);
</script>
</body>
</html>
智能推薦


Linux C系統編程-線程互斥鎖(四)
互斥鎖 互斥鎖也是屬于線程之間處理同步互斥方式,有上鎖/解鎖兩種狀態。 互斥鎖函數接口 1)初始化互斥鎖 pthread_mutex_init() man 3 pthread_mutex_init (找不到的情況下首先 sudo apt-get install glibc-doc sudo apt-get install manpages-posix-dev) 動態初始化 int pthread_...

統計學習方法 - 樸素貝葉斯
引入問題:一機器在良好狀態生產合格產品幾率是 90%,在故障狀態生產合格產品幾率是 30%,機器良好的概率是 75%。若一日第一件產品是合格品,那么此日機器良好的概率是多少。 貝葉斯模型 生成模型與判別模型 判別模型,即要判斷這個東西到底是哪一類,也就是要求y,那就用給定的x去預測。 生成模型,是要生成一個模型,那就是誰根據什么生成了模型,誰就是類別y,根據的內容就是x 以上述例子,判斷一個生產出...
styled-components —— React 中的 CSS 最佳實踐
https://zhuanlan.zhihu.com/p/29344146 Styled-components 是目前 React 樣式方案中最受關注的一種,它既具備了 css-in-js 的模塊化與參數化優點,又完全使用CSS的書寫習慣,不會引起額外的學習成本。本文是 styled-components 作者之一 Max Stoiber 所寫,首先總結了前端組件化樣式中的最佳實踐原則,然后在此基...
猜你喜歡
19.vue中封裝echarts組件
19.vue中封裝echarts組件 1.效果圖 2.echarts組件 3.使用組件 按照組件格式整理好數據格式 傳入組件 home.vue 4.接口返回數據格式...
【一只蒟蒻的刷題歷程】【藍橋杯】歷屆試題 九宮重排 (八數碼問題:BFS+集合set)
資源限制 時間限制:1.0s 內存限制:256.0MB 問題描述 如下面第一個圖的九宮格中,放著 1~8 的數字卡片,還有一個格子空著。與空格子相鄰的格子中的卡片可以移動到空格中。經過若干次移動,可以形成第二個圖所示的局面。 我們把第一個圖的局面記為:12345678. 把第二個圖的局面記為:123.46758 顯然是按從上到下,從左到右的順序記錄數字,空格記為句點。 本題目的任務是已知九宮的初態...

dataV組件容器寬高發生變化后,組件不會自適應解決方法
項目中需要大屏幕數據展示,于是使用了dataV組件,但是使用是發現拖動瀏覽器邊框,dataV組件顯示異常,如圖: 于是查了官網,官網的解釋如下: 于是按照官網的意思編寫代碼: 于是可以自適應了...
CSS3干貨10:如何做一個板塊標題水平線左邊帶顏色效果
很多網站在設計欄目標題的時候,喜歡用下劃線分開欄目標題和內容部分。 而且線條左邊的部分往往還有顏色,且這個顏色跟標題的文字長短保持一致。效果如圖所示: 這種效果其實很簡單。 我這里給大家推薦兩種方式: 假定我們的標題部分 HTML 結構如下: 方式一:利用下邊框。灰色部分是 h1 的下邊框,藍色部分是 span 標簽的下邊框。 h1 的高度為 40px,span 也設置它的高度為 40px。這樣,...