Python 數據科學入門教程:TensorFlow 目標檢測
TensorFlow 目標檢測
原文:TensorFlow Object Detection
譯者:飛龍
一、引言
你好,歡迎閱讀 TensorFlow 目標檢測 API 迷你系列。 這個 API 可以用于檢測圖像和/或視頻中的對象,帶有使用邊界框,使用可用的一些預先訓練好的模型,或者你自己可以訓練的模型(API 也變得更容易)。
首先,你要確保你有 TensorFlow 和所有的依賴。 對于 TensorFlow CPU,你可以執行pip install tensorflow,但是,當然,GPU 版本的 TensorFlow 在處理上要快得多,所以它是理想的。 如果你需要安裝 TensorFlow GPU :
安裝 TensorFlow GPU 的鏈接:
如果你沒有足夠強大的 GPU 來運行 GPU 版本的 TensorFlow,則可以選擇使用 PaperSpace。 使用該鏈接會給你 10 美元的起始折扣,10-20 小時的使用時間。
除此之外,其他的 Python 依賴包括:
pip install pillow
pip install lxml
pip install jupyter
pip install matplotlib
接下來,我們需要克隆 github。 我們可以使用git來完成,或者你可以將倉庫下載到.zip:
git clone https://github.com/tensorflow/models.git或者點擊https://github.com/tensorflow/model頁面上綠色的“克隆或下載”按鈕,下載.zip并解壓。
一旦你有了模型目錄(或models-master,如果你下載并解壓.zip),在你的終端或cmd.exe中訪問這個目錄。 在 Ubuntu 和 Windows 下的步驟略有不同。
Ubuntu:
protoc object_detection/protos/*.proto --python_out=.并且…
export PYTHONPATH=$PYTHONPATH:`pwd`:`pwd`/slim如果 Ubuntu 上的protoc命令出現錯誤,請使用protoc --version檢查你運行的版本,如果它不是最新版本,你可能需要更新。 我寫這個的時候,我們使用 3.4.0。 為了更新或獲取protoc,請前往protoc發布頁面。 下載 python 版本,解壓,訪問目錄,然后執行:
sudo ./configure
sudo make check
sudo make install之后,再次嘗試protoc命令(再次確保你在模型目錄中執行)。
Windows
前往protoc發布頁面并下載protoc-3.4.0-win32.zip,解壓縮,然后在bin目錄中找到protoc.exe。
如果你喜歡,你可以把它移到更合適的地方,或者把它放在這里。 我最終為我的程序文件生成protoc目錄,并放在那里。
現在,從models(或models-master)目錄中,可以使用protoc命令,如下所示:
"C:/Program Files/protoc/bin/protoc" object_detection/protos/*.proto --python_out=.接下來,從models/object_detection目錄中打開terminal/cmd.exe,然后用jupyter notebook打開 Jupyter 筆記本。 從這里選擇object_detection_tutorial.ipynb。 從這里,你應該能在主菜單中運行單元格,并選擇全部運行。
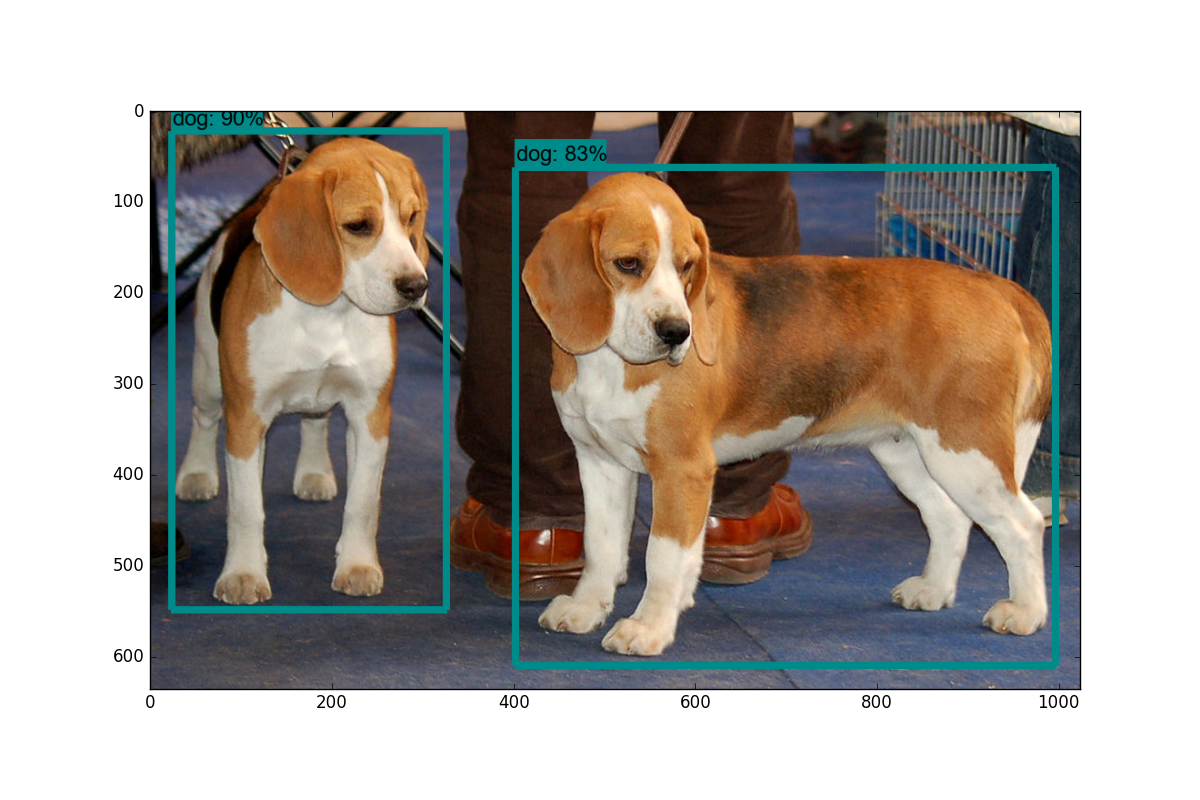
你應該得到以下結果:
在下一個教程中,我們將介紹,如何通過稍微修改此示例代碼,來實時標注來自網絡攝像頭流的數據。
二、視頻流的目標檢測
歡迎閱讀 TensorFlow 目標檢測 API 教程的第二部分。 在本教程中,我們將介紹如何調整 API 的 github 倉庫中的示例代碼,來將對象檢測應用到來自攝像頭的視頻流。
首先,我們將首先修改筆記本,將其轉換為.py文件。 如果你想保存在筆記本中,那也沒關系。 為了轉換,你可以訪問file > save as > python file。 一旦完成,你需要注釋掉get_ipython().magic('matplotlib inline')這一行。
接下來,我們將引入 Python OpenCV 包裝器:
如果你沒有安裝 OpenCV,你需要獲取它。 說明請參閱 OpenCV 簡介。
import cv2

cap = cv2.VideoCapture(0)這將準備cap變量來訪問你的攝像頭。
接下來,你將下面的代碼:
    for image_path in TEST_IMAGE_PATHS:
      image = Image.open(image_path)
      # the array based representation of the image will be used later in order to prepare the
      # result image with boxes and labels on it.
      image_np = load_image_into_numpy_array(image)
替換為:
    while True:
      ret, image_np = cap.read()
最后將這些東西:
      plt.figure(figsize=IMAGE_SIZE)
      plt.imshow(image_np)
      plt.show()
替換為:
      cv2.imshow('object detection', cv2.resize(image_np, (800,600)))
      if cv2.waitKey(25) & 0xFF == ord('q'):
        cv2.destroyAllWindows()
        break
這就好了。完整代碼:
import numpy as np
import os
import six.moves.urllib as urllib
import sys
import tarfile
import tensorflow as tf
import zipfile

from collections import defaultdict
from io import StringIO
from matplotlib import pyplot as plt
from PIL import Image

import cv2
cap = cv2.VideoCapture(1)

# This is needed since the notebook is stored in the object_detection folder.
sys.path.append("..")


# ## Object detection imports
# Here are the imports from the object detection module.

# In[3]:

from utils import label_map_util

from utils import visualization_utils as vis_util


# # Model preparation

# ## Variables
#
# Any model exported using the `export_inference_graph.py` tool can be loaded here simply by changing `PATH_TO_CKPT` to point to a new .pb file.
#
# By default we use an "SSD with Mobilenet" model here. See the [detection model zoo](https://github.com/tensorflow/models/blob/master/object_detection/g3doc/detection_model_zoo.md) for a list of other models that can be run out-of-the-box with varying speeds and accuracies.

# In[4]:

# What model to download.
MODEL_NAME = 'ssd_mobilenet_v1_coco_11_06_2017'
MODEL_FILE = MODEL_NAME + '.tar.gz'
DOWNLOAD_BASE = 'http://download.tensorflow.org/models/object_detection/'

# Path to frozen detection graph. This is the actual model that is used for the object detection.
PATH_TO_CKPT = MODEL_NAME + '/frozen_inference_graph.pb'

# List of the strings that is used to add correct label for each box.
PATH_TO_LABELS = os.path.join('data', 'mscoco_label_map.pbtxt')

NUM_CLASSES = 90


# ## Download Model

# In[5]:

opener = urllib.request.URLopener()
opener.retrieve(DOWNLOAD_BASE + MODEL_FILE, MODEL_FILE)
tar_file = tarfile.open(MODEL_FILE)
for file in tar_file.getmembers():
  file_name = os.path.basename(file.name)
  if 'frozen_inference_graph.pb' in file_name:
    tar_file.extract(file, os.getcwd())


# ## Load a (frozen) Tensorflow model into memory.

# In[6]:

detection_graph = tf.Graph()
with detection_graph.as_default():
  od_graph_def = tf.GraphDef()
  with tf.gfile.GFile(PATH_TO_CKPT, 'rb') as fid:
    serialized_graph = fid.read()
    od_graph_def.ParseFromString(serialized_graph)
    tf.import_graph_def(od_graph_def, name='')


# ## Loading label map
# Label maps map indices to category names, so that when our convolution network predicts `5`, we know that this corresponds to `airplane`.  Here we use internal utility functions, but anything that returns a dictionary mapping integers to appropriate string labels would be fine

# In[7]:

label_map = label_map_util.load_labelmap(PATH_TO_LABELS)
categories = label_map_util.convert_label_map_to_categories(label_map, max_num_classes=NUM_CLASSES, use_display_name=True)
category_index = label_map_util.create_category_index(categories)


# ## Helper code

# In[8]:

def load_image_into_numpy_array(image):
  (im_width, im_height) = image.size
  return np.array(image.getdata()).reshape(
      (im_height, im_width, 3)).astype(np.uint8)


# # Detection

# In[9]:

# For the sake of simplicity we will use only 2 images:
# image1.jpg
# image2.jpg
# If you want to test the code with your images, just add path to the images to the TEST_IMAGE_PATHS.
PATH_TO_TEST_IMAGES_DIR = 'test_images'
TEST_IMAGE_PATHS = [ os.path.join(PATH_TO_TEST_IMAGES_DIR, 'image{}.jpg'.format(i)) for i in range(1, 3) ]

# Size, in inches, of the output images.
IMAGE_SIZE = (12, 8)


# In[10]:

with detection_graph.as_default():
  with tf.Session(graph=detection_graph) as sess:
    while True:
      ret, image_np = cap.read()
      # Expand dimensions since the model expects images to have shape: [1, None, None, 3]
      image_np_expanded = np.expand_dims(image_np, axis=0)
      image_tensor = detection_graph.get_tensor_by_name('image_tensor:0')
      # Each box represents a part of the image where a particular object was detected.
      boxes = detection_graph.get_tensor_by_name('detection_boxes:0')
      # Each score represent how level of confidence for each of the objects.
      # Score is shown on the result image, together with the class label.
      scores = detection_graph.get_tensor_by_name('detection_scores:0')
      classes = detection_graph.get_tensor_by_name('detection_classes:0')
      num_detections = detection_graph.get_tensor_by_name('num_detections:0')
      # Actual detection.
      (boxes, scores, classes, num_detections) = sess.run(
          [boxes, scores, classes, num_detections],
          feed_dict={image_tensor: image_np_expanded})
      # Visualization of the results of a detection.
      vis_util.visualize_boxes_and_labels_on_image_array(
          image_np,
          np.squeeze(boxes),
          np.squeeze(classes).astype(np.int32),
          np.squeeze(scores),
          category_index,
          use_normalized_coordinates=True,
          line_thickness=8)

      cv2.imshow('object detection', cv2.resize(image_np, (800,600)))
      if cv2.waitKey(25) & 0xFF == ord('q'):
        cv2.destroyAllWindows()
break我們可以清理更多代碼,比如去掉matplotlib的導入,以及舊的圖像數據,如果你喜歡的話,隨意清理。
你應該有一個被標記的流媒體攝像頭源。 一些可以測試的物體:自己,手機或者一瓶水。 所有這些應該有效。
在下一個教程中,我們將介紹如何添加我們自己的自定義對象來跟蹤。
三、跟蹤自定義對象
歡迎閱讀 TensorFlow 目標檢測 API 系列教程的第 3 部分。 在這部分以及隨后的幾部分中,我們將介紹如何使用此 API 跟蹤和檢測自己的自定義對象。 如果你觀看視頻,我正在使用 Paperspace。 如果你需要一個高端的 GPU,你可以使用他們的云桌面解決方案,這里有個推廣鏈接能獲得 10 美元的折扣,這足以完成這個迷你系列(訓練時間約為 1 小時,GPU 為 0.40 美元/小時)
從使用預先建立的模型,到添加自定義對象,對于我的發現是個巨大跳躍,我找不到任何完整的一步一步的指導,所以希望我可以拯救你們于苦難。 一旦解決,訓練任何你能想到的自定義對象(并為其創建數據)的能力,是一項了不起的技能。
好吧,簡單介紹一下所需的步驟:
- 收集幾百個包含你的對象的圖像 - 最低限度是大約 100,理想情況下是 500+,但是,你有的圖像越多,第二部就越乏味…
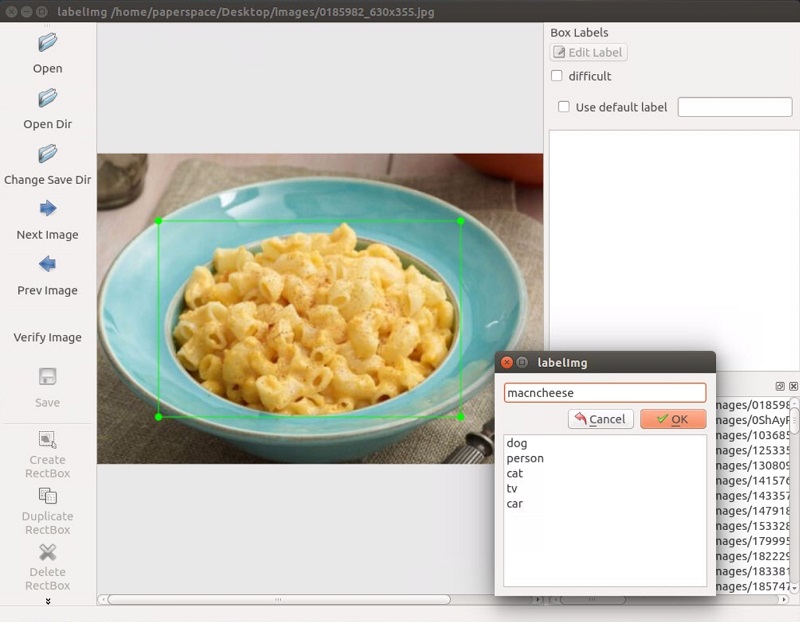
- 注釋/標注你的圖像,理想情況下使用程序。 我個人使用 LabelImg。 這個過程基本上是,在你圖像的對象周圍畫框。 標注程序會自動創建一個描述圖片中的對象的 XML 文件。
- 將這些數據分解成訓練/測試樣本
- 從這些分割生成 TF 記錄
- 為所選模型設置
.config文件(你可以從頭自己開始訓練,但是我們將使用遷移學習) - 訓練
- 從新的訓練模型導出圖形
- 實時檢測自定義對象!
- …
- 完成!
所以,在本教程中,我需要一個對象。 我想要一些有用的東西,但還沒有完成。 顯然,每個人都需要知道通心粉和奶酪的位置,所以讓我們跟蹤它!
我使用 Google Images,Bing 和 ImageNet 來收集一些通心粉和奶酪的圖像。 一般來說,圖片大小在800x600左右,不能太大也不能太小。
對于本教程,你可以跟蹤任何你想要的東西,只需要 100 多張圖片。 一旦你有圖像,你需要標注它們。 為此,我將使用 LabelImg,你可以使用git clone https://github.com/tzutalin/labelImg來獲取它,或者直接下載并解壓zip。
安裝說明在labelimg github上,但對于 Ubuntu 上的 Python3:
sudo apt-get install pyqt5-dev-tools

sudo pip3 install lxml

make qt5py3

python3 labelImg.py
運行這個時,你應該得到一個 GUI 窗口。 從這里,選擇打開目錄并選擇你保存所有圖像的目錄。 現在,你可以開始使用創建rectbox按鈕進行注釋。 繪制你的框,添加名稱,并點擊確定。 保存,點擊下一張圖片,然后重復! 你可以按w鍵來畫框,并按ctrl + s來保存得更快。 不確定是否有下一張圖片的快捷鍵。
一旦你標記了超過 100 張圖片被,我們將把他們分成訓練和測試組。 為此,只需將你的圖像和注解 XML 文件的約 10% 復制到一個稱為test的新目錄,然后將其余的復制到一個叫做train的新目錄。
一旦完成了所有這些,就可以開始下一個教程了,我們將介紹如何從這些數據創建所需的 TFRecord 文件。
另外,如果你想使用我的預制文件,你可以下載我的已標注的通心粉和奶酪。
四、創建 TFRecord
歡迎閱讀 TensorFlow 目標檢測 API 系列教程的第 4 部分。在本教程的這一部分,我們將介紹如何創建 TFRecord 文件,我們需要它來訓練對象檢測模型。
到了這里,你應該有一個圖像目錄,里面有所有的圖像,以及 2 個額外的目錄:訓練和測試。在測試目錄內應該是你的圖像的月 10% 的副本與他們的 XML 注釋數據,然后訓練目錄應該有其余的副本。如果你沒有,請轉到上一個教程。
現在我們需要將這些 XML 文件轉換為單個 CSV 文件,它們可以轉換為 TFRecord 文件。為此,我將利用datitran的 github 中的一些代碼做一些小的改動。首先,我們要使用xml_to_csv.py。你既可以克隆他的整個目錄,也可以抓取這些文件,我們將使用其中的兩個。由于他的存儲庫已經改變了多次,我已經搞亂了,我注意到,我所使用的具體提交是:這個。如果這兩個腳本中的任何一個都不適合你,請嘗試拉取和我相同的提交。絕對要嘗試他的最新版本。例如,在我寫這個的時候,他剛剛更新了圖像中的多個盒標簽,這顯然是一個非常有用的改進。
在xml_to_csv腳本中,我將:
def main():
    image_path = os.path.join(os.getcwd(), 'annotations')
    xml_df = xml_to_csv(image_path)
    xml_df.to_csv('raccoon_labels.csv', index=None)
    print('Successfully converted xml to csv.')
修改為:
def main():
    for directory in ['train','test']:
        image_path = os.path.join(os.getcwd(), 'images/{}'.format(directory))
        xml_df = xml_to_csv(image_path)
        xml_df.to_csv('data/{}_labels.csv'.format(directory), index=None)
        print('Successfully converted xml to csv.')
這只是拆分訓練/測試和命名文件的有用的東西。 繼續并創建一個數據目錄,然后運行它來創建這兩個文件。 接下來,在主對象檢測目錄中創建一個訓練目錄。 到了這里,你應該有以下結構,它在我的桌面上:
Object-Detection
-data/
--test_labels.csv
--train_labels.csv
-images/
--test/
---testingimages.jpg
--train/
---testingimages.jpg
--...yourimages.jpg
-training
-xml_to_csv.py現在,抓取generate_tfrecord.py。 你需要做的唯一修改在class_text_to_int函數中。 你需要改變你的具體類別。 在我們的例子中,我們只有一個類別。 如果你有很多類別,那么你需要繼續構建這個if語句。
# TO-DO replace this with label map
def class_text_to_int(row_label):
    if row_label == 'macncheese':
        return 1
    else:
        None
從 TODO 來看,這個函數在將來可能會有一些變化,所以再一次使用你的直覺來修改最新版本,或者使用我正在使用的同一個提交。
接下來,為了使用它,我們需要在 github 克隆的模型目錄內運行,或者可以更正式地安裝對象檢測 API。
我正在在一個新的機器上的做這個教程,來確保我不會錯過任何步驟,所以我將完整配置對象的 API。 如果你已經克隆和配置,可以跳過最初的步驟,選擇setup.py部分!
首先,我將倉庫克隆到我的桌面上:
git clone https://github.com/tensorflow/models.git之后,遵循以下安裝指令:
sudo apt-get install protobuf-compiler python-pil python-lxml
sudo pip install jupyter
sudo pip install matplotlib
之后:
# From tensorflow/models/
protoc object_detection/protos/*.proto --python_out=.
如果 Ubuntu 上的protoc命令出現錯誤,請使用protoc --version檢查你運行的版本,如果它不是最新版本,你可能需要更新。 我寫這個的時候,我們使用 3.4.0。 為了更新或獲取protoc,請前往protoc發布頁面。 下載 python 版本,解壓,訪問目錄,然后執行:
sudo ./configure
sudo make check
sudo make install之后,再次嘗試protoc命令(再次確保你在模型目錄中執行)。
并且
# From tensorflow/models/
export PYTHONPATH=$PYTHONPATH:`pwd`:`pwd`/slim最后,我們通過在models目錄中執行以下步驟,來正式安裝object_dection庫:
sudo python3 setup.py install現在我們可以運行generate_tfrecord.py腳本。 我們將運行兩次,一次用于訓練 TFRecord,一次用于測試 TFRecord。
python3 generate_tfrecord.py --csv_input=data/train_labels.csv --output_path=data/train.record

python3 generate_tfrecord.py --csv_input=data/test_labels.csv --output_path=data/test.record現在,在你的數據目錄中,你應該有train.record和test.record。
接下來,我們需要設置一個配置文件,然后訓練一個新的模型,或者從一個預先訓練好的模型的檢查點開始,這將在下一個教程中介紹。
五、訓練自定義對象檢測器
歡迎閱讀 TensorFlow 對象檢測 API 系列教程的第 5 部分。在本教程的這一部分,我們將訓練我們的對象檢測模型,來檢測我們的自定義對象。為此,我們需要匹配 TFRecords 的訓練和測試數據的圖像,然后我們需要配置模型,然后我們可以訓練。對我們來說,這意味著我們需要設置一個配置文件。
在這里,我們有兩個選擇。我們可以使用預訓練的模型,然后使用遷移學習來習得一個新的對象,或者我們可以從頭開始習得新的對象。遷移學習的好處是訓練可能更快,你需要的數據可能少得多。出于這個原因,我們將在這里執行遷移學習。
TensorFlow 有相當多的預訓練模型,帶有檢查點文件和配置文件。如果你喜歡,可以自己完成所有這些工作,查看他們的配置作業文檔。對象 API 還提供了一些示例配置供你選擇。
我打算使用 mobilenet,使用下面的檢查點和配置文件:
wget https://raw.githubusercontent.com/tensorflow/models/master/object_detection/samples/configs/ssd_mobilenet_v1_pets.config
wget http://download.tensorflow.org/models/object_detection/ssd_mobilenet_v1_coco_11_06_2017.tar.gz
你可以查看一些其他檢查點選項,來從這里起步。
將該配置放在訓練目錄中,并解壓models/object_detection目錄中的ssd_mobilenet_v1。
在配置文件中,你需要搜索所有PATH_TO_BE_CONFIGURED的位置并更改它們。 你可能還想要修改批量大小。 目前,我的配置文件中設置為 24。 其他模型可能有不同的批量。 如果出現內存錯誤,可以嘗試減小批量以使模型適合你的 VRAM。 最后,還需要修改檢查點名稱/路徑,將num_classes更改為 1,num_examples更改為 12,以及label_map_path改為"training/object-detect.pbtxt"。
這是一些編輯,所以這里是我的完整的配置文件:
# SSD with Mobilenet v1, configured for the mac-n-cheese dataset.
# Users should configure the fine_tune_checkpoint field in the train config as
# well as the label_map_path and input_path fields in the train_input_reader and
# eval_input_reader. Search for "${YOUR_GCS_BUCKET}" to find the fields that
# should be configured.

model {
  ssd {
    num_classes: 1
    box_coder {
      faster_rcnn_box_coder {
        y_scale: 10.0
        x_scale: 10.0
        height_scale: 5.0
        width_scale: 5.0
      }
    }
    matcher {
      argmax_matcher {
        matched_threshold: 0.5
        unmatched_threshold: 0.5
        ignore_thresholds: false
        negatives_lower_than_unmatched: true
        force_match_for_each_row: true
      }
    }
    similarity_calculator {
      iou_similarity {
      }
    }
    anchor_generator {
      ssd_anchor_generator {
        num_layers: 6
        min_scale: 0.2
        max_scale: 0.95
        aspect_ratios: 1.0
        aspect_ratios: 2.0
        aspect_ratios: 0.5
        aspect_ratios: 3.0
        aspect_ratios: 0.3333
      }
    }
    image_resizer {
      fixed_shape_resizer {
        height: 300
        width: 300
      }
    }
    box_predictor {
      convolutional_box_predictor {
        min_depth: 0
        max_depth: 0
        num_layers_before_predictor: 0
        use_dropout: false
        dropout_keep_probability: 0.8
        kernel_size: 1
        box_code_size: 4
        apply_sigmoid_to_scores: false
        conv_hyperparams {
          activation: RELU_6,
          regularizer {
            l2_regularizer {
              weight: 0.00004
            }
          }
          initializer {
            truncated_normal_initializer {
              stddev: 0.03
              mean: 0.0
            }
          }
          batch_norm {
            train: true,
            scale: true,
            center: true,
            decay: 0.9997,
            epsilon: 0.001,
          }
        }
      }
    }
    feature_extractor {
      type: 'ssd_mobilenet_v1'
      min_depth: 16
      depth_multiplier: 1.0
      conv_hyperparams {
        activation: RELU_6,
        regularizer {
          l2_regularizer {
            weight: 0.00004
          }
        }
        initializer {
          truncated_normal_initializer {
            stddev: 0.03
            mean: 0.0
          }
        }
        batch_norm {
          train: true,
          scale: true,
          center: true,
          decay: 0.9997,
          epsilon: 0.001,
        }
      }
    }
    loss {
      classification_loss {
        weighted_sigmoid {
          anchorwise_output: true
        }
      }
      localization_loss {
        weighted_smooth_l1 {
          anchorwise_output: true
        }
      }
      hard_example_miner {
        num_hard_examples: 3000
        iou_threshold: 0.99
        loss_type: CLASSIFICATION
        max_negatives_per_positive: 3
        min_negatives_per_image: 0
      }
      classification_weight: 1.0
      localization_weight: 1.0
    }
    normalize_loss_by_num_matches: true
    post_processing {
      batch_non_max_suppression {
        score_threshold: 1e-8
        iou_threshold: 0.6
        max_detections_per_class: 100
        max_total_detections: 100
      }
      score_converter: SIGMOID
    }
  }
}

train_config: {
  batch_size: 10
  optimizer {
    rms_prop_optimizer: {
      learning_rate: {
        exponential_decay_learning_rate {
          initial_learning_rate: 0.004
          decay_steps: 800720
          decay_factor: 0.95
        }
      }
      momentum_optimizer_value: 0.9
      decay: 0.9
      epsilon: 1.0
    }
  }
  fine_tune_checkpoint: "ssd_mobilenet_v1_coco_11_06_2017/model.ckpt"
  from_detection_checkpoint: true
  data_augmentation_options {
    random_horizontal_flip {
    }
  }
  data_augmentation_options {
    ssd_random_crop {
    }
  }
}

train_input_reader: {
  tf_record_input_reader {
    input_path: "data/train.record"
  }
  label_map_path: "data/object-detection.pbtxt"
}

eval_config: {
  num_examples: 40
}

eval_input_reader: {
  tf_record_input_reader {
    input_path: "data/test.record"
  }
  label_map_path: "training/object-detection.pbtxt"
  shuffle: false
  num_readers: 1
}在訓練目錄里面,添加object-detection.pbtxt:
item {
  id: 1
  name: 'macncheese'
}
而現在,見證奇跡時刻! 在models/object_detection中:
python3 train.py --logtostderr --train_dir=training/ --pipeline_config_path=training/ssd_mobilenet_v1_pets.config禁止錯誤,你應該看到如下輸出:
INFO:tensorflow:global step 11788: loss = 0.6717 (0.398 sec/step)
INFO:tensorflow:global step 11789: loss = 0.5310 (0.436 sec/step)
INFO:tensorflow:global step 11790: loss = 0.6614 (0.405 sec/step)
INFO:tensorflow:global step 11791: loss = 0.7758 (0.460 sec/step)
INFO:tensorflow:global step 11792: loss = 0.7164 (0.378 sec/step)
INFO:tensorflow:global step 11793: loss = 0.8096 (0.393 sec/step)
你的步驟從1開始,損失會高一些。 根據你的 GPU 和你有多少訓練數據,這個過程需要不同的時間。 像 1080ti 這樣的東西,應該只需要一個小時左右。 如果你有很多訓練數據,則可能需要更長的時間。 你想截取的損失平均約為 1(或更低)。 我不會停止訓練,直到你確定在 2 以下。你可以通過 TensorBoard 檢查模型如何訓練。 你的models/object_detection/training目錄中會出現新的事件文件,可以通過 TensorBoard 查看。
在models/object_detection中通過終端,這樣啟動 TensorBoard:
tensorboard --logdir='training'這會運行在127.0.0.1:6006(在瀏覽器中訪問);
我的總損失圖:
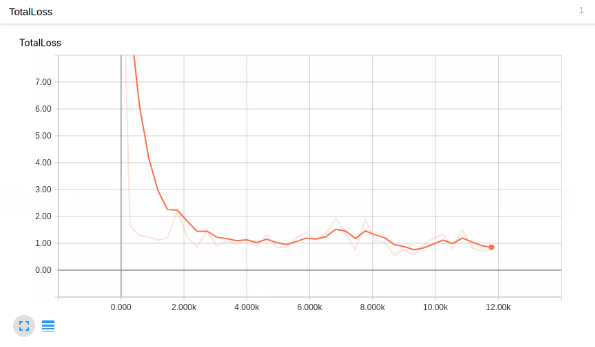
看起來不錯,但它能檢測通心粉和奶酪嘛?!
為了使用模型來檢測事物,我們需要導出圖形,所以在下一個教程中,我們將導出圖形,然后測試模型。
六、測試自定義對象檢測器
歡迎閱讀 TensorFlow 對象檢測 API 教程系列的第 6 部分。 在本教程的這一部分,我們將測試我們的模型,看看它是否符合我們的希望。 為此,我們需要導出推理圖。
幸運的是,在models/object_detection目錄中,有一個腳本可以幫助我們:export_inference_graph.py
為了運行它,你只需要傳入你的檢查點和你的流水線配置,然后是你想放置推理圖的任何地方。 例如:
python3 export_inference_graph.py \
    --input_type image_tensor \
    --pipeline_config_path training/ssd_mobilenet_v1_pets.config \
    --trained_checkpoint_prefix training/model.ckpt-10856 \
    --output_directory mac_n_cheese_inference_graph
你的檢查點文件應該在訓練目錄中。 只要找出最大步驟(破折號后面最大的那個),那就是你想要使用的那個。 接下來,確保pipeline_config_path設置為你選擇的任何配置文件,然后最后選擇輸出目錄的名稱,我用mac_n_cheese_inference_graph。
在models/object_detection中運行上述命令。
如果你得到一個錯誤,沒有名為nets的模塊,那么你需要重新運行:
# From tensorflow/models/
export PYTHONPATH=$PYTHONPATH:`pwd`:`pwd`/slim
# switch back to object_detection after this and re run the above command否則,你應該有一個新的目錄,在我的情況下,我的是mac_n_cheese_inference_graph,里面,我有新的檢查點數據,saved_model目錄,最重要的是,forzen_inference_graph.pb文件。
現在,我們將使用示例筆記本,對其進行編輯,并查看我們的模型在某些測試圖像上的工作情況。 我將一些models/object_detection/images/test images圖像復制到models/object_detection/test_images目錄中,并將其更名為image3.jpg,image4.jpg…等。
啟動 jupyter 筆記本并打開object_detection_tutorial.ipynb,讓我們進行一些更改。 首先,前往“變量”部分,然后更改模型名稱以及檢查點和標簽的路徑:
# What model to download.
MODEL_NAME = 'mac_n_cheese_inference_graph'

# Path to frozen detection graph. This is the actual model that is used for the object detection.
PATH_TO_CKPT = MODEL_NAME + '/frozen_inference_graph.pb'

# List of the strings that is used to add correct label for each box.
PATH_TO_LABELS = os.path.join('training', 'object-detection.pbtxt')

NUM_CLASSES = 1
接下來,我們可以刪除整個下載模型部分,因為我們不需要再下載了。
最后,在“檢測”部分中,將TEST_IMAGE_PATHS變量更改為:
TEST_IMAGE_PATHS = [ os.path.join(PATH_TO_TEST_IMAGES_DIR, 'image{}.jpg'.format(i)) for i in range(3, 8) ]
有了這個,你可以訪問單元格菜單選項,然后“運行全部”。
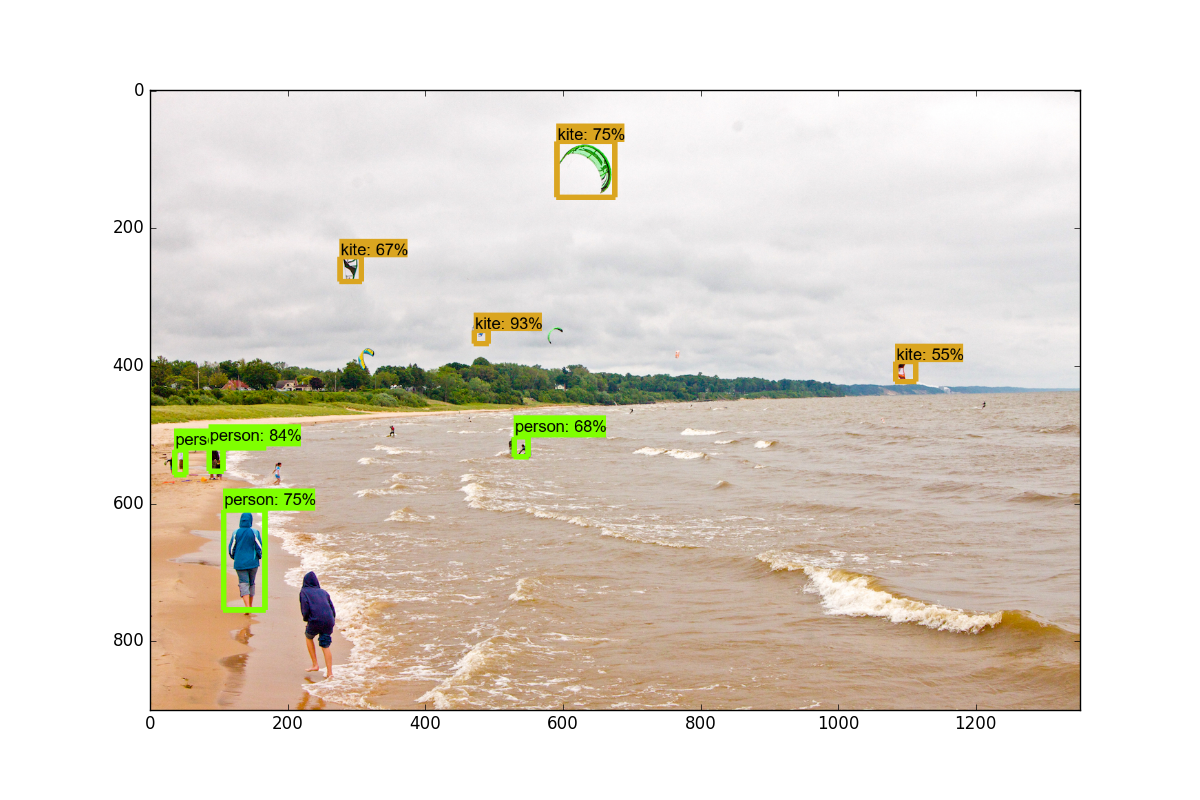
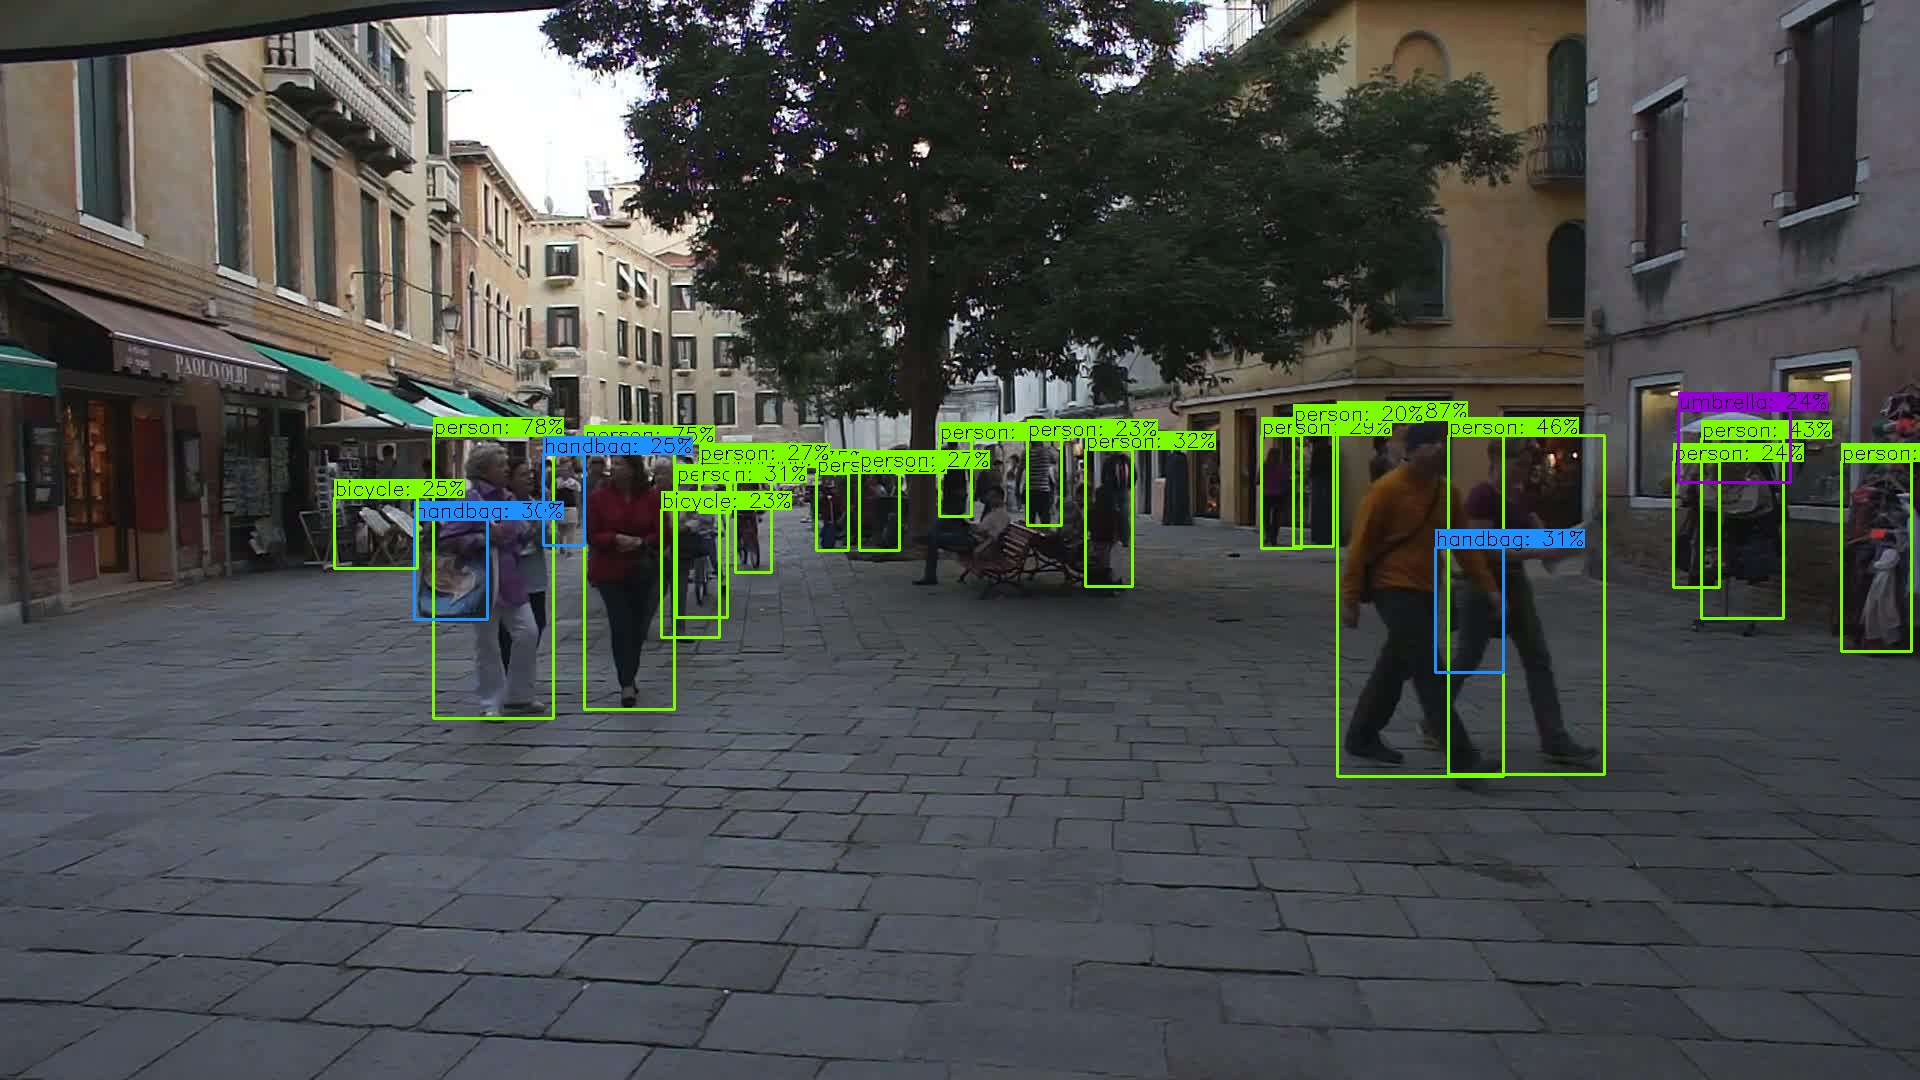
以下是我的一些結果:
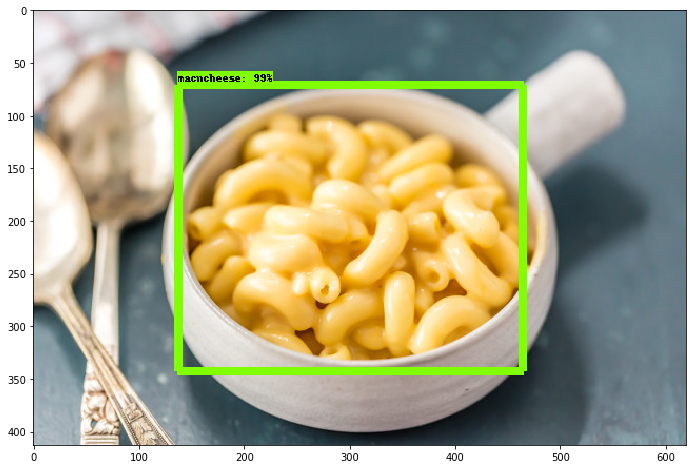
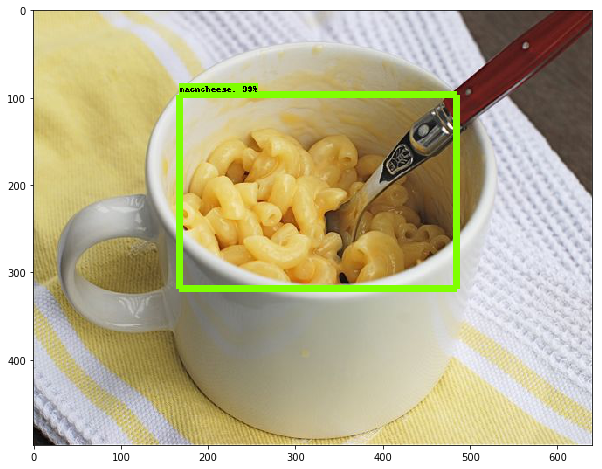
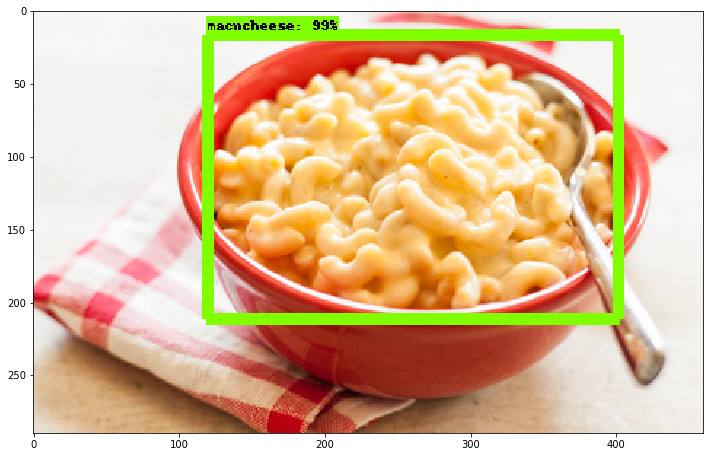
總的來說,我非常高興看到它的效果有多棒,即使你有一個非常小的數據集,你仍然可以成功。使用遷移學習來訓練一個模型只需要一個小時(在一個像樣的 GPU 上)。 很酷!
智能推薦
tensorflow目標檢測API實現
tensorflow目標檢測API實現(windows環境) 1下載Anaconda(https://repo.continuum.io/archive/Anaconda3-4.2.0-Windows-x86_64.exe) 安裝Anconda3-4.2.0,集成python3.5.2。全程一鍵安裝,遇到需要添加環境變量的,允許即可.然后一路安裝就可以了。 安裝完成后就會有上面這些應用程序,點開A...
TensorFlow 目標檢測實例解析
從GitHub下載了關于Tensorflow/Model的部分,經過1天的琢磨,終于將程序跑通了,下面是相關的代碼,我們一起進行研究學習。 Tensorflow/Model 下代碼下載地址:https://github.com/tensorflow/models 本文所有的操作都是以re...
目標檢測實戰3-generate_tfrecord錯誤tensorflow.python.framework.errors_impl.NotFoundError:
1. 錯誤1 AttributeError: module ‘tensorflow’ has no attribute ‘app’ AttributeError: module ‘tensorflow’ has no attribute ‘app’ 原因:TensorFlow版本不對應錯誤 解決辦法: ...
目標檢測EfficientDet運行教程
EfficientDet運行教程 代碼下載 文章詳解 環境調試 代碼執行 實驗結果 本人嘗試了efficientdet的TensorFlow版本和Pytorch版本代碼,但是沒有運行成功TensorFlow版本的,只運行成功了Pytorch版本代碼,這里將會解釋Pytorch版本代碼運行過程,事先聲明,本人的運行環境是 windows10+Python3.7,本文 僅包含測試,無訓練,適者食用啊。...
目標檢測入門篇
溫馨提示:學習目標檢測前必須要先掌握圖像分類的知識體系 學習資料必備:Github上tensorflow官方提供的目標檢測與分類庫 在Github上搜索tensorflow models,轉到如下界面: 點擊research,這里面有很多tensorflow官方的工具可以用來使用,分類模型庫在slim文件夾中,有很多預訓練模型可供下載,點擊code即可查看源代碼,之前官方實現還是基于tensorf...
猜你喜歡
【Yolo3】入門目標檢測實驗--Python+Opencv2+dnn
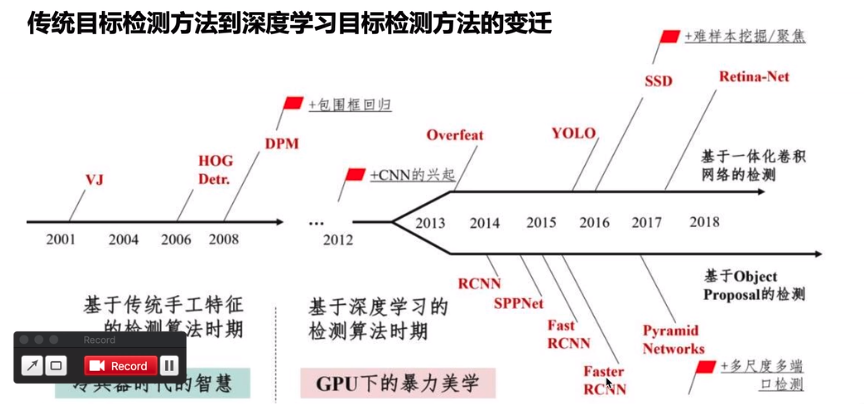
文章目錄 一、前言 二、入門實驗coco數據集 1.下載 2.食用 3.源碼 一、前言 yolo3也是目標檢測的新興算法之一。它的發展是基于HOG->CNN ->RCNN->YOLO。 (圖源于網絡,侵刪) 圖像檢測發展史: HOG階段(一步法):邊緣檢測+卷積神經網絡。 CNN ~ R-CNN階段(兩步法):基于圖像分類加上滑動窗口。 YOLO:區域推薦(RP)。 1 , 2 ...


freemarker + ItextRender 根據模板生成PDF文件
1. 制作模板 2. 獲取模板,并將所獲取的數據加載生成html文件 2. 生成PDF文件 其中由兩個地方需要注意,都是關于獲取文件路徑的問題,由于項目部署的時候是打包成jar包形式,所以在開發過程中時直接安照傳統的獲取方法沒有一點文件,但是當打包后部署,總是出錯。于是參考網上文章,先將文件讀出來到項目的臨時目錄下,然后再按正常方式加載該臨時文件; 還有一個問題至今沒有解決,就是關于生成PDF文件...
電腦空間不夠了?教你一個小秒招快速清理 Docker 占用的磁盤空間!
Docker 很占用空間,每當我們運行容器、拉取鏡像、部署應用、構建自己的鏡像時,我們的磁盤空間會被大量占用。 如果你也被這個問題所困擾,咱們就一起看一下 Docker 是如何使用磁盤空間的,以及如何回收。 docker 占用的空間可以通過下面的命令查看: TYPE 列出了docker 使用磁盤的 4 種類型: Images:所有鏡像占用的空間,包括拉取下來的鏡像,和本地構建的。 Con...

requests實現全自動PPT模板
http://www.1ppt.com/moban/ 可以免費的下載PPT模板,當然如果要人工一個個下,還是挺麻煩的,我們可以利用requests輕松下載 訪問這個主頁,我們可以看到下面的樣式 點每一個PPT模板的圖片,我們可以進入到詳細的信息頁面,翻到下面,我們可以看到對應的下載地址 點擊這個下載的按鈕,我們便可以下載對應的PPT壓縮包 那我們就開始做吧 首先,查看網頁的源代碼,我們可以看到每一...