springcloud stream binding 源碼與使用學習筆記
標簽: spring
前言
? 剛看到Stream的功能是對接mq產品,以為就是包裝一些mq產品接口,實現自動裝配后統一使用。但看了一個簡單的demo,是使用rabbitMq產品的binder,還有輸入輸出接口方法通過配置,來對應不同的mq產品。所以作者實現的功能是在自己的channel與mq產品之間做了一個binder,這樣方便的改變配置就使用多個mq,也可以方便的換不同的mq。
? 但是這些stream的channel如何被實現的,實現類是什么,binder又是如何加載進來的,又是如何通過binding操作把兩者綁在一起的?什么時候綁的?都值得了解一下。于是簡單瀏覽了源碼,并基于一個rabitmq的demo,補充寫一個簡單的binder進行了測試。
1. rabbit為例如何使用stream
1.1 基本的使用步驟
? 這個方便找到一些相關的帖子
//1. pom中引入
<artifactId>spring-cloud-starter-stream-rabbit</artifactId>

//2. 定義各個stream自己的通道。Output的發送,Input的接收。這個接口類會被一個配置類,上面通過加@EnableBinding({MessageSource.class})來觸發實現類。和@Enable***都差不多。
//這里有三個chnanel,一個接收,兩個發送。
public interface MessageSource {
    String NAME = "pao";//管道名稱:"pao"
    @Output(NAME)
    MessageChannel pao();
    @Output("liujunTopic")
    MessageChannel liujunTopic();
    @Input("liujunRevc")
    MessageChannel liujunRevc();
}

//3. 配置文件application.properties中相關的內容。
//spring.cloud.stream.bindings.${channel-name}.destination
//bindings后面的就是上面的通道名字,表示這個通道將和哪個mq的binder綁定。destination表示toipc吧。
//相關的binder:rabbit,上面的pox中引入包的meta-inf中的spring.binders文件中有,比如:
//rabbit:org.springframework.cloud.stream.binder.rabbit.config.RabbitServiceAutoConfiguration。
//前綴【rabbit】可以看到下面的default中有。指明的【RabbitServiceAutoConfiguration】這個自動配置文件中,會產生RabbitMessageChannelBinder.class這個類對象到容器中。
//liujunmq是我自己弄的一個binder,就是測試用的。
spring.cloud.stream.bindings.output.destination = ${kafka.topic}
spring.cloud.stream.bindings.pao.destination = test
spring.cloud.stream.bindings.input.destination = ${kafka.topic}
spring.cloud.stream.defaultBinder=rabbit
spring.cloud.stream.bindings.liujunTopic.binder=liujunmq
#spring.cloud.stream.bindings.liujunTopic.destination=liujunTest
spring.cloud.stream.bindings.liujunRevc.binder=liujunmq

//4. 使用2中的接口,在controller中,可以裝配channel,按名字liujunTopic。后面就可以直接用它來發送了。
    @Autowired
    @Qualifier("liujunTopic") // Bean 名稱
    private MessageChannel liujunMessageChannel;

    @GetMapping("/message/sendLiujun")
    public Boolean sendLiujun(@RequestParam String message) {
        System.out.println("1. msg received through the httpClient...");
        liujunMessageChannel.send(MessageBuilder.withPayload(message).build());
        return true;
    }
1.2 測試項目與結果展示
? 四個紅色的文件:有自己加的spring.binders文件,有channel接口,有controller類產生消息,也有消息到了mockmq后,消費消息的類。最下面的紅框是日志結果。mockmq只是一個MsgHolder,可以寫入消息,可以配置監聽,把消息發給監聽器。

1.3 業務過程
? 用戶使用channel發消息,由于channel在binding時給加了一個監聽器,監聽器收到消息后才發給mq的生產者。(客戶用channel發送,channel的監聽器收到,再轉發給mqProducer)
? 使用channel接收消息時,由于binding會產生監聽,作為mq的消費者,它得到mq消息后用這個channel發送。而用戶設置了channel的監聽,就收到了消息。(mqConsumer監聽消息,用channel發送,客戶的channel監聽收到)
? 下面都看看channel是如何產生的,binder是如何進入容器的。binder什么時候給channel加上需要的監聽器,或者給mqConsumer加上監聽器的。
2. 源碼分析
2.1 從@enableBinding開始
? 我們知道很多功能都是從@enable***開始的。這個注解可以加上幾個channel的接口。
? 具體是導入這些類:@Import({ BindingServiceConfiguration.class, BindingBeansRegistrar.class, BinderFactoryConfiguration.class,SpelExpressionConverterConfiguration.class })
2.2 導入的BindingServiceConfiguration.class
看名字是【綁定服務】的配置,這是個@Configuration的類。主要看下面三個類:
-
new BindingService(bindingServiceProperties, binderFactory);
-
new OutputBindingLifecycle();–>bindable.bindOutputs(bindingService);
-
new InputBindingLifecycle();–>bindable.bindInputs(bindingService);
后面兩個都實現了smartlifecycle接口,在容器啟動時,也會執行start(),這時會通過bindingService來進行所有的綁定。這就是綁定時機,另外在stop()時,還會用bindingService進行unbinding操作。
初步看看bindingService的主要操作:
-
bindProducer:getBinder得到binder,再用它binder.bindProducer(bindingTarget, output,
producerProperties);—參數主要是stream的channel與屬性值。 -
bindConsumer:getBinder得到binder,再用它binder.bindConsumer(target,
bindingServiceProperties.getGroup(inputName), input,
consumerProperties);—參數主要是stream的channel與屬性值。
? 綁定服務有了,要綁定的兩個對象還沒有看到。一個channel將與一個mq產品的生產者或者消費者進行綁定。
2.3 導入的BindingBeansRegistrar.class
? 這個是用于注冊bean定義的類,用于處理@EnableBinding中的值,也就是channel接口的類,應該就是被綁定的對象了。
//一般對于接口,肯定是動態代理產生一個類。這個類一般通過一個factoryBean的getObject()方法得到。比如duboo中,對接口的實現就是把請求代理成一個遠程的消息發送。
//
if (type.isInterface()) {
			RootBeanDefinition rootBeanDefinition = new RootBeanDefinition(BindableProxyFactory.class);
			rootBeanDefinition.addQualifier(new AutowireCandidateQualifier(Bindings.class, parent));
rootBeanDefinition.getConstructorArgumentValues().addGenericArgumentValue(type);
			registry.registerBeanDefinition(type.getName(), rootBeanDefinition);
		}
? 重點看BindableProxyFactory這個類,是個工廠bean。
 * {@link FactoryBean} for instantiating the interfaces specified via
 * {@link EnableBinding}
//所有EnableBinding指明的接口的實例化類,實現了工廠bean
//自己又是一個Interceptor,產生代理類
public class BindableProxyFactory implements MethodInterceptor, FactoryBean<Object>, Bindable, InitializingBean
------------------------------------------------------------------
//getObject果然返回代理對象,MethodInterceptor還是this。
	@Override
	public synchronized Object getObject() throws Exception {
		if (this.proxy == null) {
			ProxyFactory factory = new ProxyFactory(this.type, this);
			this.proxy = factory.getProxy();
		}
		return this.proxy;
	}
------------------------------------------------------------------
//看看channel接口的代理對象的方法,執行是如何的?是直接從inputHolders拿到,按名字緩存起來。
	@Override
	public synchronized Object invoke(MethodInvocation invocation) throws Throwable {
		Method method = invocation.getMethod();
...//方法上的Input注解的名字,作為channel的名字。
		Input input = AnnotationUtils.findAnnotation(method, Input.class);
		if (input != null) {
			String name = BindingBeanDefinitionRegistryUtils.getBindingTargetName(input, method);
			boundTarget = this.inputHolders.get(name).getBoundTarget();
			targetCache.put(method, boundTarget);
			return boundTarget;
		}
		else {
...//output略
		}
		return null;
	}
------------------------------------------------------------------
//從invoker方法中,看到代理類是根據Input.class注解的名字,從inputHolders這樣一個map中拿到的對象。說明這個對象應該已經存在了。
//在產生代理類產生之前,即調用getObject()之前,早就先加載了相應的boundTarget放map中了。
//果然有afterPropertiesSet方法,它對input與output分別進行了處理,把產生的channel對象放到了inputHolders中。上面的invoke才能拿到。這句是input注解的方法的處理。
BindableProxyFactory.this.inputHolders.put(name,
								new BoundTargetHolder(getBindingTargetFactory(returnType).createInput(name), true));

//按類型得到工廠,再根據名字產生綁定對象。
//關于工廠,第一個導入類中有這個bean,就是BindingTargetFactory,可以生成BindingTarget。
@Bean
public SubscribableChannelBindingTargetFactory channelFactory(
    CompositeMessageChannelConfigurer compositeMessageChannelConfigurer) {
    return new SubscribableChannelBindingTargetFactory(compositeMessageChannelConfigurer);
}

//工廠是這么產生綁定對象的。
SubscribableChannelBindingTargetFactory-->createInput/createOutput-->return SubscribableChannel subscribableChannel = new DirectChannel();

//這個steam的channel對象就是下面的樣子,是可以被訂閱的。最開始的例子說明發送/接收都可以被訂閱(監聽)。input與output都是這個,因為都需要一端發,另一端訂閱接收。
public class DirectChannel extends AbstractSubscribableChannel
? 上面有了綁定服務,也有了綁定對象了,還缺少綁定者binder。
2.4 導入的BinderFactoryConfiguration.class
? 看名字,這個是binder的工廠,有了工廠,binder就肯定有了。重點看兩個bean.
//這個是binder的工廠
@Bean
@ConditionalOnMissingBean(BinderFactory.class)
public DefaultBinderFactory binderFactory() {
	DefaultBinderFactory binderFactory = new DefaultBinderFactory(getBinderConfigurations());
	binderFactory.setDefaultBinder(bindingServiceProperties.getDefaultBinder());
	binderFactory.setListeners(binderFactoryListeners);
	return binderFactory;
}
//------------------------------------------------------------------
//這個是binder的類型注冊,從META-INF/spring.binders文件中來,本例中有兩個,一個自己寫的,一個是rabbit的。
@Bean
@ConditionalOnMissingBean(BinderTypeRegistry.class)
public BinderTypeRegistry binderTypeRegistry(ConfigurableApplicationContext configurableApplicationContext) {
    Map<String, BinderType> binderTypes = new HashMap<>();
...
    try {
        Enumeration<URL> resources = classLoader.getResources("META-INF/spring.binders");
...
        while (resources.hasMoreElements()) {
            URL url = resources.nextElement();
            UrlResource resource = new UrlResource(url);
            for (BinderType binderType : parseBinderConfigurations(classLoader, resource)) {
                binderTypes.put(binderType.getDefaultName(), binderType);
            }
        }
    }
...
    return new DefaultBinderTypeRegistry(binderTypes);
}
? 看一下這個binder工廠:DefaultBinderFactory,以及其中最主要的getBinder方法。
public class DefaultBinderFactory implements BinderFactory, DisposableBean, ApplicationContextAware

//得到binder的方法。其中根據文件中的binder配置類,還產生了一個子容器。再從中取出Binder.class類型的bean。說明每個mq都是一個子容器當中?
//子容器當然可以使用父容器中的對象,父容器也可以通過這個工廠類,得到子容器中的binder。
	private <T> Binder<T, ?, ?> getBinderInstance(String configurationName) {
...
			Properties binderProperties = binderConfiguration.getProperties();
			ArrayList<String> args = new ArrayList<>();
			for (Map.Entry<Object, Object> property : binderProperties.entrySet()) {
				args.add(String.format("--%s=%s", property.getKey(), property.getValue()));
			}
...
			args.add("--spring.main.applicationContextClass=" + AnnotationConfigApplicationContext.class.getName());
			List<Class<?>> configurationClasses = new ArrayList<Class<?>>(
	Arrays.asList(binderConfiguration.getBinderType().getConfigurationClasses()));
			SpringApplicationBuilder springApplicationBuilder = new SpringApplicationBuilder()
					.sources(configurationClasses.toArray(new Class<?>[] {})).bannerMode(Mode.OFF).web(false);
			if (useApplicationContextAsParent) {
				springApplicationBuilder.parent(this.context);
			}
...
			ConfigurableApplicationContext binderProducingContext = springApplicationBuilder
					.run(args.toArray(new String[args.size()]));
			@SuppressWarnings("unchecked")
			Binder<T, ?, ?> binder = binderProducingContext.getBean(Binder.class);
...
			this.binderInstanceCache.put(configurationName, new BinderInstanceHolder(binder, binderProducingContext));
		}
		return (Binder<T, ?, ?>) this.binderInstanceCache.get(configurationName).getBinderInstance();
	}
2.5 回頭看綁定操作-OutputBindingLifecycle
? 以發送綁定為例子。
//實現了SmartLifecycle,可以隨容器啟停。實現了ApplicationContextAware,可以方便拿容器中的bean使用。
public class OutputBindingLifecycle implements SmartLifecycle, ApplicationContextAware

////容器啟動帶著這個也start()。找出bindable進行bindInputs and OutPuts
	@Override
	public void start() {
		if (!running) {
			// retrieve the BindingService lazily, avoiding early initialization
			try {
				BindingService bindingService = this.applicationContext
						.getBean(BindingService.class);
				Map<String, Bindable> bindables = this.applicationContext
						.getBeansOfType(Bindable.class);
				for (Bindable bindable : bindables.values()) {
					bindable.bindOutputs(bindingService);
				}
			}
...
		}
	}

//--------------------------------------------------------
//BindableProxyFactory中執行上面的bindable.bindOutputs(bindingService);
//BindableProxyFactory實現了bindable,正好也是因為它的outputHolders持有所有的outputchannel這些target。通過bindingService來進行。
	@Override
	public void bindOutputs(BindingService bindingService) {
	...
        for (Map.Entry<String, BoundTargetHolder> boundTargetHolderEntry : this.inputHolders.entrySet()) {
            String inputTargetName = boundTargetHolderEntry.getKey();
            BoundTargetHolder boundTargetHolder = boundTargetHolderEntry.getValue();
            if (boundTargetHolder.isBindable()) {
                bindingService.bindConsumer(boundTargetHolder.getBoundTarget(), inputTargetName);
            }
        }
	}
//--------------------------------------------------------
//bindingService.bindConsumer。找到binder,綁定目標。
	public <T> Binding<T> bindProducer(T output, String outputName) {
		String bindingTarget = this.bindingServiceProperties
				.getBindingDestination(outputName);
		Binder<T, ?, ProducerProperties> binder = (Binder<T, ?, ProducerProperties>) getBinder(outputName, output.getClass());
...
		Binding<T> binding = binder.bindProducer(bindingTarget, output,
				producerProperties);
		this.producerBindings.put(outputName, binding);
		return binding;
	}
//--------------------------------------------------------
//getBinder(outputName, output.getClass());用binder工廠,以配置文件與類型為參數。前面說過可能有子容器的問題。
	private <T> Binder<T, ?, ?> getBinder(String channelName, Class<T> bindableType) {
		String binderConfigurationName = this.bindingServiceProperties.getBinder(channelName);
		return binderFactory.getBinder(binderConfigurationName, bindableType);
	}
3. 測試自定義的binder
? 直接在一個stream的rabbitmq的demo項目上添加,前面已經顯示過一些文件。這里的mq就用一個可接受msg,也可以收到監聽時,把msg給它的類代替。
3.1 寫一個binder與它的配置類及文件
binder類:
public class LiujunMessageChannelBinder implements
		Binder<MessageChannel, ConsumerProperties, ProducerProperties> {
	@Autowired
	MsgHolder msgHolder;//一個mock的mq.應該在父容器中。

	@Override
	public Binding<MessageChannel> bindConsumer(String name, String group,
			MessageChannel inboundBindTarget,
			ConsumerProperties consumerProperties) {
		try {
            //在mq中加一個監聽消費者,收到消息就用stream的Channel發出去。真正的客戶會監聽stream的Channel
			msgHolder.setMsgListener(msg -> {
						System.out.println("4. mqClient listener got the msg from mock-mq,then sent to targetOutput!");
						inboundBindTarget.send(msg);
					});
		} catch (Exception e) {
			e.printStackTrace();
		}
		//返回實現unbinding類
		return () -> {
			System.out.println("Unbinding");
		};
	}

	@Override
	public Binding<MessageChannel> bindProducer(String name,
			MessageChannel outputChannel, ProducerProperties producerProperties) {
		Assert.isInstanceOf(SubscribableChannel.class, outputChannel,
				"Binding is supported only for SubscribableChannel instances");
		SubscribableChannel subscribableChannel = (SubscribableChannel) outputChannel;
		//監聽真正用戶用Channel發來send來的消息,再發(設置)給mq。
        subscribableChannel.subscribe(message -> {
//			Object messageBody = message.getPayload();
			System.out.println("2. Input subscriber get the msg and send to mock-mq:"
					+ message);
			msgHolder.setMsg(message);
		});
		//返回實現unbinding類
		return () -> {
			System.out.println("Unbinding");
		};
	}
}
binder的配置類
//binder的配置類。
@Configuration
//@ConditionalOnMissingBean(Binder.class)
public class LiujunMessageChannelBinderConfiguration {
@Bean
LiujunMessageChannelBinder liujunMessageChannelBinder() {
	LiujunMessageChannelBinder binder = new LiujunMessageChannelBinder();
	return binder;
}
}
建一個meta-inf文件夾,里面寫一個spring.binders文本文件,只有一句,指出binders的配置類。
liujunmq:\
com.gupao.springcloudstream.rabbitmq.stream.LiujunMessageChannelBinderConfiguration
3.2 channel接口類并放在@enableBinding中
public interface MessageSource {
//發消息
@Output("liujunTopic")
MessageChannel liujunTopic();
//收
@Input("liujunRevc")
MessageChannel liujunRevc();
}
? 特意排除了binder的配置類。
@SpringBootApplication
@ComponentScan(excludeFilters = @ComponentScan.Filter(type = FilterType.ASSIGNABLE_TYPE, classes = {LiujunMessageChannelBinderConfiguration.class}))
@EnableBinding({MessageSource.class})
public class SpringCloudStreamApplication {
	public static void main(String[] args) {
		SpringApplication.run(SpringCloudStreamApplication.class, args);
	}
}
application.propeties文件中增加這些,表示兩個通道都被綁定到我自己加的binder上。spring.binders中有liujunmq
spring.cloud.stream.bindings.liujunTopic.binder=liujunmq
spring.cloud.stream.bindings.liujunRevc.binder=liujunmq
3.3 發送、接收及模擬的mq
? 在一個controller中,裝配一個特定的發送通道,把http請求中的msg發出去。
@Autowired
@Qualifier("liujunTopic") // Bean 名稱
private MessageChannel liujunMessageChannel;

@GetMapping("/message/sendLiujun")
public Boolean sendLiujun(@RequestParam String message) {
	System.out.println("1. msg received through the httpClient...");
	liujunMessageChannel.send(MessageBuilder.withPayload(message).build());
    return true;
}
? 兩種方式消費,指定所用的Input通道名字。
@Component
public class LiujunMessageConsumerBean {
    @Autowired
    private MessageSource messageSource;
//    @StreamListener("liujunRevc")
//    public void onMessage(String message){
//        System.out.println("5. targetOutput Listener get msg: " + message);
//    }
    @ServiceActivator(inputChannel = "liujunRevc")
    public void onMessage(Object message) {
        System.out.println("6. targetOutput another Listener get msg: " + message);
    }
}
//模擬的mq
@Component
public class MsgHolder {
	public Message msg;
	public MsgListener msgListener;
	public Message getMsg() {
		return msg;
	}
    //設置消息時(收到)后,又把消息給接收者(消費)
	public void setMsg(Message msg) {
		this.msg = msg;
		System.out.println("3. mock-mq get msg and tell the mqClientlistener...");
		msgListener.OnMsg(msg);
		msg=null;
	}
    ...
}
3.4 運行結果
瀏覽器輸入:[http://192.168.1.6:8080/message/sendLiujun?message=herriman目]
2020-01-08 23:01:29.683  INFO 12984 --- [6SvEgzY8IDiA-61] o.s.a.r.l.SimpleMessageListenerContainer : Restarting Consumer@5d4b0dbd: tags=[{}], channel=null, acknowledgeMode=AUTO local queue size=0
1. msg received through the httpClient...
2. Input subscriber get the msg and send to mock-mq:GenericMessage [payload=herriman目, headers={id=67fb81dc-ed14-5850-f2d1-499b25d055c7, timestamp=1578495697875}]
3. mock-mq get msg and tell the mqClientlistener...
4. mqClient listener got the msg from mock-mq,then sent to targetOutput!
6. targetOutput another Listener get msg: herriman目
按照設計,正確的輸出了第一步的日志。通過本次學習,兼容多種產品學到了一招。另外就是如何把你要的類都加載到容器中,如何在正確的時機進行關聯與解除關聯。
智能推薦
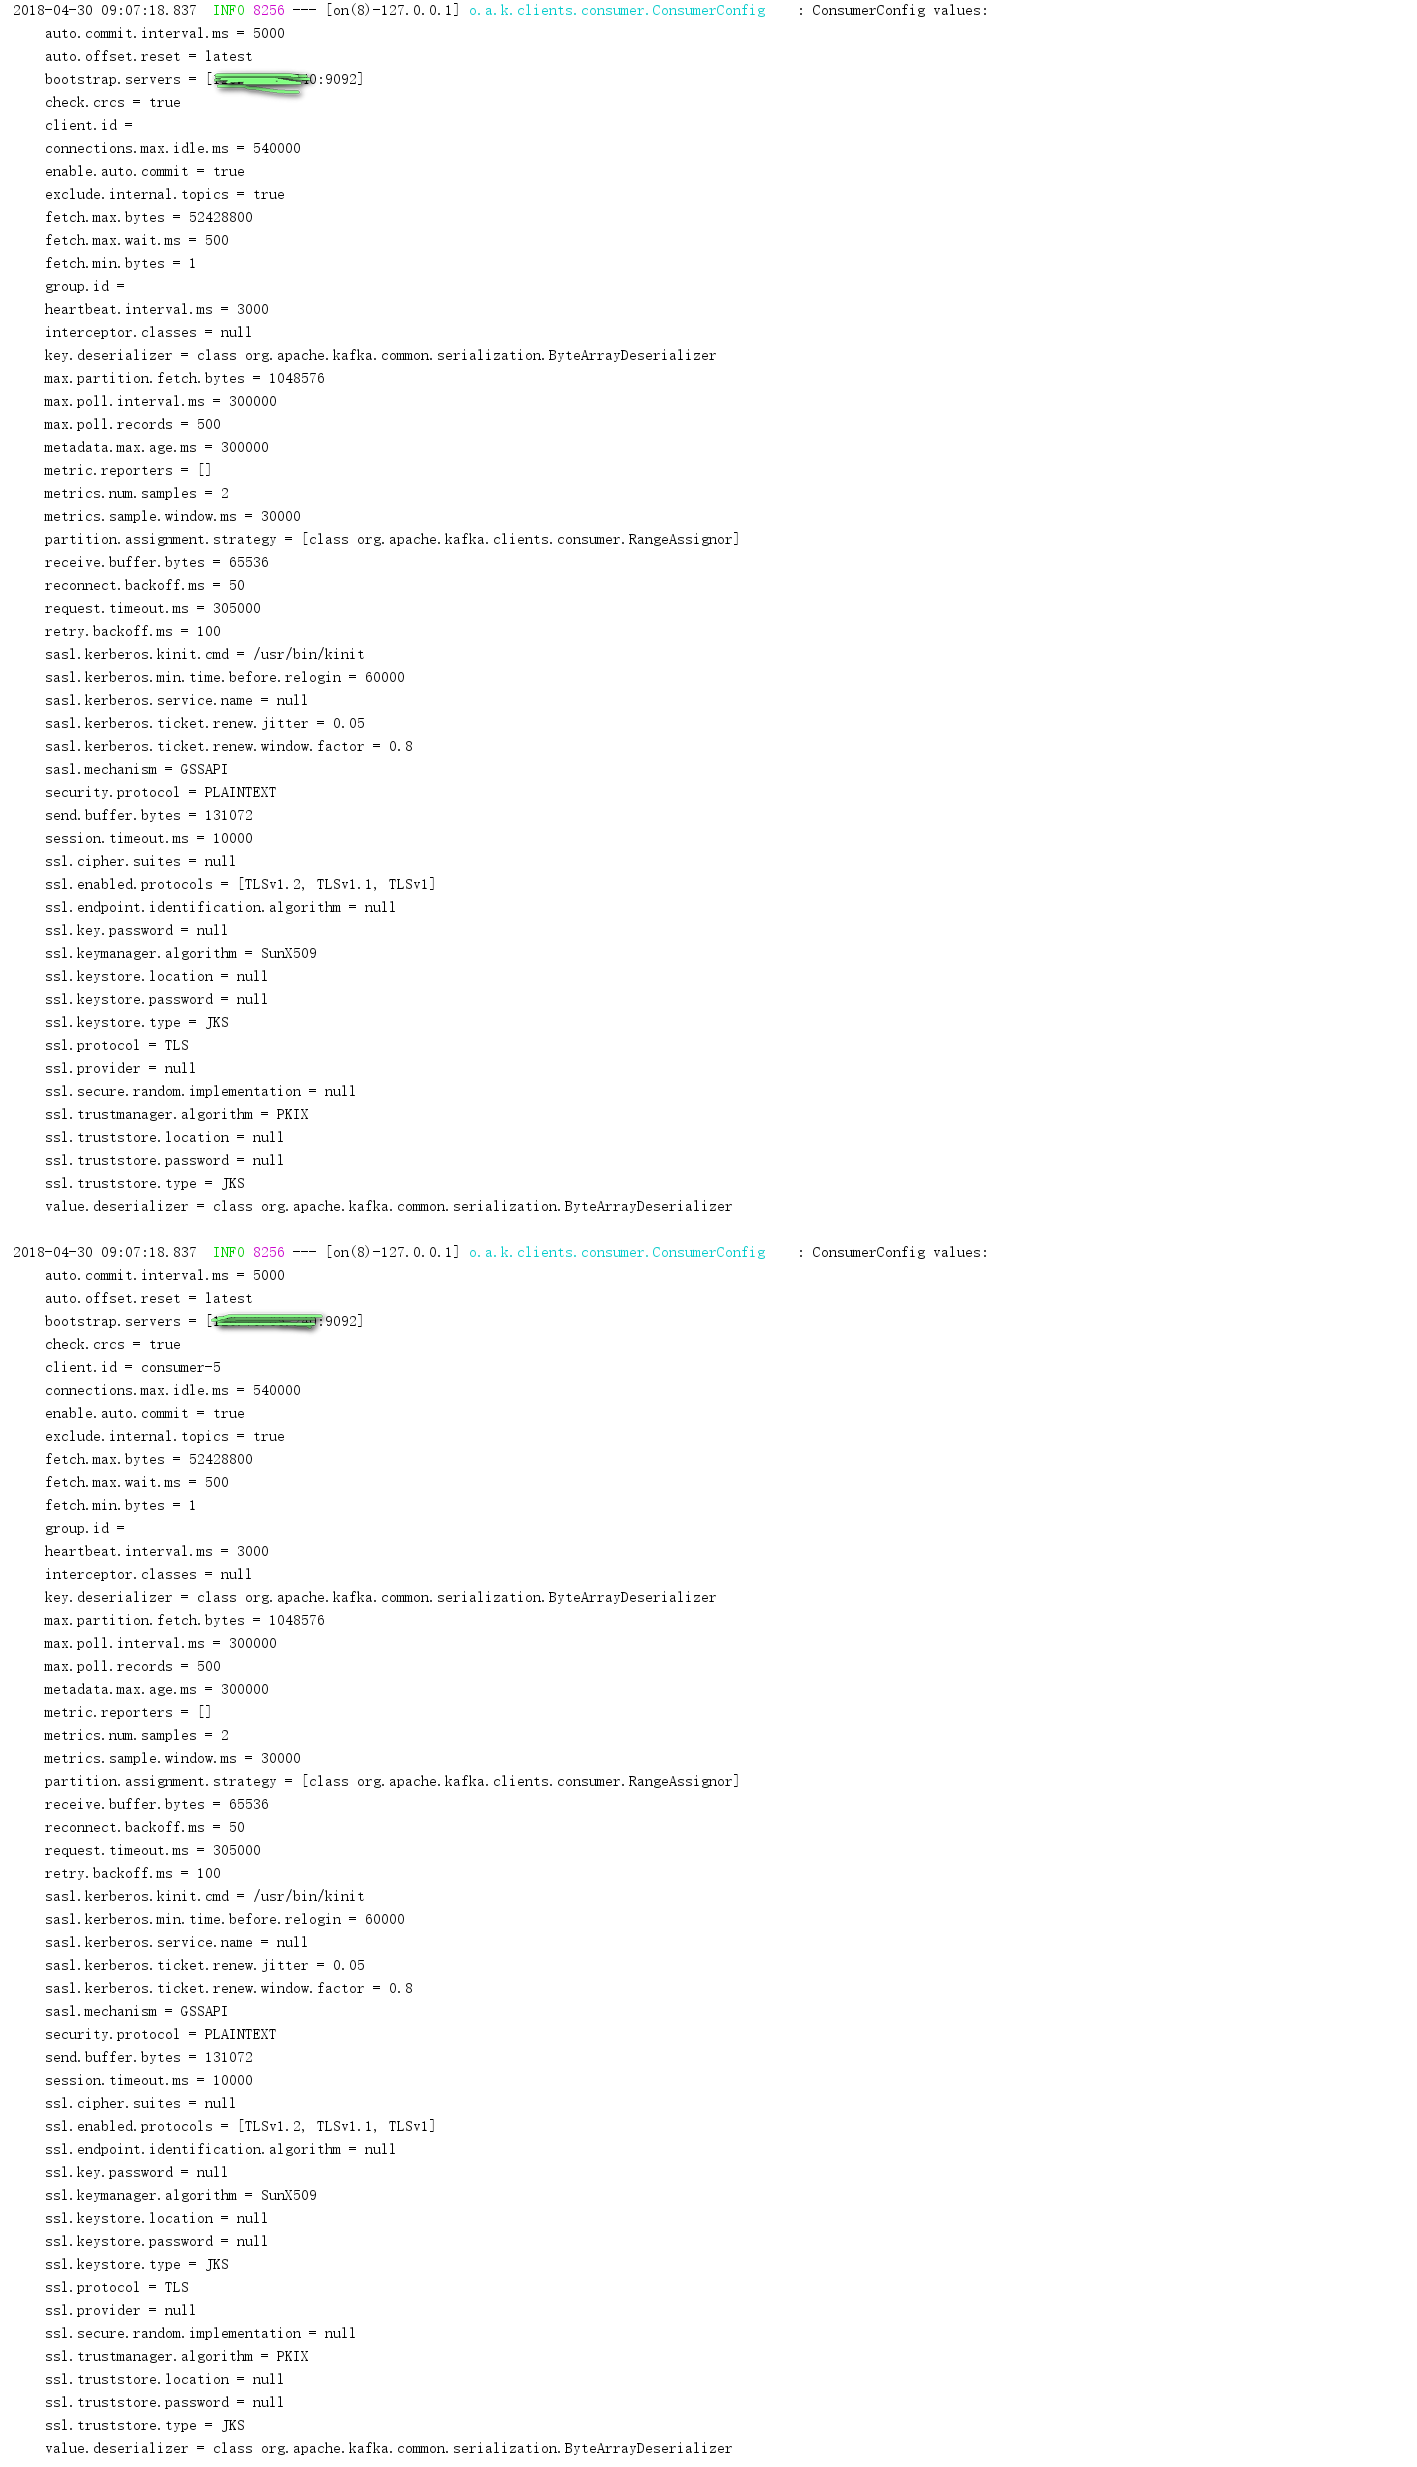
SpringCloud Stream消息驅動模塊(使用kafka)
說明 之前我們使用的是RabbitMQ與Stream的結合完成消息驅動模塊,這次使用Kafka與Stream。 目標 本文的目的在于結合Kafka與Stream來處理消息通信,采取自定義編寫Sink(input)和Source(output)來設置多通道消息和消費組、消費分區等操作實現基本的消息驅動的微服務架構。 快速開始 環境:服務器端java 1.8、kafka 0.10.1.1、zookee...
SpringCloud Stream 入門及進階使用
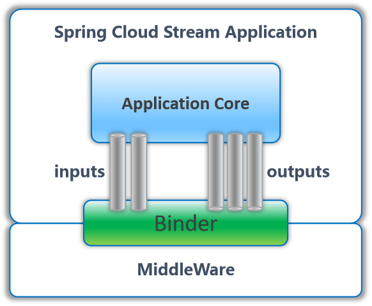
1、什么是SpringCloud Stream Spring Cloud Stream是一個用于構建消息驅動的微服務應用程序的框架,它使用 Spring Integration 可以與多個消息代理建立連接,例如kafka、rabbitMQ等消息中間件。應用程序通過 Spring Cloud Stream 注入 input 和 output 通道,然后通道通過指定綁定抽象 Binder 實現與消息代...
SpringCloud學習之(十五)SpringCloud Stream消息驅動
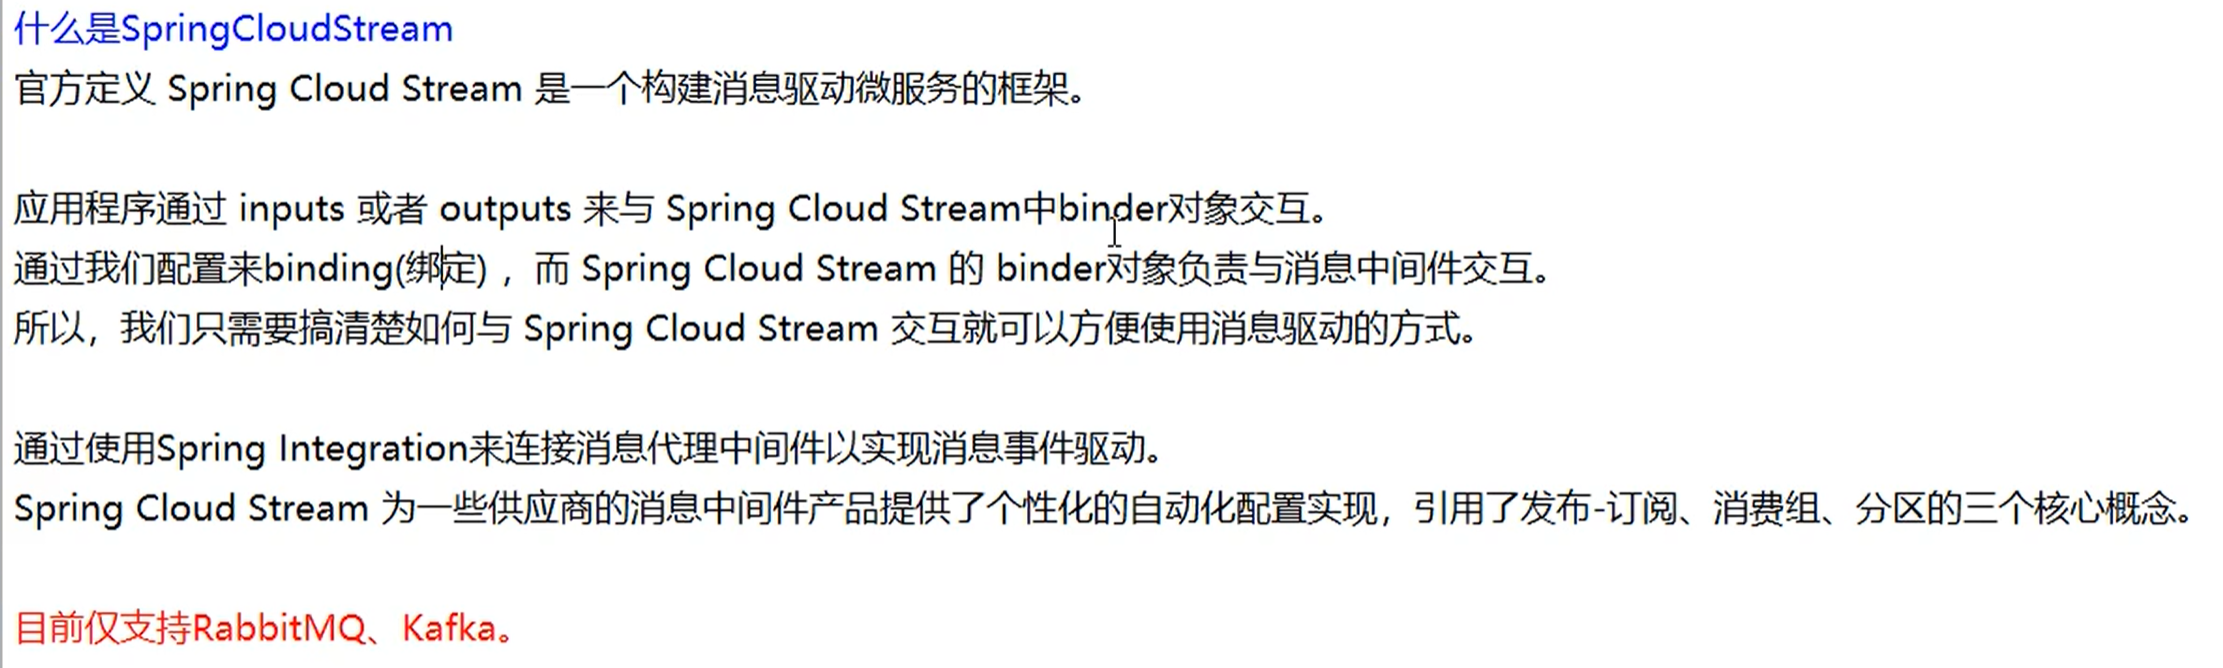
文章目錄 (十五)SpringCloud Stream消息驅動 1、消息驅動概述 1.1 什么是SpringCloudStream 1.2 設計思想 1.2.1 標準的MQ 1.2.2 為什么用Cloud Stream 1.2.3 stream憑什么可以統一底層差異 1.2.4 Binder 1.2.5 Stream中的消息通信方式遵循了發布-訂閱模式 1.3 Spring Cloud Strea...
SpringCloud框架學習筆記(九)-- stream消息驅動
消息驅動概述: 是什么: 屏蔽底層消息中間件的差異,降低切換成本,統一消息的編程模型 標準mq: 生產者/消費者之間靠消息媒介傳遞信息內容:message 消息必須走特定的通道:消息通道messageChannel 消息通道例的消息如何倍消費呢,誰負責收發處理:消息通道MessageChannel的子接口SubscribableChannel,由messageHandler消息處理器所訂閱 為什么...

猜你喜歡

freemarker + ItextRender 根據模板生成PDF文件
1. 制作模板 2. 獲取模板,并將所獲取的數據加載生成html文件 2. 生成PDF文件 其中由兩個地方需要注意,都是關于獲取文件路徑的問題,由于項目部署的時候是打包成jar包形式,所以在開發過程中時直接安照傳統的獲取方法沒有一點文件,但是當打包后部署,總是出錯。于是參考網上文章,先將文件讀出來到項目的臨時目錄下,然后再按正常方式加載該臨時文件; 還有一個問題至今沒有解決,就是關于生成PDF文件...
電腦空間不夠了?教你一個小秒招快速清理 Docker 占用的磁盤空間!
Docker 很占用空間,每當我們運行容器、拉取鏡像、部署應用、構建自己的鏡像時,我們的磁盤空間會被大量占用。 如果你也被這個問題所困擾,咱們就一起看一下 Docker 是如何使用磁盤空間的,以及如何回收。 docker 占用的空間可以通過下面的命令查看: TYPE 列出了docker 使用磁盤的 4 種類型: Images:所有鏡像占用的空間,包括拉取下來的鏡像,和本地構建的。 Con...

requests實現全自動PPT模板
http://www.1ppt.com/moban/ 可以免費的下載PPT模板,當然如果要人工一個個下,還是挺麻煩的,我們可以利用requests輕松下載 訪問這個主頁,我們可以看到下面的樣式 點每一個PPT模板的圖片,我們可以進入到詳細的信息頁面,翻到下面,我們可以看到對應的下載地址 點擊這個下載的按鈕,我們便可以下載對應的PPT壓縮包 那我們就開始做吧 首先,查看網頁的源代碼,我們可以看到每一...


Linux C系統編程-線程互斥鎖(四)
互斥鎖 互斥鎖也是屬于線程之間處理同步互斥方式,有上鎖/解鎖兩種狀態。 互斥鎖函數接口 1)初始化互斥鎖 pthread_mutex_init() man 3 pthread_mutex_init (找不到的情況下首先 sudo apt-get install glibc-doc sudo apt-get install manpages-posix-dev) 動態初始化 int pthread_...