Android SQlite數據庫使用詳解
標簽: Android # Android基礎
概述
SQLite 一個非常流行的嵌入式數據庫,它支持 SQL 語言,并且只利用很少的內存就有很好的性能。此外它還是開源的,任何人都可以使用它。
查看模擬器數據庫傳送門:Android Studio查看SQLite數據庫方法大全
SQLite使用
SQLite數據庫創建
Android提供了一個SQLiteOpenHelper幫助類,用于對數據庫進行創建和升級
SQLiteOpenHelper是一個抽象類,使用時需要創建自己的類去繼承它。
SQLiteOpenHelper有兩個抽象方法onCreate()和onUpgrade(),必須在自己的類中重寫這兩個方法,然后分別在這兩個方法中實現創建和升級數據庫的邏輯。
public class DBOpenHelper extends SQLiteOpenHelper {
    public DBOpenHelper(@Nullable Context context, @Nullable String name, @Nullable SQLiteDatabase.CursorFactory factory, int version) {
        super(context, name, factory, version);
    }

    @Override
    public void onCreate(SQLiteDatabase db) {
        //創建數據庫sql語句并執行
        String sql="create table user(id integer primary key autoincrement,username varchar(20),password varchar(20),age integer)";
        db.execSQL(sql);

    }

    @Override
    public void onUpgrade(SQLiteDatabase db, int oldVersion, int newVersion) {

    }
}
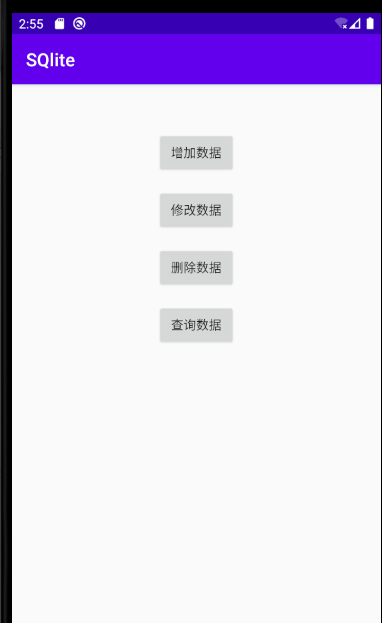
增加數據
public long insert(String table, String nullColumnHack, ContentValues values) ;
方法參數:
| table | 表名 |
|---|---|
| nullColumnHack | 可選參數,當values參數為空時,指定哪個字段設置為null,如果values不為空,則該參數值可以為空 |
| values | 指定具體的字段,相當于map集合,鍵值對的形式存儲 |
| 返回值 | 返回插入成功的行數,如果為-1表示失敗 |
實例:
SQLiteOpenHelper中還有兩個非常重要的實例方法: getReadableDatabase()和 getWritableDatabase()。
這兩個方法都可以創建或打開一個現有的數據庫(如果數據庫已存在則直接打開,否則創建一個新的數據庫),并返回一個可對數據庫進行讀寫操作的對象。
不同的是,當數據庫不可寫入的時候(如磁盤空間已滿),
getReadableDatabase()方法返回的對象將以只讀的方式去打開數據庫
getWritableDatabase()方法則將出現異常
 DBOpenHelper dbsqLiteOpenHelper = new DBOpenHelper(MainActivity.this,"users.db",null,1);
 SQLiteDatabase db = dbsqLiteOpenHelper.getWritableDatabase();
//創建存放數據的ContentValues對象
ContentValues values = new ContentValues();
values.put("username","test");
values.put("password","123456");
values.put("age",20);
//數據庫執行插入命令
db.insert("user", null, values);
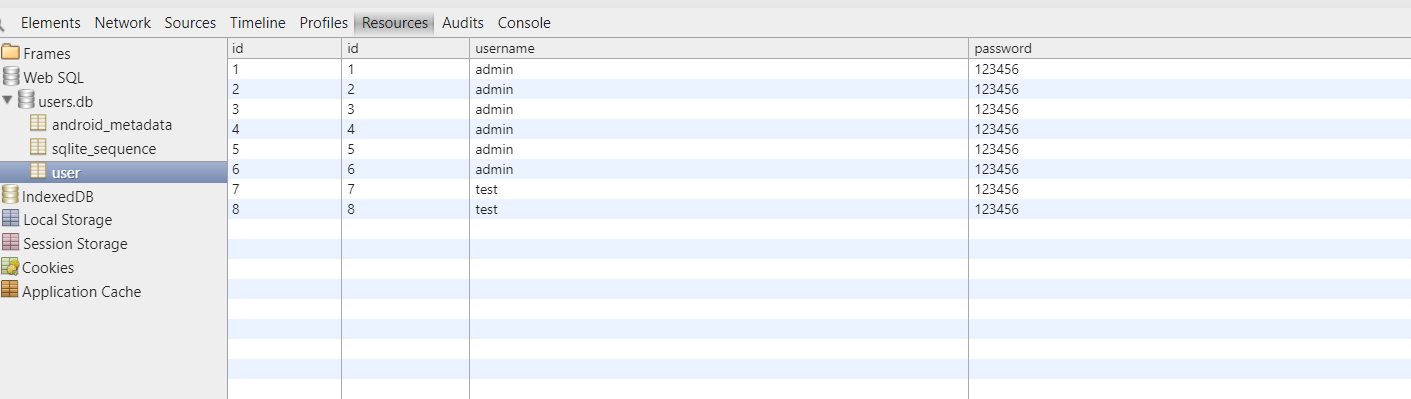
添加之前一共7條數據
點擊添加按鈕刷新后多了一條數據

刪除數據
public int delete(String table, String whereClause, String[] whereArgs)
| table | 表名 |
|---|---|
| whereClause | 查詢條件 |
| whereArgs | 指定條件語句,可以使用占位符? |
| whereArgs | 當表達式中含有占位符,改參數用戶指定各占位符參數的值 |
| 返回值 | 刪除成功的行數 |
使用方法:
 DBOpenHelper dbsqLiteOpenHelper = new DBOpenHelper(MainActivity.this,"users.db",null,1);
 SQLiteDatabase db = dbsqLiteOpenHelper.getWritableDatabase();
db.delete("user", "username=?", new String[]{"test"});
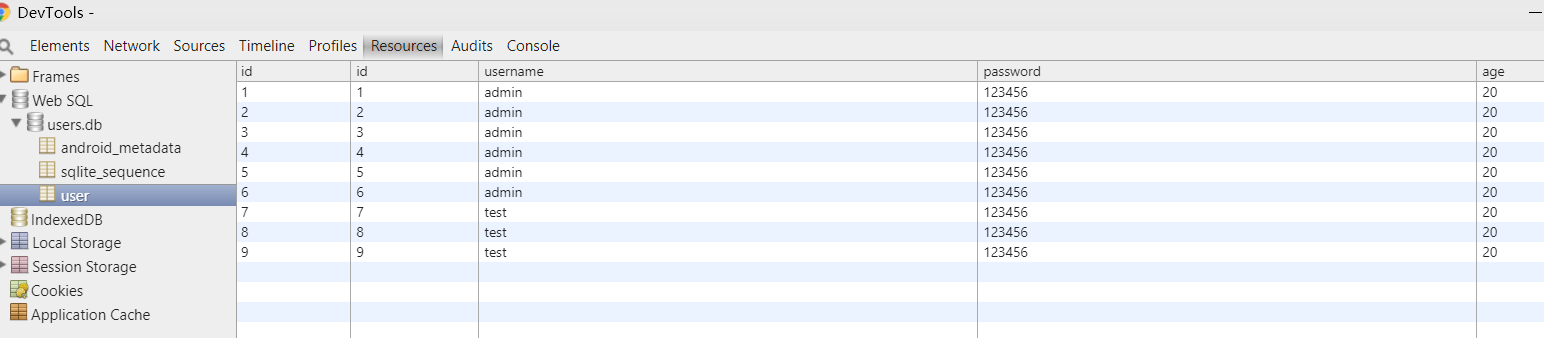
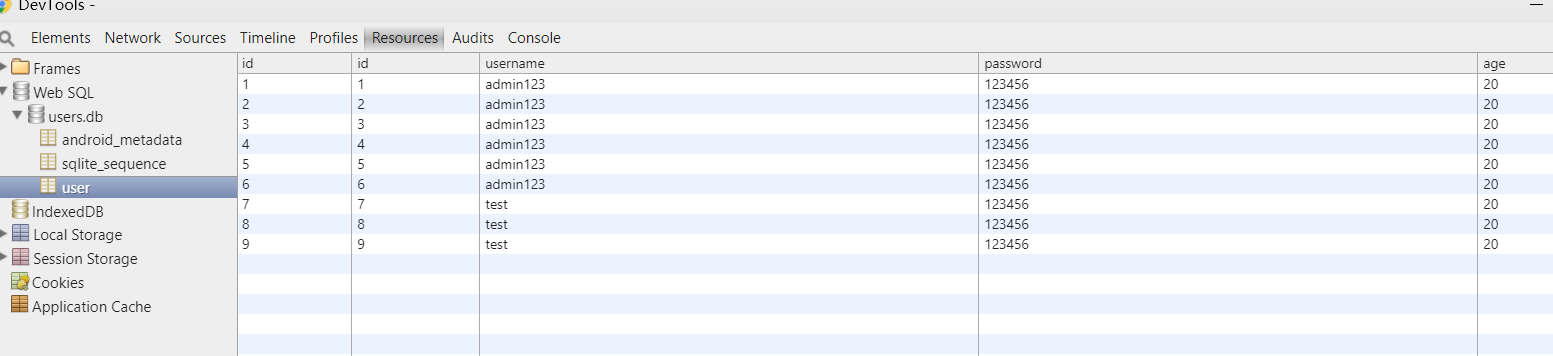
我們可以看到刪除數據之前表里一共有9條數據

點擊刪除刷新后一共只剩6條數據了,成功刪除3條數據
更新數據
public int update(String table, ContentValues values, String whereClause, String[] whereArgs)
方法參數:
| table | 表名 |
|---|---|
| values | 指定要更新的字段及對應的字段值 |
| whereClause | 指定條件語句,可以使用占位符? |
| whereArgs | 當表達式中含有占位符,改參數用戶指定各占位符參數的值 |
| 返回值 | 返回影響的數據條數 |
使用示例:
DBOpenHelper dbsqLiteOpenHelper = new DBOpenHelper(MainActivity.this,"users.db",null,1);
SQLiteDatabase db = dbsqLiteOpenHelper.getWritableDatabase();
ContentValues values2 = new ContentValues();
values2.put("username", "admin123");
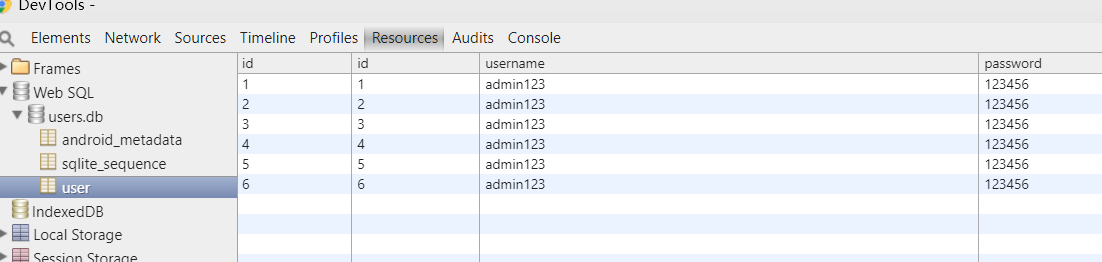
db.update("user", values2, "username=?", new String[]{"admin"});
點擊修改按鈕后再刷新數據
查詢數據
 public Cursor query(String table, String[] columns, String selection,String[]
 selectionArgs, String groupBy, String having, String orderBy)
參數詳解:
| table | 表名 |
|---|---|
| columns | 指定要查詢的列,如果為空,返回所有 |
| selection | 查詢條件 ,可以用占位符? |
| selectionArgs | where對應的條件值 |
| groupBy | 指定分組方式 |
| having | 指定having條件 |
| orderBy | 排序方式 |
使用示例:
 DBOpenHelper dbsqLiteOpenHelper = new DBOpenHelper(MainActivity.this,"users.db",null,1);
 SQLiteDatabase db = dbsqLiteOpenHelper.getWritableDatabase();
  //創建游標對象
Cursor cursor = db.query("user", new String[]{"id","username","age"}, "username=?",
 new String[]{"admin123"}, null, null, null);
//利用游標遍歷所有數據對象
while(cursor.moveToNext()){
    String id = cursor.getString(cursor.getColumnIndex("id"));
    String username = cursor.getString(cursor.getColumnIndex("username"));
    int age = cursor.getInt(cursor.getColumnIndex("age"));
    Log.i("Mainactivity","result: id="  + id +" username: " + username +"  age:" + age);
}
// 關閉游標,釋放資源
cursor.close();
我們可以看到數據庫表中的數據都被打印出來了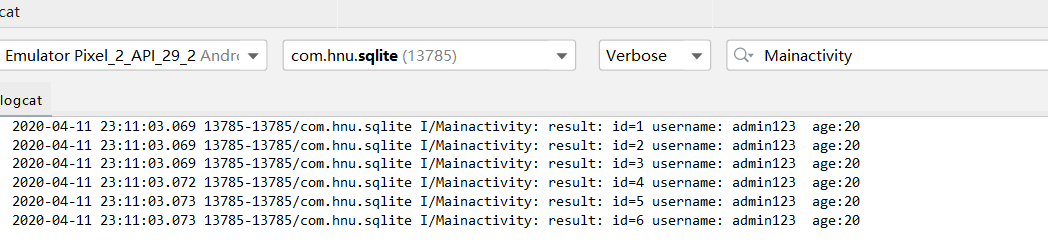
完整代碼
MainActivity.java
package com.hnu.sqlite;

import androidx.appcompat.app.AppCompatActivity;

import android.content.ContentValues;
import android.database.Cursor;
import android.database.sqlite.SQLiteDatabase;
import android.os.Bundle;
import android.util.Log;
import android.view.View;
import android.widget.Button;


import java.io.File;


public class MainActivity extends AppCompatActivity {

    @Override
    protected void onCreate(Bundle savedInstanceState) {
        super.onCreate(savedInstanceState);
        setContentView(R.layout.activity_main);


        DBOpenHelper dbsqLiteOpenHelper = new DBOpenHelper(MainActivity.this,"users.db",null,1);
        final SQLiteDatabase db = dbsqLiteOpenHelper.getWritableDatabase();

        Button button1 = findViewById(R.id.button2); //add
        button1.setOnClickListener(new View.OnClickListener() {
            @Override
            public void onClick(View v) {
                //創建存放數據的ContentValues對象
                ContentValues values = new ContentValues();
                values.put("username","test");
                values.put("password","123456");
                values.put("age",21);
                //數據庫執行插入命令
                db.insert("user", null, values);
            }
        });
        Button button2 = findViewById(R.id.button3); //刪
        button2.setOnClickListener(new View.OnClickListener() {
            @Override
            public void onClick(View v) {
                db.delete("user", "username=?", new String[]{"test"});
            }
        });
        Button button3= findViewById(R.id.button4); //改
        button3.setOnClickListener(new View.OnClickListener() {
            @Override
            public void onClick(View v) {
                ContentValues values2 = new ContentValues();
                values2.put("username", "admin123");
                db.update("user", values2, "username=?", new String[]{"admin"});
            }
        });
        Button button4 = findViewById(R.id.button5); //查
        button4.setOnClickListener(new View.OnClickListener() {
            @Override
            public void onClick(View v) {
                //創建游標對象
                Cursor cursor = db.query("user", new String[]{"id","username","age"}, "username=?or age =?", new String[]{"test","20"}, null, null, null);
                //利用游標遍歷所有數據對象
                while(cursor.moveToNext()){
                    String id = cursor.getString(cursor.getColumnIndex("id"));
                    String username = cursor.getString(cursor.getColumnIndex("username"));
                    int age = cursor.getInt(cursor.getColumnIndex("age"));
                    Log.i("Mainactivity","result: id="  + id +" username: " + username +"  age:" + age);
                }
                // 關閉游標,釋放資源
                cursor.close();
            }
        });
    }
}
DBOpenHelper .java
package com.hnu.sqlite;

import android.content.Context;
import android.database.sqlite.SQLiteDatabase;
import android.database.sqlite.SQLiteOpenHelper;

import androidx.annotation.Nullable;

public class DBOpenHelper extends SQLiteOpenHelper {
    public DBOpenHelper(@Nullable Context context, @Nullable String name, @Nullable SQLiteDatabase.CursorFactory factory, int version) {
        super(context, name, factory, version);
    }

    @Override
    public void onCreate(SQLiteDatabase db) {
        //創建數據庫sql語句并執行
        String sql="create table user(id integer primary key autoincrement,username varchar(20),password varchar(20),age integer)";
        db.execSQL(sql);

    }

    @Override
    public void onUpgrade(SQLiteDatabase db, int oldVersion, int newVersion) {

    }
}
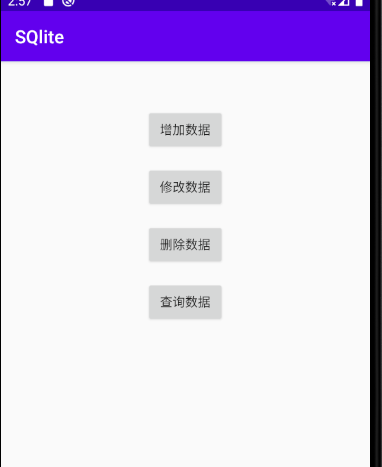
布局文件activity_main.xml
<?xml version="1.0" encoding="utf-8"?>
<androidx.constraintlayout.widget.ConstraintLayout xmlns:android="http://schemas.android.com/apk/res/android"
    xmlns:app="http://schemas.android.com/apk/res-auto"
    xmlns:tools="http://schemas.android.com/tools"
    android:layout_width="match_parent"
    android:layout_height="match_parent"
    tools:context=".MainActivity">
    <Button
        android:id="@+id/button2"
        android:layout_width="wrap_content"
        android:layout_height="wrap_content"
        android:layout_marginTop="52dp"
        android:text="增加數據"
        app:layout_constraintLeft_toLeftOf="parent"
        app:layout_constraintRight_toRightOf="parent"
        app:layout_constraintTop_toTopOf="parent" />


    <Button
        android:id="@+id/button4"
        android:layout_width="wrap_content"
        android:layout_height="wrap_content"
        android:layout_marginTop="16dp"
        android:text="修改數據"
        app:layout_constraintEnd_toEndOf="@+id/button2"
        app:layout_constraintStart_toStartOf="@+id/button2"
        app:layout_constraintTop_toBottomOf="@+id/button2" />


    <Button
        android:id="@+id/button3"
        android:layout_width="wrap_content"
        android:layout_height="wrap_content"
        android:layout_marginTop="16dp"
        android:text="刪除數據"
        app:layout_constraintEnd_toEndOf="@+id/button4"
        app:layout_constraintHorizontal_bias="0.0"
        app:layout_constraintStart_toStartOf="@+id/button4"
        app:layout_constraintTop_toBottomOf="@+id/button4" />

    <Button
        android:id="@+id/button5"
        android:layout_width="wrap_content"
        android:layout_height="wrap_content"
        android:layout_marginTop="16dp"
        android:text="查詢數據"
        app:layout_constraintEnd_toEndOf="@+id/button3"
        app:layout_constraintStart_toStartOf="@+id/button3"
        app:layout_constraintTop_toBottomOf="@+id/button3" />

</androidx.constraintlayout.widget.ConstraintLayout>
智能推薦
Android中使用LitePal操控SQLite數據庫
《第一行代碼》讀書手札 (一)什么是LitePal數據庫 LitePal數據庫是安卓的一個開源庫,我們在以后的開發中,將會遇到許許多多的開源庫,感謝開源社 區;因為開源社區的存在,一些我們需要的功能,不再需要我們從頭開始寫,我們就可以直接使用; (二)配置LitePal 由于LitePal是開源的第三方庫。但是,我們的JDK開發包中,并沒有內置這些第三方包,所有,我們 需要配置一下; 在Andro...
android中sqlite數據庫的使用
用一個Demo程序完成sqlite數據庫的增刪查改。 創建數據庫和表 android中使用SQLiteDatabase需要先實現SQLiteOpenHelper類: onCreate只在數據庫被創建時調用,可以在里面創建我們想要的數據庫;sqLiteDatabase.execSQL就是使用SQL語法執行數據庫操作,這里是創建一個表,列名稱為id,name,author,pages和price。每列...
Android開發學習---SQLite 數據庫的使用
一.創建數據庫 1.創建MyDatabaseHelper 類繼承SQLiteOpenHelper幫助類,借助這個類就可以對數據庫進行創建和升級。 2.SQLiteOpenHelper 是一個抽象類,必須繼承才能使用。 3.SQLiteOpenHelper 中有兩個抽象方法,分別是onCreate()和 onUpgrade(),我們必須在自己的幫助類里面重寫這兩個方法,然后分別在這兩個方法中去實現創...
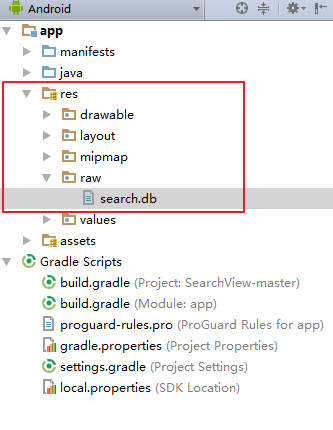
Android使用已有sqlite數據庫——內部存儲
——熱愛開源,樂于分享 Android使用已有sqlite數據庫——內部存儲 上一篇介紹了如何在手機sd卡上使用已有的sqlite數據庫,但是如果手機沒有sd卡這個外部存儲,則怎么實現呢?今天講述使用Android手機內部存儲使用已有的sqlite數據庫。 一、拷貝數據庫文件到當前工程 拷貝到res/raw下: 二、代碼: 這是我在利用Android...

Android 高效的SQLite型數據庫greenDAO使用
Android 高效的SQLite型數據庫greenDAO使用 使用: 在你project項目的build.gradle配置如下: buildscript { repositories { mavenCentral() } dependencies { classpath ‘org.greenrobot:greendao-gradle-plugin:3.2.2’ } } /...
猜你喜歡


freemarker + ItextRender 根據模板生成PDF文件
1. 制作模板 2. 獲取模板,并將所獲取的數據加載生成html文件 2. 生成PDF文件 其中由兩個地方需要注意,都是關于獲取文件路徑的問題,由于項目部署的時候是打包成jar包形式,所以在開發過程中時直接安照傳統的獲取方法沒有一點文件,但是當打包后部署,總是出錯。于是參考網上文章,先將文件讀出來到項目的臨時目錄下,然后再按正常方式加載該臨時文件; 還有一個問題至今沒有解決,就是關于生成PDF文件...
電腦空間不夠了?教你一個小秒招快速清理 Docker 占用的磁盤空間!
Docker 很占用空間,每當我們運行容器、拉取鏡像、部署應用、構建自己的鏡像時,我們的磁盤空間會被大量占用。 如果你也被這個問題所困擾,咱們就一起看一下 Docker 是如何使用磁盤空間的,以及如何回收。 docker 占用的空間可以通過下面的命令查看: TYPE 列出了docker 使用磁盤的 4 種類型: Images:所有鏡像占用的空間,包括拉取下來的鏡像,和本地構建的。 Con...

requests實現全自動PPT模板
http://www.1ppt.com/moban/ 可以免費的下載PPT模板,當然如果要人工一個個下,還是挺麻煩的,我們可以利用requests輕松下載 訪問這個主頁,我們可以看到下面的樣式 點每一個PPT模板的圖片,我們可以進入到詳細的信息頁面,翻到下面,我們可以看到對應的下載地址 點擊這個下載的按鈕,我們便可以下載對應的PPT壓縮包 那我們就開始做吧 首先,查看網頁的源代碼,我們可以看到每一...
