Android-0.LayoutInflater簡介
文章目錄
簡介
LayoutInflater.inflate()的作用類似于findViewById()
不同點是:
LayoutInflater.inflate()用于查找res/layout/下的xml布局文件,并且實例化。findViewById()是找xml布局文件下的具體widget控件(如Button)。
對于一個沒有被載入或者想要動態載入的界面,都需要使用LayoutInflater.inflater()來載入.
獲取LayoutInflater實例的三種方式:
- 調用
Activity的getLayoutInflater()
LayoutInflater inflater = getLayoutInflater();
LayoutInflater inflater = LayoutInflater.from(context);LayoutInflater inflater = LayoutInflater)context.getSystemService(Context.LAYOUT_INFLATER_SERVICE);
其實,這三種方式本質上是一樣的,從源碼中可以看出:
Activity.java:
    public LayoutInflater getLayoutInflater() {
        return getWindow().getLayoutInflater();
    }

     mWindow = new PhoneWindow(this, window, activityConfigCallback);
   --->
 PhoneWindow.java:
     public PhoneWindow(Context context) {
        super(context);
        mLayoutInflater = LayoutInflater.from(context);
    }
   --->
LayoutInflater .java:
	    public static LayoutInflater from(Context context) {
        LayoutInflater LayoutInflater =
                (LayoutInflater) context.getSystemService(Context.LAYOUT_INFLATER_SERVICE);
        if (LayoutInflater == null) {
            throw new AssertionError("LayoutInflater not found.");
        }
        return LayoutInflater;
    }
結論:這三種方法的本質都是調用
Context.getSystemService(Context.LAYOUT_INFLATER_SERVICE)這個方法。
inflate方法
三個參數的inflate方法
public View inflate(@LayoutRes int resource, @Nullable ViewGroup root, boolean attachToRoot)
1. root不為null,attachToRoot為true
當root不為null,attachToRoot為true時,表示將resource指定的布局添加到root中,添加的過程中resource所指定的布局的根節點的各個屬性都是有效的。
例如:
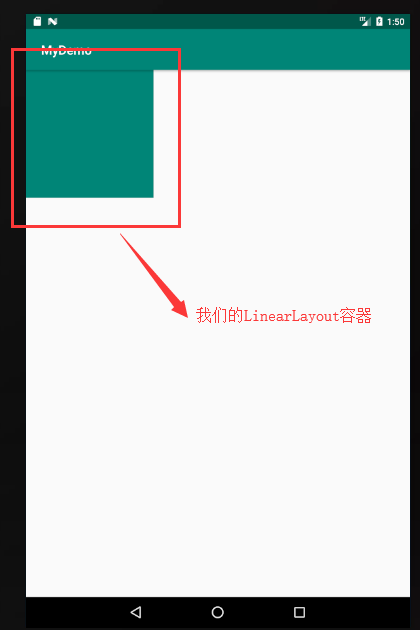
activity_main.xml如下:
<?xml version="1.0" encoding="utf-8"?>
<RelativeLayout xmlns:android="http://schemas.android.com/apk/res/android"
    android:layout_width="match_parent"
    android:layout_height="match_parent">

    <LinearLayout
        android:id="@+id/sub_linearLayout"
        android:layout_width="200dp"
        android:layout_height="200dp"
        android:orientation="vertical"
        android:background="@color/colorPrimary"
        />
</RelativeLayout>
對應的預覽圖如下:
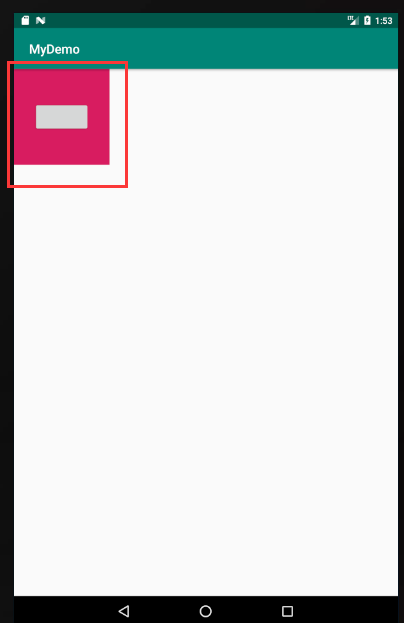
sub_linearlayout.xml如下:
<?xml version="1.0" encoding="utf-8"?>
<LinearLayout xmlns:android="http://schemas.android.com/apk/res/android"
    android:layout_width="150dp"
    android:layout_height="150dp"
    android:background="@color/colorAccent"
    android:gravity="center"
    android:orientation="vertical">

    <Button
        android:layout_width="wrap_content"
        android:layout_height="wrap_content" />
</LinearLayout>
對應的預覽圖如下:
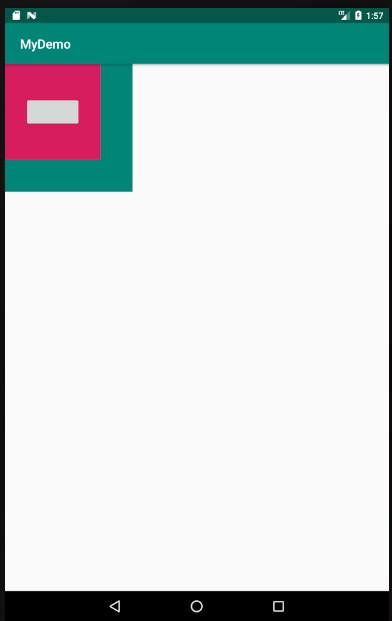
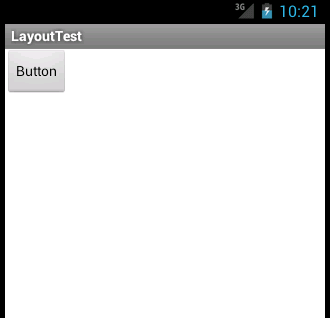
我們將sub_linearlayout.xml附加到activity_main.xml的sub_linearLayout控件中,以sub_linearLayout控件為root:
    protected void onCreate(Bundle savedInstanceState) {
        super.onCreate(savedInstanceState);
        setContentView(R.layout.activity_main);

        LinearLayout root = (LinearLayout) findViewById(R.id.sub_linearLayout);
        LayoutInflater inflater = LayoutInflater.from(this);
        inflater.inflate(R.layout.sub_linearlayout, root, true);
    }
最終效果圖如下:
如果多寫一行代碼,如下:
    protected void onCreate(Bundle savedInstanceState) {
        super.onCreate(savedInstanceState);
        setContentView(R.layout.activity_main);

        LinearLayout root = (LinearLayout) findViewById(R.id.sub_linearLayout);
        LayoutInflater inflater = LayoutInflater.from(this);
        View v = inflater.inflate(R.layout.sub_linearlayout, root, true);
        root.addView(v);	// 多寫這一行代碼
    }
再運行,系統會拋如下異常:
java.lang.IllegalStateException: The specified child already has a parent. You must call removeView() on the child's parent first.
原因就是因為當attachToRoot為true時,會自動將第一個參數所指定的View添加到第二個參數所指定的root中。
2. root不為null,attachToRoot為false
當root不為null,而attachToRoot為false的話,表示不將第一個參數所指定的View添加到root中,
那么有的小伙伴可能就有疑問了,既然不添加到root中,我第二個參數直接給null不就可以了?
其實不然,這里涉及到另外一個問題:我們給控件所指定的layout_width和layout_height到底是什么意思?
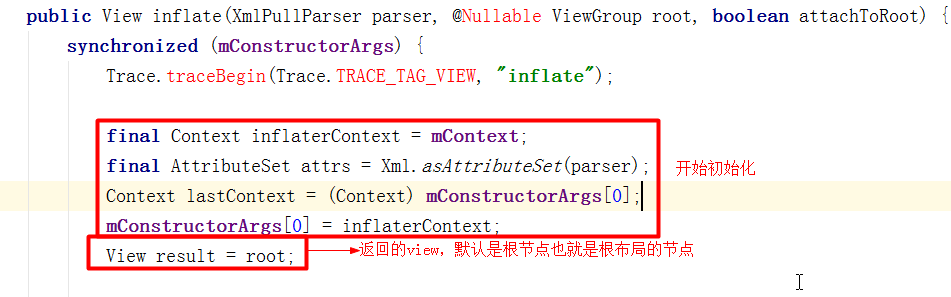
該屬性表示一個控件在容器中的大小,就是說這個控件必須在容器中,這個屬性才有意義,否則無意義,從源碼中也可以看出:
                    if (root != null) {
                        if (DEBUG) {
                            System.out.println("Creating params from root: " +
                                    root);
                        }
                        // Create layout params that match root, if supplied
                        params = root.generateLayoutParams(attrs);
                        if (!attachToRoot) {
                            // Set the layout params for temp if we are not
                            // attaching. (If we are, we use addView, below)
                            temp.setLayoutParams(params);
                        }
                    }
如果我想讓sub_linearlayout.xml的android:layout_width="150dp"和android:layout_height="150dp"屬性有效,又不想讓其處于某一個容器中,那我就可以設置root不為null,而attachToRoot為false。即root會協助sub_linearlayout.xml的根節點生成布局參數,只有這一個作用。如下所示:
    protected void onCreate(Bundle savedInstanceState) {
        super.onCreate(savedInstanceState);
        setContentView(R.layout.activity_main);

        LinearLayout root = (LinearLayout) findViewById(R.id.sub_linearLayout);
        LayoutInflater inflater = LayoutInflater.from(this);
        View v = inflater.inflate(R.layout.sub_linearlayout, root, false);
        root.addView(v);
    }
注意,這時需要使用root.addView(v)來主動把inflater加入到root容器中,顯示效果和上面一樣。
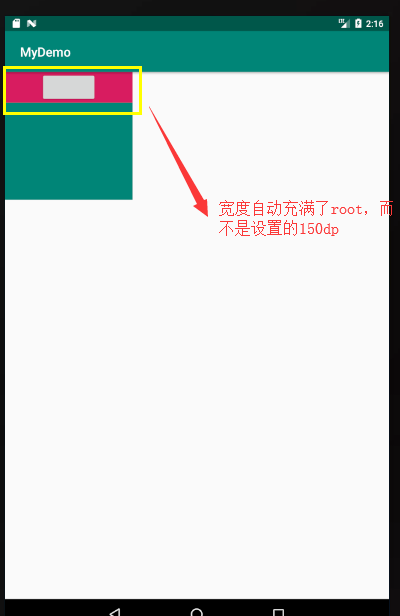
3. root為null,attachToRoot為false
前面也意味著如果我直接將sub_linearlayout.xml加載進來而不給它指定一個父布局root,則android:layout_width="150dp"和android:layout_height="150dp"屬性將會失效(因為這個時候sub_linearlayout.xml將不處于任何容器中,那么它的根節點的寬高自然會失效)。如下所示:
    protected void onCreate(Bundle savedInstanceState) {
        super.onCreate(savedInstanceState);
        setContentView(R.layout.activity_main);

        LinearLayout root = (LinearLayout) findViewById(R.id.sub_linearLayout);
        LayoutInflater inflater = LayoutInflater.from(this);
        View v = inflater.inflate(R.layout.sub_linearlayout, null, false);
        root.addView(v);
    }
最終效果圖如下:
二個參數的inflate方法
public View inflate(XmlPullParser parser, @Nullable ViewGroup root) {
        return inflate(parser, root, root != null);
    }
可以看出,它內部調用了三個參數的inflate方法:
root為null,等同于root為null,attachToRoot為false的三個參數的inflate方法。root不為null,等同于root不為null,attachToRoot為true的三個參數的inflate方法。
參考:
https://blog.csdn.net/biezhihua/article/details/43996289
https://blog.csdn.net/u012702547/article/details/52628453
智能推薦

Android探究之LayoutInflater setFactory
轉載自:http://blog.csdn.net/lmj623565791/article/details/51503977 1、概述 對于LayoutInflater setFactory,平時我們很少用到這個API,但是這個API我覺得還是有學習的必要的,能夠很多意象不到的問題,準備圍繞這方面編寫一系列的文章。 本篇包含: setFactory 相關API介紹 可能存在的問題 具體的解決方案及...
android 自定義view 前的基礎知識LayoutInflater layoutInflater = LayoutInflater.from(context);
一、首先學layoutInflater。 相信接觸Android久一點的朋友對于LayoutInflater一定不會陌生,都會知道它主要是用于加載布局的。而剛接觸Android的朋友可能對LayoutInflater不怎么熟悉,因為加載布局的任務通常都是在Activity中調用setContentView()方法來完成的。其實setContentView()方法的內部也是使用Layo...

Android動態加載布局之LayoutInflater【轉】
萬分感謝大佬:https://www.jianshu.com/p/6a235ba5ee17 深入了解View<一>之Android LayoutInfalter原理分析 下文為:LayoutInflater 簡述 LayoutInfalter主要是用來加載布局。對LayoutInfalter不怎么熟悉的,通常都是在Activity中調用setContentView()方法來完成的。其實...
Android LayoutInflater.inflate的原理
前言: 在界面的構建、自定義view和一些換膚的控件控件中都用到了LayoutInflater.inflate這個填充器或者代理了這個方法,很神奇,這個填充器類似一個打氣筒一樣將xml布局顯示出來。 正文: 我們打開LayoutInflater源碼看看發現inflate有好幾種方法, &n...
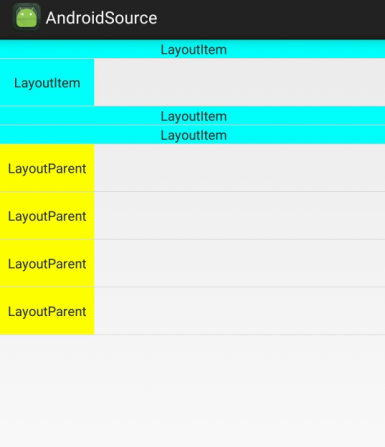
Android LayoutInflater開發中的用法
先看一下下面代碼運行結果 MainActivity activity_main.xml inflate_layout_item.xml inflate_layout_parent.xml InflateAdapter 運行結果 當打開上面viewList數組中任意一行注釋都會拋出異常(java.lang.UnsupportedOperationException: addView(View, La...
猜你喜歡


freemarker + ItextRender 根據模板生成PDF文件
1. 制作模板 2. 獲取模板,并將所獲取的數據加載生成html文件 2. 生成PDF文件 其中由兩個地方需要注意,都是關于獲取文件路徑的問題,由于項目部署的時候是打包成jar包形式,所以在開發過程中時直接安照傳統的獲取方法沒有一點文件,但是當打包后部署,總是出錯。于是參考網上文章,先將文件讀出來到項目的臨時目錄下,然后再按正常方式加載該臨時文件; 還有一個問題至今沒有解決,就是關于生成PDF文件...
電腦空間不夠了?教你一個小秒招快速清理 Docker 占用的磁盤空間!
Docker 很占用空間,每當我們運行容器、拉取鏡像、部署應用、構建自己的鏡像時,我們的磁盤空間會被大量占用。 如果你也被這個問題所困擾,咱們就一起看一下 Docker 是如何使用磁盤空間的,以及如何回收。 docker 占用的空間可以通過下面的命令查看: TYPE 列出了docker 使用磁盤的 4 種類型: Images:所有鏡像占用的空間,包括拉取下來的鏡像,和本地構建的。 Con...

requests實現全自動PPT模板
http://www.1ppt.com/moban/ 可以免費的下載PPT模板,當然如果要人工一個個下,還是挺麻煩的,我們可以利用requests輕松下載 訪問這個主頁,我們可以看到下面的樣式 點每一個PPT模板的圖片,我們可以進入到詳細的信息頁面,翻到下面,我們可以看到對應的下載地址 點擊這個下載的按鈕,我們便可以下載對應的PPT壓縮包 那我們就開始做吧 首先,查看網頁的源代碼,我們可以看到每一...
