Color Manipulation——顏色操作
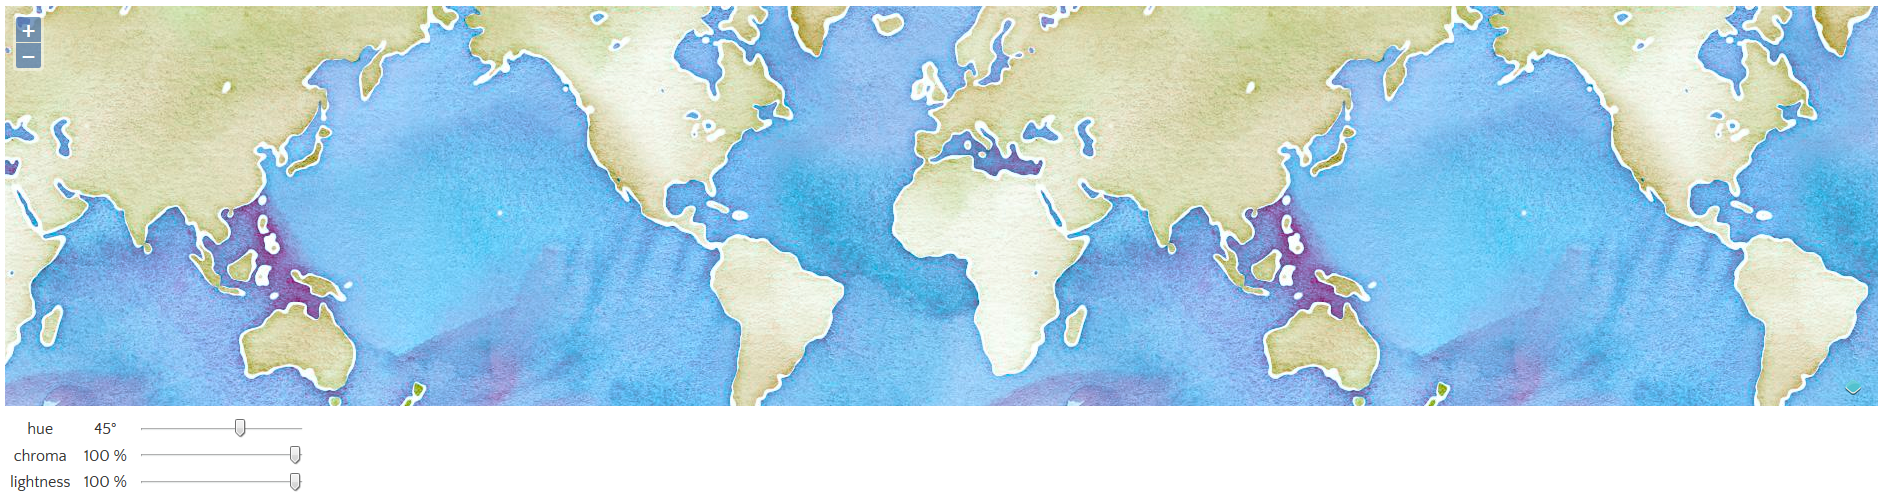
柵格數據源允許對像素值的任意操作。在這個例子中,輸入瓦片數據源的RGB值可以在用第二個柵格數據源渲染之前的逐像素操作中進行調整。柵格操作把RGB空間中的像素轉換為HCL顏色空間,基于上面的控件進行調整,然后把它們在渲染之前轉換回RGB空間進行渲染。
代碼:
<!DOCTYPE html>
<html>
  <head>
    <title>Color Manipulation</title>
    <link rel="stylesheet" href="https://openlayers.org/en/v4.2.0/css/ol.css" type="text/css">
    <!-- The line below is only needed for old environments like Internet Explorer and Android 4.x -->
    <script src="https://cdn.polyfill.io/v2/polyfill.min.js?features=requestAnimationFrame,Element.prototype.classList,URL"></script>
    <script src="https://openlayers.org/en/v4.2.0/build/ol.js"></script>
    <style>
      table.controls td {
        text-align: center;
        padding: 2px 5px;
        min-width: 60px;
      }
    </style>
  </head>
  <body>
    <div id="map" class="map"></div>
    <table class="controls">
      <tr>
        <td>hue</td>
        <td><span id="hueOut"></span>°</td>
        <td><input id="hue" type="range" min="-180" max="180" value="0"/></td>
      </tr>
      <tr>
        <td>chroma</td>
        <td><span id="chromaOut"></span> %</td>
        <td><input id="chroma" type="range" min="0" max="100" value="100"/></td>
      </tr>
      <tr>
        <td>lightness</td>
        <td><span id="lightnessOut"></span> %</td>
        <td><input id="lightness" type="range" min="0" max="100" value="100"/></td>
      </tr>
    </table>
    <script>
      /**
       * Color manipulation functions below are adapted from
      * https://github.com/d3/d3-color.
       * 下面的顏色操作函數源自https://github.com/d3/d3-color
      */
      var Xn = 0.950470;
      var Yn = 1;
      var Zn = 1.088830;
      var t0 = 4 / 29;
      var t1 = 6 / 29;
      var t2 = 3 * t1 * t1;
      var t3 = t1 * t1 * t1;
      var twoPi = 2 * Math.PI;


      /**
       * Convert an RGB pixel into an HCL pixel.
       * 轉換RGB像素為HCL像素
      * @param {Array.<number>} pixel A pixel in RGB space.
       * @return {Array.<number>} A pixel in HCL space.
       */
      function rgb2hcl(pixel) {
        var red = rgb2xyz(pixel[0]);
        var green = rgb2xyz(pixel[1]);
        var blue = rgb2xyz(pixel[2]);

        var x = xyz2lab(
            (0.4124564 * red + 0.3575761 * green + 0.1804375 * blue) / Xn);
        var y = xyz2lab(
            (0.2126729 * red + 0.7151522 * green + 0.0721750 * blue) / Yn);
        var z = xyz2lab(
            (0.0193339 * red + 0.1191920 * green + 0.9503041 * blue) / Zn);

        var l = 116 * y - 16;
        var a = 500 * (x - y);
        var b = 200 * (y - z);

        var c = Math.sqrt(a * a + b * b);
        var h = Math.atan2(b, a);
        if (h < 0) {
          h += twoPi;
        }

        pixel[0] = h;
        pixel[1] = c;
        pixel[2] = l;

        return pixel;
      }


      /**
       * Convert an HCL pixel into an RGB pixel.
       * 轉換HCL像素為RGB像素
       * @param {Array.<number>} pixel A pixel in HCL space.
       * @return {Array.<number>} A pixel in RGB space.
       */
      function hcl2rgb(pixel) {
        var h = pixel[0];
        var c = pixel[1];
        var l = pixel[2];

        var a = Math.cos(h) * c;
        var b = Math.sin(h) * c;

        var y = (l + 16) / 116;
        var x = isNaN(a) ? y : y + a / 500;
        var z = isNaN(b) ? y : y - b / 200;

        y = Yn * lab2xyz(y);
        x = Xn * lab2xyz(x);
        z = Zn * lab2xyz(z);

        pixel[0] = xyz2rgb(3.2404542 * x - 1.5371385 * y - 0.4985314 * z);
        pixel[1] = xyz2rgb(-0.9692660 * x + 1.8760108 * y + 0.0415560 * z);
        pixel[2] = xyz2rgb(0.0556434 * x - 0.2040259 * y + 1.0572252 * z);

        return pixel;
      }

      function xyz2lab(t) {
        return t > t3 ? Math.pow(t, 1 / 3) : t / t2 + t0;
      }

      function lab2xyz(t) {
        return t > t1 ? t * t * t : t2 * (t - t0);
      }

      function rgb2xyz(x) {
        return (x /= 255) <= 0.04045 ? x / 12.92 : Math.pow((x + 0.055) / 1.055, 2.4);
      }

      function xyz2rgb(x) {
        return 255 * (x <= 0.0031308 ?
            12.92 * x : 1.055 * Math.pow(x, 1 / 2.4) - 0.055);
      }

      var raster = new ol.source.Raster({
        sources: [new ol.source.Stamen({
          layer: 'watercolor'
        })],
        operation: function(pixels, data) {
          var hcl = rgb2hcl(pixels[0]);

          var h = hcl[0] + Math.PI * data.hue / 180;
          if (h < 0) {
            h += twoPi;
          } else if (h > twoPi) {
            h -= twoPi;
          }
          hcl[0] = h;

          hcl[1] *= (data.chroma / 100);
          hcl[2] *= (data.lightness / 100);

          return hcl2rgb(hcl);
        },
        lib: {
          rgb2hcl: rgb2hcl,
          hcl2rgb: hcl2rgb,
          rgb2xyz: rgb2xyz,
          lab2xyz: lab2xyz,
          xyz2lab: xyz2lab,
          xyz2rgb: xyz2rgb,
          Xn: Xn,
          Yn: Yn,
          Zn: Zn,
          t0: t0,
          t1: t1,
          t2: t2,
          t3: t3,
          twoPi: twoPi
        }
      });

      var controls = {};

      raster.on('beforeoperations', function(event) {
        var data = event.data;
        for (var id in controls) {
          data[id] = Number(controls[id].value);
        }
      });

      var map = new ol.Map({
        layers: [
          new ol.layer.Image({
            source: raster
          })
        ],
        target: 'map',
        view: new ol.View({
          center: [0, 2500000],
          zoom: 2,
          maxZoom: 18
        })
      });

      var controlIds = ['hue', 'chroma', 'lightness'];
      controlIds.forEach(function(id) {
        var control = document.getElementById(id);
        var output = document.getElementById(id + 'Out');
        control.addEventListener('input', function() {
          output.innerText = control.value;
          raster.changed();
        });
        output.innerText = control.value;
        controls[id] = control;
      });
    </script>
  </body>
</html>智能推薦
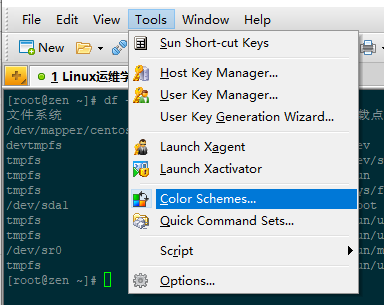
自定義Xshell顏色主題Color Schemes
xshell是一款強大的安全終端模擬軟件,支持SSH1, SSH2, 以及Microsoft Windows 平臺的TELNET 協議。現在推薦幾款不錯的xshell自定義顏色配色方案。 1.首先創建txt文件:scheme1.txt。編輯以下內容: 保存文件為:scheme1.xcs. 同樣的方式建立文件scheme2.xcs: 2.導入上述建立的文件 步驟:xshel tools -->...

react navigation back icon color設置導航返回按鈕顏色
自定義導航返回按鈕顏色,參考文檔找了半天沒解決,下面是我的比較笨的解決辦法,如果您有簡單的辦法麻煩評論告知一下。 版本信息 設置顏色方法 綠色部分是設置顏色的地方。 效果如下: 這樣的寫法略顯繁瑣,正在找簡單的實現辦法...

input光標使用caret-color改變顏色
本文轉載自:https://www.zhangxinxu.com/wordpress/2018/01/css-caret-color-first-line/ CSS caret-color屬性可以改變輸入框插入光標的顏色,同時又不改變輸入框里面的內容的顏色。 代碼為: caret-color屬性不僅對于原生的輸入表單控件有效,設置contenteditable的普通HTML標簽也適用。 兼容性 c...


freemarker + ItextRender 根據模板生成PDF文件
1. 制作模板 2. 獲取模板,并將所獲取的數據加載生成html文件 2. 生成PDF文件 其中由兩個地方需要注意,都是關于獲取文件路徑的問題,由于項目部署的時候是打包成jar包形式,所以在開發過程中時直接安照傳統的獲取方法沒有一點文件,但是當打包后部署,總是出錯。于是參考網上文章,先將文件讀出來到項目的臨時目錄下,然后再按正常方式加載該臨時文件; 還有一個問題至今沒有解決,就是關于生成PDF文件...
猜你喜歡
電腦空間不夠了?教你一個小秒招快速清理 Docker 占用的磁盤空間!
Docker 很占用空間,每當我們運行容器、拉取鏡像、部署應用、構建自己的鏡像時,我們的磁盤空間會被大量占用。 如果你也被這個問題所困擾,咱們就一起看一下 Docker 是如何使用磁盤空間的,以及如何回收。 docker 占用的空間可以通過下面的命令查看: TYPE 列出了docker 使用磁盤的 4 種類型: Images:所有鏡像占用的空間,包括拉取下來的鏡像,和本地構建的。 Con...

requests實現全自動PPT模板
http://www.1ppt.com/moban/ 可以免費的下載PPT模板,當然如果要人工一個個下,還是挺麻煩的,我們可以利用requests輕松下載 訪問這個主頁,我們可以看到下面的樣式 點每一個PPT模板的圖片,我們可以進入到詳細的信息頁面,翻到下面,我們可以看到對應的下載地址 點擊這個下載的按鈕,我們便可以下載對應的PPT壓縮包 那我們就開始做吧 首先,查看網頁的源代碼,我們可以看到每一...


Linux C系統編程-線程互斥鎖(四)
互斥鎖 互斥鎖也是屬于線程之間處理同步互斥方式,有上鎖/解鎖兩種狀態。 互斥鎖函數接口 1)初始化互斥鎖 pthread_mutex_init() man 3 pthread_mutex_init (找不到的情況下首先 sudo apt-get install glibc-doc sudo apt-get install manpages-posix-dev) 動態初始化 int pthread_...

統計學習方法 - 樸素貝葉斯
引入問題:一機器在良好狀態生產合格產品幾率是 90%,在故障狀態生產合格產品幾率是 30%,機器良好的概率是 75%。若一日第一件產品是合格品,那么此日機器良好的概率是多少。 貝葉斯模型 生成模型與判別模型 判別模型,即要判斷這個東西到底是哪一類,也就是要求y,那就用給定的x去預測。 生成模型,是要生成一個模型,那就是誰根據什么生成了模型,誰就是類別y,根據的內容就是x 以上述例子,判斷一個生產出...