01.夜鶯監控簡介及安裝
標簽: 運維
夜鶯監控系統介紹
夜鶯監控( Nightingale )是一款國產、開源云原生監控分析系統,采用 All-In-One 的設計,集數據采集、可視化、監控告警、數據分析于一體。于 2020 年 3 月 20 日,在 github 上發布 v1 版本,已累計迭代 60 多個版本。從 v5 版本開始與 Prometheus、VictoriaMetrics、Grafana、Telegraf、Datadog 等生態緊密協同集成,提供開箱即用的企業級監控分析和告警能力,已有眾多企業選擇將 Prometheus + AlertManager + Grafana 的組合方案升級為使用夜鶯監控。夜鶯監控,由滴滴開發和開源,并于 2022 年 5 月 11 日,捐贈予中國計算機學會開源發展委員會(CCF ODC),為 CCF ODC 成立后接受捐贈的第一個開源項目。夜鶯監控的核心開發團隊,也是Open-Falcon項目原核心研發人員。
產品介紹
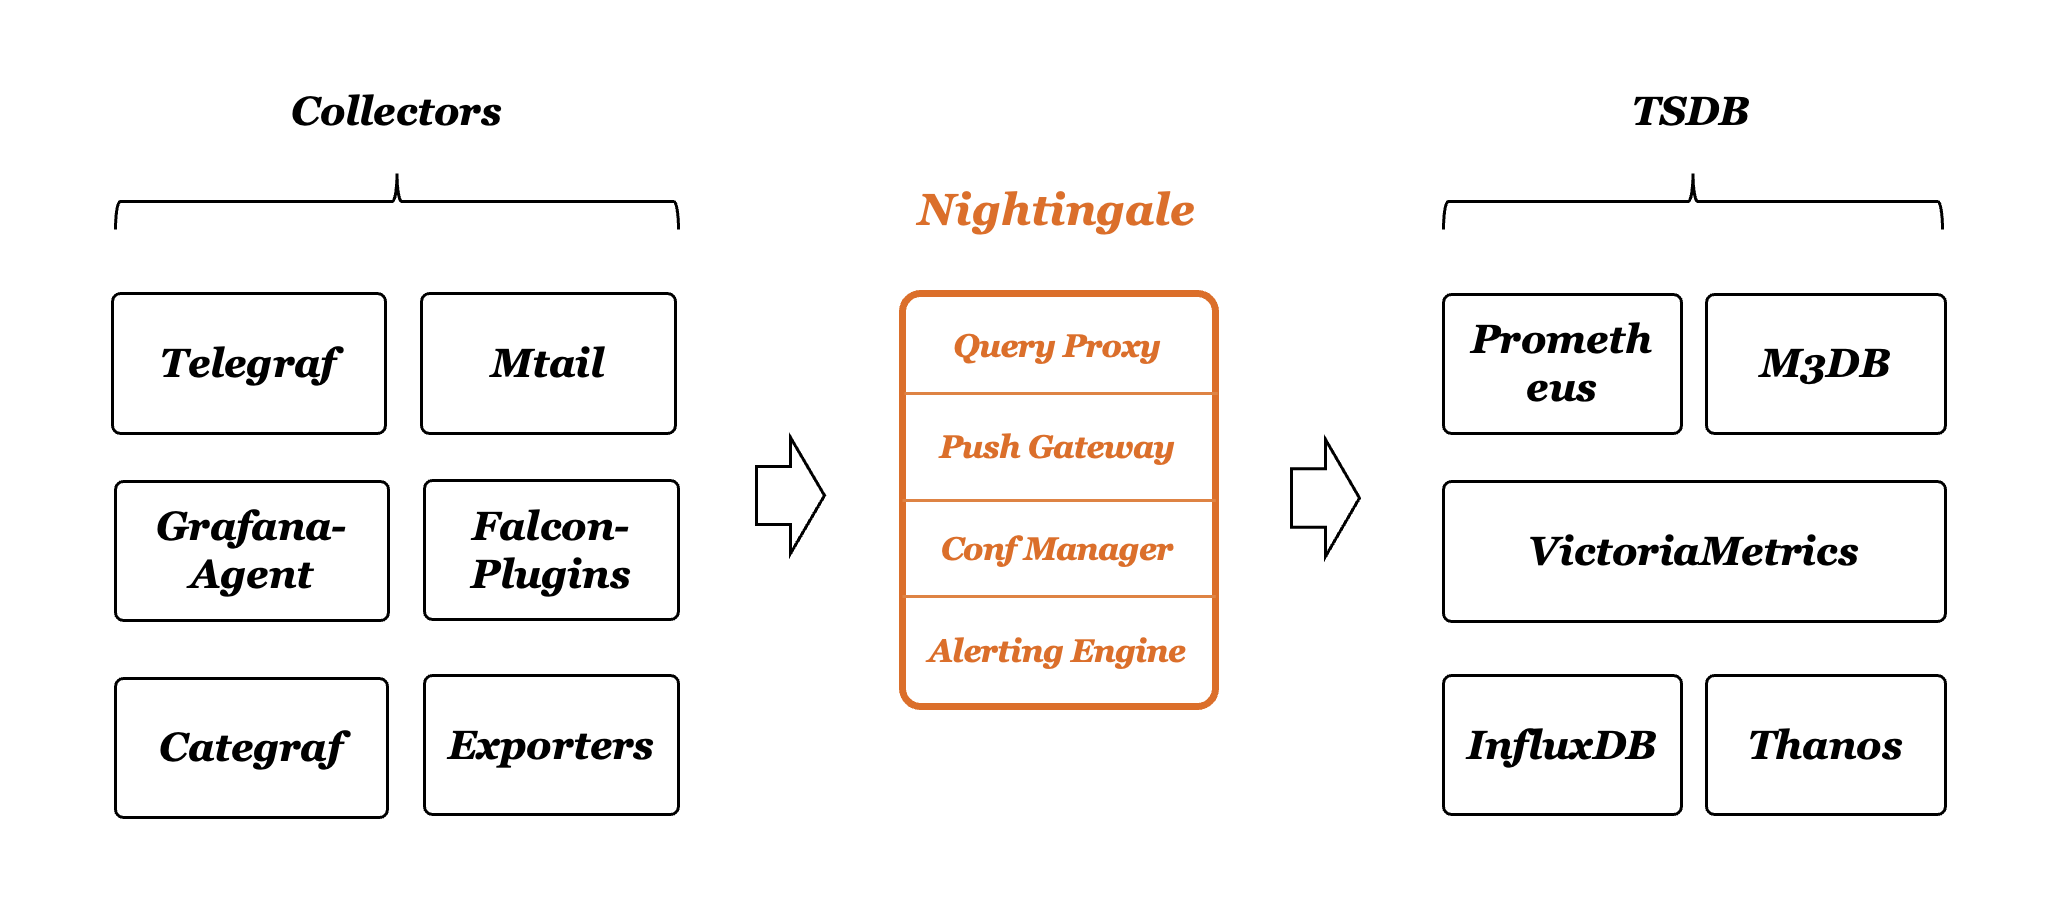
系統架構

安裝部署
Server端安裝部署架構: Prometheus + MySQL + redis + n9e server + n9e webapi
采集端:categraf
1. 關閉防火墻和安全機制
systemctl stop firewalld.service
systemctl disable firewalld.service
setenforce 0
2. 安裝普羅米修斯
#下載普羅米修斯
wget https://s3-gz01.didistatic.com/n9e-pub/prome/prometheus-2.28.0.linux-amd64.tar.gz -O prometheus-2.28.0.linux-amd64.tar.gz
#解壓
tar xzvf prometheus-2.28.0.linux-amd64.tar.gz -C /usr/local
#改名
mv /usr/local/prometheus-2.28.0.linux-amd64 /usr/local/prometheus
#prometheus配置成系統服務
cat <<EOF >/etc/systemd/system/prometheus.service
[Unit]
Description="prometheus"
Documentation=https://prometheus.io/
After=network.target

[Service]
Type=simple

ExecStart=/usr/local/prometheus/prometheus  --config.file=/usr/local/prometheus/prometheus.yml --storage.tsdb.path=/usr/local/prometheus/data --web.enable-lifecycle --enable-feature=remote-write-receiver --query.lookback-delta=2m

Restart=on-failure
SuccessExitStatus=0
LimitNOFILE=65536
StandardOutput=syslog
StandardError=syslog
SyslogIdentifier=prometheus


[Install]
WantedBy=multi-user.target
EOF

#重啟daemon
systemctl daemon-reload
#prometheus加入開機自啟
systemctl enable prometheus
#重啟prometheus
systemctl restart prometheus
#查看prometheus狀態
systemctl status prometheus
3. 安裝MySQL
#下載mysql安裝包
wget https://dev.mysql.com/get/Downloads/MySQL-8.0/mysql-8.0.28-1.el7.x86_64.rpm-bundle.tar
#創建MySQL目錄
mkdir /usr/local/mysql
#解壓MySQL安裝包
tar xf mysql-8.0.28-1.el7.x86_64.rpm-bundle.tar -C /usr/local/mysql
#移動到mysql目錄
cd /usr/local/mysql/
#RPM方式安裝MySQL
rpm -ivh mysql-community-* --force --nodeps
#啟動MySQL
systemctl start mysqld
#MySQL加入開啟自啟
systemctl enable mysqld
#以下三種方法,均可(建議都看一遍)
systemctl status mysqld.service
netstat -anptu |grep mysql
ps -ef |grep mysql
3.1 修改MySQL密碼
#啟動mysql后會初始化 查找mysql密碼
cat /var/log/mysqld.log | grep password
2022-06-23T16:15:31.370137Z 6 [Note] [MY-010454] [Server] A temporary password is generated for root@localhost: Dfo5Dm-!fVZG
#密碼為:Dfo5Dm-!fVZG

#由于MySQL8.0 有密碼驗證組件,若希望設置簡單的密碼,需要修改服務驗證條件
# 密碼檢查等級,0/LOW、1/MEDIUM、2/STRONG
set global validate_password.policy=0;
# 密碼的最短長度
set global validate_password.length=6;
# 密碼至少要包含的小寫字母個數和大寫字母個數
set global validate_password.mixed_case_count=0;
# 設置密碼
mysql -uroot -p
ALTER USER 'root'@'localhost' IDENTIFIED BY 'Likun@123';
3.2 也可以直接安裝mariadb(MySQL和Mariadb選取一個)
#安裝mariadb
yum -y install mariadb*
#mariadb加入開機自啟
systemctl enable mariadb
#啟動mariadb
systemctl restart mariadb
#修改密碼
mysql -e "SET PASSWORD FOR 'root'@'localhost' = PASSWORD('Likun@123');"
4. 安裝redis
#環境準備
yum -y install gcc
#創建redis目錄
mkdir /usr/local/redis
#下載redis:
wget https://download.redis.io/redis-stable.tar.gz
#解壓redis:
tar xf redis-stable.tar.gz -C /usr/local/redis/
#編譯
cd /usr/local/redis/redis-stable/
make && make install
#初始化redis
cd /usr/local/redis/redis-stable/utils/
#注釋文件中幾行內容(不注釋會運行報錯)
vim install_server.sh
注釋如下行
 77# _pid_1_exe="$(readlink -f /proc/1/exe)"
 78 #if [ "${_pid_1_exe##*/}" = systemd ]
 79 #then
 80 #        echo "This systems seems to use systemd."
 81 #        echo "Please take a look at the provided example service unit files in this directory, and adapt and install them. Sorry!"
 82 #       exit 1
 83 #fi
4.1 初始化安裝redis
./install_server.sh
會有如下的提示信息,直接默認就好了
Welcome to the redis service installer
This script will help you easily set up a running redis server

Please select the redis port for this instance: [6379]
Selecting default: 6379
Please select the redis config file name [/etc/redis/6379.conf]
Selected default - /etc/redis/6379.conf
Please select the redis log file name [/var/log/redis_6379.log]
Selected default - /var/log/redis_6379.log
Please select the data directory for this instance [/var/lib/redis/6379]
Selected default - /var/lib/redis/6379
Please select the redis executable path [/usr/local/bin/redis-server]
Selected config:
Port           : 6379
Config file    : /etc/redis/6379.conf
Log file       : /var/log/redis_6379.log
Data dir       : /var/lib/redis/6379
Executable     : /usr/local/bin/redis-server
Cli Executable : /usr/local/bin/redis-cli
Is this ok? Then press ENTER to go on or Ctrl-C to abort.
Copied /tmp/6379.conf => /etc/init.d/redis_6379
Installing service...
Successfully added to chkconfig!
Successfully added to runlevels 345!
Starting Redis server...
Installation successful!

#看到 successful! 安裝完成
此時,已經默認幫我們啟動了redis了,查看下redis的狀態,可以看到redis真的已經啟動了
#檢查進程
ps -ef |grep redis
root      15825      1  0 14:12 ?        00:00:00 /usr/local/bin/redis-server 127.0.0.1:6379
root      15864  10374  0 14:15 pts/0    00:00:00 grep --color=auto redis

#檢查端口
netstat -anptu |grep redis
tcp        0      0 127.0.0.1:6379          0.0.0.0:*               LISTEN      15825/redis-server
tcp6       0      0 ::1:6379                :::*                    LISTEN      15825/redis-server
5. 安裝夜鶯
夜鶯的安裝包從哪里搞?大家可以自行編譯,后端代碼在上文提到了,前端代碼在:https://github.com/n9e/fe-v5
也提供編譯好的二進制,不過只有 linux-amd64 的版本,可以從兩個地方下載:
github:https://github.com/ccfos/nightingale/releases
 gitlink:https://www.gitlink.org.cn/ccfos/nightingale/releases
#創建夜鶯目錄
mkdir /usr/local/n9e
#解壓安裝包
tar xzvf n9e-v5.10.0-linux-amd64.tar.gz -C /usr/local/n9e/
#導入數據庫
mysql -uroot -pLikun@123< /usr/local/n9e/docker/initsql/a-n9e.sql
#修改server配置文件中MySQL連接密碼
vim /usr/local/n9e/etc/server.conf
133 DSN="root:1234@tcp(127.0.0.1:3306)/n9e_v5?charset=utf8mb4&parseTime=True&loc=Local&allowNativePasswords=true"
改為
133 DSN="root:Likun@123@tcp(127.0.0.1:3306)/n9e_v5?charset=utf8mb4&parseTime=True&loc=Local&allowNativePasswords=true"
#修改webapi配置文件中MySQL連接密碼
vim /usr/local/n9e/etc/webaip.conf
165 DSN="root:1234@tcp(127.0.0.1:3306)/n9e_v5?charset=utf8mb4&parseTime=True&loc=Local&allowNativePasswords=true"
改為
165 DSN="root:Likun@123@tcp(127.0.0.1:3306)/n9e_v5?charset=utf8mb4&parseTime=True&loc=Local&allowNativePasswords=true"
#啟動server
cd /usr/local/n9e/
nohup ./n9e server &> server.log &
#啟動webapi
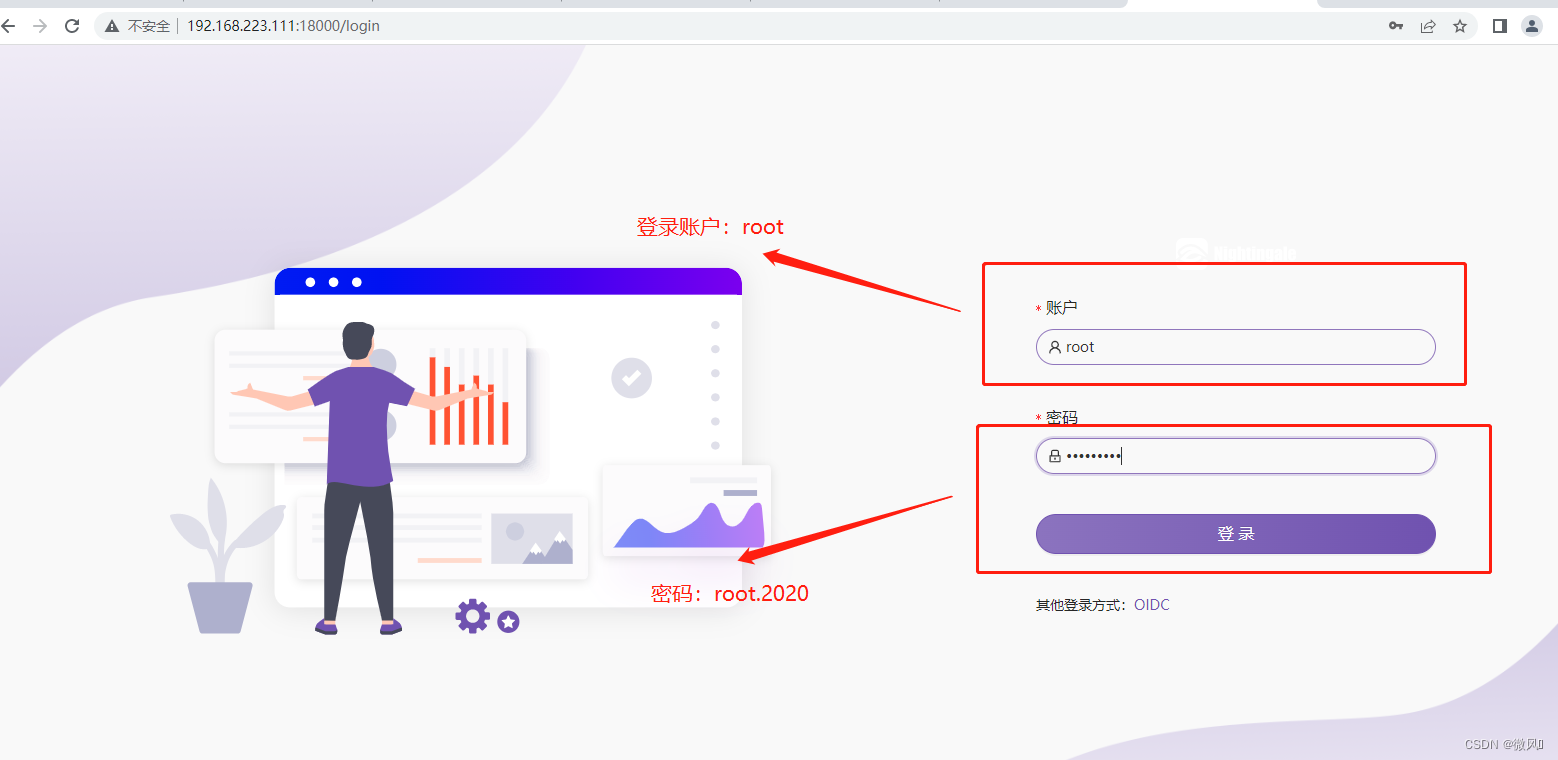
nohup ./n9e webapi &> webapi.log &如果啟動成功,server 默認會監聽在 19000 端口,webapi 會監聽在 18000 端口,且日志沒有報錯。此時瀏覽器請求 18000 端口,就可以體驗了
智能推薦
電腦空間不夠了?教你一個小秒招快速清理 Docker 占用的磁盤空間!
Docker 很占用空間,每當我們運行容器、拉取鏡像、部署應用、構建自己的鏡像時,我們的磁盤空間會被大量占用。 如果你也被這個問題所困擾,咱們就一起看一下 Docker 是如何使用磁盤空間的,以及如何回收。 docker 占用的空間可以通過下面的命令查看: TYPE 列出了docker 使用磁盤的 4 種類型: Images:所有鏡像占用的空間,包括拉取下來的鏡像,和本地構建的。 Con...

requests實現全自動PPT模板
http://www.1ppt.com/moban/ 可以免費的下載PPT模板,當然如果要人工一個個下,還是挺麻煩的,我們可以利用requests輕松下載 訪問這個主頁,我們可以看到下面的樣式 點每一個PPT模板的圖片,我們可以進入到詳細的信息頁面,翻到下面,我們可以看到對應的下載地址 點擊這個下載的按鈕,我們便可以下載對應的PPT壓縮包 那我們就開始做吧 首先,查看網頁的源代碼,我們可以看到每一...


Linux C系統編程-線程互斥鎖(四)
互斥鎖 互斥鎖也是屬于線程之間處理同步互斥方式,有上鎖/解鎖兩種狀態。 互斥鎖函數接口 1)初始化互斥鎖 pthread_mutex_init() man 3 pthread_mutex_init (找不到的情況下首先 sudo apt-get install glibc-doc sudo apt-get install manpages-posix-dev) 動態初始化 int pthread_...

統計學習方法 - 樸素貝葉斯
引入問題:一機器在良好狀態生產合格產品幾率是 90%,在故障狀態生產合格產品幾率是 30%,機器良好的概率是 75%。若一日第一件產品是合格品,那么此日機器良好的概率是多少。 貝葉斯模型 生成模型與判別模型 判別模型,即要判斷這個東西到底是哪一類,也就是要求y,那就用給定的x去預測。 生成模型,是要生成一個模型,那就是誰根據什么生成了模型,誰就是類別y,根據的內容就是x 以上述例子,判斷一個生產出...
猜你喜歡
styled-components —— React 中的 CSS 最佳實踐
https://zhuanlan.zhihu.com/p/29344146 Styled-components 是目前 React 樣式方案中最受關注的一種,它既具備了 css-in-js 的模塊化與參數化優點,又完全使用CSS的書寫習慣,不會引起額外的學習成本。本文是 styled-components 作者之一 Max Stoiber 所寫,首先總結了前端組件化樣式中的最佳實踐原則,然后在此基...
19.vue中封裝echarts組件
19.vue中封裝echarts組件 1.效果圖 2.echarts組件 3.使用組件 按照組件格式整理好數據格式 傳入組件 home.vue 4.接口返回數據格式...
【一只蒟蒻的刷題歷程】【藍橋杯】歷屆試題 九宮重排 (八數碼問題:BFS+集合set)
資源限制 時間限制:1.0s 內存限制:256.0MB 問題描述 如下面第一個圖的九宮格中,放著 1~8 的數字卡片,還有一個格子空著。與空格子相鄰的格子中的卡片可以移動到空格中。經過若干次移動,可以形成第二個圖所示的局面。 我們把第一個圖的局面記為:12345678. 把第二個圖的局面記為:123.46758 顯然是按從上到下,從左到右的順序記錄數字,空格記為句點。 本題目的任務是已知九宮的初態...