SwiftUI學習筆記-【列表】
標簽: IOS專欄 SwiftUI列表 Swift列表 Swift ListView Swift List索引 SwiftUI List索引
前言
上節我們學習了基本布局的編寫,這節課我們必須把列表給玩壞了
提示:文章中錯誤希望指正
一、List
基本上每一個大型的移動端App或者PC端對于大量的同類型數據或規則排布的UI都會選擇列表。在Android里面可能都用過【ListView,GridView和RecyclerView】,Flutter中可能用過ListView以及GridView等。那我們來試一試SwiftUI
1.List基本的滑動容器控件
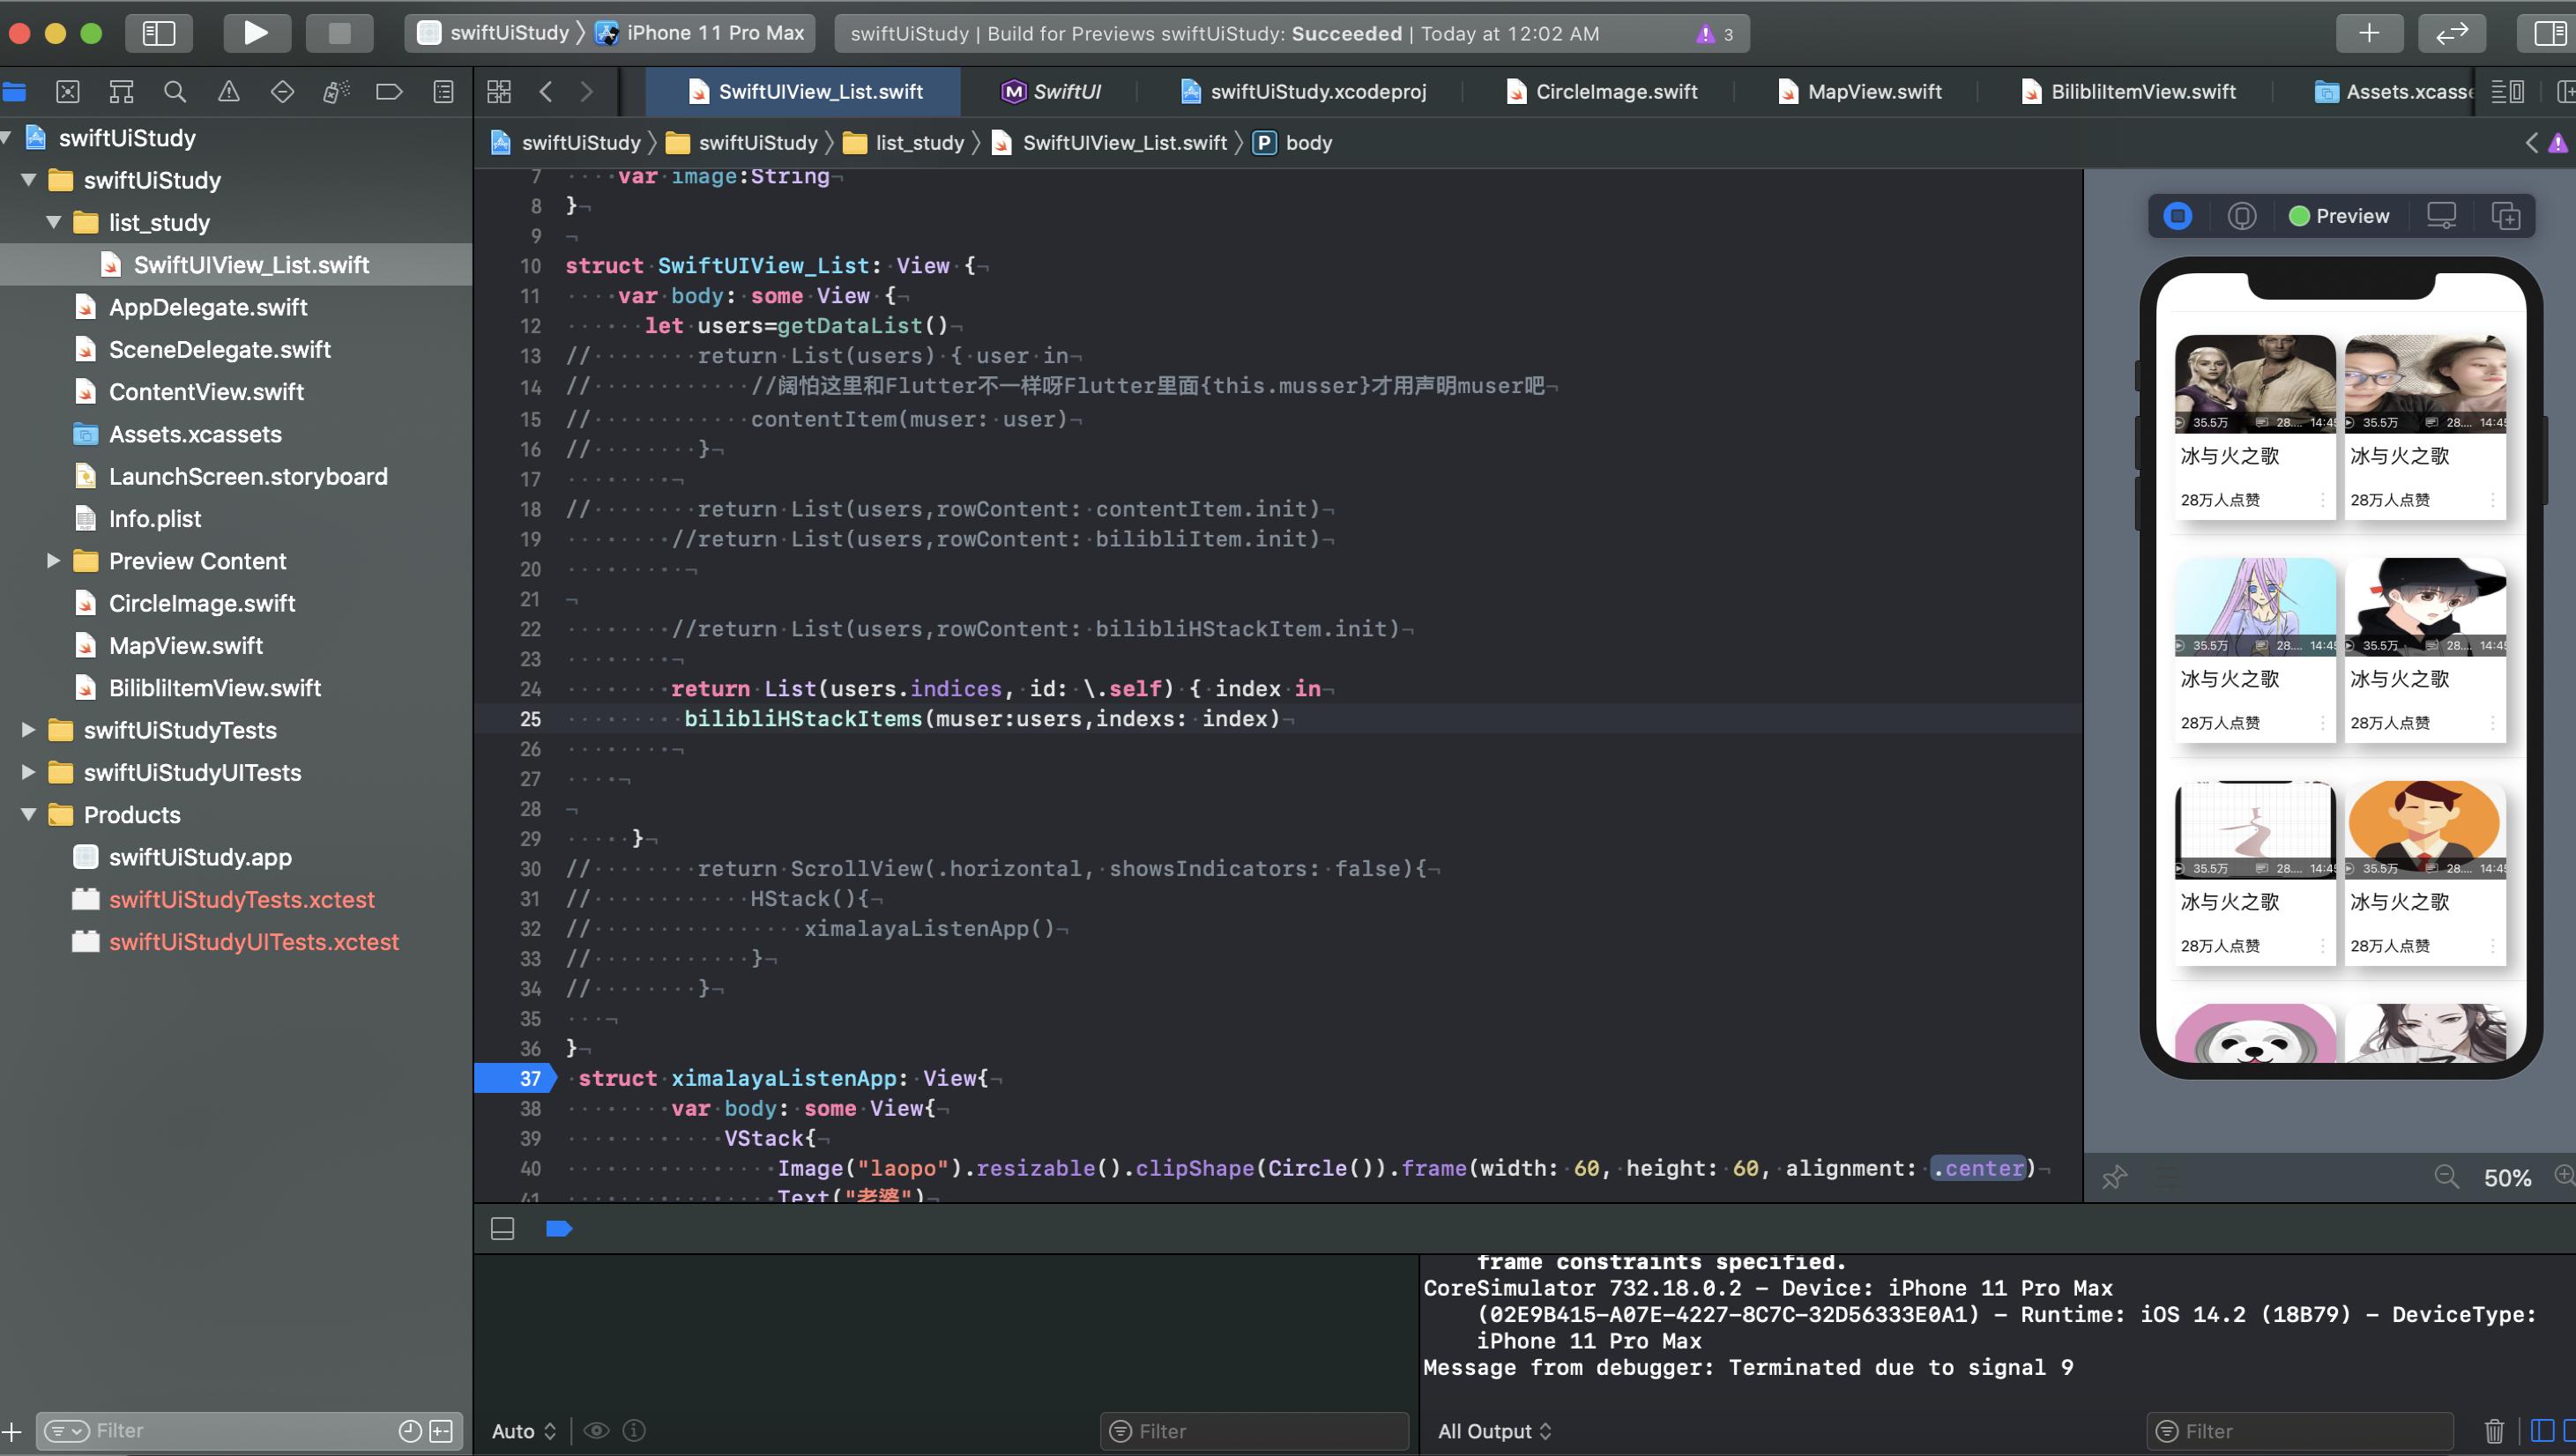
List作為基本的滑動容器部件。當開UI頁面是單純的控件排版[無數據源,很少數據源且固定數據]那么我們可以使用List和HStack以及VStack組合等進行繪制。如下:圖片顯的古老別在意,模仿喜馬拉雅聽說寫的頁面喜歡的可以去閱讀。

- 如上圖我們應該經常遇到這樣的水平滑動的布局吧。
代碼分析
List{
 HStack{
    CicleImage
    Text
 }
 HStack{
    CicleImage
    Text
 }
 HStack{
    CicleImage
    Text
 }
 HStack{
    CicleImage
    Text
 }
 HStack{
    CicleImage
    Text
 }
 HStack{
    CicleImage
    Text
 }
 .......
}
拿出你最快的兩分鐘寫出來,再用剩下的5秒鐘ctrl+c,ctrl+v…ctrl+v…慢點我拍你滑不完我的代碼如下:
struct SwiftUIView_List: View {
    var body: some View {
        return List(){
            ximalayaListenApp()
        }

}
 struct ximalayaListenApp: View{
        var body: some View{
            VStack{
                Image("laopo").resizable().clipShape(Circle()).frame(width: 60, height: 60, alignment:       .center      )
                Text("老婆")
            }
            VStack{
                Image("path_img").resizable().clipShape(Circle()).frame(width: 60, height: 60, alignment: .center)
                Text("老公")
            }
            VStack{
                Image("head_coply").resizable().clipShape(Circle()).frame(width: 60, height: 60, alignment:       .center      )
                Text("老爹")
            }
            VStack{
                Image("head_boy").resizable().clipShape(Circle()).frame(width: 60, height: 60, alignment:       .center      )
                Text("兒子")
            }
            VStack{
                Image("longnv").resizable().clipShape(Circle()).frame(width: 60, height: 60, alignment:       .center      )
                Text("老婆")
            }
            VStack{
                Image("laopo").resizable().clipShape(Circle()).frame(width: 60, height: 60, alignment:       .center      )
                Text("老婆")
            }
        }
    }
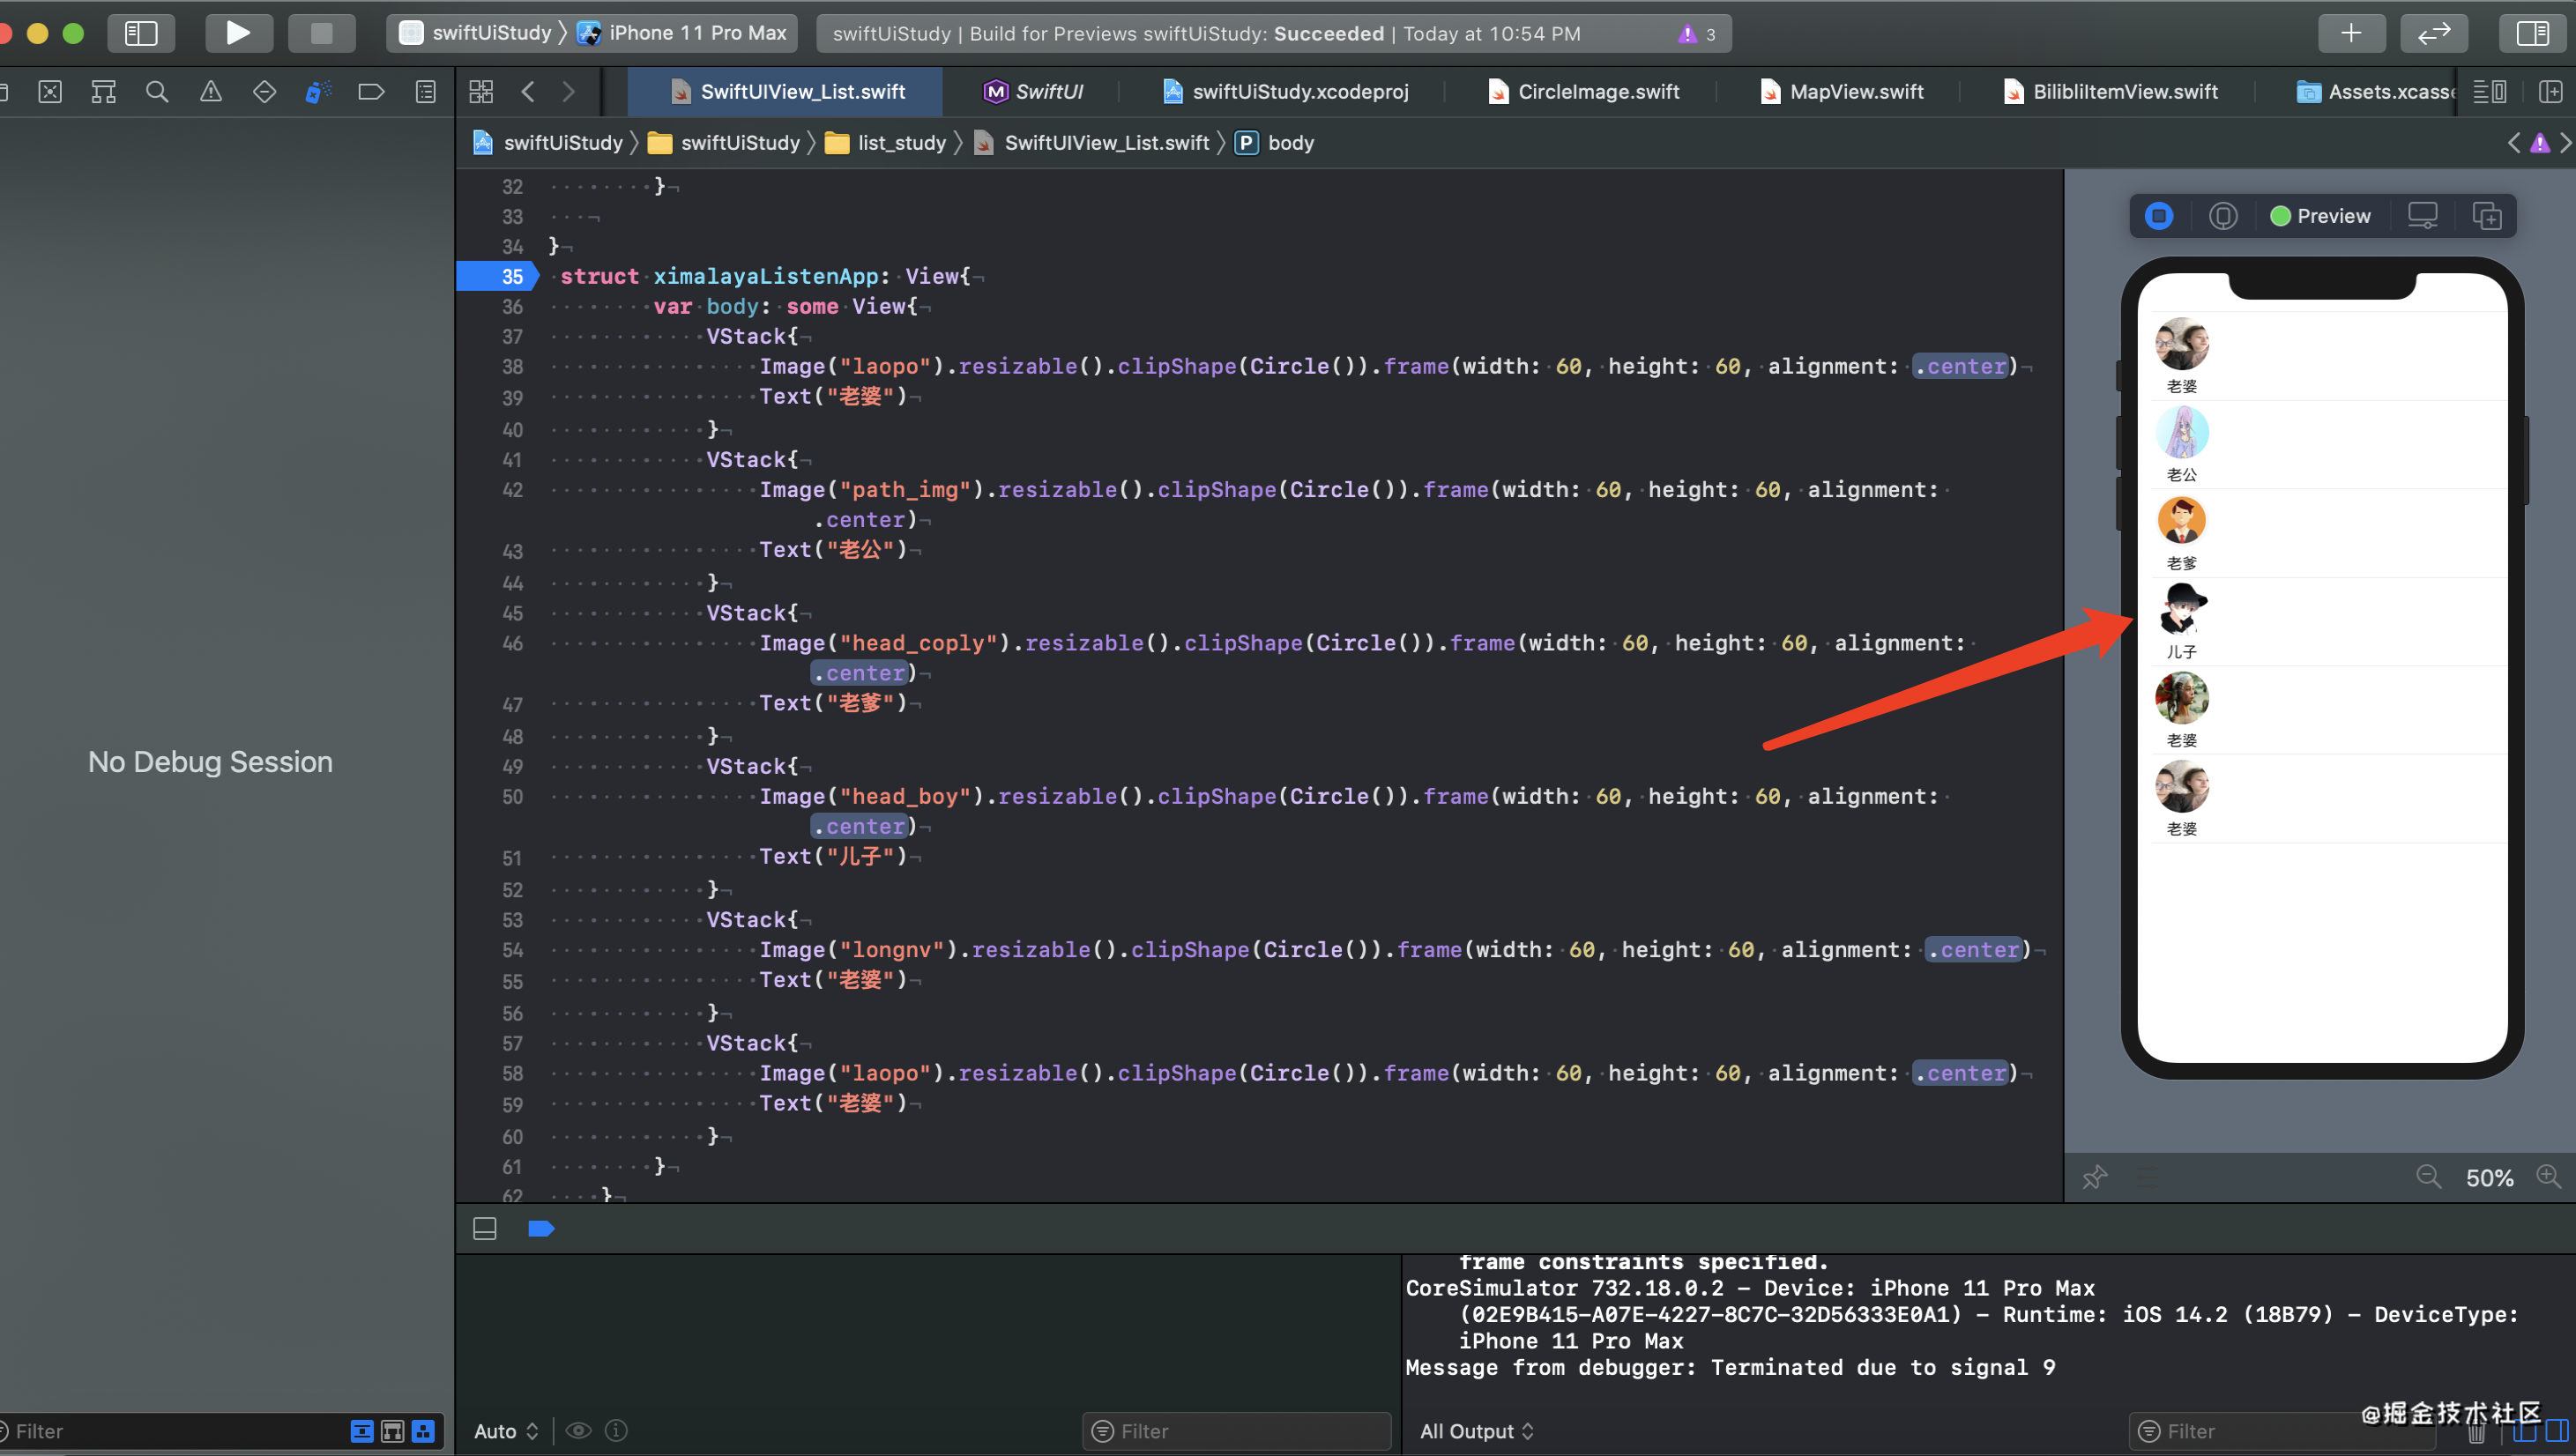
來看看效果,低級錯誤,設置一下方向即可,沒找到…!特么尷尬。我在Android里面用過ScrollView,Flutter里面用過ScrollView以及ListView是可以實現的。
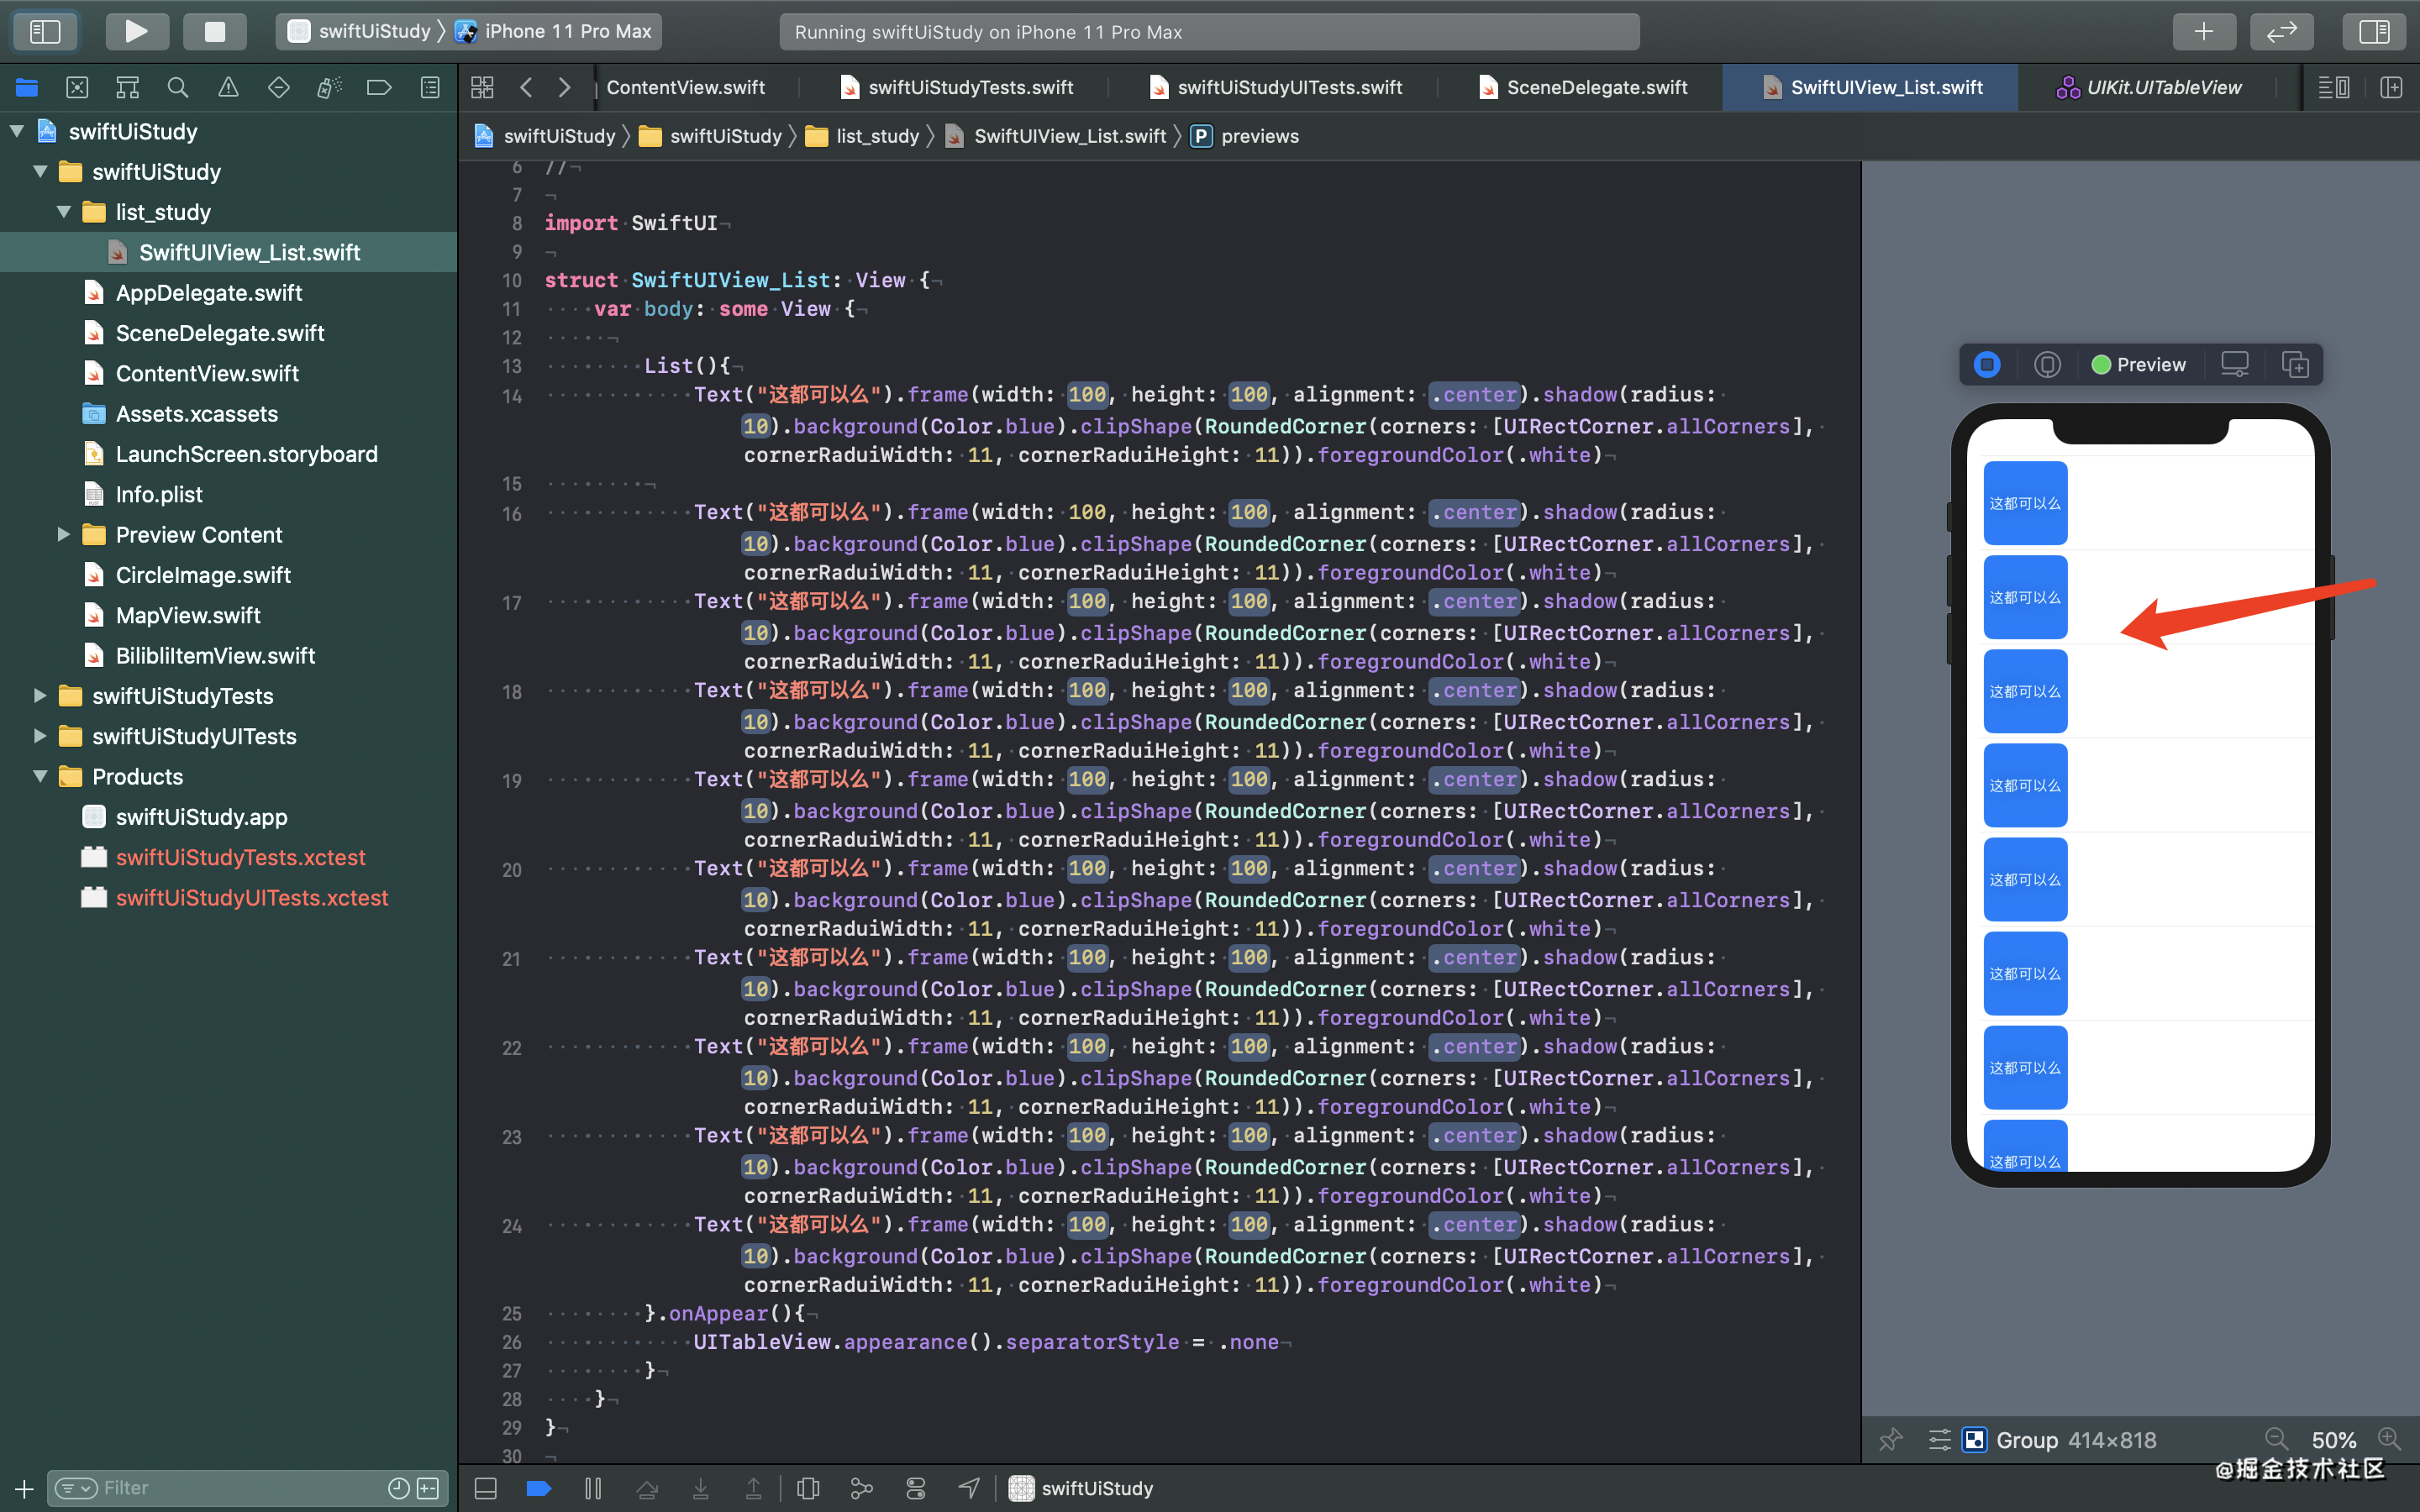
import SwiftUI

struct SwiftUIView_List: View {
    var body: some View {
      List(){
            Text("這都可以么").frame(width:   100  , height:   100  , alignment:   .center  ).shadow(radius:   10  ).background(Color.blue).clipShape(RoundedCorner(corners: [UIRectCorner.allCorners], cornerRaduiWidth: 11, cornerRaduiHeight: 11)).foregroundColor(.white)
            Text("這都可以么").frame(width: 100, height:   100  , alignment:   .center  ).shadow(radius:   10  ).background(Color.blue).clipShape(RoundedCorner(corners: [UIRectCorner.allCorners], cornerRaduiWidth: 11, cornerRaduiHeight: 11)).foregroundColor(.white)
            Text("這都可以么").frame(width:   100  , height:   100  , alignment:   .center  ).shadow(radius:   10  ).background(Color.blue).clipShape(RoundedCorner(corners: [UIRectCorner.allCorners], cornerRaduiWidth: 11, cornerRaduiHeight: 11)).foregroundColor(.white)
            Text("這都可以么").frame(width:   100  , height:   100  , alignment:   .center  ).shadow(radius:   10  ).background(Color.blue).clipShape(RoundedCorner(corners: [UIRectCorner.allCorners], cornerRaduiWidth: 11, cornerRaduiHeight: 11)).foregroundColor(.white)
            Text("這都可以么").frame(width:   100  , height:   100  , alignment:   .center  ).shadow(radius:   10  ).background(Color.blue).clipShape(RoundedCorner(corners: [UIRectCorner.allCorners], cornerRaduiWidth: 11, cornerRaduiHeight: 11)).foregroundColor(.white)
            Text("這都可以么").frame(width:   100  , height:   100  , alignment:   .center  ).shadow(radius:   10  ).background(Color.blue).clipShape(RoundedCorner(corners: [UIRectCorner.allCorners], cornerRaduiWidth: 11, cornerRaduiHeight: 11)).foregroundColor(.white)
            Text("這都可以么").frame(width:   100  , height:   100  , alignment:   .center  ).shadow(radius:   10  ).background(Color.blue).clipShape(RoundedCorner(corners: [UIRectCorner.allCorners], cornerRaduiWidth: 11, cornerRaduiHeight: 11)).foregroundColor(.white)
            Text("這都可以么").frame(width:   100  , height:   100  , alignment:   .center  ).shadow(radius:   10  ).background(Color.blue).clipShape(RoundedCorner(corners: [UIRectCorner.allCorners], cornerRaduiWidth: 11, cornerRaduiHeight: 11)).foregroundColor(.white)
            Text("這都可以么").frame(width:   100  , height:   100  , alignment:   .center  ).shadow(radius:   10  ).background(Color.blue).clipShape(RoundedCorner(corners: [UIRectCorner.allCorners], cornerRaduiWidth: 11, cornerRaduiHeight: 11)).foregroundColor(.white)
            Text("這都可以么").frame(width:   100  , height:   100  , alignment:   .center  ).shadow(radius:   10  ).background(Color.blue).clipShape(RoundedCorner(corners: [UIRectCorner.allCorners], cornerRaduiWidth: 11, cornerRaduiHeight: 11)).foregroundColor(.white)
        }.onAppear(){
            UITableView.appearance().separatorStyle = .none
        }
    }
}

struct SwiftUIView_List_Previews: PreviewProvider {
    static var previews: some View {
        SwiftUIView_List()
    }
}
那么我們去找找SwiftUI ScrollView有沒有,沒問題的我們拿過來試一試效果。
struct SwiftUIView_List: View {
    var body: some View {
        return ScrollView(.horizontal, showsIndicators: false){
            HStack(){
                ximalayaListenApp()
            }
        }

}
 struct ximalayaListenApp: View{
        var body: some View{
            VStack{
                Image("laopo").resizable().clipShape(Circle()).frame(width: 60, height: 60, alignment:        .center      )
                Text("老婆")
            }
            VStack{
                Image("path_img").resizable().clipShape(Circle()).frame(width: 60, height: 60, alignment: .center)
                Text("老公")
            }
            VStack{
                Image("head_coply").resizable().clipShape(Circle()).frame(width: 60, height: 60, alignment:        .center      )
                Text("老爹")
            }
            VStack{
                Image("head_boy").resizable().clipShape(Circle()).frame(width: 60, height: 60, alignment:        .center      )
                Text("兒子")
            }
            VStack{
                Image("longnv").resizable().clipShape(Circle()).frame(width: 60, height: 60, alignment:        .center      )
                Text("老婆")
            }
            VStack{
                Image("laopo").resizable().clipShape(Circle()).frame(width: 60, height: 60, alignment:        .center      )
                Text("老婆")
            }
            VStack{
                Image("head_coply").resizable().clipShape(Circle()).frame(width: 60, height: 60, alignment:        .center      )
                Text("老爹")
            }
            VStack{
                Image("head_boy").resizable().clipShape(Circle()).frame(width: 60, height: 60, alignment:        .center      )
                Text("兒子")
            }
            VStack{
                Image("longnv").resizable().clipShape(Circle()).frame(width: 60, height: 60, alignment:        .center      )
                Text("老婆")
            }
            VStack{
                Image("laopo").resizable().clipShape(Circle()).frame(width: 60, height: 60, alignment:        .center      )
                Text("老婆")
            }

        }
    }
今天的主角是列表控件,所以就此罷過…后面我們肯定會單獨章節講滑動控件…的使用以及滑動測量等…
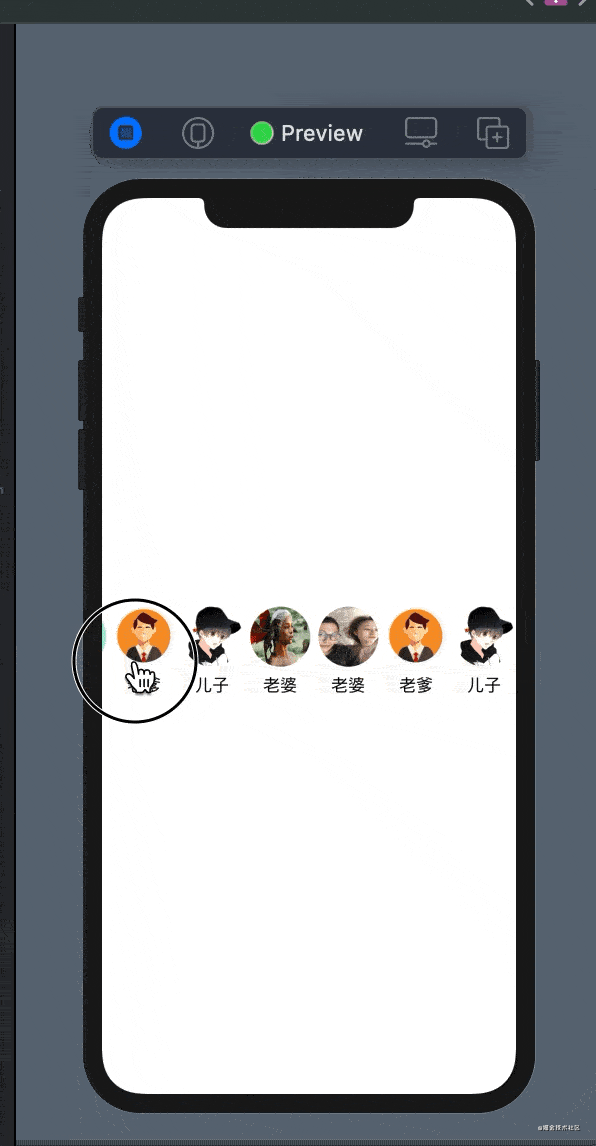
- 橫著不行豎著來
:只要超出屏幕就可滑動,基本和Flutter的ListView[Text,Text…]一樣。List作為超出屏幕可滑動容器控件,里面可以任意的放置其他控件,不妨自己試一試。
2.List綁定集合數據源
- 當然我們一般不會這么寫。一般數據源可能百千條或者上千萬條【淘寶滑動我是沒超過200條…我對象應該可以破千破萬】,這種情況我們就不能向上面這樣去寫了,而是綁定數據源【常見的有集合和數組對于基本的swift語言我是沒看過所以后面我會拿出一兩節補充,現在都是用kt和感覺+度娘基本解決】。首先我們來模擬一個數據源數組。數組類型定義如下:
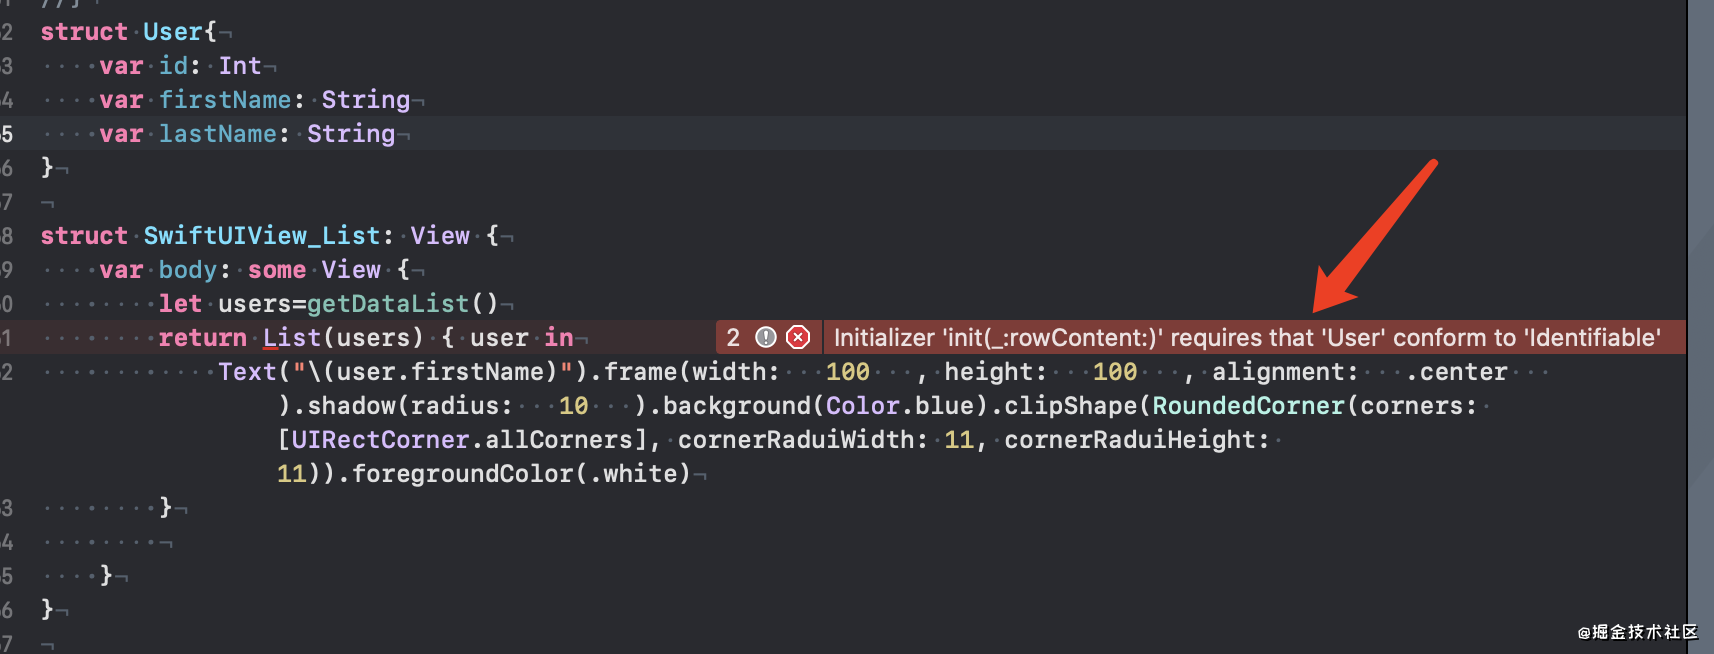
//創建數據源模型,開始這里沒有實現Identifiable粗錯了,見笑了第一次寫這玩意。
struct User:Identifiable{
    var id: Int
    var firstName: String
    var lastName: String
}
//創建SwiftUI List
struct SwiftUIView_List: View {
    var body: some View {
        let users=getDataList()
        return List(users) { user in
            //闊怕這里和Flutter不一樣呀Flutter里面{this.musser}才用聲明muser吧
            contentItem(muser: user)
        }


    }

}
//列表的item
struct contentItem: View{
    var muser:User
    var body: some View{
        Text("\(muser.firstName)").frame(width:   100   , height:   100   , alignment:   .center   ).shadow(radius:   10   ).background(Color.blue).clipShape(RoundedCorner(corners: [UIRectCorner.allCorners], cornerRaduiWidth: 11, cornerRaduiHeight: 11)).foregroundColor(.white)
    }


}


func getDataList()->Array<User>
{
    let user1 = User(id: 1, firstName: "Piper1", lastName: "Chapman")
    let user2 = User(id: 2, firstName: "GGloria", lastName: "Mendoza")
    let user3 = User(id: 3, firstName: "LGloria3", lastName: "Mendoza")
    let user4 = User(id: 4, firstName: "WGloria5", lastName: "SMendoza")
    let user5 = User(id: 5, firstName: "LGlorias", lastName: "MCendoza")
    let user6 = User(id: 6, firstName: "SSGAloria", lastName: "AMendoza")
    let user7 = User(id: 7, firstName: "LLCGloria", lastName: "CMendoza")
    let user8 = User(id: 8, firstName: "WGlria", lastName: "MMendoza")
    let user9 = User(id: 9, firstName: "GlorSSia", lastName: "LMendoza")
    let user10 = User(id: 10, firstName: "MGloria", lastName: "QMendoza")
    let user14 = User(id: 11, firstName: "WGloria", lastName: "WMendoza")
    let user11 = User(id: 12, firstName: "GGloria", lastName: "LJMendoza")
    let user12 = User(id: 13, firstName: "HGlid", lastName: "UMendoza")
    let user13 = User(id: 14, firstName: "Lme", lastName: "OMendoza")
    return [user1,user2,user3,user4,user5,user6,user7,user8,user9,user10,user11,user12,user13,user14]
}

struct SwiftUIView_List_Previews: PreviewProvider {
    static var previews: some View {
        Group {
            SwiftUIView_List()
        }
    }
}
- 這里出現了錯誤,要求User是一個Identifiable持有身份標識的類。可以點List進去看看rowContent要求數據類需要去實現Identifiable。
更加簡介的寫法
    return List(users) { user in
            //闊怕這里和Flutter不一樣呀Flutter里面{this.musser}才用聲明muser吧
            contentItem(muser: user)
        }
    //可以替換為下面
     return List(users,rowContent: contentItem.init)
- 接下來我們把上節的B站布局拿過來看看效果。
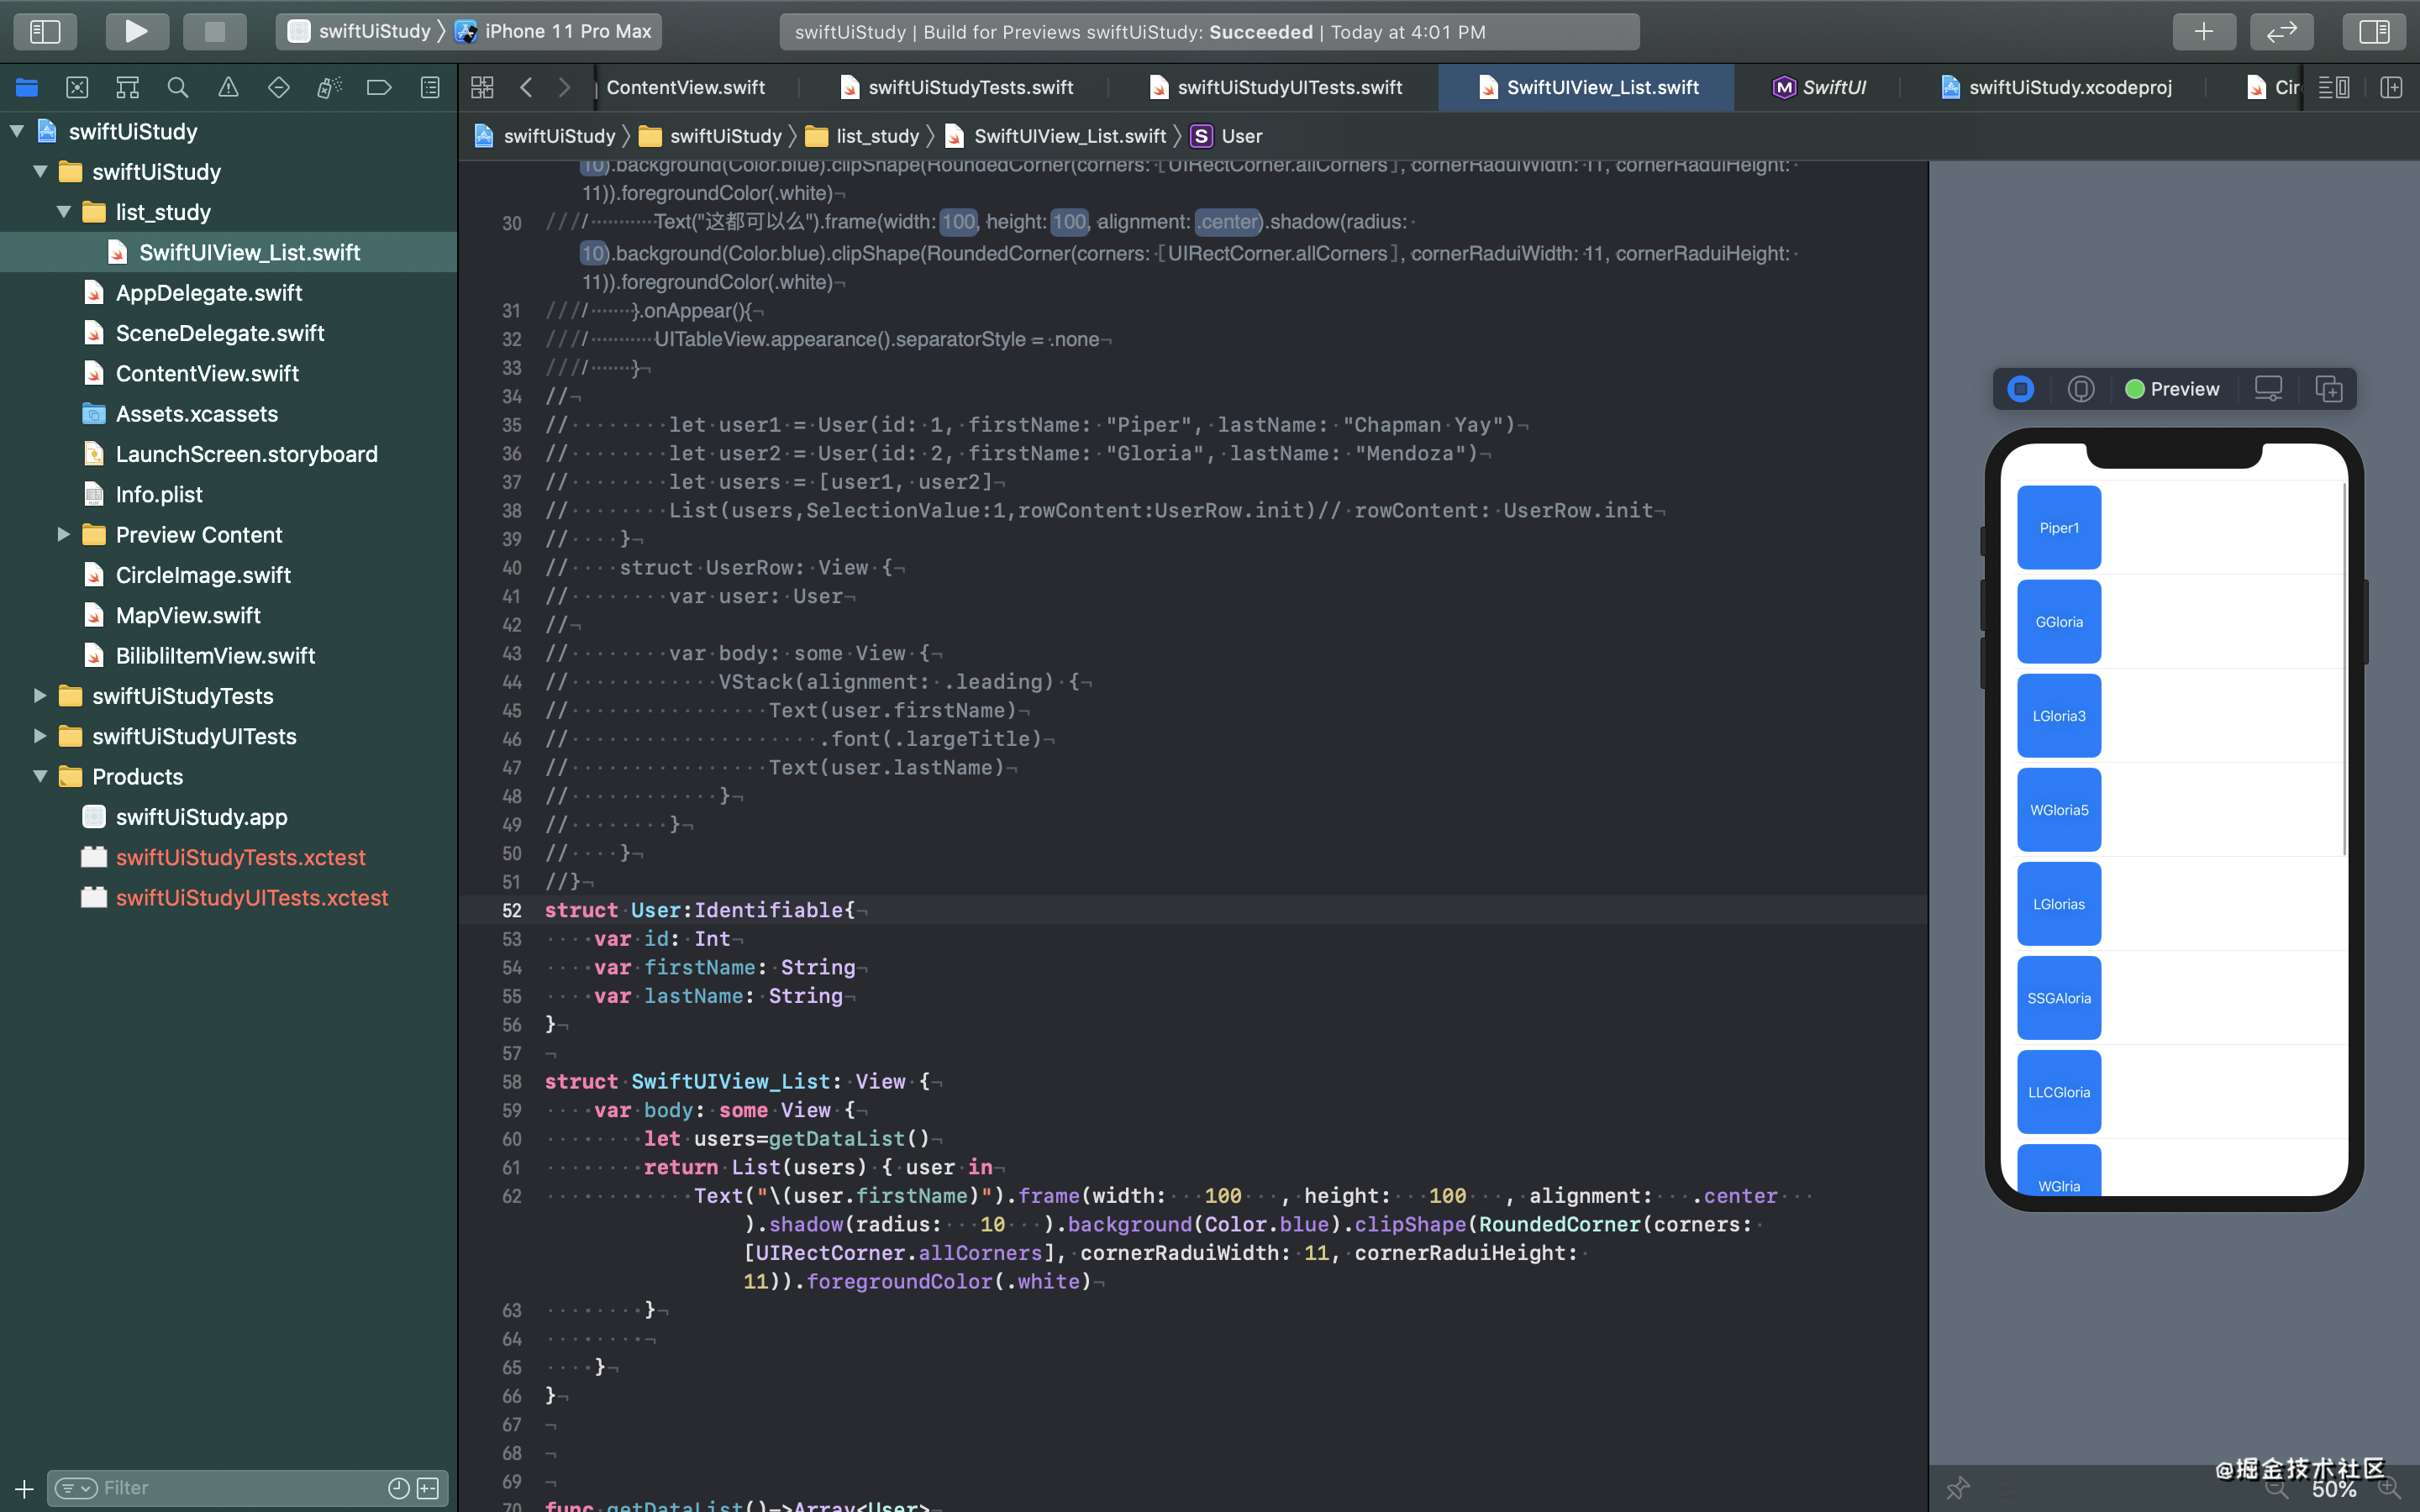
import SwiftUI

struct User:Identifiable{
    var id: Int
    var firstName: String
    var lastName: String
    var image:String
}

struct SwiftUIView_List: View {
    var body: some View {
        let users=getDataList()


          //無索引初始化
//        return List(users) { user in
//            //闊怕這里和Flutter不一樣呀Flutter里面{this.musser}才用聲明muser吧
//            contentItem(muser: user)
//        }


          //簡便初始化
//        return List(users,rowContent: contentItem.init)
//        return List(users,rowContent: bilibliItem.init)


        return List(users,rowContent: bilibliHStackItem.init)

}
    //b站的item
struct bilibliHStackItem: View{
        var muser:User
        var body: some View {
            HStack(){
                bilibliItem(user: muser)

            }
        }
    }
//文字
struct contentItem: View{
    var muser:User
    var body: some View{
        Text("\(muser.firstName)").frame(width:   100   , height:   100   , alignment:   .center   ).shadow(radius:   10   ).background(Color.blue).clipShape(RoundedCorner(corners: [UIRectCorner.allCorners], cornerRaduiWidth: 11, cornerRaduiHeight: 11)).foregroundColor(.white)
    }


}

//Item
struct bilibliItem: View{
    var user:User
    var body: some View {
        VStack{
        VStack(alignment:.leading, spacing: 1){
            ZStack(alignment:.bottom){
                Image("\(user.image)").resizable().frame(width:190, height: 125, alignment:      .center    )
                HStack(){
                    HStack(){
                        Image("bofang").resizable().frame(minWidth: 15, idealWidth:7, maxWidth:7, minHeight: 15, idealHeight: 5, maxHeight:5, alignment:      .center    ).padding(EdgeInsets(top: 5, leading: 1, bottom: 5, trailing:1))
                        Text("35.5萬").font(.footnote).foregroundColor(.white)
                    }.frame(alignment:      .center    )
                    Spacer()
                    HStack(){
                        Image("pinglun").resizable().frame(minWidth: 15, idealWidth:5, maxWidth:5, minHeight: 15, idealHeight: 5, maxHeight:5, alignment:      .center    ).padding(EdgeInsets(top: 5, leading: 1, bottom: 5, trailing:1))
                        Text("28.77").lineLimit(1).font(.footnote).foregroundColor(.white)
                    }
                    HStack(){
                        Text("14:45").font(.footnote).foregroundColor(.white)
                    }
                }.background(Color.black.opacity(0.6))
                //標題

            }.frame(width: 190, height:125, alignment:      .center    )
            Text("冰與火之歌").font(.system(size:22)).padding(EdgeInsets.init(top: 11.0, leading:11,bottom:0,trailing:26)).background(Color.white)
            HStack(alignment:.center) {
                Text("28萬人點贊")
                Spacer()
                Image("ziyuan").resizable().frame(minWidth: 22, idealWidth:5, maxWidth:5, minHeight: 22, idealHeight: 5, maxHeight:5, alignment:      .center    ).padding(EdgeInsets(top: 5, leading: 1, bottom: 5, trailing:0))
            }.frame(width: 170,height:50).background(Color.white).padding(EdgeInsets(top: 11, leading: 11, bottom: 11, trailing:1))


        }

        }.frame(width: 180, height:210, alignment:      .center    ).background(Color.white).clipShape(RoundedCorner(corners:[UIRectCorner.topLeft,UIRectCorner.topRight], cornerRaduiWidth:22)).shadow(color: Color     .black    .opacity(0.3), radius:      10    , x: 11, y: 11).padding(EdgeInsets(top: 20, leading: 1, bottom: 11, trailing:1))
    }


}

func getDataList()->Array<User>
{
    let user1 = User(id: 1, firstName: "Piper1", lastName: "Chapman",image:"iimage")
    let user2 = User(id: 2, firstName: "GGloria", lastName: "Mendoza",image:"laopo")
    let user3 = User(id: 3, firstName: "LGloria3", lastName: "Mendoza",image:"path_img")
    let user4 = User(id: 4, firstName: "WGloria5", lastName: "SMendoza",image:"head_boy")
    let user5 = User(id: 5, firstName: "LGlorias", lastName: "MCendoza",image:"dao")
    let user6 = User(id: 6, firstName: "SSGAloria", lastName: "AMendoza",image:"head_coply")
    let user7 = User(id: 7, firstName: "LLCGloria", lastName: "CMendoza",image:"head_dog")
    let user8 = User(id: 8, firstName: "WGlria", lastName: "MMendoza",image:"head_god")
    let user9 = User(id: 9, firstName: "GlorSSia", lastName: "LMendoza",image:"head_godd")
    let user10 = User(id: 10, firstName: "MGloria", lastName: "QMendoza",image:"longnv")
    let user14 = User(id: 11, firstName: "WGloria", lastName: "WMendoza",image:"head_hl")
    let user11 = User(id: 12, firstName: "GGloria", lastName: "LJMendoza",image:"path_img")
    let user12 = User(id: 13, firstName: "HGlid", lastName: "UMendoza",image:"head_boy")
    let user13 = User(id: 14, firstName: "Lme", lastName: "OMendoza",image:"dao")
    return [user1,user2,user3,user4,user5,user6,user7,user8,user9,user10,user11,user12,user13,user14]
}

struct SwiftUIView_List_Previews: PreviewProvider {
    static var previews: some View {
        Group {
            SwiftUIView_List()
        }
    }
}

}
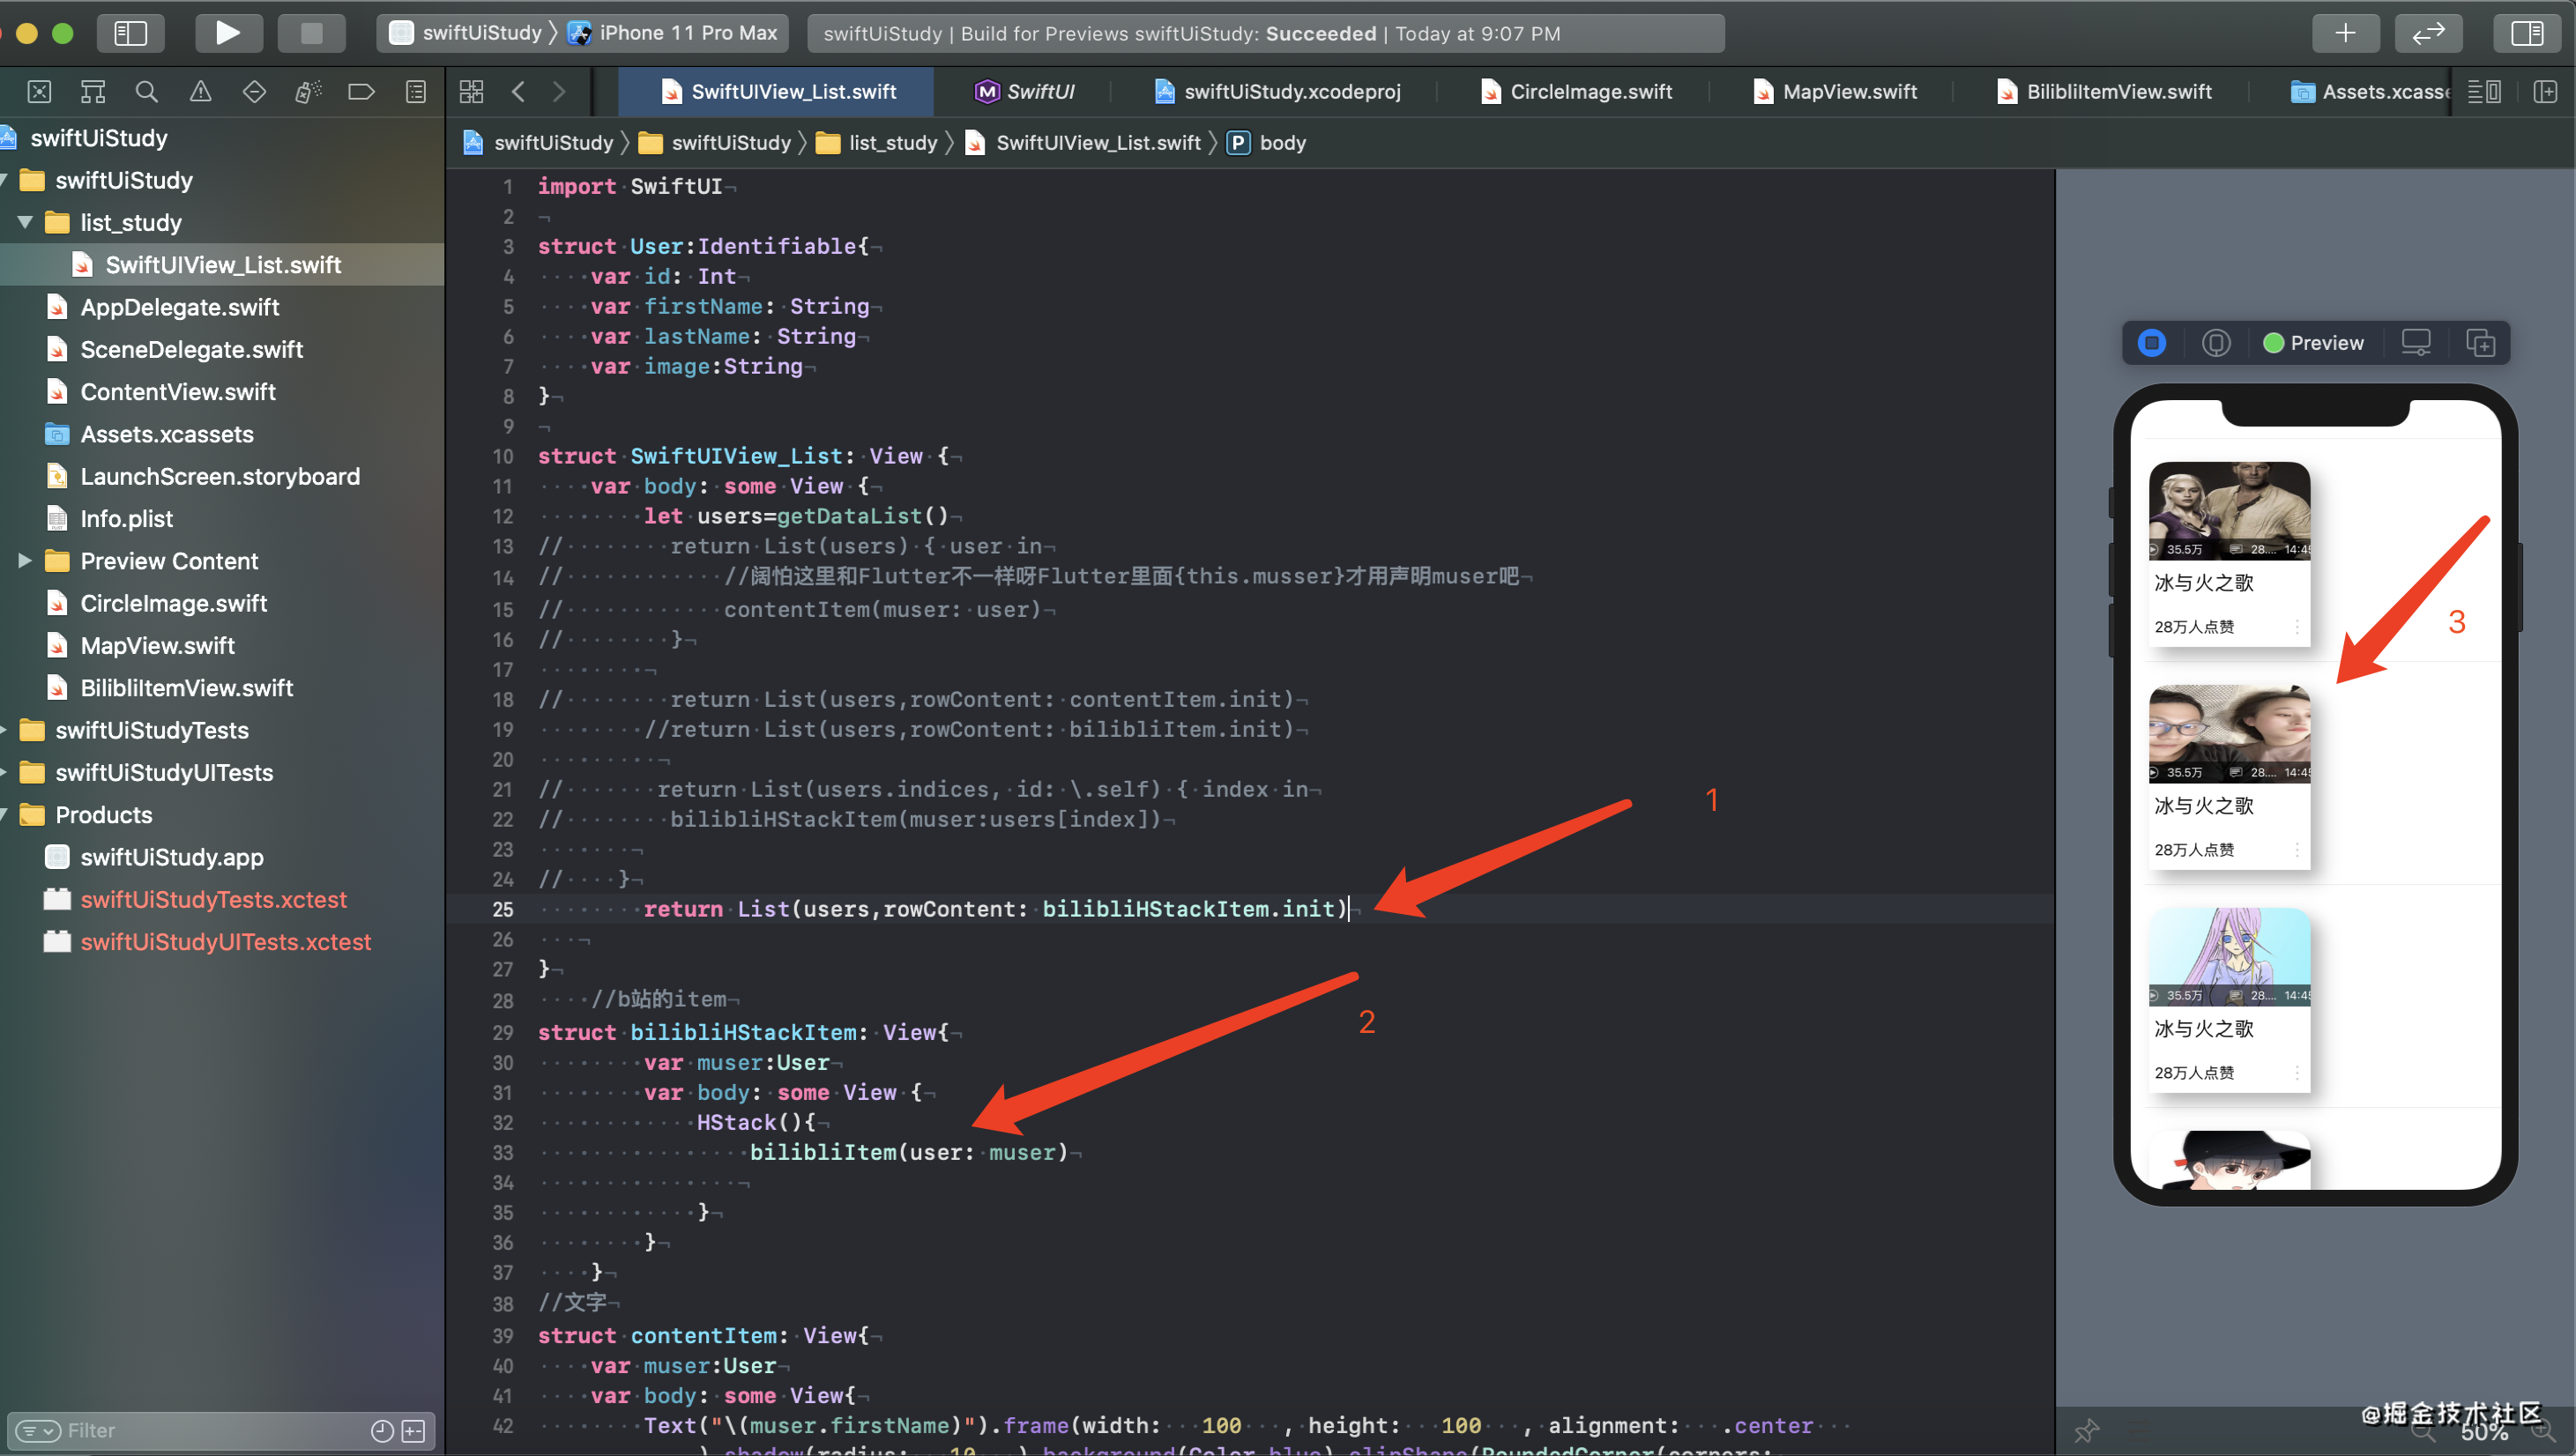
3.List實現網格布局GridView
一般都是兩列的列表,我們這里只是一列。太low了我們竟然學了這一個列表那我們也來實現一下。我們可以想到通過HStack來排布如下:
struct bilibliHStackItem: View{
    var muser:User
    var body: some View {
        HStack(){
            bilibliItem(user: muser)
            bilibliItem(user: muser)
        }
    }
}
完整代碼
import SwiftUI

struct User:Identifiable{
    var id: Int
    var firstName: String
    var lastName: String
}

struct SwiftUIView_List: View {
    var body: some View {
        let users=getDataList()
//        return List(users) { user in
//            //闊怕這里和Flutter不一樣呀Flutter里面{this.musser}才用聲明muser吧
//            contentItem(muser: user)
//        }

//        return List(users,rowContent: contentItem.init)
        //return List(users,rowContent: bilibliItem.init)
        return List(users,rowContent: bilibliHStackItem.init)
    }

}

struct contentItem: View{
    var muser:User
    var body: some View{
        Text("\(muser.firstName)").frame(width:   100   , height:   100   , alignment:   .center   ).shadow(radius:   10   ).background(Color.blue).clipShape(RoundedCorner(corners: [UIRectCorner.allCorners], cornerRaduiWidth: 11, cornerRaduiHeight: 11)).foregroundColor(.white)
    }


}

struct bilibliHStackItem: View{
    var muser:User
    var body: some View {
        HStack(){
            bilibliItem(user: muser)
            bilibliItem(user: muser)
        }
    }
}
//Item
struct bilibliItem: View{
    var user:User
    var body: some View {
        VStack{
        VStack(alignment:.leading, spacing: 1){
            ZStack(alignment:.bottom){
                Image("iimage").resizable().frame(width:190, height: 125, alignment:         .center       )
                HStack(){
                    HStack(){
                        Image("bofang").resizable().frame(minWidth: 15, idealWidth:7, maxWidth:7, minHeight: 15, idealHeight: 5, maxHeight:5, alignment:         .center       ).padding(EdgeInsets(top: 5, leading: 1, bottom: 5, trailing:1))
                        Text("35.5萬").font(.footnote).foregroundColor(.white)
                    }.frame(alignment:         .center       )
                    Spacer()
                    HStack(){
                        Image("pinglun").resizable().frame(minWidth: 15, idealWidth:5, maxWidth:5, minHeight: 15, idealHeight: 5, maxHeight:5, alignment:         .center       ).padding(EdgeInsets(top: 5, leading: 1, bottom: 5, trailing:1))
                        Text("28.77").lineLimit(1).font(.footnote).foregroundColor(.white)
                    }
                    HStack(){
                        Text("14:45").font(.footnote).foregroundColor(.white)
                    }
                }.background(Color.black.opacity(0.6))
                //標題

            }.frame(width: 190, height:125, alignment:         .center       )
            Text("冰與火之歌").font(.system(size:22)).padding(EdgeInsets.init(top: 11.0, leading:11,bottom:0,trailing:26)).background(Color.white)
            HStack(alignment:.center) {
                Text("28萬人點贊")
                Spacer()
                Image("ziyuan").resizable().frame(minWidth: 22, idealWidth:5, maxWidth:5, minHeight: 22, idealHeight: 5, maxHeight:5, alignment:         .center       ).padding(EdgeInsets(top: 5, leading: 1, bottom: 5, trailing:0))
            }.frame(width: 170,height:50).background(Color.white).padding(EdgeInsets(top: 11, leading: 11, bottom: 11, trailing:1))


        }

        }.frame(width: 180, height:210, alignment:         .center       ).background(Color.white).clipShape(RoundedCorner(corners:[UIRectCorner.topLeft,UIRectCorner.topRight], cornerRaduiWidth:22)).shadow(color: Color        .black       .opacity(0.3), radius:         10       , x: 11, y: 11).padding(EdgeInsets(top: 20, leading: 1, bottom: 11, trailing:1))
    }


}

func getDataList()->Array<User>
{
    let user1 = User(id: 1, firstName: "Piper1", lastName: "Chapman")
    let user2 = User(id: 2, firstName: "GGloria", lastName: "Mendoza")
    let user3 = User(id: 3, firstName: "LGloria3", lastName: "Mendoza")
    let user4 = User(id: 4, firstName: "WGloria5", lastName: "SMendoza")
    let user5 = User(id: 5, firstName: "LGlorias", lastName: "MCendoza")
    let user6 = User(id: 6, firstName: "SSGAloria", lastName: "AMendoza")
    let user7 = User(id: 7, firstName: "LLCGloria", lastName: "CMendoza")
    let user8 = User(id: 8, firstName: "WGlria", lastName: "MMendoza")
    let user9 = User(id: 9, firstName: "GlorSSia", lastName: "LMendoza")
    let user10 = User(id: 10, firstName: "MGloria", lastName: "QMendoza")
    let user14 = User(id: 11, firstName: "WGloria", lastName: "WMendoza")
    let user11 = User(id: 12, firstName: "GGloria", lastName: "LJMendoza")
    let user12 = User(id: 13, firstName: "HGlid", lastName: "UMendoza")
    let user13 = User(id: 14, firstName: "Lme", lastName: "OMendoza")
    return [user1,user2,user3,user4,user5,user6,user7,user8,user9,user10,user11,user12,user13,user14]
}

struct SwiftUIView_List_Previews: PreviewProvider {
    static var previews: some View {
        Group {
            SwiftUIView_List()
        }
    }
}
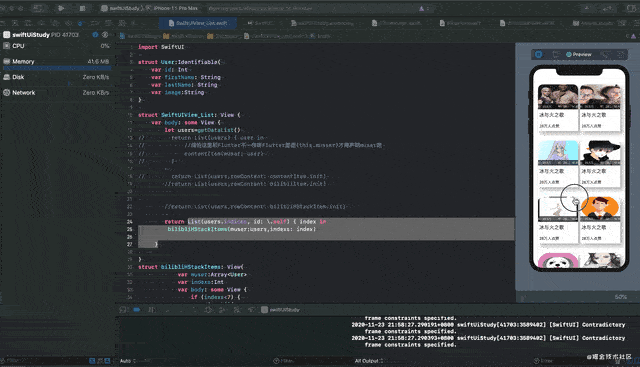
寫過前端的都通過index處理過類似上圖中的問題吧,如果沒有我告訴你,users數組作為數據源,我們可以將item的左右通過index來分為
users[index]和users[index+1]這樣我們的列表就可以按照我們需求顯示了好好想想。算了我們來分析一波:
index=0時候 users[0]  users[1]
index=1時候 users[2]  users[3]
index=2時候 users[4]  users[5]如此類推
.....
index=index時候 users[index*2] users[index*2+1]
應該很完美了吧
...等等我們的index總共有14
index=14時候 user[14*2] user[14*2+1]?what?這樣會出錯吧。超出數組索引了。
我就不嘗試了你們可以入坑。那我們需要判斷[index小于7]才對。
我靠分析完美..靠swift有沒有index提供的初始化方法呢?不要太尷尬了..
一頓瘋狂操作發現的缺有。毫無問題
那么我們代碼應該是如下:
struct SwiftUIView_List: View {
    var body: some View {
        let users=getDataList()
        //含有index初始化list
        return List(users.indices, id: \.self) { index in
         bilibliHStackItems(muser:users,indexs: index)

     }

}
struct bilibliHStackItems: View{
            var muser:Array<User>
            var indexs:Int
            var body: some View {
                if (indexs<7) {
                    HStack(){
                        bilibliItem(user: muser[indexs*2])
                        bilibliItem(user: muser[indexs*2+1])

                    }
                }

            }
        }
說好的網格布局呢?我們來分析一波繼續,網格布局意味著多行多列吧
index=0時候 users[0]  users[1] user[2]
index=1時候 users[3]  users[4] user[5]
index=2時候 users[6]  users[7] user[8]如此類推
.....
index=index時候 users[index*3] users[index*3+1] users[index*3+2]
需要判斷 index小于users.size/3
所以我們可以通過這個公示來進行排列
11:55了明天繼續…
智能推薦
【python學習筆記】列表
列表 1.創建列表 2.添加元素 ----append()方法:向列表末尾添加單個元素 append()不能添加多個元素 ----extend()方法:向列表末尾添加多個元素 事實上extend()方法是使用一個列表來擴展另一個列表,因此參數是列表,而不是單個元素 ----insert()方法:兩個參數,第一個是代表列表中的位置,第二個是在這個位置處插入一個元素 3.獲取元素 通過元素的索引值從列...
html學習筆記——列表
無序列表ul(unordered list) ul無序列表標簽 li 列表項 展示為: orange apple tree 不通類型形狀的無序列表 有序列表ol(ordered list) ol有序列表標簽 li 列表項 展示為: Coffee Milk 不通序號類型的列表: 嵌套列表 無序列表的嵌套列表 不指定類型是以實心圓點、空心圓、實心方塊的默認排列 自定義列表 dl 自定義列表 dt 自定...
Python列表學習筆記
1. 列表的創建 2. 列表的連接與復制 3. 列表的索引與切片 4. 列表常用操作 5. 列表的簡單應用 1. 列表的創建 列表是Python的核心數據類型,可由數值、字符串、布爾值和空值構成。 利用range()來生成列表 range(start,end,step) start起始數據 end結束數據 step設置步長 這三者數據類型都為int(整型),否則報錯 2. 列表的連接與復制 列表的...


freemarker + ItextRender 根據模板生成PDF文件
1. 制作模板 2. 獲取模板,并將所獲取的數據加載生成html文件 2. 生成PDF文件 其中由兩個地方需要注意,都是關于獲取文件路徑的問題,由于項目部署的時候是打包成jar包形式,所以在開發過程中時直接安照傳統的獲取方法沒有一點文件,但是當打包后部署,總是出錯。于是參考網上文章,先將文件讀出來到項目的臨時目錄下,然后再按正常方式加載該臨時文件; 還有一個問題至今沒有解決,就是關于生成PDF文件...
猜你喜歡
電腦空間不夠了?教你一個小秒招快速清理 Docker 占用的磁盤空間!
Docker 很占用空間,每當我們運行容器、拉取鏡像、部署應用、構建自己的鏡像時,我們的磁盤空間會被大量占用。 如果你也被這個問題所困擾,咱們就一起看一下 Docker 是如何使用磁盤空間的,以及如何回收。 docker 占用的空間可以通過下面的命令查看: TYPE 列出了docker 使用磁盤的 4 種類型: Images:所有鏡像占用的空間,包括拉取下來的鏡像,和本地構建的。 Con...

requests實現全自動PPT模板
http://www.1ppt.com/moban/ 可以免費的下載PPT模板,當然如果要人工一個個下,還是挺麻煩的,我們可以利用requests輕松下載 訪問這個主頁,我們可以看到下面的樣式 點每一個PPT模板的圖片,我們可以進入到詳細的信息頁面,翻到下面,我們可以看到對應的下載地址 點擊這個下載的按鈕,我們便可以下載對應的PPT壓縮包 那我們就開始做吧 首先,查看網頁的源代碼,我們可以看到每一...


Linux C系統編程-線程互斥鎖(四)
互斥鎖 互斥鎖也是屬于線程之間處理同步互斥方式,有上鎖/解鎖兩種狀態。 互斥鎖函數接口 1)初始化互斥鎖 pthread_mutex_init() man 3 pthread_mutex_init (找不到的情況下首先 sudo apt-get install glibc-doc sudo apt-get install manpages-posix-dev) 動態初始化 int pthread_...

統計學習方法 - 樸素貝葉斯
引入問題:一機器在良好狀態生產合格產品幾率是 90%,在故障狀態生產合格產品幾率是 30%,機器良好的概率是 75%。若一日第一件產品是合格品,那么此日機器良好的概率是多少。 貝葉斯模型 生成模型與判別模型 判別模型,即要判斷這個東西到底是哪一類,也就是要求y,那就用給定的x去預測。 生成模型,是要生成一個模型,那就是誰根據什么生成了模型,誰就是類別y,根據的內容就是x 以上述例子,判斷一個生產出...