Springcloud學習筆記(二)
標簽: springcloud configserver 配置服務
上回在springcloud學習筆記(一)中我們演示了如何搭建eureka注冊中心和網關,今天我們借著老A的項目接著演示用戶微服務和配置微服務。用戶微服務就是用來模擬真實開發環境中的具體業務服務,配置微服務則是用來統一管理每個微服務的啟動文件的。
一:用戶微服務搭建
第一步是在ag-parent父工程中新建一個子工程取名ag-uc,接下來還是之前的套路,搭建一個微服務的三個步驟:導入依賴文件,修改配置文件以及編寫啟動類。
用戶微服務(亦即普通微服務)的依賴文件如下:
<?xml version="1.0" encoding="UTF-8"?>
<project xmlns="http://maven.apache.org/POM/4.0.0"
         xmlns:xsi="http://www.w3.org/2001/XMLSchema-instance"
         xsi:schemaLocation="http://maven.apache.org/POM/4.0.0 http://maven.apache.org/xsd/maven-4.0.0.xsd">
    <parent>
        <artifactId>ag-parent</artifactId>
        <groupId>com.github.wxiaoqi.learning</groupId>
        <version>1.0-SNAPSHOT</version>
    </parent>
    <modelVersion>4.0.0</modelVersion>

    <artifactId>ag-uc</artifactId>
    <dependencies>
        <dependency>
            <groupId>org.springframework.cloud</groupId>
            <artifactId>spring-cloud-starter-eureka</artifactId>
        </dependency>
        <dependency>
            <groupId>org.springframework.boot</groupId>
            <artifactId>spring-boot-starter-actuator</artifactId>
        </dependency>
        <dependency>
            <groupId>org.springframework.cloud</groupId>
            <artifactId>spring-cloud-config-client</artifactId>
        </dependency>
    </dependencies>

</project>
spring:
  application:
    name: user-center
eureka:
  client:
    service-url:
      defaultZone: http://localhost:8761/eureka
server:
  port: 7771
配置文件中只需要填寫以上基本的屬性配置就能啟動成功。
最后一步是編寫啟動類UserCenterBootstrap啟動類:
package com.github.wxiaoqi.learning.uc;

import org.springframework.boot.SpringApplication;
import org.springframework.boot.autoconfigure.SpringBootApplication;
import org.springframework.cloud.netflix.eureka.EnableEurekaClient;

/**
 * <pre>
 *    author  : lpf
 *    time    : 2017/10/2922:21
 *    desc    : 輸入描述
 * </pre>
 */
@SpringBootApplication
@EnableEurekaClient
public class UseCenterBootstrap {
    public static void main(String[] args) {
        SpringApplication.run(UseCenterBootstrap.class,args);
    }
}新建一個Controller取名UserRest,內容如下:
package com.github.wxiaoqi.learning.uc.rest;

import org.springframework.beans.factory.annotation.Value;
import org.springframework.web.bind.annotation.PathVariable;
import org.springframework.web.bind.annotation.RequestMapping;
import org.springframework.web.bind.annotation.RestController;

/**
 * <pre>
 *    author  : lpf
 *    time    : 2017/10/3020:29
 *    desc    : 輸入描述
 * </pre>
 */
@RestController
@RequestMapping("user")
public class UserRest {


    @RequestMapping("/{id}")
    public String getUserInfo(@PathVariable String id){
        return "接口訪問成功";
    }
}
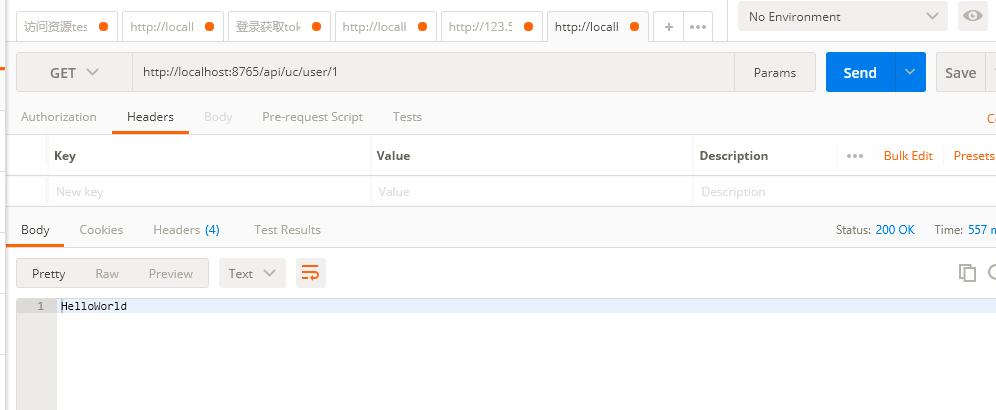
如果有不明白請求的鏈接為什么是http://localhost:8765/api/uc/user/1,可以看我上一篇關于網關的路由分發配置,相信看完之后就會明白為什么是/api/uc打頭的路徑了。
二:配置中心微服務搭建
到這里就該演示如何搭建一個配置服務了,搭建的基本思路不變,只是部分配置和之前有些不同。
依賴文件:
<?xml version="1.0" encoding="UTF-8"?>
<project xmlns="http://maven.apache.org/POM/4.0.0"
         xmlns:xsi="http://www.w3.org/2001/XMLSchema-instance"
         xsi:schemaLocation="http://maven.apache.org/POM/4.0.0 http://maven.apache.org/xsd/maven-4.0.0.xsd">
    <parent>
        <artifactId>ag-parent</artifactId>
        <groupId>com.github.wxiaoqi.learning</groupId>
        <version>1.0-SNAPSHOT</version>
    </parent>
    <modelVersion>4.0.0</modelVersion>

    <artifactId>ag-config</artifactId>

    <dependencies>
        <dependency>
            <groupId>org.springframework.boot</groupId>
            <artifactId>spring-boot-actuator</artifactId>
        </dependency>
        <dependency>
            <groupId>org.springframework.cloud</groupId>
            <artifactId>spring-cloud-config</artifactId>
        </dependency>
        <dependency>
            <groupId>org.springframework.cloud</groupId>
            <artifactId>spring-cloud-starter-eureka</artifactId>
        </dependency>
        <dependency>
            <groupId>org.springframework.cloud</groupId>
            <artifactId>spring-cloud-config-server</artifactId>
        </dependency>

    </dependencies>
</project>
spring:
  application:
    name: ag-config
  cloud:
    config:
      server:
        git:
          uri: https://git.oschina.net/geek_qi/AG-Config.git

eureka:
  client:
    service-url:
      defaultZone: http://localhost:8761/eureka
server:
  port: 8750
配置微服務啟動類:
package com.github.wxiaoqi.learning.config;

import org.springframework.boot.SpringApplication;
import org.springframework.boot.autoconfigure.EnableAutoConfiguration;
import org.springframework.boot.autoconfigure.SpringBootApplication;
import org.springframework.cloud.config.server.EnableConfigServer;
import org.springframework.cloud.netflix.eureka.EnableEurekaClient;


/**
 * <pre>
 *    author  : lpf
 *    time    : 2017/10/2922:21
 *    desc    : 輸入描述
 * </pre>
 */
@SpringBootApplication
@EnableEurekaClient
@EnableConfigServer
@EnableAutoConfiguration
public class ConfigServerBootstrap {
    public static void main(String[] args) {
        SpringApplication.run(ConfigServerBootstrap.class,args);
    }
}
spring:
  cloud:
    config:
        discovery:
           service-id: ag-config
           enabled: true
        label: master  # git 分支
        name: uc
profile: dev至于這里為什么要新建bootstrap文件填寫配置信息而不在application配置文件中填寫,這里沒有明顯的區別。只是大家需要知道bootstrap.yml要比application.yml文件先加載,并且bootstrap.yml文件會覆蓋application.yml中相同屬性的內容(如果有的話)。所以bootstrap.yml文件中通常都會配置一些固定的數據,比如配置文件的讀取方式以及加解密信息。
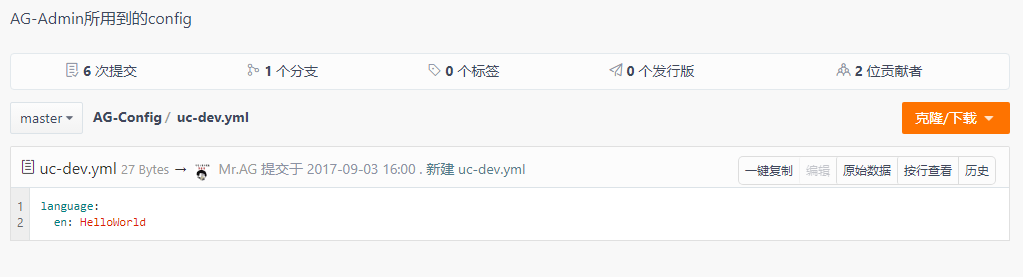
最后我們再改造一下用戶微服務的接口打印出配置文件中的內容,先看一下配置文件中的內容:
改造用戶微服務的接口:
package com.github.wxiaoqi.learning.uc.rest;

import org.springframework.beans.factory.annotation.Value;
import org.springframework.web.bind.annotation.PathVariable;
import org.springframework.web.bind.annotation.RequestMapping;
import org.springframework.web.bind.annotation.RestController;

/**
 * <pre>
 *    author  : lpf
 *    time    : 2017/10/3020:29
 *    desc    : 輸入描述
 * </pre>
 */
@RestController
@RequestMapping("user")
public class UserRest {

    @Value("${language.en}")
    private String hello;
    @RequestMapping("/{id}")
    public String getUserInfo(@PathVariable String id){
        return hello;
    }
}
到這里我們已經把配置微服務和用戶微服務搭建完成,并演示了接口調用以及從配置服務中讀取內容的過程。整個springcloud的腳手架基本搭建完成,后續任務就是一步一步填充這個框架,使其更加豐滿。
智能推薦


freemarker + ItextRender 根據模板生成PDF文件
1. 制作模板 2. 獲取模板,并將所獲取的數據加載生成html文件 2. 生成PDF文件 其中由兩個地方需要注意,都是關于獲取文件路徑的問題,由于項目部署的時候是打包成jar包形式,所以在開發過程中時直接安照傳統的獲取方法沒有一點文件,但是當打包后部署,總是出錯。于是參考網上文章,先將文件讀出來到項目的臨時目錄下,然后再按正常方式加載該臨時文件; 還有一個問題至今沒有解決,就是關于生成PDF文件...
電腦空間不夠了?教你一個小秒招快速清理 Docker 占用的磁盤空間!
Docker 很占用空間,每當我們運行容器、拉取鏡像、部署應用、構建自己的鏡像時,我們的磁盤空間會被大量占用。 如果你也被這個問題所困擾,咱們就一起看一下 Docker 是如何使用磁盤空間的,以及如何回收。 docker 占用的空間可以通過下面的命令查看: TYPE 列出了docker 使用磁盤的 4 種類型: Images:所有鏡像占用的空間,包括拉取下來的鏡像,和本地構建的。 Con...

requests實現全自動PPT模板
http://www.1ppt.com/moban/ 可以免費的下載PPT模板,當然如果要人工一個個下,還是挺麻煩的,我們可以利用requests輕松下載 訪問這個主頁,我們可以看到下面的樣式 點每一個PPT模板的圖片,我們可以進入到詳細的信息頁面,翻到下面,我們可以看到對應的下載地址 點擊這個下載的按鈕,我們便可以下載對應的PPT壓縮包 那我們就開始做吧 首先,查看網頁的源代碼,我們可以看到每一...

猜你喜歡

Linux C系統編程-線程互斥鎖(四)
互斥鎖 互斥鎖也是屬于線程之間處理同步互斥方式,有上鎖/解鎖兩種狀態。 互斥鎖函數接口 1)初始化互斥鎖 pthread_mutex_init() man 3 pthread_mutex_init (找不到的情況下首先 sudo apt-get install glibc-doc sudo apt-get install manpages-posix-dev) 動態初始化 int pthread_...

統計學習方法 - 樸素貝葉斯
引入問題:一機器在良好狀態生產合格產品幾率是 90%,在故障狀態生產合格產品幾率是 30%,機器良好的概率是 75%。若一日第一件產品是合格品,那么此日機器良好的概率是多少。 貝葉斯模型 生成模型與判別模型 判別模型,即要判斷這個東西到底是哪一類,也就是要求y,那就用給定的x去預測。 生成模型,是要生成一個模型,那就是誰根據什么生成了模型,誰就是類別y,根據的內容就是x 以上述例子,判斷一個生產出...
styled-components —— React 中的 CSS 最佳實踐
https://zhuanlan.zhihu.com/p/29344146 Styled-components 是目前 React 樣式方案中最受關注的一種,它既具備了 css-in-js 的模塊化與參數化優點,又完全使用CSS的書寫習慣,不會引起額外的學習成本。本文是 styled-components 作者之一 Max Stoiber 所寫,首先總結了前端組件化樣式中的最佳實踐原則,然后在此基...
19.vue中封裝echarts組件
19.vue中封裝echarts組件 1.效果圖 2.echarts組件 3.使用組件 按照組件格式整理好數據格式 傳入組件 home.vue 4.接口返回數據格式...