如果你在用 Python3,如果你需要搭建一個 API 服務,如果時間很緊,那么 HUG 可能就是你的最佳選擇!本文將用輕松易懂的實例教程來帶大家走入 HUG 的世界。
更新歷史
- 2017.03.09: 完成初稿
準備工作
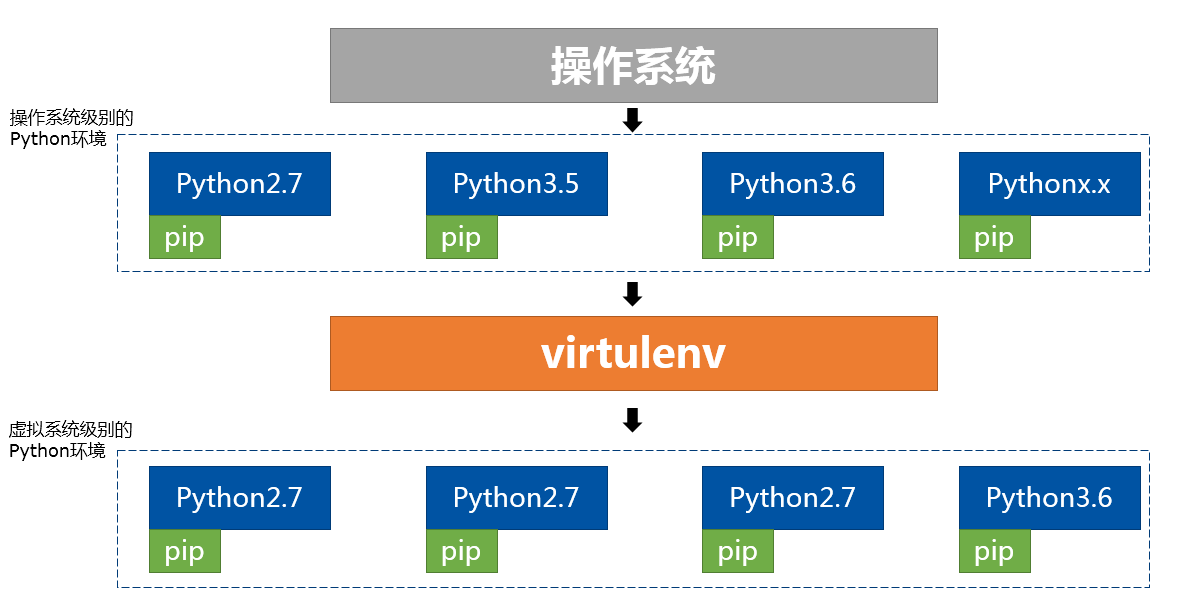
HUG 是基于 Python3 的,所以我們來安裝一下。一般來說我們會使用 virtualenv 來隔離不同的環境,不然不同的包容易『打架』。比較簡單,跟著敲命令即可。
|
# 安裝 Python3,其中 pip3 會隨著 Python3 一并安裝 # 編譯時間會比較長,請耐心等待 brew install python3 # 安裝 VirtualEnv 方便隔離開發 pip3 install virtualenv # 新建一個 ~/hug 文件夾來保存 virtualenv -p python3 ~/hug # **環境 source ~/hug/bin/activate # 離開環境 deactivate
|
配置完成之后,我們就可以安裝 hug 啦,直接 pip3
install hug --upgrade 即可。恭喜,一切完事兒!(如果你手滑,可以再 pip3 install bottle 一下,之后有用)
Hello World
按照通常的 Hello World 慣例,我們就來寫一個 API,給訪問這個 API 的用戶問好。就是如下 7 行(文件名為 hello.py):
|
import time import hug @hug.get('/hello') def hello(name): """Say Hello to the User""" ticks = time.time() return "Hello {name}! Now is {ticks}".format(**locals())
|
然后我們在命令行里輸入 hug -f hello.py,就可以看到如下萌萌的啟動界面:

然后我們來訪問一下 127.0.0.1:8000,發現返回的結果是這個:
|
{ "404": "The API call you tried to make was not defined. Here's a definition of the API to help you get going :)", "documentation": { "handlers": { "/hello": { "GET": { "usage": "Say Hello to the User", "outputs": { "format": "JSON (Javascript Serialized Object Notation)", "content_type": "application/json" }, "inputs": { "name": { "type": "Basic text / string value" } } } } } } }
|
這個告訴我們,嘿這個 API 我們沒有定義噢,但是我們很貼心的給你列出來已經定義的 API,剩下的你自己看咯!
好,我們現在知道了,要訪問的是 127.0.0.1:8000/hello,于是我們打開瀏覽器再試一次,發現結果是這個:
|
{ "errors": { "name": "Required parameter 'name' not supplied" } }
|
噢,這個錯誤提醒我們,一定要給出 name 這個參數,好,那我們訪問 127.0.0.1:8000/hello?name=wdxtub,結果終于對了,像這樣(給出了名字,也給出了當前的時間戳):
|
"Hello wdxtub! Now is 1489061160.552566"
|
但是這個方法還有一點不好,就是我們改動了代碼,并不會自動重新載入,每次都要手動重啟很麻煩,那怎么辦呢?下一節我們就來搞這個問題。
自動重啟及 API 測試
還記得我們之前手滑安裝的 bottle 嗎?接下來就有用啦,我們把代碼改成如***意新增的 import 和下面的 if 部分):
|
import hug import time from bottle import run @hug.get('/hello') def hello(name): """Say Hello to the User""" ticks = time.time() return "Hello {name}! Now is {ticks}".format(**locals()) if __name__ == "__main__": app = __hug__.http.server() run(app=app, reloader=True, port=8000)
|
然后在命令行中輸入 python hello.py,就可以看到我們的 API
服務器啟動起來了,如果這個時候我們對 hello.py 做些修改,bottle 會自動幫我們重啟,非常方便!比如我們可以加入下面幾行:
|
@hug.get('/', output=hug.output_format.json) def root(): return {'msg': "歡迎來到 HUG 指南"}
|
稍等一下,就可以訪問 127.0.0.1:8000 了。當然,使用瀏覽器測試
API 其實是不太方便的,這里推薦一下 Postman 這個 Chrome 應用,可以很方便地進行各類測試。比如像這樣:

重新認識 HUG
官方的標題起的很威武霸氣 - 擁抱未來的 API(Embrace the APIs of the future)。借用其簡介:
Drastically simplify API development over multiple interfaces. With hug, design and develop your API once, then expose it however your clients need to consume it. Be it locally, over HTTP, or through the command line - hug is the fastest and most modern way to create APIs on Python3.
從前面的例子中我們其實也可以簡單領略到 HUG 的魅力,這里簡單總結一下:
- 性能高。在如此高的抽象層仍舊不損失太多性能,值得稱贊(接近最快的
falcon) - 自帶版本管理。簡單制定所屬的 API 版本,就可以用
v1,v2這樣的方式來切換,方便 - 自動化文檔。只要簡單地在代碼中寫注釋及標注好類型,文檔就自動生成了,省事兒
- 標記即驗證。利用 Python 3 的 type annotation 能力,可以對每個參數進行驗證和轉換
- 寫一次到處用。只能用作 API 嗎?錯!還可以用在命令行和其他 python 代碼中,因為業務邏輯很干凈
好了!現在你已經準備好了!可能教程不是特別『豐富』,但是相信你可以的,畢竟參考鏈接里可是有完整的教程呢!