Android34_Animations使用(二)
標簽: Anidroid AnimationUtils Set XML
在代碼中使用Animations可以很方便的調試、運行,但是代碼的可重用性差,重復代碼多。同樣可以在xml文件中配置Animations,這樣做可維護性變高了,只不過不容易進行調試。
一、在xml中使用Animations步驟
1.在res文件夾下建立一個anim文件夾;
2.創建xml文件,并首先加入set標簽,更改標簽如下:
<?xml version="1.0" encoding="utf-8"?>
<set xmlns:android="http://schemas.android.com/apk/res/android"
	android:interpolator="@android:anim/accelerate_interpolator">
</set>
3.在該標簽當中加入rotate,alpha,scale或者translate標簽;
<alpha
    	android:fromAlpha="1.0"
    	android:toAlpha="0.0"
    	android:startOffset="500"
    	android:duration="500"/>
4.在代碼當中使用AnimationUtils當中裝載xml文件,并生成Animation對象。因為Animation是AnimationSet的子類,所以向上轉型,用Animation對象接收。
//使用AnimationUtils裝載動畫配置文件
Animation animation = AnimationUtils
	.loadAnimation(AnimationActivity.this, R.anim.alpha);
//啟動動畫
image.startAnimation(animation);
二、完整代碼
目錄結構:

Main.xml
<?xml version="1.0" encoding="utf-8"?>
<LinearLayout xmlns:android="http://schemas.android.com/apk/res/android"
    android:orientation="vertical"
    android:layout_width="fill_parent"
    android:layout_height="fill_parent"
    >
	<LinearLayout
	    android:orientation="horizontal"
	    android:layout_height="wrap_content"
	    android:layout_width="wrap_content">
		<Button
			android:id="@+id/rotateButton"
	    	android:layout_width="wrap_content"
	    	android:layout_height="wrap_content"
	    	android:text="旋轉"/>
		<Button
			android:id="@+id/scaleButton"
	    	android:layout_width="wrap_content"
	    	android:layout_height="wrap_content"
	    	android:text="縮放"/>
		<Button
			android:id="@+id/alphaButton"
	    	android:layout_width="wrap_content"
	    	android:layout_height="wrap_content"
	    	android:text="淡入淡出"/>
		<Button
			android:id="@+id/translateButton"
	    	android:layout_width="wrap_content"
	    	android:layout_height="wrap_content"
	    	android:text="移動"/>
	</LinearLayout>
	<LinearLayout
	    android:orientation="vertical"
	    android:layout_width="fill_parent"
	    android:layout_height="fill_parent">
		<ImageView
			android:id="@+id/image"
	    	android:layout_width="wrap_content"
	    	android:layout_height="wrap_content"
	    	android:layout_centerInParent="true"
	    	android:src="@drawable/image"/>
	</LinearLayout>
</LinearLayout>
Alpha.xml
<?xml version="1.0" encoding="utf-8"?>
<set xmlns:android="http://schemas.android.com/apk/res/android"
	android:interpolator="@android:anim/accelerate_interpolator">
    <!-- fromAlpha和toAlpha是起始透明度和結束時透明度 -->
    <alpha
    	android:fromAlpha="1.0"
    	android:toAlpha="0.0"
    	android:startOffset="500"
    	android:duration="500"/>
</set>
Rotate.xml
<?xml version="1.0" encoding="utf-8"?>
<set xmlns:android="http://schemas.android.com/apk/res/android"
	android:interpolator="@android:anim/accelerate_interpolator">
    <!--
    	fromDegrees:開始的角度
    	toDegrees:結束的角度,+表示是正的
    	pivotX:用于設置旋轉時的x軸坐標
    	例
    		1)當值為"50",表示使用絕對位置定位
    		2)當值為"50%",表示使用相對于控件本身定位
    		3)當值為"50%p",表示使用相對于控件的父控件定位
    	pivotY:用于設置旋轉時的y軸坐標
      -->
    <rotate
    	android:fromDegrees="0"
    	android:toDegrees="+360"
    	android:pivotX="50%"
    	android:pivotY="50%"
    	android:duration="1000"/>
</set>
Translate.xml
<?xml version="1.0" encoding="utf-8"?>
<set xmlns:android="http://schemas.android.com/apk/res/android"
	android:interpolator="@android:anim/accelerate_interpolator">
    <!--
    		始x軸坐標
    		止x軸坐標
    		始y軸坐標
    		止y軸坐標
      -->
    <translate
    	android:fromXDelta="0%"
    	android:toXDelta="100%"
    	android:fromYDelta="0%"
    	android:toYDelta="100%"
    	android:duration="2000"/>
</set>
Scale.xml
<?xml version="1.0" encoding="utf-8"?>
<set xmlns:android="http://schemas.android.com/apk/res/android"
	android:interpolator="@android:anim/accelerate_interpolator">
   <!--
   		起始x軸坐標
    		止x軸坐標
    		始y軸坐標
    		止y軸坐標
    		軸的坐標
    		軸的坐標
     -->
   <scale
   		android:fromXScale="1.0"
   		android:toXScale="0.0"
   		android:fromYScale="1.0"
   		android:toYScale="0.0"
   		android:pivotX="50%"
   		android:pivotY="50%"
   		android:duration="1000"/>
</set>
AnimationActivity.java
package com.android.activity;
import android.app.Activity;
import android.os.Bundle;
import android.view.View;
import android.view.View.OnClickListener;
import android.view.animation.Animation;
import android.view.animation.AnimationUtils;
import android.widget.Button;
import android.widget.ImageView;
public class AnimationActivity extends Activity {
	private Button rotateButton = null;
	private Button scaleButton = null;
	private Button alphaButton = null;
	private Button translateButton = null;
	private ImageView image = null;
	@Override
    public void onCreate(Bundle savedInstanceState) {
        super.onCreate(savedInstanceState);
        setContentView(R.layout.main);

        rotateButton = (Button)findViewById(R.id.rotateButton);
        scaleButton = (Button)findViewById(R.id.scaleButton);
        alphaButton = (Button)findViewById(R.id.alphaButton);
        translateButton = (Button)findViewById(R.id.translateButton);
        image = (ImageView)findViewById(R.id.image);

        rotateButton.setOnClickListener(new RotateButtonListener());
        scaleButton.setOnClickListener(new ScaleButtonListener());
        alphaButton.setOnClickListener(new AlphaButtonListener());
        translateButton.setOnClickListener(
			 TranslateButtonListener());
    }
	class AlphaButtonListener implements OnClickListener{
		public void onClick(View v) {
			//使用AnimationUtils裝載動畫配置文件
			Animation animation = AnimationUtils
				.loadAnimation(AnimationActivity.this, R.anim.alpha);
			//啟動動畫
			image.startAnimation(animation);
		}
	}
	class RotateButtonListener implements OnClickListener{
		public void onClick(View v) {
			Animation animation = AnimationUtils
				.loadAnimation(AnimationActivity.this, R.anim.rotate);
			image.startAnimation(animation);
		}
	}
	class ScaleButtonListener implements OnClickListener{
		public void onClick(View v) {
			Animation animation = AnimationUtils
				.loadAnimation(AnimationActivity.this, R.anim.scale);
			image.startAnimation(animation);
		}
	}

	class TranslateButtonListener implements OnClickListener{
		public void onClick(View v) {
			Animation animation = AnimationUtils
				.loadAnimation(AnimationActivity.this, R.anim.translate);
			image.startAnimation(animation);
		}
	}
}
運行結果:

智能推薦
34 | join語句的使用
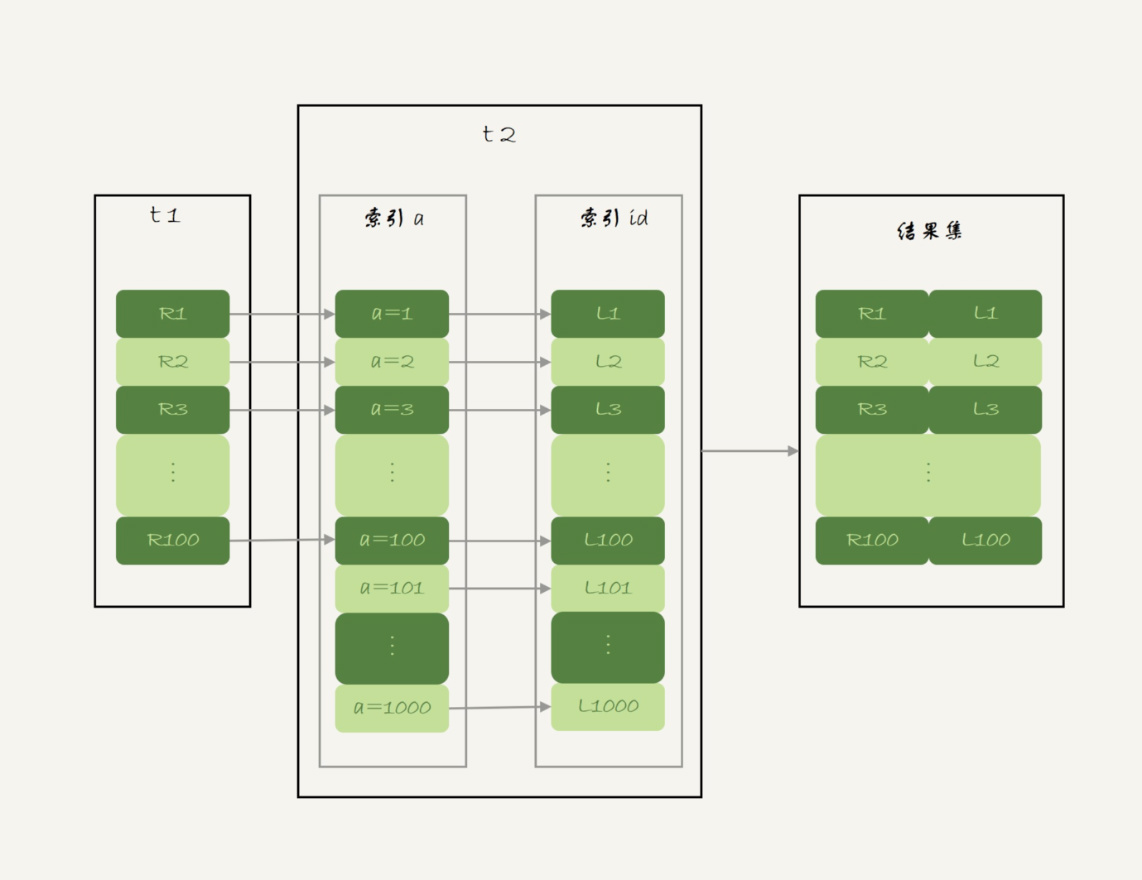
在Mysql的實現中,Nested-Loop Join有3種實現的算法: Simple Nested-Loop Join:SNLJ,簡單嵌套循環連接 Index Nested-Loop Join:INLJ,索引嵌套循環連接 Block Nested-Loop Join:BNLJ,緩存塊嵌套循環連接 在選擇Join算法時,會有優先級,理論上會優先判斷能否使用INLJ、BNLJ: Index Nest...
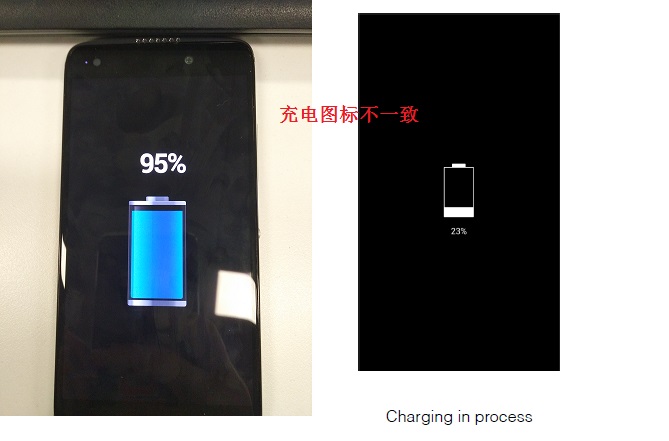
android 系統(34)--關機充電圖標修改
關機充電圖標修改 關機充電圖標修改 關機充電main函數 函數set_draw_anim_mode 函數pthread_mutex_init 函數bootlogo_init 函數alarm_control 函數charging_control 1 draw_thread_routine 2 draw_with_interval 3 bootlogo_show_charging 4 show_bat...
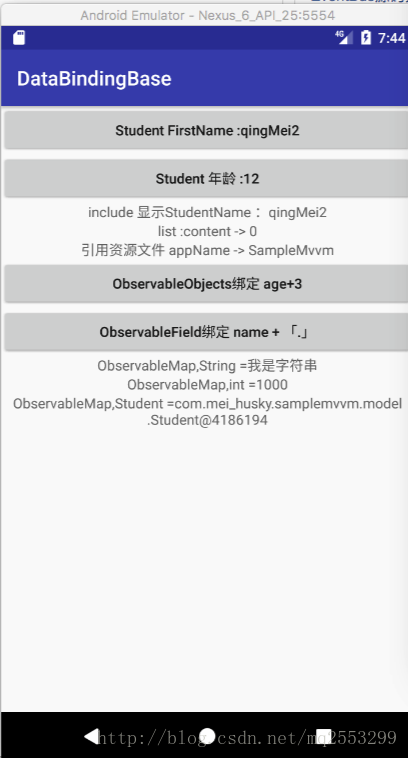
Android DataBinding使用總結(二)
一、基本的數據綁定 1.可以通過這樣的方式創建對象(JavaBean): 2.在layout文件中,設置: 3.然后在activity中: 二、Layout Details(布局詳解) 1.我們可以在xml的data標簽中添加import標簽進行導包,這樣我們就可以直接調用對應類的方法了 2.dataBinding綁定include標簽 include標簽常用于可復用的layout,我們當然也可以...

Android ExpandableListView使用小結(二)
http://www.jianshu.com/p/4c7be6fdb12b 在上一篇Android ExpandableListView使用小結(一)的介紹中,我們了解了ExpandableListView的使用方法,學習了自定義適配器,為列表選項設置監聽事件。想必大家都能熟練使用了,今天我要分享的是ExpandableListView的Indicator(指示器)的使用。 在我們看來,Indic...
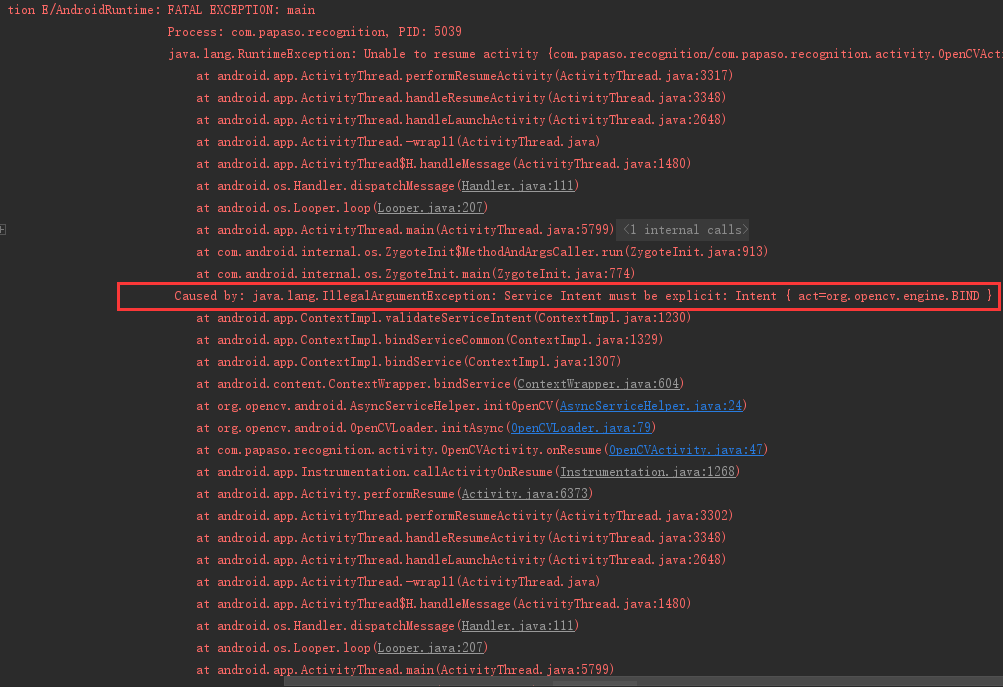
Android中使用OpenCV(二)
轉載請注明gao_chun的Blog:http://blog.csdn.net/gao_chun/article/details/72654286 Android中使用OpenCV 之前比較早的時候寫了一篇博文: AndroidStudio中配置及使用OpenCV示例 ,主要介紹了如何在AS中使用OpenCV,基本的配置介紹及使用示例,上傳的示例也比較潦草,使用的版本是 OPENCV_VERSIO...
猜你喜歡


freemarker + ItextRender 根據模板生成PDF文件
1. 制作模板 2. 獲取模板,并將所獲取的數據加載生成html文件 2. 生成PDF文件 其中由兩個地方需要注意,都是關于獲取文件路徑的問題,由于項目部署的時候是打包成jar包形式,所以在開發過程中時直接安照傳統的獲取方法沒有一點文件,但是當打包后部署,總是出錯。于是參考網上文章,先將文件讀出來到項目的臨時目錄下,然后再按正常方式加載該臨時文件; 還有一個問題至今沒有解決,就是關于生成PDF文件...
電腦空間不夠了?教你一個小秒招快速清理 Docker 占用的磁盤空間!
Docker 很占用空間,每當我們運行容器、拉取鏡像、部署應用、構建自己的鏡像時,我們的磁盤空間會被大量占用。 如果你也被這個問題所困擾,咱們就一起看一下 Docker 是如何使用磁盤空間的,以及如何回收。 docker 占用的空間可以通過下面的命令查看: TYPE 列出了docker 使用磁盤的 4 種類型: Images:所有鏡像占用的空間,包括拉取下來的鏡像,和本地構建的。 Con...

requests實現全自動PPT模板
http://www.1ppt.com/moban/ 可以免費的下載PPT模板,當然如果要人工一個個下,還是挺麻煩的,我們可以利用requests輕松下載 訪問這個主頁,我們可以看到下面的樣式 點每一個PPT模板的圖片,我們可以進入到詳細的信息頁面,翻到下面,我們可以看到對應的下載地址 點擊這個下載的按鈕,我們便可以下載對應的PPT壓縮包 那我們就開始做吧 首先,查看網頁的源代碼,我們可以看到每一...
