Netty拾遺(二)——Java NIO的三個組件(Buffer,Channel,Selector)
前言
關于Java的NIO與BIO在上一篇博客中已經簡單總結,這里開始梳理NIO的三個組件——buffer,channel與selector
Buffer
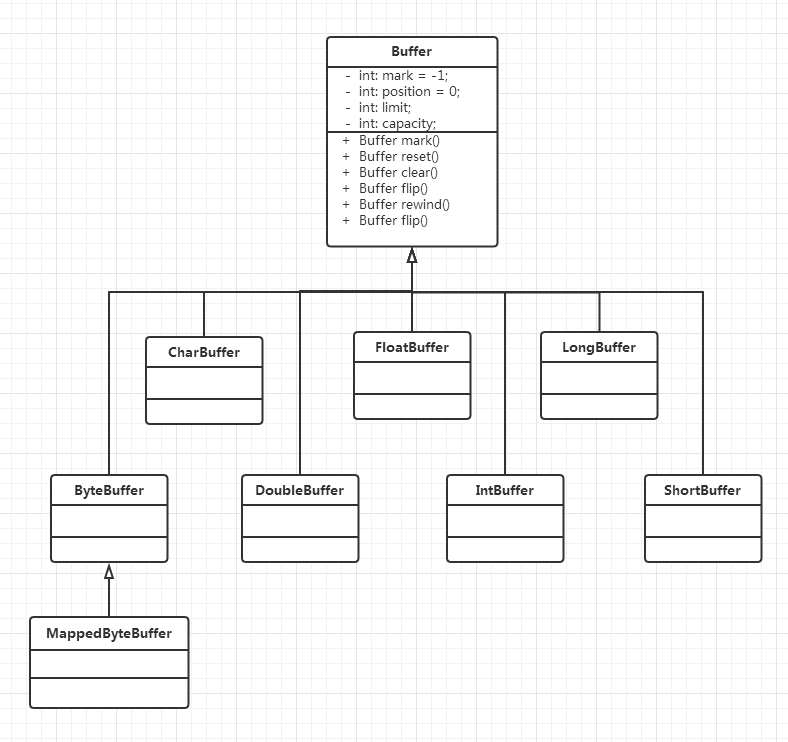
從名字來看其實就是一個用于緩存數據的類,Buffer類是一個抽象類,具體的實現在NIO中有8種緩沖區類,分別如下:ByteBuffer,CharBuffer,DoubleBuffer,FloatBuffer,IntBuffer,LongBuffer,ShortBuffer,MappedByteBuffer 前7種其實就對應的Java中的基本類型,第八種數據類型是專門用于內存映射的一種ByteBuffer類型。
三個關鍵的屬性
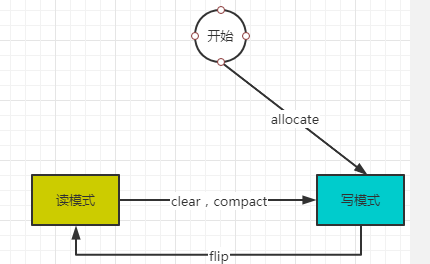
Buffer內部維護了三個關鍵的屬性,一個是capacity,一個是position,一個是limit,同時Buffer存在兩種不同的模式,可讀模式和可寫模式。
capacity
這個表示Buffer的容量大小,寫入對象的數量最多不能超過capacity,該屬性一旦被分配,就不會改變。
Buffer的創建是通過調用之類的allocate方法來分配。
position
這個表示當前的位置,但是position的值與Buffer的讀寫模式有關,在不同的模式下,position屬性的值是不同的。當Buffer進行讀寫模式的切換的時候position會進行調整。
幾個方法的調用都會觸發Buffer的讀寫模式的切換,后續會總結這個
limit
limit表示讀寫的最大上限。這個也與Buffer的讀寫模式有關,不同的模式limit的值不同。
寫模式下:limit表示寫入的數據最大上限,在Buffer剛進入到寫模式下,limit屬性值被設置為緩沖區的capacity容量。
讀模式下:limit表示最多能從Buffer中讀到多少數據。
下面以IntBuffer為例來說明
Buffer的容量分配
打印Buffer相關屬性的方法
/**
 * 打印出buffer各個屬性的位置
 * @param buffer
 */
public static void printBufferPropertiesInfo(Buffer buffer){
    int position = buffer.position();
    int limit = buffer.limit();
    int capacity = buffer.capacity();
    log.info("================= print buffer info start =================");
    log.info("position:{}",position);
    log.info("limit:{}",limit);
    log.info("capacity:{}",capacity);
    log.info("================= print buffer info end =================");
}
通過allocate進行容量的分配
/**
 * buffer分配空間,buffer創建之后,默認進入寫模式
 */
public static void allocateBuffer(){
    //Buffer.allocate,分配指定空間的buffer
    intBuffer = IntBuffer.allocate(20);
    log.info("buffer allocate finished");
    log.info("buffer mode : {}",intBuffer.isReadOnly());
    intBuffer.flip();
    log.info("buffer mode : {}",intBuffer.isReadOnly());
    printBufferPropertiesInfo(intBuffer);
}
運行結果如下:
[main] INFO com.learn.netty.component.buffer.BufferDemo - buffer allocate finished
[main] INFO com.learn.netty.component.buffer.BufferDemo - ================= print buffer info start =================
[main] INFO com.learn.netty.component.buffer.BufferDemo - position:0
[main] INFO com.learn.netty.component.buffer.BufferDemo - limit:20
[main] INFO com.learn.netty.component.buffer.BufferDemo - capacity:20
[main] INFO com.learn.netty.component.buffer.BufferDemo - ================= print buffer info end =================
Buffer的寫入
Buffer只要分配了內存空間,就是可寫入模式,寫入數據需要調用Buffer中的put方法,如下實例
/**
 * 往buffer中寫入數據
 * @param buffer
 * @param count
 */
public static void writeBuffer(IntBuffer buffer,int count){
    int i = 0;
    while(i<count){
        buffer.put(i+1);
        i++;
    }
    printBufferPropertiesInfo(buffer);
}
寫入指定數據之后,相關變量的變化如下
[main] INFO com.learn.netty.component.buffer.BufferDemo - ================= print buffer info start =================
[main] INFO com.learn.netty.component.buffer.BufferDemo - position:6
[main] INFO com.learn.netty.component.buffer.BufferDemo - limit:20
[main] INFO com.learn.netty.component.buffer.BufferDemo - capacity:20
[main] INFO com.learn.netty.component.buffer.BufferDemo - ================= print buffer info end =================
可以看到position變成了6,表示寫入了6個元素,limit表示可寫入20個元素
Buffer的讀取
向緩沖區中寫入數據之后,并不能直接從Buffer中讀取數據,需要進行一個模式的切換,需要調用Buffer的flip方法完成模式的切換。
/**
 * 從buffer中讀取,從寫入模式切換到讀取模式,需要調用buffer的flip方法
 * @param buffer
 */
public static void readBuffer(IntBuffer buffer){
	//由寫入模式切換成讀取模式
    buffer.flip();
    int index = 0;
    printBufferPropertiesInfo(buffer);
    while(index<buffer.limit()){
       	//利用get()方法從Buffer中讀取數據
        log.info("read info {}",buffer.get());
        index++;
    }
    log.info("after read print buffer info");
    printBufferPropertiesInfo(buffer);
}
運行讀取數據之后的日志
# 可以看到由寫入模式切換成讀取模式之后。position置為0,limit置成了可讀取的個數
[main] INFO com.learn.netty.component.buffer.BufferDemo - ================= print buffer info start =================
[main] INFO com.learn.netty.component.buffer.BufferDemo - position:0
[main] INFO com.learn.netty.component.buffer.BufferDemo - limit:6
[main] INFO com.learn.netty.component.buffer.BufferDemo - capacity:20
[main] INFO com.learn.netty.component.buffer.BufferDemo - ================= print buffer info end =================

# 開始讀取數據
[main] INFO com.learn.netty.component.buffer.BufferDemo - read info 1
[main] INFO com.learn.netty.component.buffer.BufferDemo - read info 2
[main] INFO com.learn.netty.component.buffer.BufferDemo - read info 3
[main] INFO com.learn.netty.component.buffer.BufferDemo - read info 4
[main] INFO com.learn.netty.component.buffer.BufferDemo - read info 5
[main] INFO com.learn.netty.component.buffer.BufferDemo - read info 6
[main] INFO com.learn.netty.component.buffer.BufferDemo - after read print buffer info

# 讀取完成之后,position指向當前讀取到的元素位置,limit依舊為可讀取的個數。
[main] INFO com.learn.netty.component.buffer.BufferDemo - ================= print buffer info start =================
[main] INFO com.learn.netty.component.buffer.BufferDemo - position:6
[main] INFO com.learn.netty.component.buffer.BufferDemo - limit:6
[main] INFO com.learn.netty.component.buffer.BufferDemo - capacity:20
[main] INFO com.learn.netty.component.buffer.BufferDemo - ================= print buffer info end =================
倒帶,標記讀取
倒帶讀取
已經讀完的數據,如果需要再讀一遍,需要調用rewind方法,position的位置會被重新置為0,然后可以重新讀取緩存中的數據
/**
 * 倒帶讀取
 * @param buffer
 */
public static void readWind(IntBuffer buffer){
    log.info("after rewind");
    buffer.rewind();//倒帶的操作
    printBufferPropertiesInfo(buffer);
    log.info("rewind read buffer info");
    int index = 0;
    while(index<buffer.limit()){
        log.info("buffer item : {}",buffer.get(index++));
    }

}
運行日志如下:
[main] INFO com.learn.netty.component.buffer.BufferDemo - after rewind
# 倒帶之后的position和limit的值
[main] INFO com.learn.netty.component.buffer.BufferDemo - ================= print buffer info start =================
[main] INFO com.learn.netty.component.buffer.BufferDemo - position:0
[main] INFO com.learn.netty.component.buffer.BufferDemo - limit:6
[main] INFO com.learn.netty.component.buffer.BufferDemo - capacity:20
[main] INFO com.learn.netty.component.buffer.BufferDemo - ================= print buffer info end =================

# 倒帶之后讀取的數據
[main] INFO com.learn.netty.component.buffer.BufferDemo - rewind read buffer info
[main] INFO com.learn.netty.component.buffer.BufferDemo - buffer item : 1
[main] INFO com.learn.netty.component.buffer.BufferDemo - buffer item : 2
[main] INFO com.learn.netty.component.buffer.BufferDemo - buffer item : 3
[main] INFO com.learn.netty.component.buffer.BufferDemo - buffer item : 4
[main] INFO com.learn.netty.component.buffer.BufferDemo - buffer item : 5
[main] INFO com.learn.netty.component.buffer.BufferDemo - buffer item : 6
標記讀取
可以通過mark方法,暫存需要讀取的位置。然后reset方法之后,position可以置回mark方法記錄的位置,之后從mark標記的位置開始讀取
代碼如下所示:
/**
 * 測試mark和reset的操作
 * @param buffer
 */
public static void markAndResetRead(IntBuffer buffer){
    buffer.flip();
    int i = 0;
    log.info("normal read");
    printBufferPropertiesInfo(buffer);
    while(i<buffer.limit()){
        if(i==2){
            log.info("mark index");
            buffer.mark();//這里標記的一個位置
        }
        log.info("mark read item:{}",buffer.get());
        i++;
    }
    printBufferPropertiesInfo(buffer);
    log.info("reset read");
    buffer.reset();//回退到上一次mark的位置
    printBufferPropertiesInfo(buffer);
    while(buffer.position()<buffer.limit()){
        log.info("after reset read item:{}",buffer.get());
    }
}
運行結果
[main] INFO com.learn.netty.component.buffer.BufferDemo - normal read
# 正常讀取的position等相關屬性
[main] INFO com.learn.netty.component.buffer.BufferDemo - ================= print buffer info start =================
[main] INFO com.learn.netty.component.buffer.BufferDemo - position:0
[main] INFO com.learn.netty.component.buffer.BufferDemo - limit:6
[main] INFO com.learn.netty.component.buffer.BufferDemo - capacity:20
[main] INFO com.learn.netty.component.buffer.BufferDemo - ================= print buffer info end =================
[main] INFO com.learn.netty.component.buffer.BufferDemo - mark read item:1
[main] INFO com.learn.netty.component.buffer.BufferDemo - mark read item:2
## 這里是標志位
[main] INFO com.learn.netty.component.buffer.BufferDemo - mark index
[main] INFO com.learn.netty.component.buffer.BufferDemo - mark read item:3
[main] INFO com.learn.netty.component.buffer.BufferDemo - mark read item:4
[main] INFO com.learn.netty.component.buffer.BufferDemo - mark read item:5
[main] INFO com.learn.netty.component.buffer.BufferDemo - mark read item:6
[main] INFO com.learn.netty.component.buffer.BufferDemo - ================= print buffer info start =================

##正常讀取完成之后的 position等相關屬性
[main] INFO com.learn.netty.component.buffer.BufferDemo - position:6
[main] INFO com.learn.netty.component.buffer.BufferDemo - limit:6
[main] INFO com.learn.netty.component.buffer.BufferDemo - capacity:20
[main] INFO com.learn.netty.component.buffer.BufferDemo - ================= print buffer info end =================

##reset標記為
[main] INFO com.learn.netty.component.buffer.BufferDemo - reset read
[main] INFO com.learn.netty.component.buffer.BufferDemo - ================= print buffer info start =================
[main] INFO com.learn.netty.component.buffer.BufferDemo - position:2
[main] INFO com.learn.netty.component.buffer.BufferDemo - limit:6
[main] INFO com.learn.netty.component.buffer.BufferDemo - capacity:20
[main] INFO com.learn.netty.component.buffer.BufferDemo - ================= print buffer info end =================
##從第3個元素開始讀取
[main] INFO com.learn.netty.component.buffer.BufferDemo - after reset read item:3
[main] INFO com.learn.netty.component.buffer.BufferDemo - after reset read item:4
[main] INFO com.learn.netty.component.buffer.BufferDemo - after reset read item:5
[main] INFO com.learn.netty.component.buffer.BufferDemo - after reset read item:6
清空
clear方法會清空Buffer中的數據,同時Buffer會切換入寫入模式
小結
關于Buffer的模式切換,這里做一個簡單的總結
Channel
在NIO中一個連接就是一個channel,如果熟悉Linux的話,其實一個channel就是對應一個文件描述符。在Java NIO中對應不同的網絡傳輸協議,對應不同的channel。幾種常用的channel實現類如下:FileChannel,SocketChannel,ServerSocketChannel,DatagramChannel。NIO中的讀取數據,都會通過channel與Buffer進行交互。
FileChannel是文件通道,SocketChannel是套接字通道,ServerSocketChannel是服務套接字通道,DatagramChannel是數據報通道。下面我們重點通過實例說明FileChannel,SocketChannel和ServerSocketChannel。
FileChannel
獲取FileChannel
通常來講獲取FileChannel有兩種方式,一種是根據文件輸入輸出流進行獲取,另一種是根據文件隨機訪問類進行獲取。需要說明的是FileChannel沒有非阻塞模式,都是阻塞模式。
1、根據文件輸入輸出流獲取文件channel
需要注意的是根據輸入文件流獲取的channel對文件只有讀取的權限,沒有寫入的權限。
//1.構建文件輸入流
FileInputStream fileInputStream = new FileInputStream(new File(fileName));
//2.獲取文件channel
FileChannel fileChannel = fileInputStream.getChannel();

//1.構建文件輸出流
FileOutputStream fileOutputStream = new FileOutputStream(new File(fileName));
//2.獲取文件channel
FileChannel fileChannel = fileInputStream.getChannel();
2、通過RandomAccessFile獲取FileChannel
如果需要channel對文件進行可讀寫,則需要指定rw訪問權限。
//這里的targetFileName是文件的絕對路徑
RandomAccessFile randomAccessFile = new RandomAccessFile(targetFileName,"rw");
//通過RandomAccessFile獲取FileChannel
FileChannel fileChannel = randomAccessFile.getChannel();
通過FileChannel讀取文件內容
調用指定的read方法,將文件中的內容讀取到buffer中即可
//,因此我們每次在讀取文件內容的時候,需要先分配一個Buffer緩沖區。
fileChannel.read(buffer)
通過FileChannel寫入文件內容
在將channel中的內容寫入到磁盤的時候,需要將buffer變成讀模式。
//將buffer中的內容讀取出來,寫入到FileChannel指定的文件中,因此在讀取之前,需要將buffer變成可讀模式
buffer.flip();
fileChannel.write(buffer)
實例
可以通過以下實例來熟悉FileChannel。下述代碼的讀取和寫入都是用的同一個buffer
/**
 * 先讀取文件內容,然后將簡單的一句話附加到文件末尾
 */
public static void simpleAppendInfo2File(){
    String targetFileName = "F:\\git_learn\\index_newName_bak.html";
    FileInputStream fileInputStream=null;
    FileChannel fileChannel = null;
    try{
		//1、創建FileChannel
        RandomAccessFile randomAccessFile = new RandomAccessFile(targetFileName,"rw");
        fileChannel = randomAccessFile.getChannel();

        //2.實例化Buffer緩沖區
        ByteBuffer fileBuffer = ByteBuffer.allocate(1024);//文件緩沖區

		//3、文件內容的讀取
        while(fileChannel.read(fileBuffer)!=-1){
            fileBuffer.flip();//fileBuffer變成可讀模式
            //讀取buffer中的內容
            while(fileBuffer.position()<fileBuffer.limit()){
                System.out.print((char)fileBuffer.get());
            }
			//清空緩沖區
            fileBuffer.clear();
        }

		//4、在文件的末尾附加內容,依舊可以用同一個buffer操作
        fileBuffer.put("\nthis is append coment".getBytes("UTF-8"));
        fileBuffer.flip();//這里需要切換成可讀模式
        fileChannel.write(fileBuffer);
    }catch (Exception e){
        e.printStackTrace();
    }finally {
        try {
            fileChannel.close();
        } catch (IOException e) {
            e.printStackTrace();
        }
    }
}
ServerSocketChannel和SocketChannel
NIO中涉及到網絡的通道有兩個,一個是ServerSocketChannel,一個是SocketChannel。前者負責連接的監聽,后者負責連接的傳輸。ServerSocketChannel位于服務端,而SocketChannel則位于兩端。需要說明的是這兩者有阻塞和非阻塞兩種模式,但是接下來的代碼實例我們只介紹阻塞模式下二者的操作。這里還是采用一個簡單的網絡通信實例
客戶端代碼:
/**
 * autor:liman
 * createtime:2020/8/26
 * comment:SocketChannel的實例
 */
@Slf4j
public class SocketChannelSelf {

    public static void main(String[] args) {
        SocketChannel socketChannel = null;
        try {
            socketChannel = SocketChannel.open();
            socketChannel.connect(new InetSocketAddress("127.0.0.1",8899));

            //這里實例化了兩個buffer,一個用于從channel中讀取數據,一個用于往channel中寫入數據。
            ByteBuffer writeBuffer = ByteBuffer.allocate(1024);
            ByteBuffer readBuffer = ByteBuffer.allocate(1024);

            String clientMessage = "i am client ";
            writeBuffer.put(clientMessage.getBytes("UTF-8"));

            writeBuffer.flip();//變成讀模式
            socketChannel.write(writeBuffer);//將客戶端的數據發送到服務端的SocketChannel

            readBuffer.clear();//clear操作之后,buffer會變成寫模式
            String serverInfo = readInfoFromBuffer(socketChannel,readBuffer);
            log.info("從服務端接受到的消息:{}",serverInfo);
        }catch (Exception e){
            e.printStackTrace();
        }finally {
            try {
                socketChannel.close();
            } catch (IOException e) {
                e.printStackTrace();
            }
        }
    }

    /**
     * 從buffer讀取相關內容
     * @param socketChannel
     * @param buffer
     * @return
     * @throws IOException
     */
    public static String readInfoFromBuffer(SocketChannel socketChannel,ByteBuffer buffer) throws IOException {
        StringBuilder stringBuilder = new StringBuilder();
        socketChannel.read(buffer);//這里的buffer是可寫模式,可以直接read
        buffer.flip();//將buffer變成可讀模式
        while(buffer.hasRemaining()){
            while(buffer.position()<buffer.limit()) {
                stringBuilder.append((char) buffer.get());
            }
        }
        return stringBuilder.toString();
    }
}
服務端代碼:
/**
 * autor:liman
 * createtime:2020/8/26
 * comment:ServerSocketChannel的實例
 */
@Slf4j
public class ServerSocketChannelSelf {

    public static void main(String[] args) {
        ServerSocketChannel  serverSocketChannel = null;
        SocketChannel socketChannel = null;
        try {
            serverSocketChannel = ServerSocketChannel.open();
            serverSocketChannel.socket().bind(new InetSocketAddress("127.0.0.1",8899));

            socketChannel = serverSocketChannel.accept();
            ByteBuffer writeBuffer = ByteBuffer.allocate(1024);
            ByteBuffer readBuffer = ByteBuffer.allocate(1024);
            writeBuffer.put("hello this is Server,I'm listening in port 8899".getBytes("UTF-8"));
            writeBuffer.flip();
            socketChannel.write(writeBuffer);

            //讀取數據
            String messageFromClient = readInfoFromClient(socketChannel, readBuffer);
            log.info("從客戶端讀取到的信息為:{}",messageFromClient);
            System.in.read();
        } catch (IOException e) {
            e.printStackTrace();
        }finally {
            try {
                socketChannel.close();
                serverSocketChannel.close();
            } catch (IOException e) {
                e.printStackTrace();
            }
        }
    }

    /**
    	從buffer中讀取數據
    */
    public static String readInfoFromClient(SocketChannel socketChannel,ByteBuffer buffer) throws IOException {

        StringBuilder stringBuilder = new StringBuilder();
        socketChannel.read(buffer);
        buffer.flip();
        while(buffer.hasRemaining()){
            while(buffer.position()<buffer.limit()) {
                stringBuilder.append((char) buffer.get());
            }
        }
        return stringBuilder.toString();
    }

}
二者其實差異不大,只需要注意buffer的操作即可,同時需要注意SocketChannel與ServerSocketChannel的構建即可。
Selector
Selector是完成IO多路復用的關鍵組件,通過上面的Channel實例我們可以看出,其實一個channel可以代表一條連接通道,但是通過一個Selector就可以同時監控多個通道的網絡IO操作。
通道和選擇器的關系通過注冊完成,注冊到選擇器的通道,必須處于非阻塞模式,這也意味著FileChannel無法注冊到選擇器。同時只有繼承了SelectableChannel的通道才能注冊到選擇器上 關于Selector的實例需要詳細參考其他資料。
選擇器實例的獲取
通過Selector的靜態open方法來獲取Selector實例。
Selector selector = Selector.open()
通道注冊到Selector
如果將通道注冊到Selector,需要提前準備好對應的channel,相關代碼如下所示
selector = Selector.open();

serverSocketChannel = ServerSocketChannel.open();
//注冊到選擇器的通道必須是非阻塞模式
serverSocketChannel.configureBlocking(false);
serverSocketChannel.socket().bind(new InetSocketAddress(port), 1024);
//將serverSocketChannel注冊到selector上
serverSocketChannel.register(selector, SelectionKey.OP_ACCEPT);
遍歷Selector中的事件
try {
    selector.select(1000);
    Set<SelectionKey> selectionKeys = selector.selectedKeys();
    Iterator<SelectionKey> keysIterator = selectionKeys.iterator();
    SelectionKey key = null;
    while (keysIterator.hasNext()) {
        key = keysIterator.next();
        try {
			//TODO:處理相關事件
            // ......
        } catch (Exception e) {
            log.error("通道出現異常,異常信息為:{}",e);
            if(key!=null){
                key.cancel();
                if(key.channel()!=null){
                    key.channel().close();
                }
            }
        }
        keysIterator.remove();
    }
} catch (Exception e) {
    e.printStackTrace();
}
Selector更多的東西需要多多領悟,有時候通過文字似乎不好表述。還是直接上實例(該實例參照《Netty 權威指南》)。
實例
服務端代碼
/**
 * autor:liman
 * createtime:2020/8/12
 * comment:
 */
@Slf4j
public class MultiplexerTimeServer implements Runnable {

    private Selector selector;
    private ServerSocketChannel serverSocketChannel;
    private volatile boolean stop;

    public MultiplexerTimeServer(int port) {
        //構造方法中將ServerSocketChannel注冊到Selector
        try {
            selector = Selector.open();
            serverSocketChannel = ServerSocketChannel.open();
            //注冊到選擇器的通道必須是非阻塞模式
            serverSocketChannel.configureBlocking(false);
            serverSocketChannel.socket().bind(new InetSocketAddress(port), 1024);
            //將serverSocketChannel注冊到selector上
            serverSocketChannel.register(selector, SelectionKey.OP_ACCEPT);
            log.info("The time server is start in port : {}", port);
        } catch (IOException e) {
            log.error("服務啟動出行異常,異常信息為:{}", e);
            System.exit(1);
        }
    }

    public void stop() {
        this.stop = true;
    }

    /**
    	開辟線程處理Selector上注冊的事件
    */
    @Override
    public void run() {
        while (!stop) {
            try {
                selector.select(1000);
                Set<SelectionKey> selectionKeys = selector.selectedKeys();
                Iterator<SelectionKey> keysIterator = selectionKeys.iterator();
                SelectionKey key = null;
                while (keysIterator.hasNext()) {
                    key = keysIterator.next();
                    try {
                        handleInput(key);
                    } catch (Exception e) {
                        log.error("通道出現異常,異常信息為:{}",e);
                        if(key!=null){
                            key.cancel();
                            if(key.channel()!=null){
                                key.channel().close();
                            }
                        }
                    }
                    keysIterator.remove();
                }
            } catch (Exception e) {

            }
        }

        if (selector != null) {
            try {
                selector.close();
            } catch (IOException e) {
                e.printStackTrace();
            }
        }
    }

    /**
     * 處理Selector上的注冊事件
     * @param key
     * @throws IOException
     */
    private void handleInput(SelectionKey key) throws IOException {
        String currentTime = null;
        if (key.isValid()) {
			//處理服務端ServerSocketChannel的Accept事件。
            if(key.isAcceptable()){
                ServerSocketChannel serverSocketChannel = (ServerSocketChannel) key.channel();
                //將與ServerSocketChannel建立連接的SocketChannel注冊到selector,并注冊READ事件
                SocketChannel socketChannel = serverSocketChannel.accept();
                socketChannel.configureBlocking(false);
                socketChannel.register(selector,SelectionKey.OP_READ);
            }

            //處理ServerSocketChannel的可讀事件,讀取SocketChannel中的數據
            if (key.isReadable()) {
                SocketChannel socketChannel = (SocketChannel) key.channel();
                ByteBuffer readBuffer = ByteBuffer.allocate(1024);
                int readBytes = socketChannel.read(readBuffer);
                if (readBytes > 0) {
                    readBuffer.flip();
                    byte[] bytes = new byte[readBuffer.remaining()];
                    readBuffer.get(bytes);
                    String body = new String(bytes, "UTF-8");
                    log.info("the time server receive order:{}", body);
                    if ("QUERY TIME".equalsIgnoreCase(body)) {
                        currentTime = LocalDateTime.now().toString();
                    } else {
                        currentTime = "BAD ORDER";
                    }
                    doWrite(socketChannel, currentTime);
                } else if (readBytes < 0) {
                    key.channel();

                }
                socketChannel.close();
            }
        }
    }

    /*
    	將SocketChannel中的內容寫入到buffer中
    */
    private void doWrite(SocketChannel socketChannel, String response) throws IOException {
        if (response != null && response.trim().length() > 0) {
            byte[] bytes = response.getBytes();
            ByteBuffer writeBuffer = ByteBuffer.allocate(bytes.length);
            writeBuffer.put(bytes);
            writeBuffer.flip();
            socketChannel.write(writeBuffer);
        }
    }
}
啟動服務端的代碼
/**
 * autor:liman
 * createtime:2020/8/12
 * comment:時間回顯服務端啟動
 */
@Slf4j
public class TimeServer {
    public static void main(String[] args) {
        int port = 8999;
        MultiplexerTimeServer timeServer = new MultiplexerTimeServer(port);
        new Thread(timeServer,"NIO-Time-HandlerServer-001").start();
    }
}
客戶端代碼
客戶端的線程代碼
/**
 * autor:liman
 * createtime:2020/8/12
 * comment:
 */
@Slf4j
public class TimeClientHandler implements Runnable {

    private String host;
    private int port;
    private Selector selector;
    private SocketChannel socketChannel;
    private volatile boolean stop;

    public TimeClientHandler(String host, int port) {
        this.host = host;
        this.port = port;
        try {
            //構造方法中,將SocketChannel注冊到selector
            selector = Selector.open();
            socketChannel = SocketChannel.open();
            socketChannel.configureBlocking(false);
        } catch (Exception e) {
            log.error("客戶端初始化異常,異常信息為:{}",e);
        }
    }

    @Override
    public void run() {
        try {
            doConnect();
        } catch (IOException e) {
            e.printStackTrace();
        }

        while(!stop){
            try {
                selector.select(1000);
                Set<SelectionKey> selectionKeys = selector.selectedKeys();
                Iterator<SelectionKey> selectorKeyIterator = selectionKeys.iterator();
                SelectionKey key = null;
                while(selectorKeyIterator.hasNext()){
                    key = selectorKeyIterator.next();
                    try{
                        handleInput(key);
                    }catch (Exception e){
                        if(key!=null){
                            key.cancel();
                            if(key.channel()!=null){
                                key.channel().close();
                            }
                        }
                    }
                    selectorKeyIterator.remove();
                }

            } catch (IOException e) {
                e.printStackTrace();
            }
        }

        if(selector!=null){
            try{
                selector.close();
            }catch (Exception e){
                log.error("流關閉異常,異常信息為:{}",e);
            }
        }
    }

    private void handleInput(SelectionKey key) throws IOException {
        if (key.isValid()) {
            SocketChannel socketChannel = (SocketChannel) key.channel();
            if (key.isConnectable()) {//如果可連接,則繼續注冊可讀事件。
                if (socketChannel.finishConnect()) {
                    socketChannel.register(selector, SelectionKey.OP_READ);
                    log.info("client connect to server ,client time is {}", LocalDateTime.now().toString());
                    doWrite(socketChannel);
                } else {
                    System.exit(1);
                }
            }

            if (key.isReadable()) {//可讀事件
                ByteBuffer readBuffer = ByteBuffer.allocate(1024);
                int readBytes = socketChannel.read(readBuffer);
                if (readBytes > 0) {
                    readBuffer.flip();
                    byte[] bytes = new byte[readBuffer.remaining()];
                    readBuffer.get(bytes);
                    String body = new String(bytes,"UTF-8");
                    log.info("receive server message,Now is : {}",body);
                    this.stop = true;
                }else if(readBytes < 0){
                    key.cancel();
                }
                socketChannel.close();
            }
        }
    }

    /**
    	將客戶端的連接事件注冊到Selector上
    	這里只注冊了CONNECT和READ事件。
    */
    private void doConnect() throws IOException {
        if (socketChannel.connect(new InetSocketAddress(host, port))) {
            socketChannel.register(selector, SelectionKey.OP_READ);
            doWrite(socketChannel);
        } else {
            socketChannel.register(selector, SelectionKey.OP_CONNECT);
        }
    }

  	/**
  		將指定的發送命令寫入到SocketChannel
  	*/
    private void doWrite(SocketChannel socketChannel) throws IOException {
        byte[] req = "QUERY TIME".getBytes();
        ByteBuffer writeBuffer = ByteBuffer.allocate(req.length);
        writeBuffer.put(req);
        writeBuffer.flip();
        socketChannel.write(writeBuffer);
        if (!writeBuffer.hasRemaining()) {
            log.info("send order 2 server succeed.");
        }
    }
}
注冊事件
關于注冊事件,主要有以下四種
| 可讀事件 | OP_READ |
|---|---|
| 可寫事件 | OP_WRITE |
| 連接事件 | OP_CONNECT |
| 接收事件 | OP_ACCEPT |
但每一個通道,其實并不需要關注所有的事件,比如ServerSocketChannel,僅僅支持接收事件。SocketChannel支持接收事件,可讀與可寫事件,并不支持接收事件。
總結
本篇博客簡單總結了一下Java NIO中的三個核心組件,大部分參考了《Netty、Redis、Zookeeper高并發實戰》與《Netty權威指南》兩本書。
智能推薦

JAVA NIO : Buffer ,Channel, Selector
概述 標準的IO基于字節流和字符流進行操作的,而NIO是基于通道(Channel)和緩沖區(Buffer)進行操作,數據總是從通道讀取到緩沖區中,或者從緩沖區寫入到通道中。 非阻塞IO:例如:當線程從通道讀取數據到緩沖區時,線程還是可以進行其他事情。當數據被寫入到緩沖區時,線程可以繼續處理它。從緩沖區寫入通道也類似 Java NIO引入了選擇器的概念,選擇器用于監聽多個通道的事件(比如:連接打開,...
Java基礎-NIO(buffer、channel、selector)三大組件學習筆記
又是兩天沒有學習了,內心十分慚愧,今天又開始學習; Buffer 一個用于特定基本類型數據的容器。 先看結構 上圖一共七個buffer類,java的8大基本數據類型唯獨差了boolean,查看源碼,他們都是各自對應的數組組成。 屬性分析:position、limit、capacity 0 <= 標記 <= 位置 <= 限制 <= 容量 capacity,它代表這...

java多線程拾遺(一) 創建線程的三種方式
前言 java創建線程的三種方式分別是繼承Thread類、 實現Runnable接口、 實現Callable接口。 繼承Thread 這種方式是通過新建繼承于Thread的類,并重寫run()方法來實現的,run()方法主要是指定你要讓這個線程為你做什么 執行結果 實現Runnable接口 同樣是新建一個類,不同的是,不再繼承Thread類,而是去實現Runnable接口。 Runnable接口源...

java多線程拾遺(三) 霸道的join()方法
前言 相信每個人都有被插隊的經歷,線程之間執行任務也是這樣,總有線程愛插隊,最騷的是Thread類中專門有這樣一個方法來讓其"插隊",那就是join方法。 join()方法的作用在于,如果在某個線程A中,另外一個線程B調用join()方法后,那么A需要在B執行完成之后,才可以繼續執行任務。此時A線程的狀態由運行態變為阻塞態。 另外,我們亦可以設置一個超時時間,讓等待的線程最多等...

猜你喜歡

freemarker + ItextRender 根據模板生成PDF文件
1. 制作模板 2. 獲取模板,并將所獲取的數據加載生成html文件 2. 生成PDF文件 其中由兩個地方需要注意,都是關于獲取文件路徑的問題,由于項目部署的時候是打包成jar包形式,所以在開發過程中時直接安照傳統的獲取方法沒有一點文件,但是當打包后部署,總是出錯。于是參考網上文章,先將文件讀出來到項目的臨時目錄下,然后再按正常方式加載該臨時文件; 還有一個問題至今沒有解決,就是關于生成PDF文件...
電腦空間不夠了?教你一個小秒招快速清理 Docker 占用的磁盤空間!
Docker 很占用空間,每當我們運行容器、拉取鏡像、部署應用、構建自己的鏡像時,我們的磁盤空間會被大量占用。 如果你也被這個問題所困擾,咱們就一起看一下 Docker 是如何使用磁盤空間的,以及如何回收。 docker 占用的空間可以通過下面的命令查看: TYPE 列出了docker 使用磁盤的 4 種類型: Images:所有鏡像占用的空間,包括拉取下來的鏡像,和本地構建的。 Con...

requests實現全自動PPT模板
http://www.1ppt.com/moban/ 可以免費的下載PPT模板,當然如果要人工一個個下,還是挺麻煩的,我們可以利用requests輕松下載 訪問這個主頁,我們可以看到下面的樣式 點每一個PPT模板的圖片,我們可以進入到詳細的信息頁面,翻到下面,我們可以看到對應的下載地址 點擊這個下載的按鈕,我們便可以下載對應的PPT壓縮包 那我們就開始做吧 首先,查看網頁的源代碼,我們可以看到每一...


Linux C系統編程-線程互斥鎖(四)
互斥鎖 互斥鎖也是屬于線程之間處理同步互斥方式,有上鎖/解鎖兩種狀態。 互斥鎖函數接口 1)初始化互斥鎖 pthread_mutex_init() man 3 pthread_mutex_init (找不到的情況下首先 sudo apt-get install glibc-doc sudo apt-get install manpages-posix-dev) 動態初始化 int pthread_...