Android36_Animations使用(四)
標簽: Android Animation LayoutAnimationsContrlller AnimationListener
一、LayoutAnimationsContrlller的使用方法
LayoutAnimationsContrlller可以用于實現使多個控件按順序一個一個的顯示。
1)LayoutAnimationsContrlller用于為一個layout里面的控件,或者是一個ViewGroup里面的控件設置動畫效果。
2)每一個控件都有相同的動畫效果。
3)控件的動畫效果可以在不同的時間顯示出來。
4)LayoutAnimationsContrlller可以在xml文件當中設置,以可以在代碼當中進行設置。
二、ListView與Animaions結合使用
1.在xml當中使用LayoutAnimationsController
1)在res/anim文件夾下創建一個名為list_anim_layout.xml文件:
android:dylay - 動畫間隔時間;
android:animationOrder - 動畫執行的循序(normal:順序,random:隨機,reverse:反向顯示)
android:animation – 引用動畫效果文件
<layoutAnimation
	xmlns:android="http://schemas.android.com/apk/res/android"
	android:delay="0.5"
	android:animationOrder="normal"
	android:animation="@anim/list_anim"/>
2)在布局文件當中為ListVIew添加如下配置:
android:layoutAnimation="@anim/list_anim_layout"
完整代碼:

List_anim_layout.xml
<?xml version="1.0" encoding="utf-8"?>
<layoutAnimation
	xmlns:android="http://schemas.android.com/apk/res/android"
	android:delay="0.5"
	android:animationOrder="normal"
	android:animation="@anim/list_anim"/>
List_anim.xml
<?xml version="1.0" encoding="utf-8"?>
<set xmlns:android="http://schemas.android.com/apk/res/android"
	android:interpolator="@android:anim/accelerate_interpolator"
	android:shareInterpolator="true">
	<alpha
		android:fromAlpha="0.0"
		android:toAlpha="1.0"
		android:duration="1000"/>
</set>
Main.xml
<?xml version="1.0" encoding="utf-8"?>
<LinearLayout xmlns:android="http://schemas.android.com/apk/res/android"
    android:orientation="vertical"
    android:layout_width="fill_parent"
    android:layout_height="fill_parent"
    >
	<ListView
		android:id="@id/android:list"
    	android:layout_width="fill_parent"
    	android:layout_height="wrap_content"
    	android:scrollbars="vertical"
    	android:layoutAnimation="@anim/list_anim_layout"/>
    <Button
    	android:id="@+id/button"
    	android:layout_width="fill_parent"
    	android:layout_height="wrap_content"
    	android:text="測試"/>
</LinearLayout>
Item.xml
<?xml version="1.0" encoding="utf-8"?>
<LinearLayout xmlns:android="http://schemas.android.com/apk/res/android"
	android:layout_width="fill_parent"
	android:layout_height="fill_parent"
	android:orientation="horizontal"
	android:paddingLeft="10dip"
	android:paddingRight="10dip"
	android:paddingTop="1dip"
	android:paddingBottom="1dip">
	<TextView android:id="@+id/name"
		android:layout_width="180dip"
		android:layout_height="30dip"
		android:textSize="5pt"
		android:singleLine="true" />
	<TextView android:id="@+id/sex"
		android:layout_width="fill_parent"
		android:layout_height="fill_parent"
		android:textSize="5pt"
		android:singleLine="true"/>
</LinearLayout>
AnimationsActivity.java
package com.android.activity;
import java.util.ArrayList;
import java.util.HashMap;
import java.util.List;
import android.app.ListActivity;
import android.os.Bundle;
import android.view.View;
import android.view.View.OnClickListener;
import android.widget.Button;
import android.widget.ListAdapter;
import android.widget.ListView;
import android.widget.SimpleAdapter;
public class AnimationsActivity extends ListActivity {
	private Button button = null;
	private ListView listView = null;
	@Override
    public void onCreate(Bundle savedInstanceState) {
        super.onCreate(savedInstanceState);
        setContentView(R.layout.main);
        listView = getListView();
        button = (Button)findViewById(R.id.button);
        button.setOnClickListener(new ButtonListener());
    }
	private ListAdapter createListAdapter() {
		List<HashMap<String,String>> list =
			new ArrayList<HashMap<String,String>>();
		HashMap<String,String> m1 = new HashMap<String,String>();
		m1.put("name", "bauble");
		m1.put("sex", "male");
		HashMap<String,String> m2 = new HashMap<String,String>();
		m2.put("name", "Allorry");
		m2.put("sex", "male");
		HashMap<String,String> m3 = new HashMap<String,String>();
		m3.put("name", "Allotory");
		m3.put("sex", "male");
		HashMap<String,String> m4 = new HashMap<String,String>();
		m4.put("name", "boolbe");
		m4.put("sex", "male");
		list.add(m1);
		list.add(m2);
		list.add(m3);
		list.add(m4);
		SimpleAdapter simpleAdapter = new SimpleAdapter(
				this,list,R.layout.item,new String[]{"name","sex"},
				new int[]{R.id.name,R.id.sex});
		return simpleAdapter;
	}
	private class ButtonListener implements OnClickListener{
		public void onClick(View v) {
			listView.setAdapter(createListAdapter());
		}
	}
} 運行結果:每一個item都是淡入淡出的按順序顯示。

2.在代碼當中使用LayoutAnimationsController
對于在代碼中使用LayoutAnimationsController,只不過去掉了list_anim_layout.xml這個文件,以及listview當中的
android:layoutAnimation="@anim/list_anim_layout"
這句。將animation的布局設置更改到了ButtonListener代碼當中進行。
1) 創建一個Animation對象:可以通過裝載xml文件,或者是直接使用Animation的構造方法創建Animation對象;
Animation animation = (Animation)AnimationUtils.loadAnimation(
	AnimationsActivity.this, R.anim.list_anim);
2) 創建LayoutAnimationController對象:
LayoutAnimationController controller = new LayoutAnimationController(animation); 3) 設置控件的顯示順序以及延遲時間:
controller.setOrder(LayoutAnimationController.ORDER_NORMAL);
controller.setDelay(0.5f);
4) 為ListView設置LayoutAnimationController屬性:
listView.setLayoutAnimation(controller);
三、AnimationListener的使用方法
1.AnimationListener是一個監聽器,該監聽器在動畫執行的各個階段會得到通知,從而調用相應的方法;
2.AnimationListener主要包括如下三個方法:
·onAnimationEnd(Animation animation) - 當動畫結束時調用
·onAnimationRepeat(Animation animation) - 當動畫重復時調用
·onAniamtionStart(Animation animation) - 當動畫啟動時調用
實例:
Main.xml
<?xml version="1.0" encoding="utf-8"?>
<RelativeLayout xmlns:android="http://schemas.android.com/apk/res/android"
	android:id="@+id/layout"
	android:orientation="vertical"
	android:layout_width="fill_parent"
	android:layout_height="fill_parent">
	<Button android:id="@+id/addButton"
		android:layout_width="fill_parent"
		android:layout_height="wrap_content"
		android:layout_alignParentBottom="true"
		android:text="添加圖片" />
	<Button android:id="@+id/deleteButton"
		android:layout_width="fill_parent"
		android:layout_height="wrap_content"
		android:layout_above="@id/addButton"
		android:text="刪除圖片" />
	<ImageView android:id="@+id/image"
		android:layout_width="wrap_content"
		android:layout_height="wrap_content"
		android:layout_centerInParent="true"
		android:layout_marginTop="100dip"
		android:src="@drawable/image" />
</RelativeLayout>
AnimationListenerActivity.java
package com.android.activity;
import android.app.Activity;
import android.os.Bundle;
import android.view.View;
import android.view.View.OnClickListener;
import android.view.ViewGroup;
import android.view.ViewGroup.LayoutParams;
import android.view.animation.AlphaAnimation;
import android.view.animation.Animation;
import android.view.animation.Animation.AnimationListener;
import android.widget.Button;
import android.widget.ImageView;
public class AnimationListenerActivity extends Activity {
	private Button addButton = null;
	private Button deleteButton = null;
	private ImageView imageView = null;
	private ViewGroup viewGroup = null;
	@Override
    public void onCreate(Bundle savedInstanceState) {
        super.onCreate(savedInstanceState);
        setContentView(R.layout.main);
        addButton = (Button)findViewById(R.id.addButton);
        deleteButton = (Button)findViewById(R.id.deleteButton);
        imageView = (ImageView)findViewById(R.id.image);
        //LinearLayout下的一組控件
        viewGroup = (ViewGroup)findViewById(R.id.layout);
        addButton.setOnClickListener(new AddButtonListener());
        deleteButton.setOnClickListener(new DeleteButtonListener());
    }
	private class AddButtonListener implements OnClickListener{
		public void onClick(View v) {
			//淡入
			AlphaAnimation animation = new AlphaAnimation(0.0f, 1.0f);
			animation.setDuration(1000);
			animation.setStartOffset(500);
			//創建一個新的ImageView
			ImageView newImageView = new ImageView(
				AnimationListenerActivity.this);
			newImageView.setImageResource(R.drawable.image);
			viewGroup.addView(newImageView,
				new LayoutParams(
					LayoutParams.FILL_PARENT,
					LayoutParams.WRAP_CONTENT));
			newImageView.startAnimation(animation);
		}
	}
	private class DeleteButtonListener implements OnClickListener{
		public void onClick(View v) {
			//淡出
			AlphaAnimation animation = new AlphaAnimation(1.0f, 0.0f);
			animation.setDuration(1000);
			animation.setStartOffset(500);
			//為Aniamtion對象設置監聽器
			animation.setAnimationListener(
				new RemoveAnimationListener());
			imageView.startAnimation(animation);
		}
	}
	private class RemoveAnimationListener implements AnimationListener{
		//動畫效果執行完時remove
		public void onAnimationEnd(Animation animation) {
			System.out.println("onAnimationEnd");
			viewGroup.removeView(imageView);
		}
		public void onAnimationRepeat(Animation animation) {
			System.out.println("onAnimationRepeat");
		}
		public void onAnimationStart(Animation animation) {
			System.out.println("onAnimationStart");
		}
	}
}
運行結果:
刪除時慢慢淡出,添加時慢慢淡入

智能推薦
android -------- Data Binding的使用 ( 四 )ListView
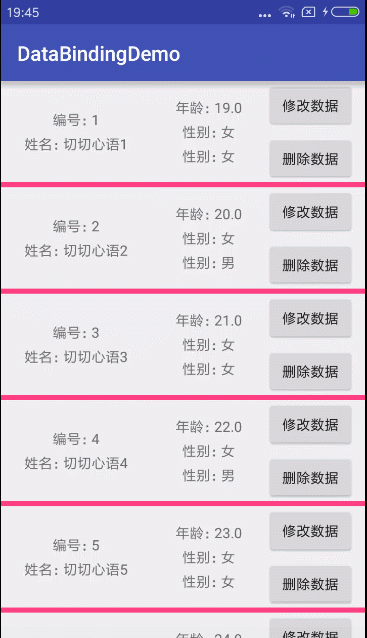
今天來說說DataBinding在列表ListView中的使用 主要分為兩種,1: 基本的實體類 2:Observable 定義字段 listView布局文件 主要看item布局 實體類就不給了,幾個字段就行 來看看adapter activity中 上面adapter主要是第一種方式 第二種adapter如下: 把前面講的Observable 結合到Lis...
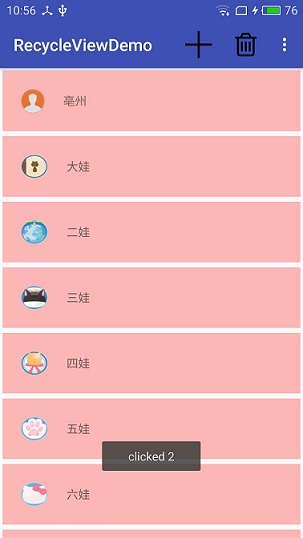
Android RecyclerView的使用(四)——點擊事件
Android RecyclerView的使用(四)——點擊事件 前言: RecyclerView提供了一種插拔式的體驗,高度的解耦,異常的靈活,通過設置它提供的不同LayoutManager,ItemDecoration , ItemAnimator實現絢麗的效果。 通過布局管理器LayoutManager,可以控制其顯示的方式; 通過ItemDecoration,可以控...
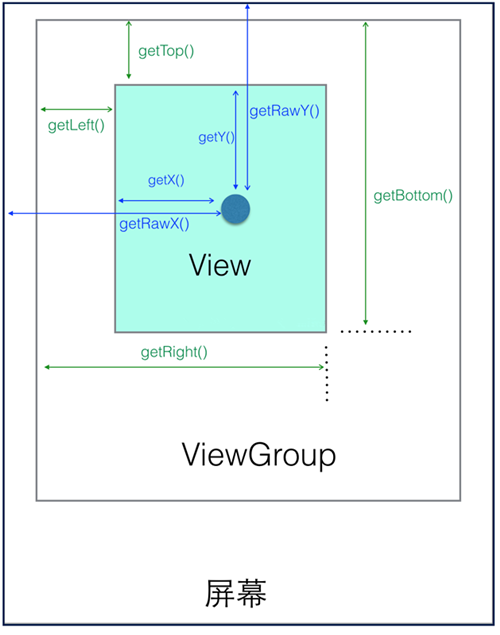
Android探索之路(四)—View的使用
前言 在這篇文章之前已經總結學習了View的工作流程、事件分發機制。這里總結一下在工作過程中使用View的一些感想,主要從常用的View中的一些方法以及View的一些基礎知識兩方面來進行介紹。 View的位置參數 在Android系統中存在著坐標系用來確定位置。分為兩種:一種是Android坐標系(是整個Android設備的坐標系),還有一種是View的坐標系(是一個視圖的坐標系)。這兩種坐標系都...

android學習筆記36:消息提示
在android中,如果程序的提示消息只是很少量的,且不需要用戶進行操作時,就可以使用android提供的輕量級消息提示toast。 純文字提示。 帶圖片的消息提示 使用一個Toast的實例即可...

猜你喜歡

freemarker + ItextRender 根據模板生成PDF文件
1. 制作模板 2. 獲取模板,并將所獲取的數據加載生成html文件 2. 生成PDF文件 其中由兩個地方需要注意,都是關于獲取文件路徑的問題,由于項目部署的時候是打包成jar包形式,所以在開發過程中時直接安照傳統的獲取方法沒有一點文件,但是當打包后部署,總是出錯。于是參考網上文章,先將文件讀出來到項目的臨時目錄下,然后再按正常方式加載該臨時文件; 還有一個問題至今沒有解決,就是關于生成PDF文件...
電腦空間不夠了?教你一個小秒招快速清理 Docker 占用的磁盤空間!
Docker 很占用空間,每當我們運行容器、拉取鏡像、部署應用、構建自己的鏡像時,我們的磁盤空間會被大量占用。 如果你也被這個問題所困擾,咱們就一起看一下 Docker 是如何使用磁盤空間的,以及如何回收。 docker 占用的空間可以通過下面的命令查看: TYPE 列出了docker 使用磁盤的 4 種類型: Images:所有鏡像占用的空間,包括拉取下來的鏡像,和本地構建的。 Con...

requests實現全自動PPT模板
http://www.1ppt.com/moban/ 可以免費的下載PPT模板,當然如果要人工一個個下,還是挺麻煩的,我們可以利用requests輕松下載 訪問這個主頁,我們可以看到下面的樣式 點每一個PPT模板的圖片,我們可以進入到詳細的信息頁面,翻到下面,我們可以看到對應的下載地址 點擊這個下載的按鈕,我們便可以下載對應的PPT壓縮包 那我們就開始做吧 首先,查看網頁的源代碼,我們可以看到每一...


Linux C系統編程-線程互斥鎖(四)
互斥鎖 互斥鎖也是屬于線程之間處理同步互斥方式,有上鎖/解鎖兩種狀態。 互斥鎖函數接口 1)初始化互斥鎖 pthread_mutex_init() man 3 pthread_mutex_init (找不到的情況下首先 sudo apt-get install glibc-doc sudo apt-get install manpages-posix-dev) 動態初始化 int pthread_...