安卓總結 之 OkHttp使用及源碼分析(三)
本章主要介紹Okhttp的使用和和源碼分析
- 準備工作
- 常見用法
- OkHttp更好的封裝
- OkHttp的源碼分析
一. 準備工作
在gradle中添加依賴
    implementation 'com.squareup.okio:okio:1.7.0'
    implementation 'com.squareup.okhttp3:okhttp:3.2.0'
添加網絡權限
<uses-permission android:name="android.permission.INTERNET"/>
二. 常見用法
- get異步請求
private void getAsynHttp() {

        Request.Builder requestBuilder = new Request.Builder().url("http://www.baidu.com");
        requestBuilder.method("GET", null);
        Request request = requestBuilder.build();
        Call mcall = mOkHttpClient.newCall(request);
        mcall.enqueue(new Callback() {
            @Override
            public void onFailure(Call call, IOException e) {
                Toast.makeText(getApplicationContext(), "請求失敗", Toast.LENGTH_SHORT).show();
            }

            @Override
            public void onResponse(Call call, Response response) throws IOException {
                String str = response.body().string();
                Log.i(TAG, str);
                runOnUiThread(new Runnable() {
                    @Override
                    public void run() {
                        Toast.makeText(getApplicationContext(), "請求成功", Toast.LENGTH_SHORT).show();
                    }
                });
            }
        });
    }
- post異步請求
    private void postAsynHttp() {
        RequestBody formBody = new FormBody.Builder()
                .add("ip", "59.108.54.37")
                .build();
        Request request = new Request.Builder()
                .url("http://ip.taobao.com/service/getIpInfo.php")
                .post(formBody)
                .build();
        OkHttpClient mOkHttpClient = new OkHttpClient();
        Call call = mOkHttpClient.newCall(request);
        call.enqueue(new Callback() {
            @Override
            public void onFailure(Call call, IOException e) {
                Toast.makeText(getApplicationContext(), "請求失敗", Toast.LENGTH_SHORT).show();
            }

            @Override
            public void onResponse(Call call, Response response) throws IOException {
                String str = response.body().string();
                Log.d(TAG, str);
                runOnUiThread(new Runnable() {
                    @Override
                    public void run() {
                        Toast.makeText(getApplicationContext(), "請求成功", Toast.LENGTH_SHORT).show();
                    }
                });
            }

        });
    }
只是添加了一個FormBody
- 異步上傳文件
    private void postAsynFile() {
        String filepath = "";
        if (Environment.getExternalStorageState().equals(
                Environment.MEDIA_MOUNTED)) {
            filepath = Environment.getExternalStorageDirectory().getAbsolutePath();
        } else {
            filepath = getFilesDir().getAbsolutePath();
        }
        File file = new File(filepath, "wangshu.txt");
        Request request = new Request.Builder()
                .url("https://api.github.com/markdown/raw")
                .post(RequestBody.create(MEDIA_TYPE_MARKDOWN, file))
                .build();
        mOkHttpClient.newCall(request).enqueue(new Callback() {
            @Override
            public void onFailure(Call call, IOException e) {

            }

            @Override
            public void onResponse(Call call, Response response) throws IOException {
                Log.d(TAG, response.body().string());
            }
        });
    }
定義文件類型再調用RequestBody方法就ok
- 異步下載文件
    private void downAsynFile() {
        String url = "https://img-my.csdn.net/uploads/201603/26/1458988468_5804.jpg";
        Request request = new Request.Builder().url(url).build();
        mOkHttpClient.newCall(request).enqueue(new Callback() {
            @Override
            public void onFailure(Call call, IOException e) {
                Toast.makeText(getApplicationContext(), "文件下載失敗", Toast.LENGTH_SHORT).show();
            }

            @Override
            public void onResponse(Call call, Response response) {
                InputStream inputStream = response.body().byteStream();
                FileOutputStream fileOutputStream = null;
                String filepath = "";
                try {
                    if (Environment.getExternalStorageState().equals(
                            Environment.MEDIA_MOUNTED)) {
                        filepath = Environment.getExternalStorageDirectory().getAbsolutePath();
                    } else {
                        filepath = getFilesDir().getAbsolutePath();
                    }
                    File file = new File(filepath, "wangshu.jpg");
                    if (null != file) {
                        fileOutputStream = new FileOutputStream(file);
                        byte[] buffer = new byte[2048];
                        int len = 0;
                        while ((len = inputStream.read(buffer)) != -1) {
                            fileOutputStream.write(buffer, 0, len);
                        }
                        fileOutputStream.flush();
                        runOnUiThread(new Runnable() {
                            @Override
                            public void run() {
                                Toast.makeText(getApplicationContext(), "文件存儲成功", Toast.LENGTH_SHORT).show();
                            }
                        });
                    } else {
                        runOnUiThread(new Runnable() {
                            @Override
                            public void run() {
                                Toast.makeText(getApplicationContext(), "文件存儲失敗", Toast.LENGTH_SHORT).show();
                            }
                        });
                    }
                } catch (IOException e) {
                    Log.e(TAG, "IOException");
                    e.printStackTrace();
                }
            }
        });
    }
調用response.body().byteStream();得到輸入流然后就是文件操作了
- 初始化okClient
    private void initOkHttpClient() {
        File sdcache = getExternalCacheDir();
        int cacheSize = 10 * 1024 * 1024;
        OkHttpClient.Builder builder = new OkHttpClient.Builder()
                .connectTimeout(15, TimeUnit.SECONDS)
                .writeTimeout(20, TimeUnit.SECONDS)
                .readTimeout(20, TimeUnit.SECONDS)
                .cache(new Cache(sdcache.getAbsoluteFile(), cacheSize));
        mOkHttpClient = builder.build();
    }
在okHttp中,所有所有對于連接的初始化操作都在OkHttpClient.Builder進行,這里設置了超市時間和緩存。
- 取消請求
當用戶離開應用程序或者跳轉到其他頁面的時候,我們可以取消任務節省網絡資源。
簡單的方法就是在Request.Builder.tag中分配一個標簽,然后我們就能用OkHtppClient.cancel(Object tag)來取消任務
三. OkHttp更好的封裝
public class OkHttpEngine {
    private static volatile  OkHttpEngine mInstance;
    private OkHttpClient mOkHttpClient;
    private Handler mHandler;

    // 雙重檢驗鎖創建OkHttpEngine單例
    public static OkHttpEngine getInstance(Context context) {
        if (mInstance == null) {
            synchronized (OkHttpEngine.class) {
                if (mInstance == null) {
                    mInstance = new OkHttpEngine(context);
                }
            }
        }
        return mInstance;
    }

    // 在構造函數中初始化Client和handler
    private OkHttpEngine(Context context) {
        File sdcache = context.getExternalCacheDir();
        int cacheSize = 10 * 1024 * 1024;
        OkHttpClient.Builder builder = new OkHttpClient.Builder()
                .connectTimeout(15, TimeUnit.SECONDS)
                .writeTimeout(20, TimeUnit.SECONDS)
                .readTimeout(20, TimeUnit.SECONDS)
                .cache(new Cache(sdcache.getAbsoluteFile(), cacheSize));
         mOkHttpClient=builder.build();
         mHandler = new Handler();
    }


    /**
     * 異步get請求
     * @param url
     * @param callback
     */
    public void getAsynHttp(String url, ResultCallback callback) {

        final Request request = new Request.Builder()
                .url(url)
                .build();
        Call call = mOkHttpClient.newCall(request);
        dealResult(call, callback);
    }


    private void dealResult(Call call, final ResultCallback callback) {
        call.enqueue(new Callback() {
            @Override
            public void onFailure(Call call, IOException e) {
                sendFailedCallback(call.request(), e, callback);
            }

            @Override
            public void onResponse(Call call, Response response) throws IOException {
                sendSuccessCallback(response.body().string(), callback);
            }

            private void sendSuccessCallback(final String str, final ResultCallback callback) {
                mHandler.post(new Runnable() {
                    @Override
                    public void run() {
                        if (callback != null) {
                            try {
                                callback.onResponse(str);
                            } catch (IOException e) {
                                e.printStackTrace();
                            }
                        }
                    }
                });
            }

            private void sendFailedCallback(final Request request, final Exception e, final ResultCallback callback) {
                mHandler.post(new Runnable() {
                    @Override
                    public void run() {
                        if (callback != null)
                            callback.onError(request, e);
                    }
                });
            }

        });
    }


    public abstract class ResultCallback{
        public abstract void onError(Request request, Exception e);
        public abstract void onResponse(String str) throws IOException;
    }
}
請求網絡的時候是用Handler將請求結果回調給UI線程,所以我們想要請求網絡的時候只需要調用OkHttpEngine的getAsynHttp方法并寫一個ResultCallback回調就可以了。
四. OkHttp的源碼分析
我們從使用開始,一步步剖析OkClient的源碼實現
//下面是一段Kotlin代碼
override fun onCreate(savedInstanceState: Bundle?) {
        super.onCreate(savedInstanceState)
        setContentView(R.layout.activity_main)
        val request = Request.Builder().url("https://www.baidu.com/").method("get", null).build()
        OkHttpClient().newCall(request).enqueue(object : Callback {
            override fun onFailure(call: Call?, e: IOException?) {
                Log.d("onClient", "isBad")
            }

            override fun onResponse(call: Call?, response: Response?) {
                Log.e("onClient", "isOk")
            }
        })
    }
我們把重點關注在 OkHttpClient().newCall(request).enqueue() 這個方法中
newCall方法:
  // OkHttpClint中的newCall方法
  @Override public Call newCall(Request request) {
    return new RealCall(this, request);
  }
實例化一個RealCall類,RealCall實現了Call接口,看一下Call是干什么的
,這里保留了源碼的英文注釋
// A call is a request that has been prepared for execution.
public interface Call {
    //  Invokes the request immediately, and blocks until the response can be processed or is in  error.
    Response execute() throws IOException;

    // Schedules the request to be executed at some point in the future.
    void enqueue(Callback responseCallback);

    void cancel();
    boolean isExecuted();
    boolean isCanceled();
    interface Factory {
    Call newCall(Request request);
  }
}
然后我們繼續看OkHttpClient().newCall(request).enqueue()
的enqueue方法
  // RealCall中的enqueue方法
  void enqueue(Callback responseCallback, boolean forWebSocket) {
    synchronized (this) {
      if (executed) throw new IllegalStateException("Already Executed");
      executed = true;
    }
    client.dispatcher().enqueue(new AsyncCall(responseCallback, forWebSocket));
  }
其中這個參數responseCallback就是源碼介紹開頭中OkHttpClient().newCall(request).enqueue()傳入的callback
我們這里可以看到,真正處理這個Callback的并不是RealCall,而是dispatcher(),這個就是調度器,看看他的類聲明 public final class Dispatcher 是一個不變類,也就是說不能被重寫。
我們看一下調度器Dispatcher中的enqueue方法:
 // Dispatcher類的enqueue方法
  synchronized void enqueue(AsyncCall call) {
    if (runningAsyncCalls.size() < maxRequests && runningCallsForHost(call) < maxRequestsPerHost) {
      runningAsyncCalls.add(call);
      executorService().execute(call);
    } else {
      readyAsyncCalls.add(call);
    }
  }
這個方法用了synchronized聲明。看到這么多全局的變量,感覺有點煩,沒事,其實很簡單,我們看一下Dispatcher的聲明:
 // Dispatcher類的成員變量
  private int maxRequests = 64;
  private int maxRequestsPerHost = 5;

  /** Executes calls. Created lazily. */
  private ExecutorService executorService;

  /** Ready async calls in the order they'll be run. */
  private final Deque<AsyncCall> readyAsyncCalls = new ArrayDeque<>();

  /** Running asynchronous calls. Includes canceled calls that haven't finished yet. */
  private final Deque<AsyncCall> runningAsyncCalls = new ArrayDeque<>();

  /** Running synchronous calls. Includes canceled calls that haven't finished yet. */
  private final Deque<RealCall> runningSyncCalls = new ArrayDeque<>();
是不是感覺很清晰,很簡單
我們回頭看這段代碼
 // Dispatcher類的enqueue方法
  synchronized void enqueue(AsyncCall call) {
    if (runningAsyncCalls.size() < maxRequests && runningCallsForHost(call) < maxRequestsPerHost) {
      runningAsyncCalls.add(call);
      executorService().execute(call);
    } else {
      readyAsyncCalls.add(call);
    }
  }
很簡單,如果可以這個符合可以運行的條件,就把它加到runningAsyncCalls隊列中,然后調用execute執行,否則加到readyAsyncCalls準備隊列中
ok,我們把關注點放在這個方法中
executorService().execute(call);
// Dispatcher的executorService方法
public synchronized ExecutorService executorService() {
    if (executorService == null) {
      executorService = new ThreadPoolExecutor(0, Integer.MAX_VALUE, 60, TimeUnit.SECONDS,
          new SynchronousQueue<Runnable>(), Util.threadFactory("OkHttp Dispatcher", false));
    }
    return executorService;
  }

 // 對比一下newCachedThreadPool,簡直就是一毛一樣好吧
    public static ExecutorService newCachedThreadPool() {
        return new ThreadPoolExecutor(0, Integer.MAX_VALUE,
                                      60L, TimeUnit.SECONDS,
                                      new SynchronousQueue<Runnable>());
    }
我們知道CachedThreadPool實際上就是一個無限容量,但是隊列中只有一個線程的線程池。這種線程池比較適合任務比較多,但是任務比較小的情況。
execute(Runnable run)調度方法最后會調用調用這個runnable的run方法,因為這個call是AsyncCall類,我們看看這個類的run方法:
final class AsyncCall extends NamedRunnable {
    private final Callback responseCallback;
    private final boolean forWebSocket;
    private AsyncCall(Callback responseCallback, boolean forWebSocket) {
      super("OkHttp %s", originalRequest.url().toString());
      this.responseCallback = responseCallback;
      this.forWebSocket = forWebSocket;
    }
    @Override protected void execute() {
      boolean signalledCallback = false;
      try {
        Response response = getResponseWithInterceptorChain(forWebSocket);
        if (canceled) {
          signalledCallback = true;
          responseCallback.onFailure(RealCall.this, new IOException("Canceled"));
        } else {
          signalledCallback = true;
          responseCallback.onResponse(RealCall.this, response);
        }
      } catch (IOException e) {
        if (signalledCallback) {
          // Do not signal the callback twice!
          logger.log(Level.INFO, "Callback failure for " + toLoggableString(), e);
        } else {
          responseCallback.onFailure(RealCall.this, e);
        }
      } finally {
        client.dispatcher().finished(this);
      }
    }
  }
沒有run方法呀,怎么肥事?看看它繼承的類NamedRunnable搞了什么。
public abstract class NamedRunnable implements Runnable {
  protected final String name;

  public NamedRunnable(String format, Object... args) {
    this.name = String.format(format, args);
  }

  @Override public final void run() {
    String oldName = Thread.currentThread().getName();
    Thread.currentThread().setName(name);
    try {
      execute();
    } finally {
      Thread.currentThread().setName(oldName);
    }
  }
  protected abstract void execute();
}
原來是它在run方法執行了execute方法,行吧,其實一樣,線程池最后執行的是AsyncCall的execute方法。ojbk,來看一下吧!
   // AsyncCall的execute方法
    @Override protected void execute() {
      boolean signalledCallback = false;
      try {
        Response response = getResponseWithInterceptorChain(forWebSocket);
        if (canceled) {
          signalledCallback = true;
          responseCallback.onFailure(RealCall.this, new IOException("Canceled"));
        } else {
          signalledCallback = true;
          responseCallback.onResponse(RealCall.this, response);
        }
      } catch (IOException e) {
        if (signalledCallback) {
          // Do not signal the callback twice!
          logger.log(Level.INFO, "Callback failure for " + toLoggableString(), e);
        } else {
          responseCallback.onFailure(RealCall.this, e);
        }
      } finally {
        client.dispatcher().finished(this);
      }
    }
別急,我們一個個往下面看,先看這個方法:getResponseWithInterceptorChain
  private Response getResponseWithInterceptorChain(boolean forWebSocket) throws IOException {
    Interceptor.Chain chain = new ApplicationInterceptorChain(0, originalRequest, forWebSocket);
    return chain.proceed(originalRequest);
  }
ApplicationInterceptorChain 從名字可以猜測到,他是一個攔截鏈,看一下吧!
 // ApplicationInterceptorChain類的proceed方法
 @Override public Response proceed(Request request) throws IOException {
      // If there's another interceptor in the chain, call that.
      if (index < client.interceptors().size()) {
        Interceptor.Chain chain = new ApplicationInterceptorChain(index + 1, request, forWebSocket);
        // 得到了當前攔截器
        Interceptor interceptor = client.interceptors().get(index);
        // 攔截操作,所有攔截器(除了最后一個)都會阻塞到這里
        Response interceptedResponse = interceptor.intercept(chain);

        if (interceptedResponse == null) {
          throw new NullPointerException("application interceptor " + interceptor
              + " returned null");
        }

        return interceptedResponse;
      }
      return getResponse(request, forWebSocket);
    }
  }
看到這段,有點發蒙
Interceptor.Chain chain = new ApplicationInterceptorChain(index + 1, request, forWebSocket);
為什么還要創建一個chain呢,原來index代表當前攔截器所在的位置,比如一共有五個攔截器,攔截器“G”在第二個,那你要做的是將“G”攔截器攔截在第一個攔截器之后。get到了嗎?
Response interceptedResponse = interceptor.intercept(chain);
這個方法為什么會攔住所有的攔截器,大家可能不明白,我就隨便創建一個攔截器(攔截發出的請求和響應的日志)出來,大家就知道了。
class LoggingInterceptor implements Interceptor {
  @Override public Response intercept(Interceptor.Chain chain) throws IOException {
    Request request = chain.request();

    long t1 = System.nanoTime();
    logger.info(String.format("Sending request %s on %s%n%s",
        request.url(), chain.connection(), request.headers()));

    Response response = chain.proceed(request);

    long t2 = System.nanoTime();
    logger.info(String.format("Received response for %s in %.1fms%n%s",
        response.request().url(), (t2 - t1) / 1e6d, response.headers()));

    return response;
  }
}
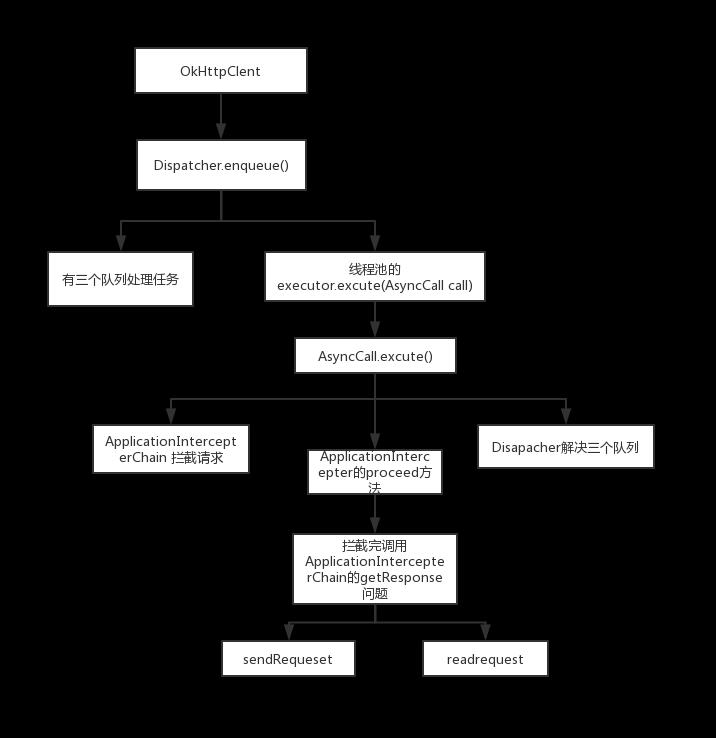
大家能夠明白嗎,這里我畫一張圖:
這個有點類似Spirng中的攔截器,其實是一個道理。
ok,我們討論完了攔截器。回到AsyncCall的execute方法。
   // AsyncCall的execute方法
    @Override protected void execute() {
      boolean signalledCallback = false;
      try {
        Response response = getResponseWithInterceptorChain(forWebSocket);
        if (canceled) {
          signalledCallback = true;
          responseCallback.onFailure(RealCall.this, new IOException("Canceled"));
        } else {
          signalledCallback = true;
          responseCallback.onResponse(RealCall.this, response);
        }
      } catch (IOException e) {
        if (signalledCallback) {
          // Do not signal the callback twice!
          logger.log(Level.INFO, "Callback failure for " + toLoggableString(), e);
        } else {
          responseCallback.onFailure(RealCall.this, e);
        }
      } finally {
        client.dispatcher().finished(this);
      }
    }
responseCallback.onFailure(RealCall.this, responseCallback.onResponse(RealCall.this, response);
這里正是我們重寫的Callback的兩個方法。
好了,做了這么久的前戲,也該開始網絡請求了吧?看這個方法
client.dispatcher().finished(this); 是調度器的finish方法。
   // Dispatcher類的finished方法
   synchronized void finished(AsyncCall call) {
    if (!runningAsyncCalls.remove(call)) throw new AssertionError("AsyncCall wasn't running!");
    promoteCalls();
  }
這里簡單地把call從運行隊列中移走了。看一下PromoteCalls方法:
 // Dispatcher類中的promoteCalls方法
 private void promoteCalls() {
    if (runningAsyncCalls.size() >= maxRequests) return; // Already running max capacity.
    if (readyAsyncCalls.isEmpty()) return; // No ready calls to promote.

    for (Iterator<AsyncCall> i = readyAsyncCalls.iterator(); i.hasNext(); ) {
      AsyncCall call = i.next();

      if (runningCallsForHost(call) < maxRequestsPerHost) {
        i.remove();
        runningAsyncCalls.add(call);
        executorService().execute(call);
      }

      if (runningAsyncCalls.size() >= maxRequests) return; // Reached max capacity.
    }
  }
很簡單,running的一個call被消化了,這個隊列也就有了空位置,這時候ready隊列有call乘機上位。等等,說好的網絡請求呢,在哪?是不是哪里疏忽了?
我們分析到AsyncCall的execute方法的時候,還記得它做了什么嗎,它用一大堆攔截鏈攔截他,然后在最后 client.dispatcher().finished(this);對調度器Dispactcher的兩個隊列進行收尾對吧?
于是我們大概分析到網絡請求操作在它們中間!果然在攔截器中間ApplicationInterceptorChain類的proceed方法找到啦!
 // ApplicationInterceptorChain類的proceed方法
 @Override public Response proceed(Request request) throws IOException {
      // If there's another interceptor in the chain, call that.
      if (index < client.interceptors().size()) {
        Interceptor.Chain chain = new ApplicationInterceptorChain(index + 1, request, forWebSocket);
        // 得到了當前攔截器
        Interceptor interceptor = client.interceptors().get(index);
        // 攔截操作,所有攔截器(除了最后一個)都會阻塞到這里
        Response interceptedResponse = interceptor.intercept(chain);

        if (interceptedResponse == null) {
          throw new NullPointerException("application interceptor " + interceptor
              + " returned null");
        }

        return interceptedResponse;
      }
      return getResponse(request, forWebSocket);
    }
  }
網絡請求在這里:getResponse(request, forWebSocket);
這個方法又臭又長,這里我把重要的貼出來。
Response getResponse(Request request, boolean forWebSocket) throws IOException {
    engine.sendRequest();
    engine.readResponse();
}
喵喵喵!就這么短
一個個看啰!
HttpEngine的sendRequest方法也很復雜,主要解決的是緩存問題,我們就不展開了,不然要要要講到明年!
// HttpEngine的sendRequest方法
 public void sendRequest() throws RequestException, RouteException, IOException {
    if (cacheStrategy != null) return;
    if (httpStream != null) throw new IllegalStateException();

    Request request = networkRequest(userRequest);

    //獲取Client中的Cache,同時Cache在初始化的時候讀取緩存目錄中曾經請求過的所有信息。
    InternalCache responseCache = Internal.instance.internalCache(client);
    Response cacheCandidate = responseCache != null
        ? responseCache.get(request)
        : null;

    long now = System.currentTimeMillis();
    cacheStrategy = new CacheStrategy.Factory(now, request, cacheCandidate).get();
    //網絡請求
    networkRequest = cacheStrategy.networkRequest;
    //緩存的響應
    cacheResponse = cacheStrategy.cacheResponse;

    if (responseCache != null) {
        //記錄當前請求是網絡發起的還是緩存發起的
      responseCache.trackResponse(cacheStrategy);
    }


    if (cacheCandidate != null && cacheResponse == null) {
      closeQuietly(cacheCandidate.body()); // The cache candidate wasn't applicable. Close it.
    }

    // 不進行網絡請求并且緩存不存在或者過期,返回504錯誤
    if (networkRequest == null && cacheResponse == null) {
      userResponse = new Response.Builder()
          .request(userRequest)
          .priorResponse(stripBody(priorResponse))
          .protocol(Protocol.HTTP_1_1)
          .code(504)
          .message("Unsatisfiable Request (only-if-cached)")
          .body(EMPTY_BODY)
          .build();
      return;
    }

    // 不進行網絡請求而且緩存可以使用,則直接返回緩存
    if (networkRequest == null) {
      userResponse = cacheResponse.newBuilder()
          .request(userRequest)
          .priorResponse(stripBody(priorResponse))
          .cacheResponse(stripBody(cacheResponse))
          .build();
      userResponse = unzip(userResponse);
      return;
    }

    // 需要訪問網絡時
    boolean success = false;
    try {
      httpStream = connect();
      httpStream.setHttpEngine(this);
cacheCandidate是上次與服務器交互時緩存的Response,這里的緩存均基于Map。key是請求中url的md5,value是在文件中查到的緩存,頁面置換算法基于LRU。
通過cacheStrategy我們可以得到networkRequest和cacheResponse,代表網絡請求和緩存是否存在。如果networkRequest和cacheResponse都為null的時候,返回504錯誤,當networkRequest為null時,也就是不進行網絡請求時,就可以直接返回緩存,其他情況就請求網絡。
我們粗略看一下readResponse()方法:
 public void readResponse() throws IOException {
    Response networkResponse;
    if (forWebSocket) {
      httpStream.writeRequestHeaders(networkRequest);
      // 讀取網絡響應
      networkResponse = readNetworkResponse();
    } else if (!callerWritesRequestBody) {
     // 檢查緩存是否可用,如果可用則使用當前緩存的Response,關閉網絡連接,釋放連接
      networkResponse = new NetworkInterceptorChain(0, networkRequest).proceed(networkRequest);
    } else {
      // Emit the request body's buffer so that everything is in requestBodyOut.
      if (bufferedRequestBody != null && bufferedRequestBody.buffer().size() > 0) {
        bufferedRequestBody.emit();
      }

      // Emit the request headers if we haven't yet. We might have just learned the Content-Length.
      if (sentRequestMillis == -1) {
        if (OkHeaders.contentLength(networkRequest) == -1
            && requestBodyOut instanceof RetryableSink) {
          long contentLength = ((RetryableSink) requestBodyOut).contentLength();
          networkRequest = networkRequest.newBuilder()
              .header("Content-Length", Long.toString(contentLength))
              .build();
        }
        httpStream.writeRequestHeaders(networkRequest);
      }

      // Write the request body to the socket.
      if (requestBodyOut != null) {
        if (bufferedRequestBody != null) {
          // This also closes the wrapped requestBodyOut.
          bufferedRequestBody.close();
        } else {
          requestBodyOut.close();
        }
        if (requestBodyOut instanceof RetryableSink) {
          httpStream.writeRequestBody((RetryableSink) requestBodyOut);
        }
      }

      networkResponse = readNetworkResponse();
    }

    receiveHeaders(networkResponse.headers());

    // If we have a cache response too, then we're doing a conditional get.
    if (cacheResponse != null) {
      if (validate(cacheResponse, networkResponse)) {
        userResponse = cacheResponse.newBuilder()
            .request(userRequest)
            .priorResponse(stripBody(priorResponse))
            .headers(combine(cacheResponse.headers(), networkResponse.headers()))
            .cacheResponse(stripBody(cacheResponse))
            .networkResponse(stripBody(networkResponse))
            .build();
        networkResponse.body().close();
        releaseStreamAllocation();

        // Update the cache after combining headers but before stripping the
        // Content-Encoding header (as performed by initContentStream()).
        InternalCache responseCache = Internal.instance.internalCache(client);
        responseCache.trackConditionalCacheHit();
        responseCache.update(cacheResponse, stripBody(userResponse));
        userResponse = unzip(userResponse);
        return;
      } else {
        closeQuietly(cacheResponse.body());
      }
    }

    userResponse = networkResponse.newBuilder()
        .request(userRequest)
        .priorResponse(stripBody(priorResponse))
        .cacheResponse(stripBody(cacheResponse))
        .networkResponse(stripBody(networkResponse))
        .build();

    if (hasBody(userResponse)) {
      maybeCache();
      userResponse = unzip(cacheWritingResponse(storeRequest, userResponse));
    }
  }
這個方法做的是解析HTTP響應報頭。如果有緩存而且可用,則用緩存的數據并更新緩存,否則則用網絡請求返回的數據。
總結完了,大家應該會覺得很亂,這里粗略畫個圖幫助大家理解。
智能推薦
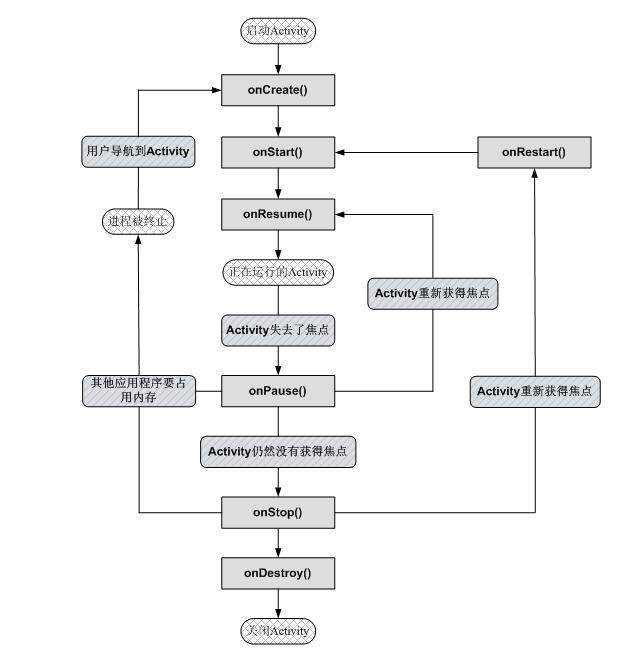
安卓四大組件總結之activity
一、簡介 Android四大組件分別為activity、service、content provider、broadcast receiver。(活動、服務、內容提供器、廣播)。 1、activity (1)一個Activity通常是一個單獨的窗口,是一個負責與用戶交互的組件。 (2)...


freemarker + ItextRender 根據模板生成PDF文件
1. 制作模板 2. 獲取模板,并將所獲取的數據加載生成html文件 2. 生成PDF文件 其中由兩個地方需要注意,都是關于獲取文件路徑的問題,由于項目部署的時候是打包成jar包形式,所以在開發過程中時直接安照傳統的獲取方法沒有一點文件,但是當打包后部署,總是出錯。于是參考網上文章,先將文件讀出來到項目的臨時目錄下,然后再按正常方式加載該臨時文件; 還有一個問題至今沒有解決,就是關于生成PDF文件...
電腦空間不夠了?教你一個小秒招快速清理 Docker 占用的磁盤空間!
Docker 很占用空間,每當我們運行容器、拉取鏡像、部署應用、構建自己的鏡像時,我們的磁盤空間會被大量占用。 如果你也被這個問題所困擾,咱們就一起看一下 Docker 是如何使用磁盤空間的,以及如何回收。 docker 占用的空間可以通過下面的命令查看: TYPE 列出了docker 使用磁盤的 4 種類型: Images:所有鏡像占用的空間,包括拉取下來的鏡像,和本地構建的。 Con...

requests實現全自動PPT模板
http://www.1ppt.com/moban/ 可以免費的下載PPT模板,當然如果要人工一個個下,還是挺麻煩的,我們可以利用requests輕松下載 訪問這個主頁,我們可以看到下面的樣式 點每一個PPT模板的圖片,我們可以進入到詳細的信息頁面,翻到下面,我們可以看到對應的下載地址 點擊這個下載的按鈕,我們便可以下載對應的PPT壓縮包 那我們就開始做吧 首先,查看網頁的源代碼,我們可以看到每一...
猜你喜歡


Linux C系統編程-線程互斥鎖(四)
互斥鎖 互斥鎖也是屬于線程之間處理同步互斥方式,有上鎖/解鎖兩種狀態。 互斥鎖函數接口 1)初始化互斥鎖 pthread_mutex_init() man 3 pthread_mutex_init (找不到的情況下首先 sudo apt-get install glibc-doc sudo apt-get install manpages-posix-dev) 動態初始化 int pthread_...

統計學習方法 - 樸素貝葉斯
引入問題:一機器在良好狀態生產合格產品幾率是 90%,在故障狀態生產合格產品幾率是 30%,機器良好的概率是 75%。若一日第一件產品是合格品,那么此日機器良好的概率是多少。 貝葉斯模型 生成模型與判別模型 判別模型,即要判斷這個東西到底是哪一類,也就是要求y,那就用給定的x去預測。 生成模型,是要生成一個模型,那就是誰根據什么生成了模型,誰就是類別y,根據的內容就是x 以上述例子,判斷一個生產出...
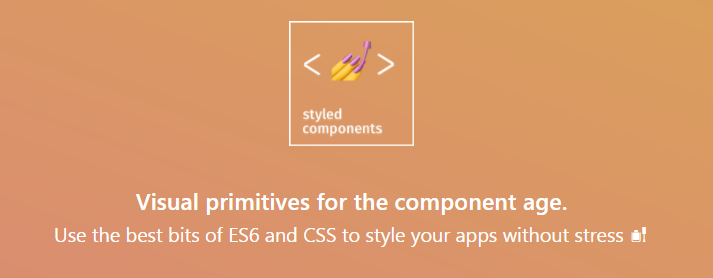
styled-components —— React 中的 CSS 最佳實踐
https://zhuanlan.zhihu.com/p/29344146 Styled-components 是目前 React 樣式方案中最受關注的一種,它既具備了 css-in-js 的模塊化與參數化優點,又完全使用CSS的書寫習慣,不會引起額外的學習成本。本文是 styled-components 作者之一 Max Stoiber 所寫,首先總結了前端組件化樣式中的最佳實踐原則,然后在此基...