安卓學習筆記之Handler
UI線程
當系統啟動的時候,就會創建一個主線程(Main Thread),然后這個主線程向UI組件分發事件,主線程和UI的組件進行交互,故稱UI線程。
線程安全
Android的UI線程是不安全的。引用一下,百度百科的解釋
線程安全就是多線程訪問時,采用了加鎖機制,當一個線程訪問該類的某個數據時,進行保護,其他線程不能進行訪問直到該線程讀取完,其他線程才可使用。不會出現數據不一致或者數據污染。 線程不安全就是不提供數據訪問保護,有可能出現多個線程先后更改數據造成所得到的數據是臟數據
from 百度百科
既然這樣,Google給我們提供了更新ui界面的Handler類。
Handler
一個處理異步消息的類,創建一個子線程發送消息至主線程,在主線程更新相應的UI界面。比如在子線程進行長時間的網絡操作,然后更新UI界面上的TextView。
使用的方法有兩種,
1.post(runnable)&2.sendMessage(message)
先演示一下,所謂不能直接在UI線程更新TextView的操作。在XML布局文件里創建一個TextView。
package com.example.myapplication;

import android.app.Activity;
import android.os.Bundle;
import android.support.annotation.Nullable;
import android.widget.Button;
import android.widget.TextView;

/**
 * Created by Does on 2017/7/20.
 */

public class HandlerExample extends Activity {

    private TextView tv_content;
    @Override
    protected void onCreate(@Nullable Bundle savedInstanceState) {
        super.onCreate(savedInstanceState);
        setContentView(R.layout.activity_main);

        tv_content= (TextView) findViewById(R.id.tv_content);
        new Thread(){
            @Override
            public void run() {
                try {
                    Thread.sleep(5000);
                    tv_content.setText("更新UI");
                } catch (InterruptedException e) {
                    e.printStackTrace();
                }
            }
        }.start();
    }
}
寫好之后,運行之后,

Exception:只有創建了視圖層次結構的原始線程才能觸及它的視圖
為了解決這種問題,我們使用Handler。
post(runnable)?
這里模擬一個簡單的下載功能。XML文件里面添加兩個組件,一個Button和一個Textview
public class MainActivity extends AppCompatActivity implements View.OnClickListener {
private TextView tv_content;
private Button btn_onclick;
private Handler handler=new Handler();
@Override
protected void onCreate(Bundle savedInstanceState) {
super.onCreate(savedInstanceState);
setContentView(R.layout.activity_main);
tv_content= (TextView) findViewById(R.id.tv_content);
btn_onclick= (Button) findViewById(R.id.btn_onclick);
btn_onclick.setOnClickListener(this);
}
@Override
public void onClick(View view) {
DownLoadThread downLoadThread=new DownLoadThread();
downLoadThread.start();
}
class DownLoadThread extends Thread{
@Override
public void run() {
try {
System.out.println("文件正在下載...");
Thread.sleep(2000);
System.out.println("文件下載成功");
Runnable runnable=new Runnable() {
@Override
public void run() {
System.out.println("當前線程的id是: "+Thread.currentThread().getId());
MainActivity.this.tv_content.setText("textview已經改變");
}
};
handler.post(runnable);
} catch (InterruptedException e) {
e.printStackTrace();
}
}
}
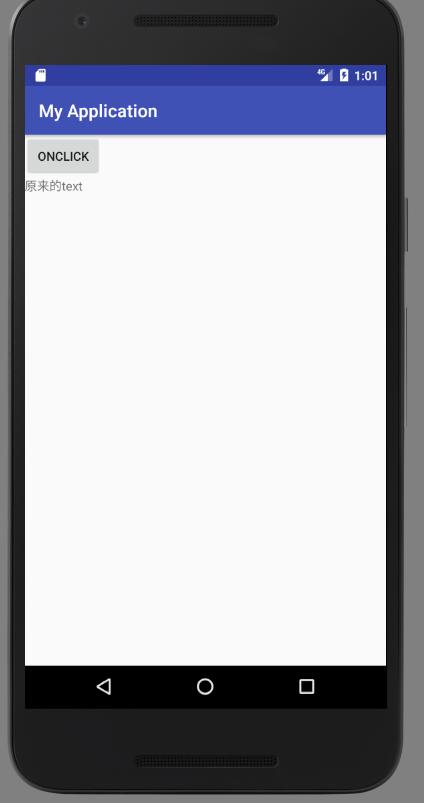
}運行效果如下,點擊Button之前
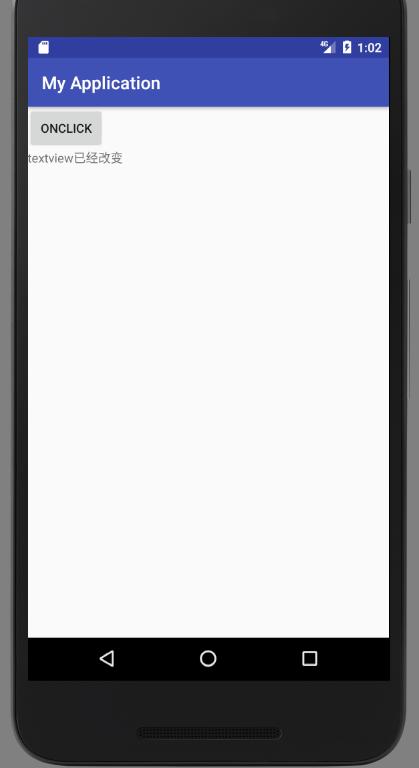
點擊Button之后
sendMessage(message)
public class HandlerExample extends Activity {

    private TextView tv_content;
    private Handler handler=new Handler(){
        @Override
        public void handleMessage(Message msg) {
            switch (msg.what){
                case 1:
                    tv_content.setText("UI變化了");
                    break;
                default:
                    break;
            }
        }
    };
    @Override
    protected void onCreate(@Nullable Bundle savedInstanceState) {
        super.onCreate(savedInstanceState);
        setContentView(R.layout.activity_main);

        tv_content= (TextView) findViewById(R.id.tv_content);
        new Thread(){
            @Override
            public void run() {
                try {
                    Thread.sleep(5000);
                    Message message=new Message();
                    message.what=1;
                    handler.sendMessage(message);
                } catch (InterruptedException e) {
                    e.printStackTrace();
                }
            }
        }.start();
    }
}
效果和上面的是一樣的。
這個明顯和上一個有些不同,多了幾樣的東西。Message(),sendMessage(),handleMessage()
首先要子線程中,創建一個Handler的一個對象handler,然后執行handler.sendMessage(message),
handler攜帶message的一個對象,message.what=1,給它一個標識,隨便取。在handleMessage()方法里,就會接受到傳過去的值,進而在handleMessage里進行UI的更新操作。
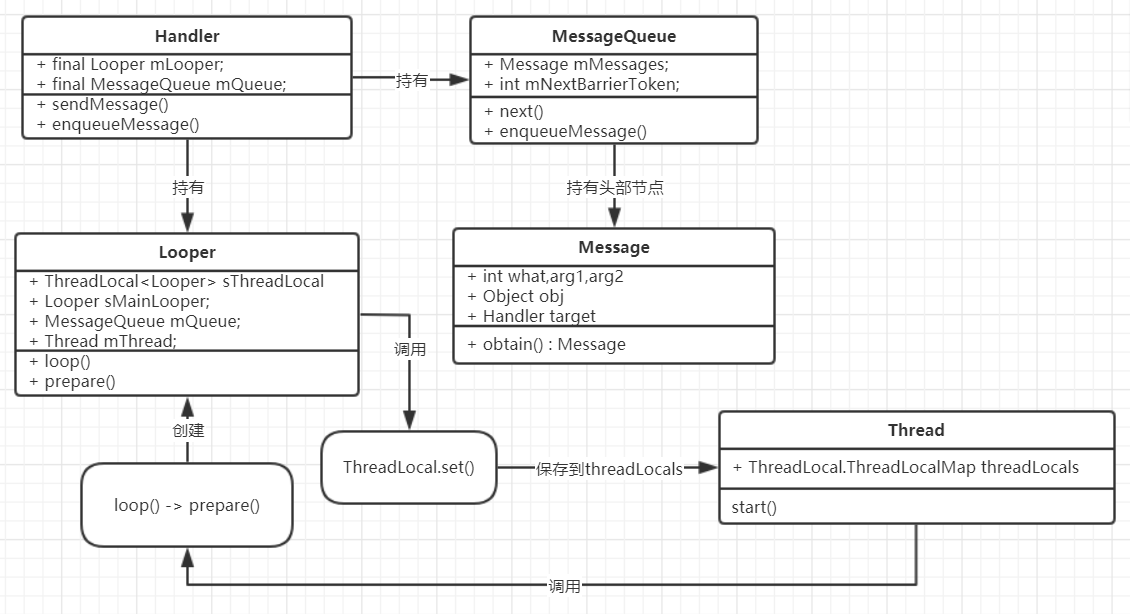
Handler運行機制
接下來我們說說內部機制的運行。主要有用到Looper,Handler,MessageQueu(消息隊列).從源碼入手,
當我們手機一啟動的時候,系統默認主線程會先調用prepareMainLooper()方法。先執行prepare(false)
 public static void prepareMainLooper() {
        prepare(false);
        synchronized (Looper.class) {
            ...
            sMainLooper = myLooper();
        }
    }
接著創建一個Looper對象,將ThreadLocal設置為線程安全的對象。
private static void prepare(boolean quitAllowed) {
        if (sThreadLocal.get() != null) {
            throw new RuntimeException("Only one Looper may be created per thread");
        }
        sThreadLocal.set(new Looper(quitAllowed));
    }
接著sThreadLocal向Looper類里傳過去quitAllowed,并在Looper()構造器里創建了一個MessageQueue的對象mQueue。
private Looper(boolean quitAllowed) {
        mQueue = new MessageQueue(quitAllowed);
        mRun = true;
        mThread = Thread.currentThread();
    }
最后,再調用prepareMainLooper()中的myLooper(),取出線程安全的Looper對象。
public static Looper myLooper() {
        return sThreadLocal.get();
    }
這是系統幫我們做的事情!!
接著我們需要做一些事情更新UI的操作,我們在MainActivity方法中創建了一個Handler對象,
public Handler() {
        this(null, false);
    }

    public Handler(Callback callback, boolean async) {
        ...

        mLooper = Looper.myLooper();
        if (mLooper == null) {
            throw new RuntimeException(
                "Can't create handler inside thread that has not called Looper.prepare()");
        }
        mQueue = mLooper.mQueue;
        mCallback = callback;
        mAsynchronous = async;
    }
handler取出了系統為我們創建的Looper對象,并取出系統創建的mQueue對象。此時我們創建的handler就持有了系統剛創建的Looper對象和MessageQueue對象。
**
發送消息
**
當我們發送消息的時候,sendMessage
    sendMessage(Message msg)

    sendMessageDelayed(Message msg, long delayMillis)

    public final boolean sendMessageAtFrontOfQueue(Message msg) {
        MessageQueue queue = mQueue;
        if (queue == null) {
            RuntimeException e = new RuntimeException(
                this + " sendMessageAtTime() called with no mQueue");
            Log.w("Looper", e.getMessage(), e);
            return false;
        }
        return enqueueMessage(queue, msg, 0);
    }

    private boolean enqueueMessage(MessageQueue queue, Message msg, long uptimeMillis) {
        msg.target = this;
        if (mAsynchronous) {
            msg.setAsynchronous(true);
        }
        return queue.enqueueMessage(msg, uptimeMillis);
    }
首先是取出Looper對象中MessageQueue在enqueueMessage()方法中,handler攜帶我們要發送的Message,然后放入消息隊列MessageQueue中
boolean enqueueMessage(Message msg, long when) {
        ...

        boolean needWake;
        synchronized (this) {
            ...

            msg.when = when;
            Message p = mMessages;
            if (p == null || when == 0 || when < p.when) {

                msg.next = p;
                mMessages = msg;
                needWake = mBlocked;
            } else {

                // Inserted within the middle of the queue.  Usually we don't have to wake
                // up the event queue unless there is a barrier at the head of the queue
                // and the message is the earliest asynchronous message in the queue.
                needWake = mBlocked && p.target == null && msg.isAsynchronous();
                Message prev;
                for (;;) {
                    prev = p;
                    p = p.next;
                    if (p == null || when < p.when) {
                        break;
                    }
                    if (needWake && p.isAsynchronous()) {
                        needWake = false;
                    }
                }
                msg.next = p;
                prev.next = msg;
            }
        }
        ...
        return true;
    }
循環取出
接著Looper調用loop()方法
public static void loop() {
        final Looper me = myLooper();
        ...

        final MessageQueue queue = me.mQueue;

        Binder.clearCallingIdentity();
        final long ident = Binder.clearCallingIdentity();

        for (;;) {
            Message msg = queue.next();
            ...
            // This must be in a local variable, in case a UI event sets the logger
            Printer logging = me.mLogging;

            msg.target.dispatchMessage(msg);
            ...
            final long newIdent = Binder.clearCallingIdentity();
            ...

            msg.recycle();
        }
    }
myLooper()取出當前Looper對象
me.mQueue拿到當前的MessageQueue對象
queue.next();取出下一個消息
如果消息存在 則調用消息的msg.target.dispatchMessage(msg);
處理消息
這就是我們重寫的方法,
 public void dispatchMessage(Message msg) {
        if (msg.callback != null) {
            handleCallback(msg);
        } else {
            if (mCallback != null) {
                if (mCallback.handleMessage(msg)) {
                    return;
                }
            }
            handleMessage(msg);
        }
    }
智能推薦

安卓開發使用Thread、Handler實時更新UI學習筆記。
最近開發安卓的時候常有需求要實時更新UI,然后發現很多都忘了,故做個學習筆記。 首先,假設需求:點擊按鈕后實時更新當前時間。 然后開工! 布局代碼: Java代碼: 完畢。...
安卓Loop機制剖析之Looper,handler
目錄 Looper是什么 簡單使用 從源碼了解loop原理 loop分析 myLooper() next() handler.dispatchMessage handler分析 消息入隊 同步屏障 總結 Looper是什么 用于為線程運行消息循環的類。默認情況下,線程沒有與之關聯的消息循環。要創建一個,在要運行循環的線程中調用 prepare(),然后調用loop()讓它處理消息,直到循環停止為止...
安卓:數據存儲之SharedPreference——學習筆記
Android提供了四種數據存儲的方式 SharedPreference:一種常用的數據存儲方式,其本質是基于XML文件存儲鍵值對數據,通常用來存儲一些簡單的配置信息。 SQLite:一個輕量級數據庫,支持基本SQL語法,是Android系統中常被采用的一種數據存儲方式。 ContentProvider:Android系統中能實現應用程序之間數據共享的一種存儲方式。 文件:即常說的文件存儲方法,常...
安卓學習筆記(一)
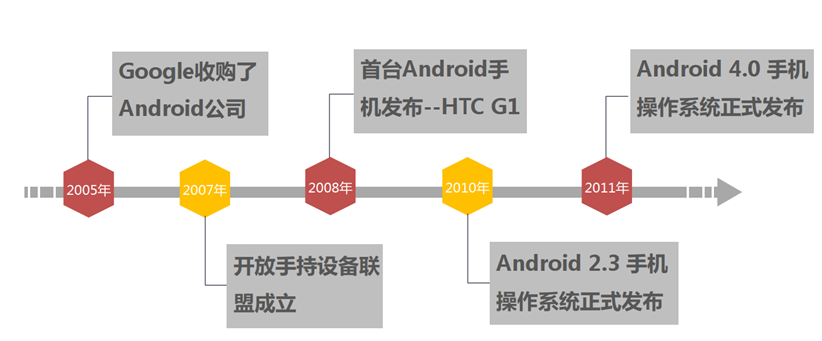
一、Android 起源 Android操作系統最初是由安迪·魯賓(Andy Rubin)開發出的,2005年被Google收購,并于2007年11月5日正式向外界展示了這款系統。 二、安卓發展史 三、安卓開發基本概念 四、安卓版本的發展 正式版發布之前有兩個測試的版本:分別是鐵臂阿童木和發條機器人 2008年由HTC代工發布了第一款安卓手機,谷歌公司發布安卓1.0,發展到現在的安卓...
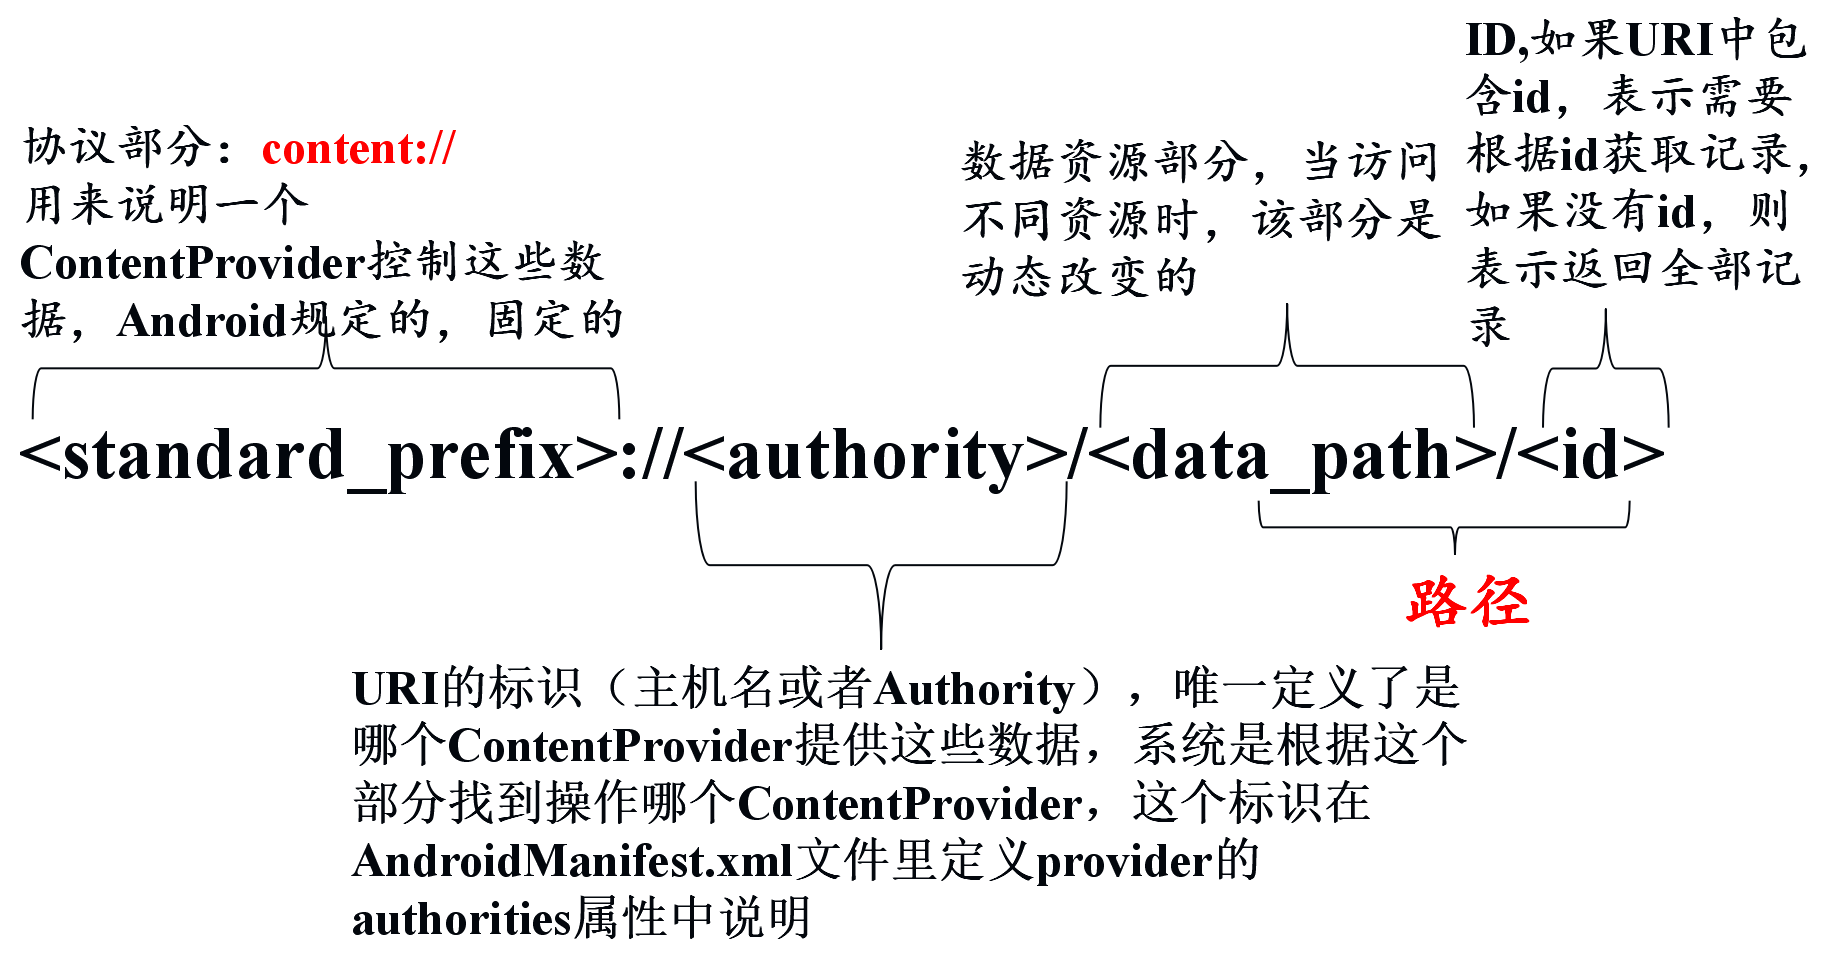
安卓學習筆記——URI
一、URI:統一資源定位符,Universal Resource Identifier的簡稱 每一個ContentProvider都擁有一個公共的URI,這個URI用于表示ContentProvider提供的數據 二、URI的組成: 例: 三、URI 常用方法: 1、static Uri parse(String UriString):將一個字符串轉換為Uri 例如: 2、 List getPat...
猜你喜歡


freemarker + ItextRender 根據模板生成PDF文件
1. 制作模板 2. 獲取模板,并將所獲取的數據加載生成html文件 2. 生成PDF文件 其中由兩個地方需要注意,都是關于獲取文件路徑的問題,由于項目部署的時候是打包成jar包形式,所以在開發過程中時直接安照傳統的獲取方法沒有一點文件,但是當打包后部署,總是出錯。于是參考網上文章,先將文件讀出來到項目的臨時目錄下,然后再按正常方式加載該臨時文件; 還有一個問題至今沒有解決,就是關于生成PDF文件...
電腦空間不夠了?教你一個小秒招快速清理 Docker 占用的磁盤空間!
Docker 很占用空間,每當我們運行容器、拉取鏡像、部署應用、構建自己的鏡像時,我們的磁盤空間會被大量占用。 如果你也被這個問題所困擾,咱們就一起看一下 Docker 是如何使用磁盤空間的,以及如何回收。 docker 占用的空間可以通過下面的命令查看: TYPE 列出了docker 使用磁盤的 4 種類型: Images:所有鏡像占用的空間,包括拉取下來的鏡像,和本地構建的。 Con...

requests實現全自動PPT模板
http://www.1ppt.com/moban/ 可以免費的下載PPT模板,當然如果要人工一個個下,還是挺麻煩的,我們可以利用requests輕松下載 訪問這個主頁,我們可以看到下面的樣式 點每一個PPT模板的圖片,我們可以進入到詳細的信息頁面,翻到下面,我們可以看到對應的下載地址 點擊這個下載的按鈕,我們便可以下載對應的PPT壓縮包 那我們就開始做吧 首先,查看網頁的源代碼,我們可以看到每一...
