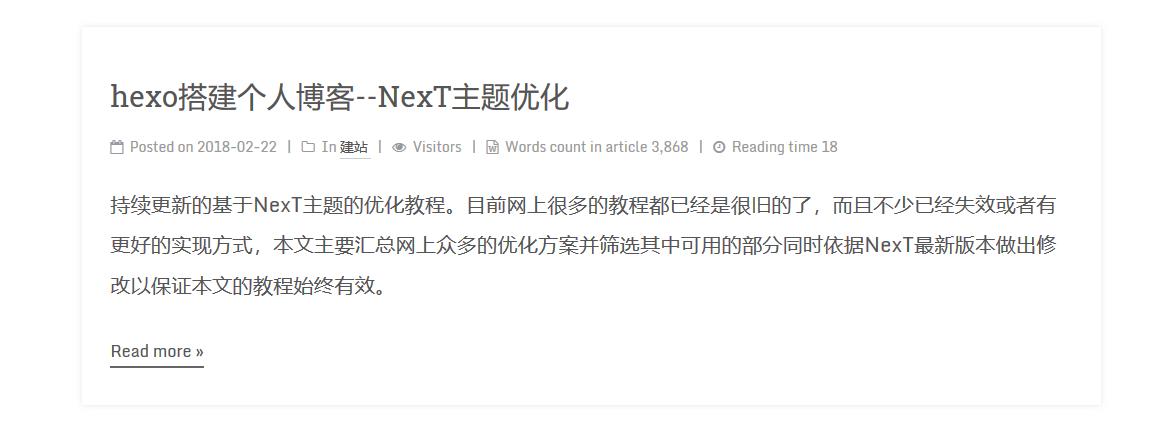
hexo搭建個人博客--NexT主題優化
寫在前面
本文為個人前一篇文章hexo搭建個人博客–基礎篇的后續篇,前文主要介紹了如何搭建一個個人網站以及綁定域名等相關內容,還沒有建站的伙伴們可以看一下前文,已經搭建好的就可以忽略了。
本文的優化是基于Hexo的NexT主題的,其他主題的疑問也可以在后臺或評論區一起溝通交流。
目錄
1 實用性優化
- 基本使用(_config.yml文件配置)
- 添加RSS
- 添加標簽、分類等頁面
- 設置網站icon
- 添加側邊欄社交鏈接
- 添加側邊欄友情鏈接
- 底部顯示建站時間和圖標的修改
- 微信支付寶打賞功能
- 關閉網站動畫效果
- 設置第三方JS庫
- 添加評論系統
- 統計訪客量以及文章閱讀量
- 閱讀次數統計(基于LanCloud)
- 字數統計
- 增加版權信息
- 添加文章分享功能
- 文章排序優先級設置
- 添加站內搜索功能
- DaoVoice在線聯系
2 個性化優化
- 設置字體
- 設置代碼高亮主題
- 左上角或右上角的Github樣式
- 添加背景動畫
- 添加頂部加載條
- 點擊出現小愛心效果
- 修改文章鏈接文本樣式
- 修改文章底部標簽樣式
- 文章末尾統一添加“文本結束”標記
- 修改作者頭像并旋轉
- 文章添加陰影效果
- 修改打賞部分字體動畫
- 自定義鼠標樣式
- 添加看板娘
正文
以下修改保存后均可通過hexo g && hexo s指令在本地http://localhost:4000查看修改,另外通過hexo d發布到GitHub pages 或 Coding pages上面通過綁定的域名在線查看效果。
實用性優化
基本使用
上一篇文章已經講過如何安裝Hexo,不了解的小伙伴可以參考一下我的上一篇文章,或者訪問Hexo文檔來了解如何安裝Hexo。
在Hexo中有兩個很重要的名為_config.yml的文件,其中一個在站點安裝的根目錄下,另一個在主題目錄下。前者提供了Hexo自身的一些基本配置信息,后者為你所安裝的主題的相關配置。為了方便區分,我們把前者稱為站點配置文件,后者稱為主題配置文件。
站點配置文件
文件路徑站點根目錄/_config.yml,編輯軟件推薦使用Sublime Text 。
這里貼一下個人的部分配置,可以改一下相關內容自行體會一下效果:
# Site
title: Alvabill
subtitle: Stay Hungry, Stay Foolish
author: Alvabill
description: "Alvabill個人站,主要涉及前端知識共享、實踐教程、前沿技術共同學習等方面"  #網站描述 SEO
language: en
timezone: Asia/Shanghai
“title”:博客的名稱。
“subtitle”:根據主題的不同,有的會顯示有的不會顯示。
“description”:主要用于SEO,告訴搜索引擎一個關于站點的簡單描述,通常建議在其中包含網站的關鍵詞。
“author”:作者名稱,用于主題顯示文章的作者。
“language”:語言會對應的解析正在應用的主題中的languages文件夾下的不同語言文件。所以這里的名稱要和languages文件夾下的語言文件名稱一致。
“timezone”:可不填寫。
# URL
## If your site is put in a subdirectory, set url as 'http://yoursite.com/child' and root as '/child/'
url: http://alvabill.ml
root: /
permalink: :title/
permalink_defaults:
“url”:一般填寫自己的站點鏈接。
“root”:設置根目錄的位置。如果你的網站存放在子目錄中,例如 http://yoursite.com/blog,則應該將你的 url 設為http://yoursite.com/blog 并把 root 設為 /blog/。
“permalink”:生成的鏈接的格式。帶井號的是默認的格式,帶有日期感覺怪怪的,改成了自己喜歡的格式。規則也比較簡單,標簽前面要加英文冒號。
“permalink_defaults”: 生成鏈接中各部分的默認值
# Directory
source_dir: source
public_dir: public
tag_dir: tags
archive_dir: archives
category_dir: categories
code_dir: downloads/code
i18n_dir: :lang
skip_render:
  - README.md
- CNAME目錄一般不需要修改,這里需要改動的是skip_render,跳過指定文件的渲染,這里寫上去著兩個文件名便可,在上一篇文章中已經詳細描述過這里就不累贅了。
# Writing
new_post_name: :title.md # File name of new posts
default_layout: post
titlecase: false # Transform title into titlecase
external_link: true # Open external links in new tab
filename_case: 0
render_drafts: false
post_asset_folder: false
relative_link: false
future: true
highlight:
  enable: true
  line_number: true
  auto_detect: false
  tab_replace:
書寫相關的設置
“new_post_name”:新的博文的文件名
“default_layout:“ 默認布局
“filename_case: 0“ #把文件名稱轉換為 (1) 小寫或 (2) 大寫
“render_drafts: false“ 是否顯示草稿
“post_asset_folder: false“ #是否啟動資源文件夾
“relative_link: false“ #把鏈接改為與根目錄的相對位址
“future: true “
“highlight:“ #代碼塊的設置,Hexo自帶的代碼高亮插件
# Category & Tag
default_category: uncategorized
category_map:
tag_map:
分類和標簽的設置
“default_category”:如果撰寫文章時沒有設置分類,默認的分類選擇。
“category_map”:用于映射分類的別名。
“tag_map”:用法和分類別名是一樣的。
# Extensions
## Plugins: https://hexo.io/plugins/
## Themes: https://hexo.io/themes/
theme: next

# Deployment
## Docs: https://hexo.io/docs/deployment.html
deploy:
  type: git
  repository:
    github: git@github.com:Alvabill/Alvabill.github.io.git,master
    coding: git@git.coding.net:Alvabill/Alvabill.git,master
“theme”:主題拓展,可以在主題商店選擇其他主題,這里使用next
“deploy”:部署方式,前文已經詳細描述,不再累贅。
主題配置文件
文件路徑站點根目錄/themes/next/_config.yml,編輯軟件推薦使用Sublime Text 。
這里先選擇主題:
# ---------------------------------------------------------------
# Scheme Settings
# ---------------------------------------------------------------

# Schemes  # NexT 主題提供三種布局
#scheme: Muse
scheme: Mist
#scheme: Pisces
#scheme: Gemini主題選擇,在前面加#注釋掉其他的,這里我們選Mist,其他主題你們也可以體驗一下,不過不保證本教程的優化全部適配哦,不過選擇其他主題的小伙伴遇到的問題也歡迎在評論區提出一起交流。
添加RSS
在主題配置文件中有NexT默認的RSS設置,默認為留空,這時使用 Hexo 生成的 Feed 鏈接,需要先安裝 hexo-generator-feed插件。
在站點根目錄打開git bash,安裝插件:
$ npm install --save hexo-generator-feed修改站點配置文件,在最后添加以下代碼:
feed: # RSS訂閱插件
  type: atom
  path: atom.xml
  limit: 0

plugins: hexo-generate-feed修改主題配置文件如下:
# Set rss to false to disable feed link.
# Leave rss as empty to use site's feed link.
# Set rss to specific value if you have burned your feed already.
rss: /atom.xml
實現效果:

添加標簽、分類等頁面
1 修改主題配置文件,在菜單項添加以下內容:
# ---------------------------------------------------------------
# Menu Settings
# ---------------------------------------------------------------

# When running the site in a subdirectory (e.g. domain.tld/blog), remove the leading slash (/archives -> archives)
menu:
  home: /
  archives: /archives/
  tags: /tags/
  categories: /categories/
  about: /about/
  #sitemap: /sitemap.xml
  #commonweal: /404/
這里可以添加圖標,個人不是很喜歡所以沒有添加,圖標的代碼就在以上代碼的下邊,可以自行修改體驗。
2 新建頁面
在站點根目錄輸入以下代碼新建頁面:
$ hexo new page tags
$ hexo new page categories
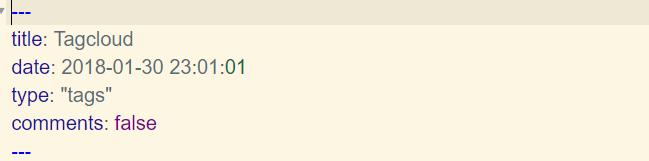
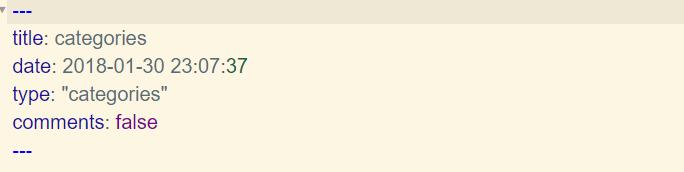
$ hexo new page aboutarchives頁面不需要新建,NexT主題自帶了;tags、categories頁面需要設置類型,即打開站點根目錄\source\tags、站點根目錄\source\categories分別進行修改:
如果有集成評論服務,頁面也會帶有評論。因為后面我們會添加評論系統所以這里需要添加字段 comments 并將值設置為 false。
設置網站icon
主題配置文件中第一行代碼就是網站icon設置,這里你只需要找到你喜歡的logo把它制作成ico格式然后改名favicon.ico,放到/themes/next/source/images下面即可。
# Put your favicon.ico into `hexo-site/source/` directory.
favicon: /favicon.ico # 網站logo
添加側邊欄社交鏈接
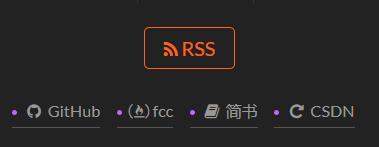
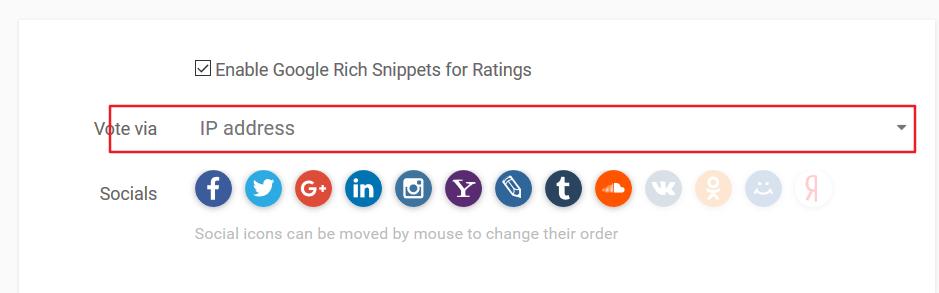
主要修改主題配置文件的社交鏈接和對應圖標:
# Social Links
# Key is the link label showing to end users.
# Value is the target link (E.g. GitHub: https://github.com/iissnan)
social:  # 添加你的社交賬號
  #LinkLabel: Link
  GitHub: https://github.com/Alvabill
  fcc: https://www.freecodecamp.cn/alvabill
  簡書: https://www.jianshu.com/u/439a6eee60e1
  CSDN: http://blog.csdn.net/weixin_38796712
# Social Links Icons
# Icon Mapping:
#   Map a menu item to a specific FontAwesome icon name.
#   Key is the name of the item and value is the name of FontAwesome icon. Key is case-senstive.
#   When an globe mask icon presenting up means that the item has no mapping icon.
social_icons:
  enable: true
  icons_only: false
  transition: false
  # Icon Mappings.
  # KeyMapsToSocialItemKey: NameOfTheIconFromFontAwesome
  fcc: free-code-camp
  GitHub: github
  簡書: book
  CSDN: rotate-right
實現效果如下:
添加側邊欄友情鏈接
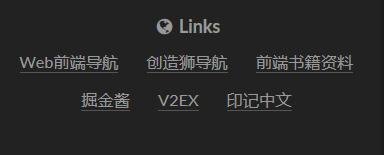
修改主題配置文件:
# Blog rolls  推薦閱讀
links_title: Links
#links_layout: block
links_layout: inline
links:
  Web前端導航: http://www.alloyteam.com/nav/
  創造獅導航: http://www.chuangzaoshi.com/code
  前端書籍資料: http://www.36zhen.com/t?id=3448
  掘金醬: http://e.xitu.io/
  V2EX: https://www.v2ex.com/
  印記中文: https://www.v2ex.com/
實現效果:
底部顯示建站時間和圖標修改
修改主題配置文件:
# Specify the date when the site was setup
since: 2018 # 建站年份

# icon between year and author @Footer
authoricon: snowflake-o
實現效果:

雪花圖標需要用到最新的fa圖標庫,后面會介紹如何設置默認庫。
微信支付寶打賞功能
在主題配置文件中的微信or支付寶收款地址處填入收款二維碼圖片即可:
# Reward
#reward_comment: 堅持原創技術分享,您的支持將鼓勵我繼續創作!
wechatpay: http://p3dm71oa7.bkt.clouddn.com/wcpay.png
alipay: http://p3dm71oa7.bkt.clouddn.com/zfbpay.jpg
#bitcoin: /images/bitcoin.png
實現效果:

關閉網站動畫效果
為了追求更快的響應速度我們可以把網站的大部分動畫關掉,這里修改主題配置文件的一行代碼即可:
# Motion
use_motion: [false/true]
設置第三方JS庫
在主題配置文件中設定成合適的 CDN 地址,此特性可以加速靜態資源(JavaScript 第三方庫)的加載。
例如:
# Script Vendors.
# Set a CDN address for the vendor you want to customize.
# For example
#    mquery: https://ajax.googleapis.com/ajax/libs/jquery/2.2.0/jquery.min.js
# Be aware that you should use the same version as internal ones to avoid potential problems.
# Please use the https protocol of CDN files when you enable https on your site.
vendors:
  # Internal path prefix. Please do not edit it.
  _internal: lib

  # Internal version: 2.1.3
  jquery: //cdn.jsdelivr.net/jquery/2.1.3/jquery.min.js

  # Internal version: 2.1.5
  # See: http://fancyapps.com/fancybox/
  fancybox: //cdn.jsdelivr.net/fancybox/2.1.5/jquery.fancybox.pack.js
  fancybox_css: //cdn.jsdelivr.net/fancybox/2.1.5/jquery.fancybox.min.css

  # Internal version: 1.0.6
  # See: https://github.com/ftlabs/fastclick
  fastclick: //cdn.jsdelivr.net/fastclick/1.0.6/fastclick.min.js

  # Internal version: 1.9.7
  # See: https://github.com/tuupola/jquery_lazyload
  lazyload: //cdn.jsdelivr.net/jquery.lazyload/1.9.3/jquery.lazyload.min.js

  # Internal version: 1.2.1
  # See: http://VelocityJS.org
  velocity: //cdn.jsdelivr.net/velocity/1.2.3/velocity.min.js

  # Internal version: 1.2.1
  # See: http://VelocityJS.org
  velocity_ui: //cdn.jsdelivr.net/velocity/1.2.3/velocity.ui.min.js

  # Internal version: 0.7.9
  # See: https://faisalman.github.io/ua-parser-js/
  ua_parser: //cdn.jsdelivr.net/ua-parser.js/0.7.10/ua-parser.min.js

  # Internal version: 4.6.2
  # See: http://fontawesome.io/
  fontawesome: //maxcdn.bootstrapcdn.com/font-awesome/4.7.0/css/font-awesome.min.css

  # Internal version: 1
  # https://www.algolia.com
  algolia_instant_js:
  algolia_instant_css:

  # Internal version: 1.0.2
  # See: https://github.com/HubSpot/pace
  # Or use direct links below:
  # pace: //cdn.bootcss.com/pace/1.0.2/pace.min.js
  # pace_css: //cdn.bootcss.com/pace/1.0.2/themes/blue/pace-theme-flash.min.css
  pace: //cdn.bootcss.com/pace/1.0.2/pace.min.js
  pace_css: //cdn.bootcss.com/pace/1.0.2/themes/blue/pace-theme-flash.min.css

  # Internal version: 1.0.0
  # https://github.com/hustcc/canvas-nest.js
  canvas_nest: //cdn.bootcss.com/canvas-nest.js/1.0.1/canvas-nest.min.js
添加評論系統
NexT支持的第三方的評論系統有很多,不過不少已經關閉不再可用了,而且對于國內來說比較友好的現在應該就只有來必力,當然喜歡折騰的小伙伴可以嘗試一下其他的或者自建評論系統。這里就先介紹目前最簡單可行的方案,也就是來必力。
獲取來必力id:
登陸 來必力 注冊獲取,這里要注意,這個韓國的系統注冊啥的真的太慢了,所以要記住不要耐不住關閉頁面或者狂刷新,耐心等待就好。
注冊后點擊導航上邊的安裝,選擇免費的city版本:
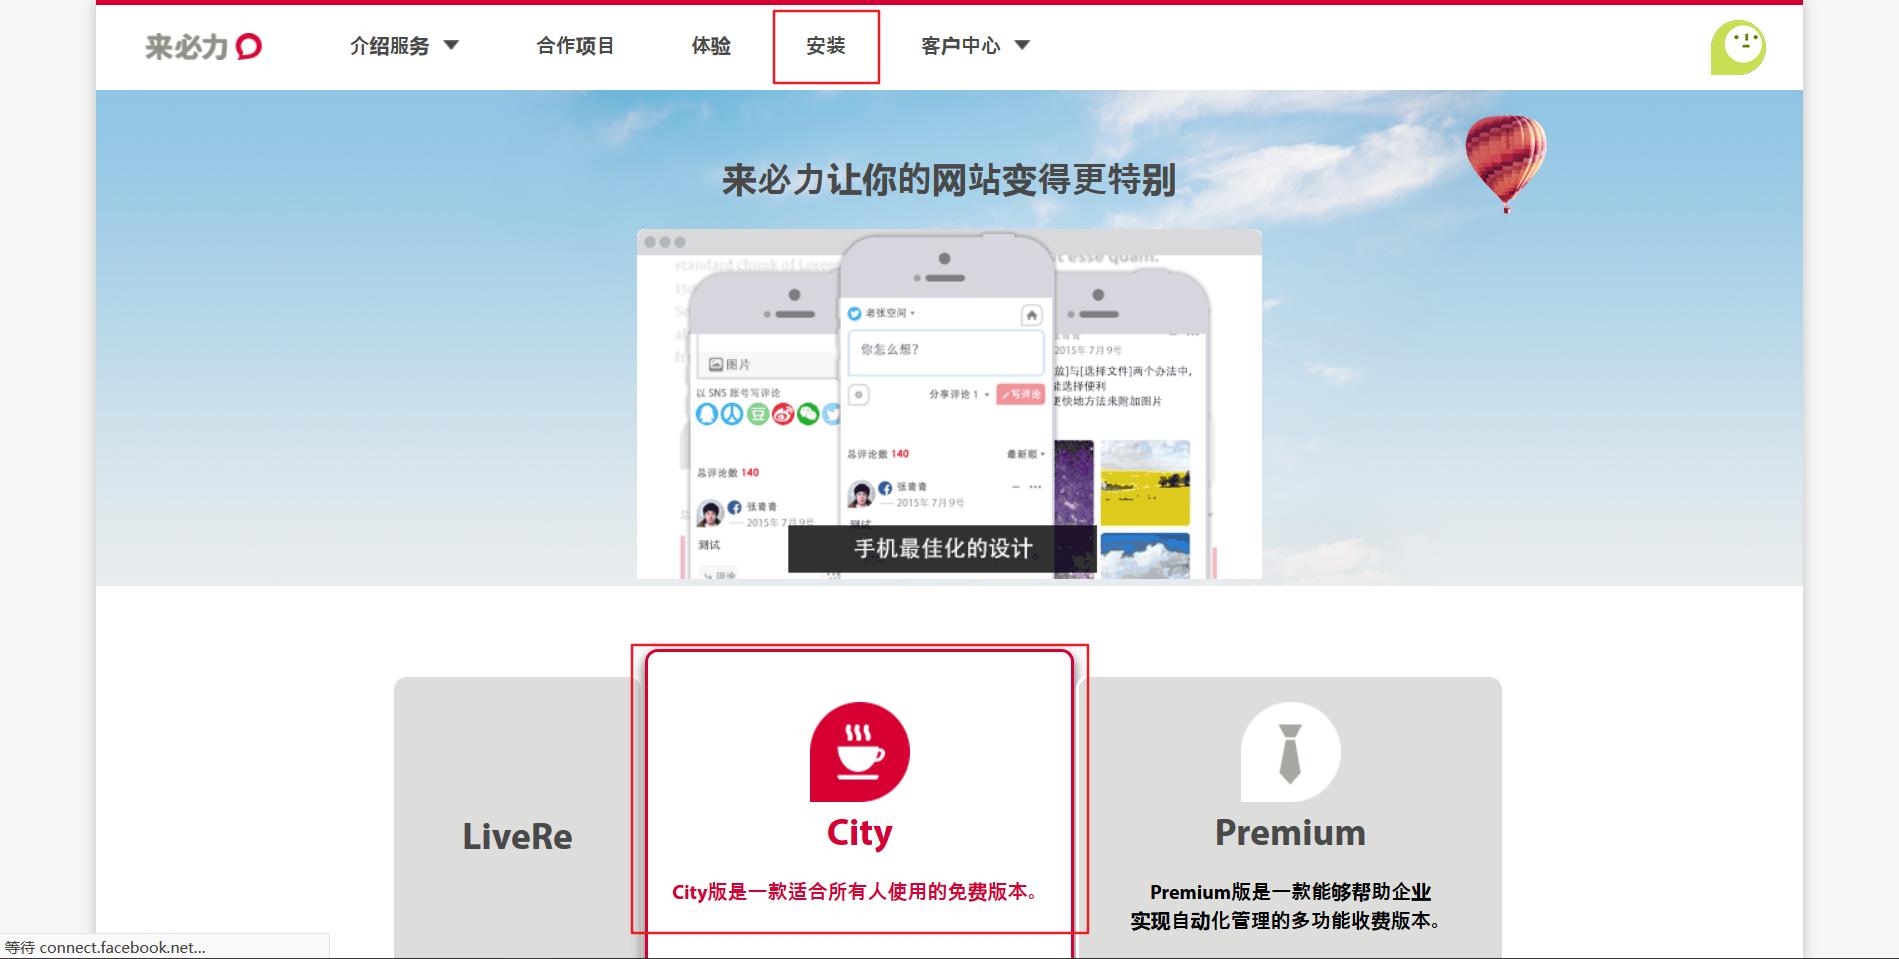
點擊現在安裝后填入網站的一些信息就可以獲取到安裝代碼,框中的就是你的來必力id:

復制上邊的id,在主題配置文件里面搜索livere_uid,在后面添加來必力id即可:
# Support for LiveRe comments system.
# You can get your uid from https://livere.com/insight/myCode (General web site)
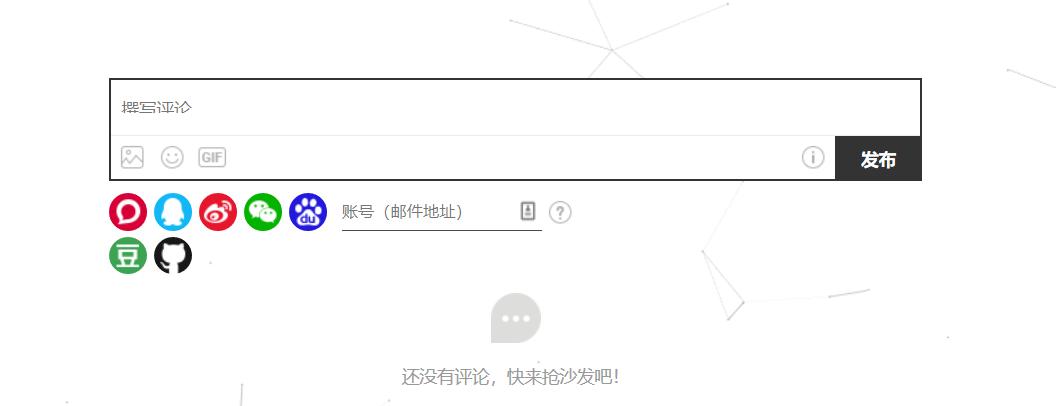
livere_uid: {你的來必力id}另外可以點擊用戶頭像進入管理界面個性化你的評論系統:

最終實現效果:
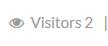
統計訪客量以及文章閱讀量
NexT主題集成了不蒜子統計功能:
# Show PV/UV of the website/page with busuanzi.
# Get more information on http://ibruce.info/2015/04/04/busuanzi/
# 不蒜子統計功能
busuanzi_count:
  # count values only if the other configs are false
  enable: false
  # custom uv span for the whole site
  site_uv: false
  site_uv_header: <i class="fa fa-user"></i>
  site_uv_footer:
  # custom pv span for the whole site
  site_pv: false
  site_pv_header: <i class="fa fa-eye"></i>
  site_pv_footer:
  # custom pv span for one page only
  page_pv: false
  page_pv_header: <i class="fa fa-file-o"></i>
page_pv_footer:當enable: true時,代表開啟全局開關。若site_uv、site_pv、page_pv的值均為false時,不蒜子僅作記錄而不會在頁面上顯示。
當site_uv: true時,代表在頁面底部顯示站點的UV值。
當site_pv: true時,代表在頁面底部顯示站點的PV值。
當page_pv: true時,代表在文章頁面的標題下顯示該頁面的PV值(閱讀數)。
site_uv_header和site_uv_footer這幾個為自定義樣式配置,相關的值留空時將不顯示,可以使用(帶特效的)font-awesome。
示例:
enable: true
# 效果:本站訪客數12345人次
site_uv: true
site_uv_header: 本站訪客數
site_uv_footer: 人次
# 效果:本站總訪問量12345次(一般不開啟這個)
site_pv: true
site_pv_header: 本站總訪問量
site_pv_footer: 次
# 效果:本文總閱讀量12345次
page_pv: true
page_pv_header: 本文總閱讀量
page_pv_footer: 次
閱讀次數統計(基于LeanCloud)
相比不蒜子的統計,LeanCloud的文章閱讀量統計更加穩定靠譜,所以本人也把網站的文章內統計改為LeanCloud的了。
設置方法參考該文章–傳送門
實現效果:
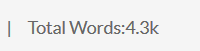
字數統計
用于統計文章的字數以及分析出閱讀時間。
在主題配置文件中,搜索wordcount,設置為下面這樣就可以了:
# Post wordcount display settings
# Dependencies: https://github.com/willin/hexo-wordcount
post_wordcount:
  item_text: true
  min2read: true
  wordcount: true
separated_meta: true再打開\themes\next\layout\_macro\post.swig文件,在leancloud-visitors-count后面位置添加一個分割符:

實現效果:

另外,在/themes/next/layout/_partials/footer.swig文件endif %}前加上下面代碼可以實現在站點底部統計全站字數:
<div class="theme-info">
  <span class="post-count">Total Words:{{ totalcount(site) }}</span>
</div>
實現效果:
如果無法顯示可能是hexo-wordcount插件沒有安裝,git bash在網站根目錄安裝一下就可以:
$ npm install hexo-wordcount --save增加版權信息
在目錄themes/next/layout/_macro/下添加my-copyright.swig,代碼如下:
{% if page.copyright %}
<div class="my_post_copyright">
  <script src="//cdn.bootcss.com/clipboard.js/1.5.10/clipboard.min.js"></script>

  <!-- JS庫 sweetalert 可修改路徑 -->
  <script src="https://cdn.bootcss.com/jquery/2.0.0/jquery.min.js"></script>
  <script src="https://unpkg.com/sweetalert/dist/sweetalert.min.js"></script>
  <p><span>本文標題:</span><a href="{{ url_for(page.path) }}">{{ page.title }}</a></p>
  <p><span>文章作者:</span><a href="/" title="訪問 {{ theme.author }} 的個人博客">{{ theme.author }}</a></p>
  <p><span>發布時間:</span>{{ page.date.format("YYYY年MM月DD日 - HH:MM") }}</p>
  <p><span>最后更新:</span>{{ page.updated.format("YYYY年MM月DD日 - HH:MM") }}</p>
  <p><span>原始鏈接:</span><a href="{{ url_for(page.path) }}" title="{{ page.title }}">{{ page.permalink }}</a>
    <span class="copy-path"  title="點擊復制文章鏈接"><i class="fa fa-clipboard" data-clipboard-text="{{ page.permalink }}"  aria-label="復制成功!"></i></span>
  </p>
  <p><span>許可協議:</span><i class="fa fa-creative-commons"></i> <a rel="license" href="https://creativecommons.org/licenses/by-nc-nd/4.0/" target="_blank" title="Attribution-NonCommercial-NoDerivatives 4.0 International (CC BY-NC-ND 4.0)">署名-非商業性使用-禁止演繹 4.0 國際</a> 轉載請保留原文鏈接及作者。</p>
</div>
<script>
    var clipboard = new Clipboard('.fa-clipboard');
    $(".fa-clipboard").click(function(){
      clipboard.on('success', function(){
        swal({
          title: "",
          text: '復制成功',
          icon: "success",
          showConfirmButton: true
          });
    });
    });
</script>
{% endif %}在目錄themes/next/source/css/_common/components/post/下添加my-post-copyright.styl:
.my_post_copyright {
  width: 85%;
  max-width: 45em;
  margin: 2.8em auto 0;
  padding: 0.5em 1.0em;
  border: 1px solid #d3d3d3;
  font-size: 0.93rem;
  line-height: 1.6em;
  word-break: break-all;
  background: rgba(255,255,255,0.4);
}
.my_post_copyright p{margin:0;}
.my_post_copyright span {
  display: inline-block;
  width: 5.2em;
  color: #b5b5b5;
  font-weight: bold;
}
.my_post_copyright .raw {
  margin-left: 1em;
  width: 5em;
}
.my_post_copyright a {
  color: #808080;
  border-bottom:0;
}
.my_post_copyright a:hover {
  color: #a3d2a3;
  text-decoration: underline;
}
.my_post_copyright:hover .fa-clipboard {
  color: #000;
}
.my_post_copyright .post-url:hover {
  font-weight: normal;
}
.my_post_copyright .copy-path {
  margin-left: 1em;
  width: 1em;
  +mobile(){display:none;}
}
.my_post_copyright .copy-path:hover {
  color: #808080;
  cursor: pointer;
}修改themes/next/layout/_macro/post.swig,在代碼:
    {% if theme.wechat_subscriber.enabled and not is_index %}
      <div>
        {% include 'wechat-subscriber.swig' %}
      </div>
    {% endif %}
前面添加代碼:
<div>
      {% if not is_index %}
        {% include 'my-copyright.swig' %}
      {% endif %}
</div>修改themes/next/source/css/_common/components/post/post.styl文件,在最后一行增加代碼:
@import "my-post-copyright"最后到站點根目錄/scaffolds/post.md,在兩個---中間增加一行:
copyright: true之后的每一篇文章都會自己加上版權信息,之前的文章也可以通過在文章對應的md文件頭部加上以上代碼添加版權信息。
添加分享文章功能
這里我們使用AddThis,為什么呢,曬一下我的樣式你就知道了:

具體選擇什么樣式可以在AddThis網站上面設置。
首先注冊賬號(需要科學上網),注冊后找到該位置:
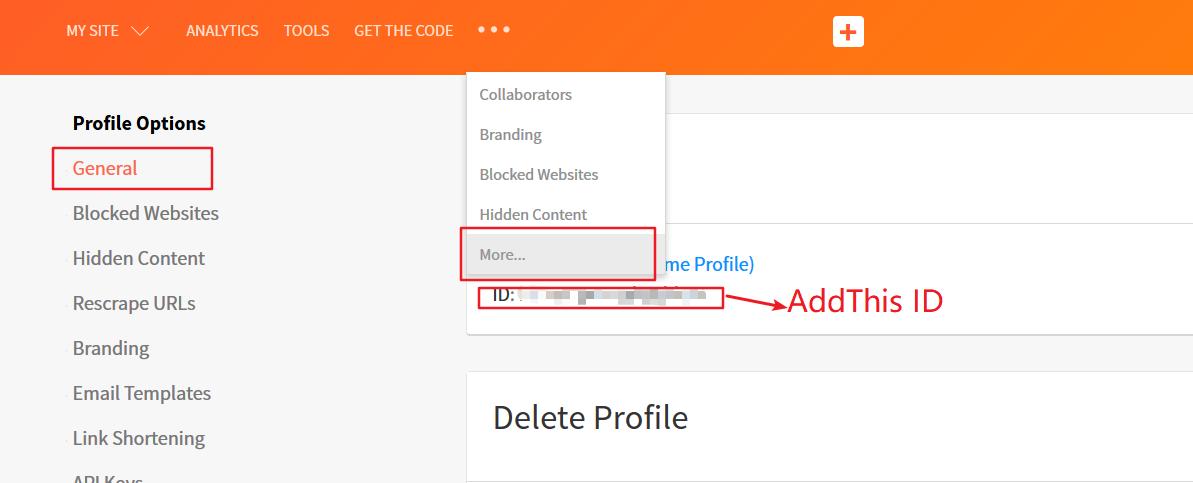
在主題配置文件中搜索add_this_id,去掉前面的注釋,添加上你的AddThis ID就可以了。
# Share  分享
#jiathis: true
# Warning: JiaThis does not support https. 博主實測支持https
add_this_id: {your AddThis ID}
具體添加方式如下,可以選擇多種樣式:
添加文章評分功能
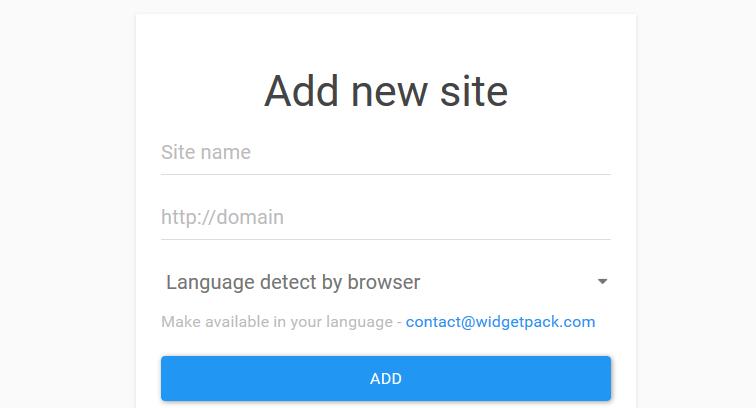
通過widgetpack來給網站每篇文章添加評分系統,效果如下:

首先注冊賬號,添加新站點,填入網站名稱和域名地址,點擊添加:
獲取id:

這里9384就是我的id,復制下來到主題配置文件中搜索widgetpack添加即可:
# Star rating support to each article.
# To get your ID visit https://widgetpack.com
rating:
  enable: true
  id:  {your ID}    #<app_id>
  color:  fc6423
這里建議設置為按ip地址記錄評分,比較方便:
文章排序優先級設置
修改hero-generator-index插件,把文件node_modules/hexo-generator-index/lib/generator.js內的代碼替換為:
'use strict';
var pagination = require('hexo-pagination');
module.exports = function(locals){
  var config = this.config;
  var posts = locals.posts;
    posts.data = posts.data.sort(function(a, b) {
        if(a.top && b.top) { // 兩篇文章top都有定義
            if(a.top == b.top) return b.date - a.date; // 若top值一樣則按照文章日期降序排
            else return b.top - a.top; // 否則按照top值降序排
        }
        else if(a.top && !b.top) { // 以下是只有一篇文章top有定義,那么將有top的排在前面(這里用異或操作居然不行233)
            return -1;
        }
        else if(!a.top && b.top) {
            return 1;
        }
        else return b.date - a.date; // 都沒定義按照文章日期降序排
    });
  var paginationDir = config.pagination_dir || 'page';
  return pagination('', posts, {
    perPage: config.index_generator.per_page,
    layout: ['index', 'archive'],
    format: paginationDir + '/%d/',
    data: {
      __index: true
    }
  });
};在\scaffolds\post.md頭部---中添加以下代碼:
top: 以后新建文章就可以給文章的top賦值,數值越大優先級越高。
已經寫好的文章在對應的md文件頭部添加
top:{number}即可
添加站內搜索功能
這里使用Algolia,其他的都不太靠譜。
前往Algolia注冊頁面,注冊一個新賬戶。可以使用GitHub或者Google賬戶直接登錄,注冊后的14天內擁有所有功能(包括收費類別的)。之后若未續費會自動降級為免費賬戶,免費賬戶總共有10,000條記錄,每月有100,000的可以操作數。注冊完成后,創建一個新的Index,這個Index將在后面使用。
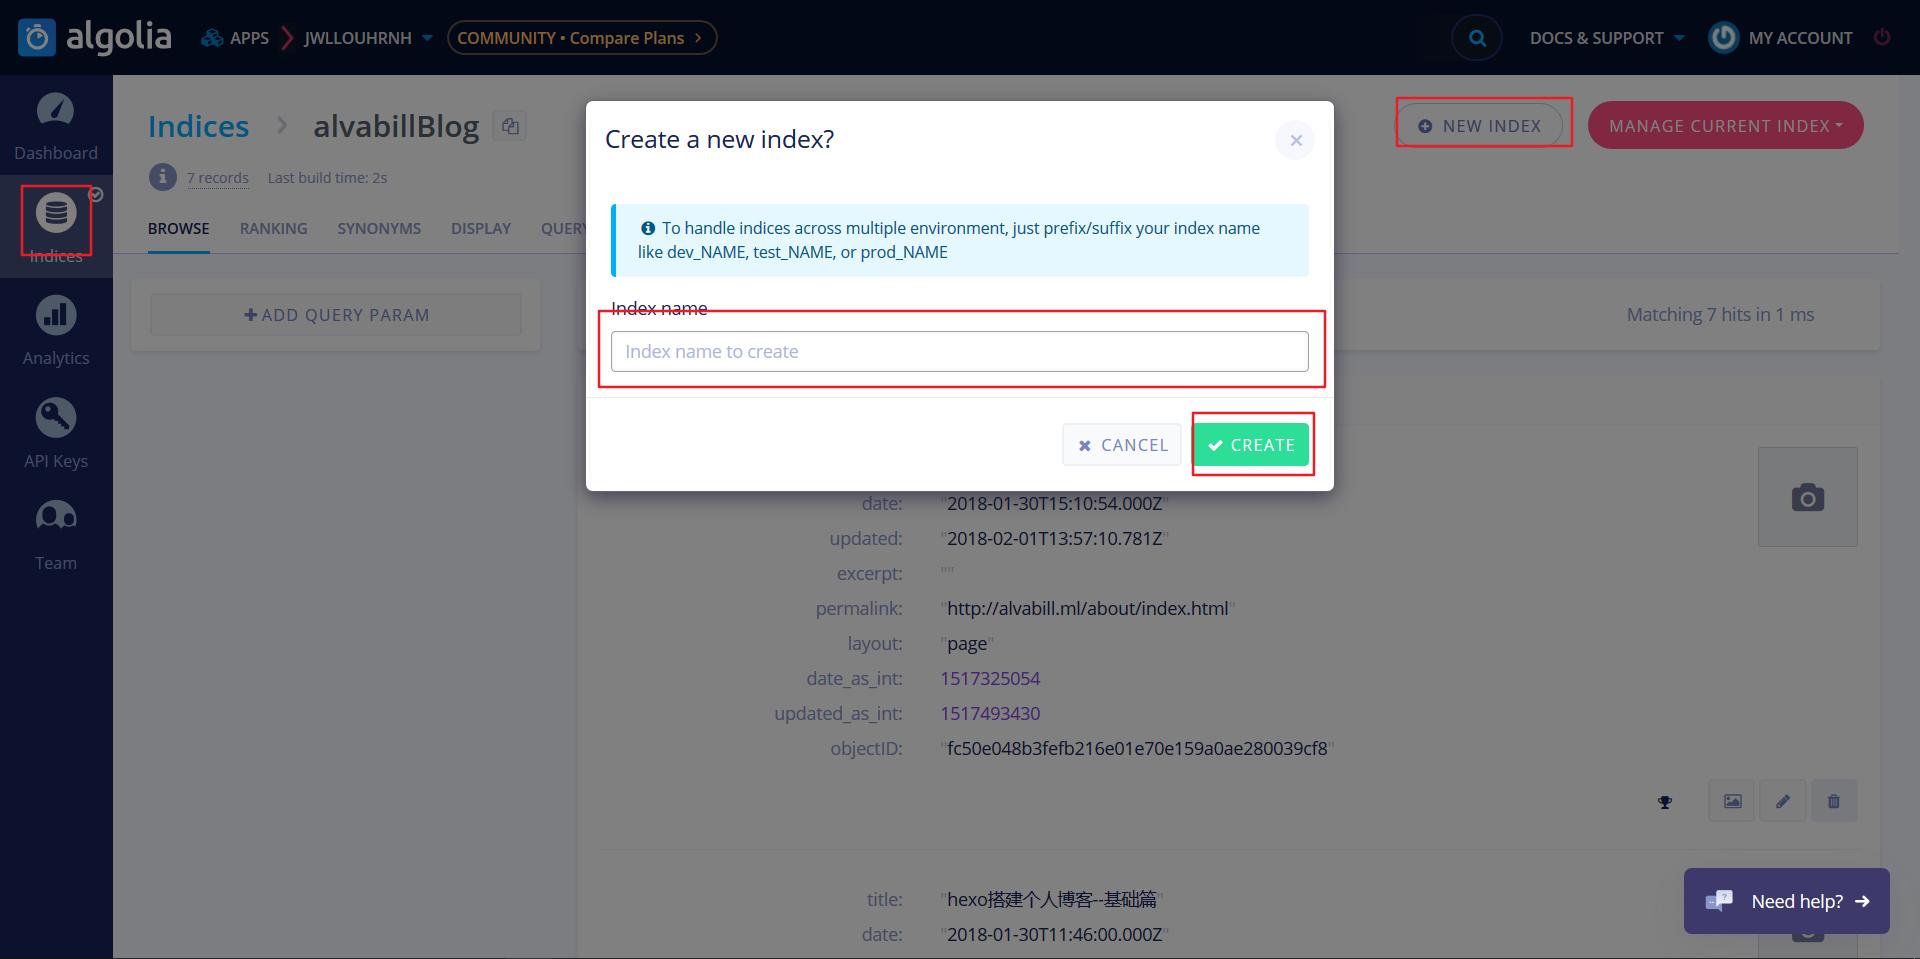
Index創建完成后,此時這個Index里未包含任何數據。接下來需要安裝Hexo Algolia擴展,這個擴展的功能是搜集站點的內容并通過API發送給Algolia。前往站點根目錄,執行命令安裝:
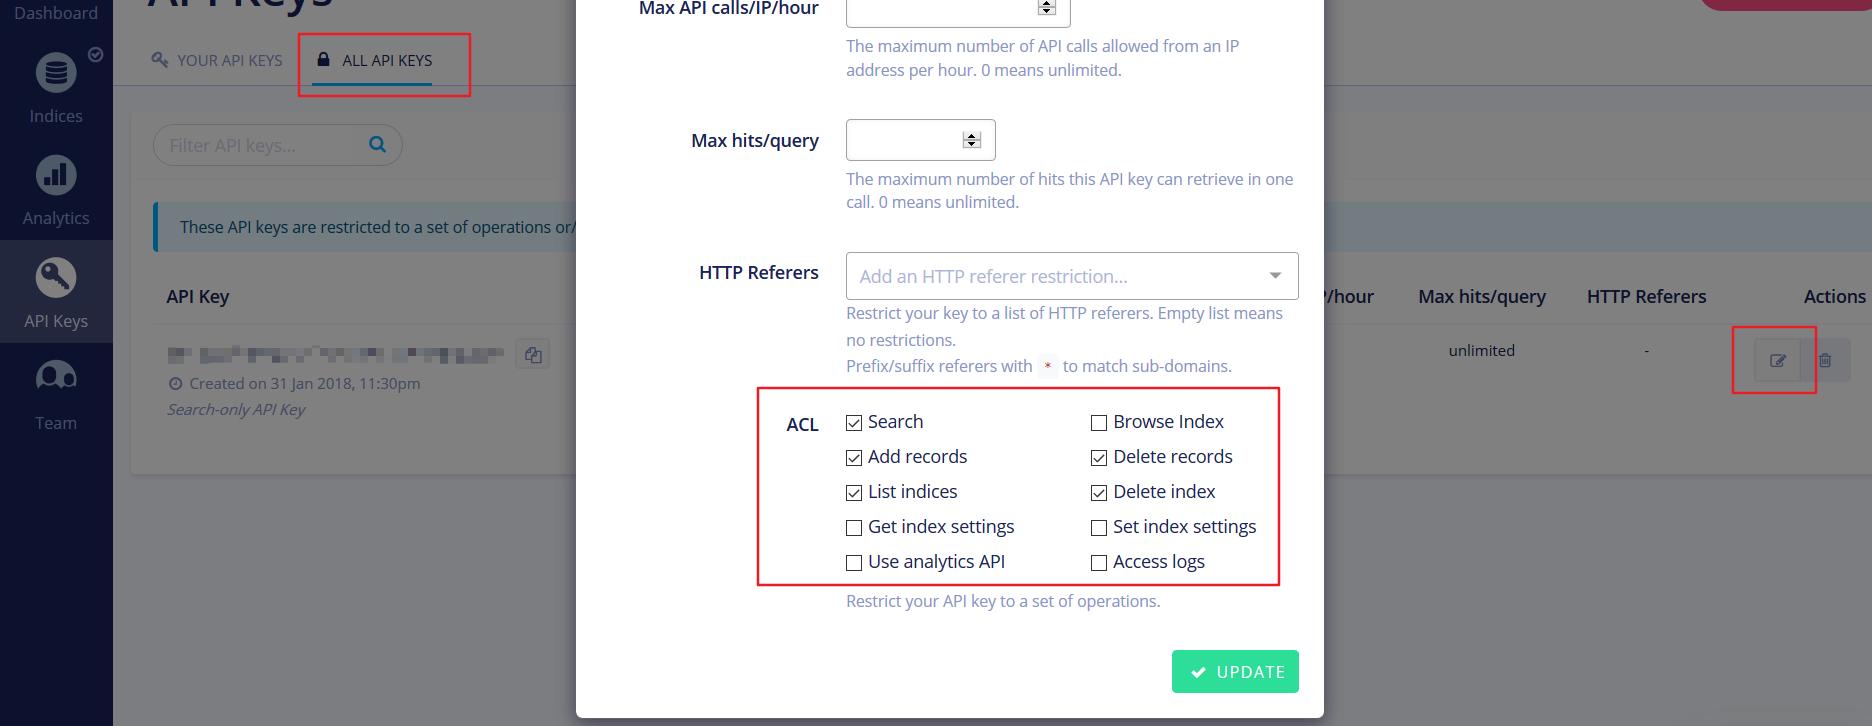
$ npm install --save hexo-algolia找到新建的Index對應的Key,復制下面的App ID和API Key,同時修改權限:
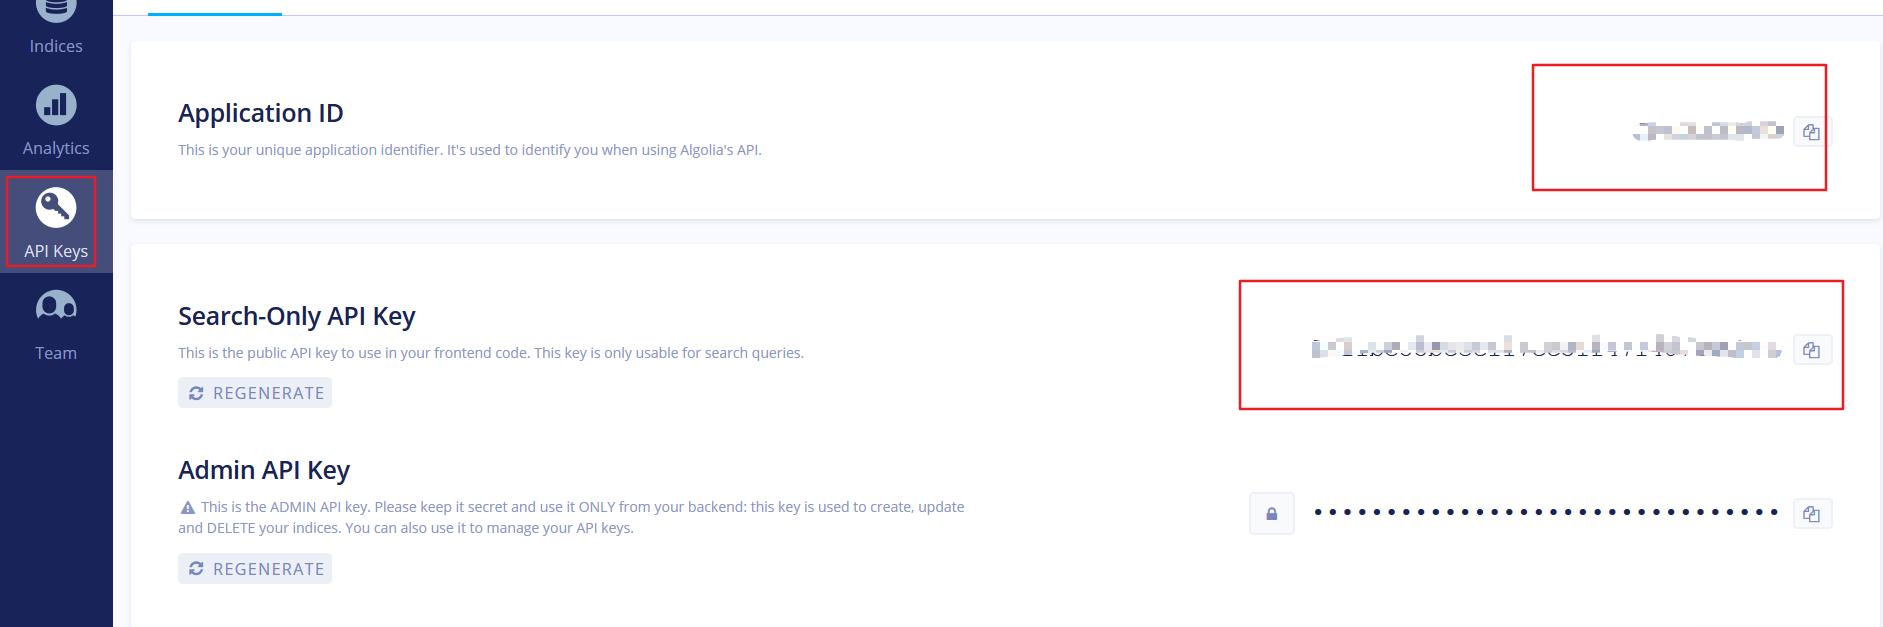
在站點配置文件(注意是站點配置文件)末尾,新增配置代碼:
#添加搜索
algolia:
  applicationID: '{your appID}'
  apiKey: 'your API Key'
  indexName: 'your Index name'
  chunkSize: 5000
在站點根目錄執行以下代碼,更新Index(每次更新文章都需要執行一次),即上傳站點內容到algolia:
$ export HEXO_ALGOLIA_INDEXING_KEY={your API Key}
$ hexo algolia更改主題配置文件,搜索algolia_search:
# Algolia Search
algolia_search:
  enable: true
  hits:
    per_page: 10
  labels:
    input_placeholder: Search for Posts
    hits_empty: "We didn't find any results for the search: ${query}"
hits_stats: "${hits} results found in ${time} ms"將enable改為true即可,根據需要你可以調整labels中的文本。
DaoVoice 在線聯系
實現效果:

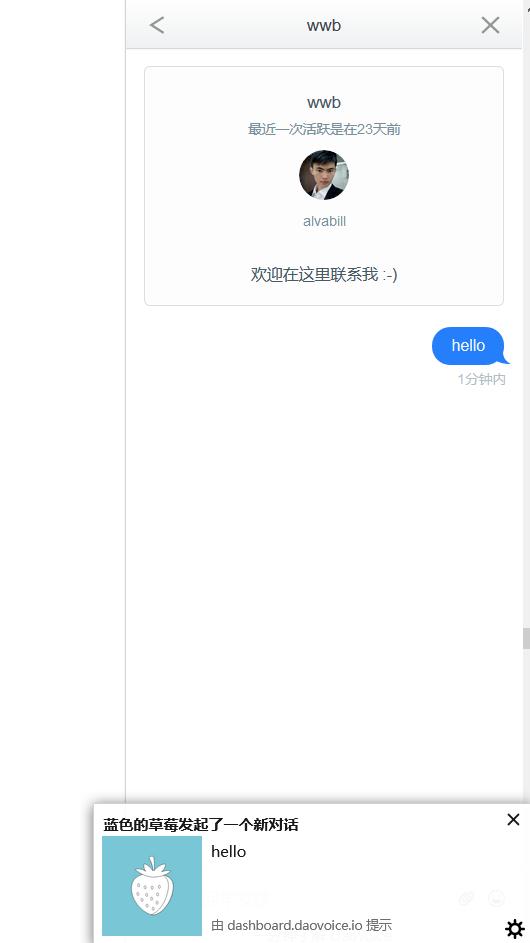
首先去注冊,這里需要邀請碼,貼一個5ea4435c,或者直接點擊邀請碼的鏈接。注冊后就可以查看你的app_id:
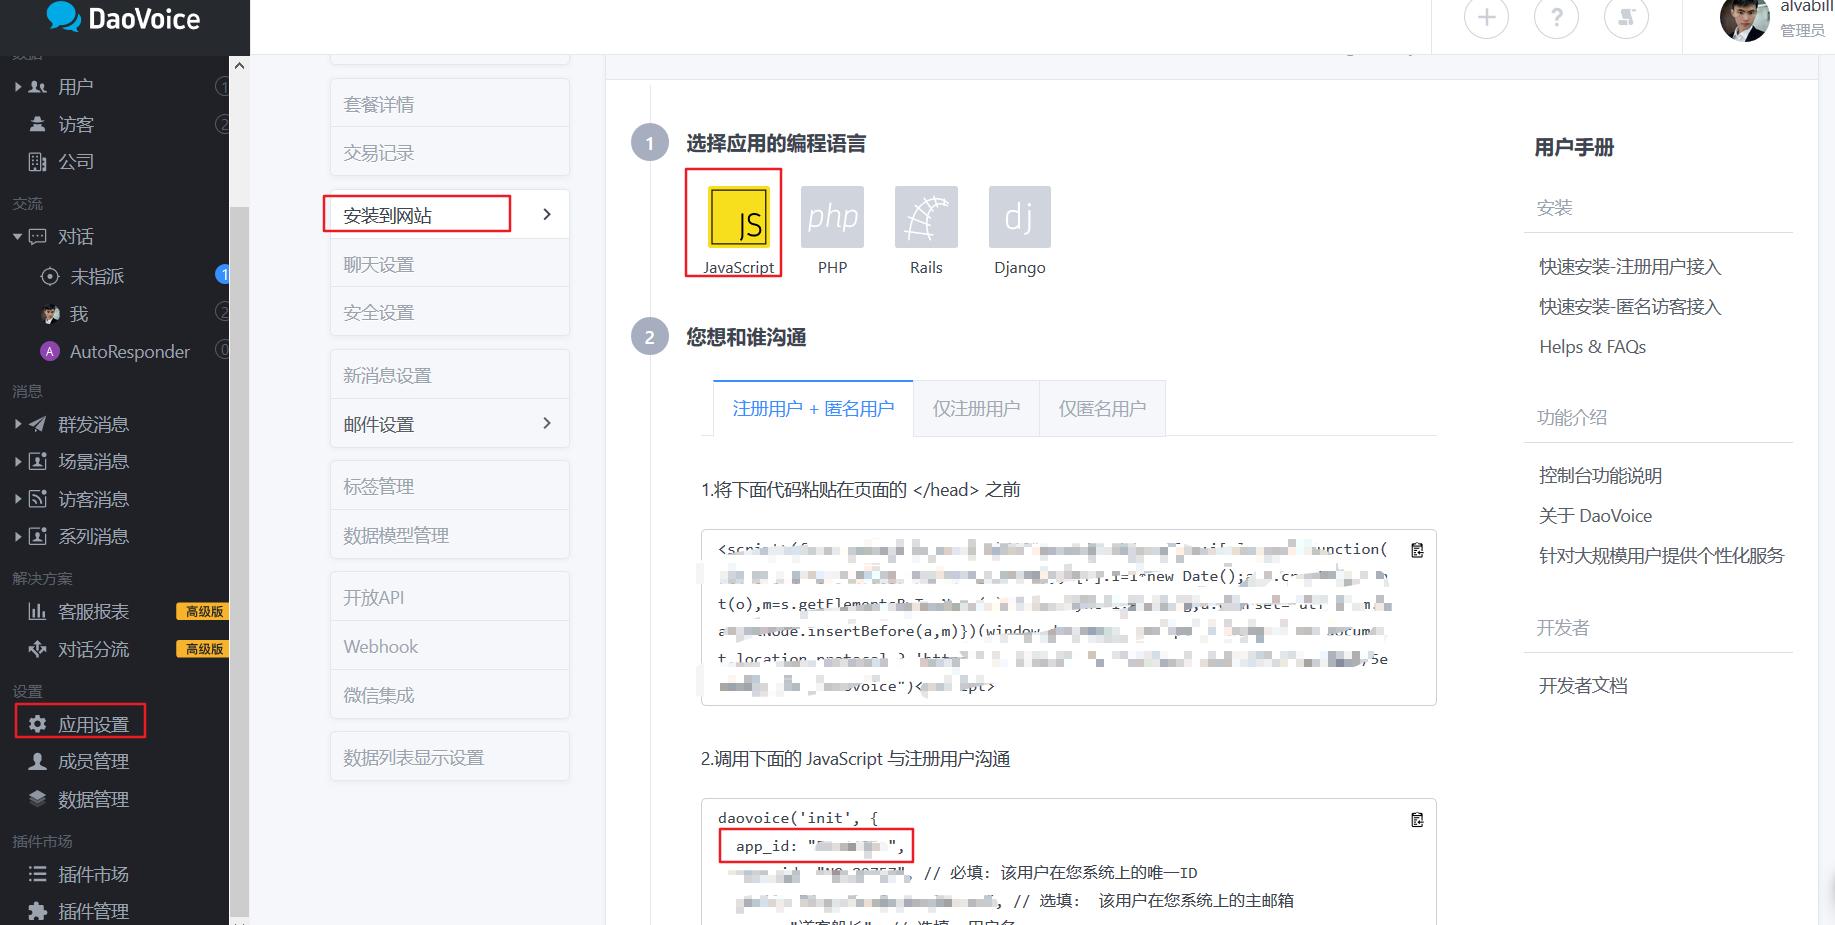
復制app_id,打開/themes/next/layout/_partials/head.swig,寫下如下代碼:
{% if theme.daovoice %}
  <script>
  (function(i,s,o,g,r,a,m){i["DaoVoiceObject"]=r;i[r]=i[r]||function(){(i[r].q=i[r].q||[]).push(arguments)},i[r].l=1*new Date();a=s.createElement(o),m=s.getElementsByTagName(o)[0];a.async=1;a.src=g;a.charset="utf-8";m.parentNode.insertBefore(a,m)})(window,document,"script",('https:' == document.location.protocol ? 'https:' : 'http:') + "//widget.daovoice.io/widget/0f81ff2f.js","daovoice")
  daovoice('init', {
      app_id: "{{theme.daovoice_app_id}}"
    });
  daovoice('update');
  </script>
{% endif %}接著打開主題配置文件,在最后寫下如下代碼:
# Online contact
daovoice: true
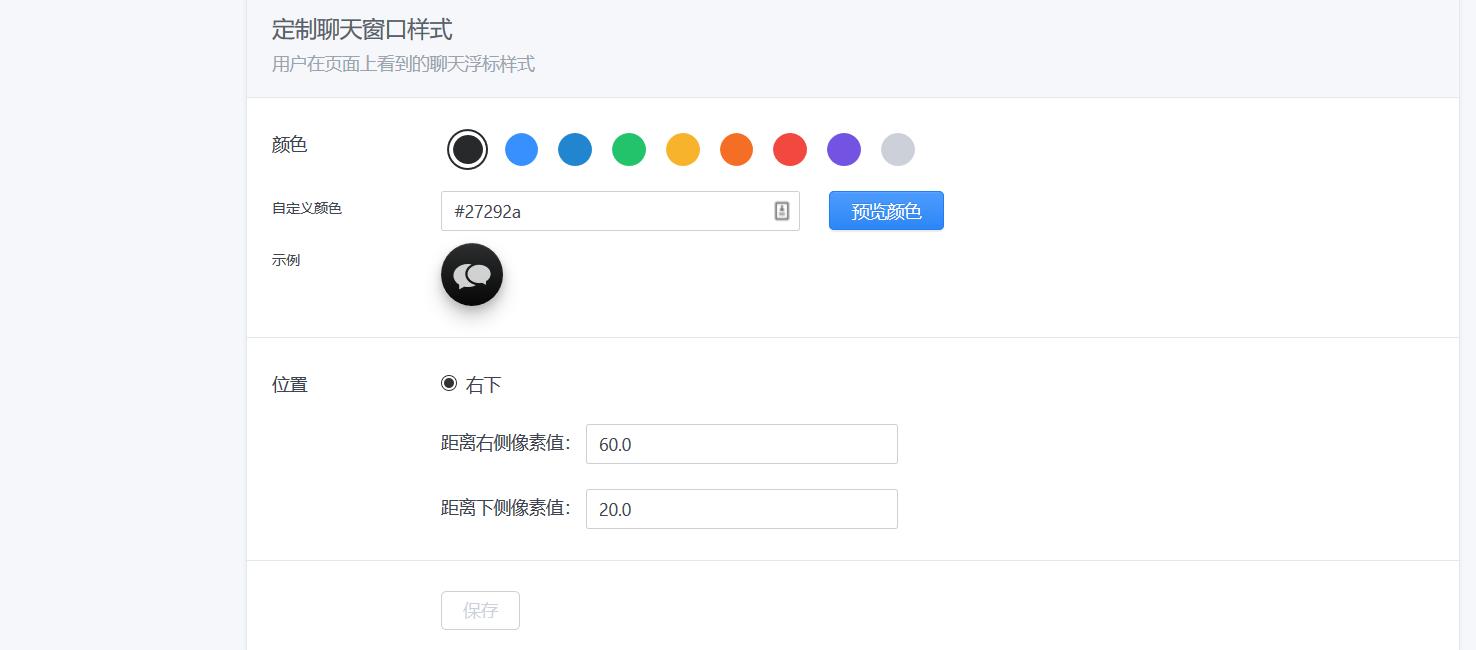
daovoice_app_id: {your app_id}具體樣式設計可以在 應用設置–>聊天設置 后邊改。
個性化優化
設置字體
在主題配置文件中設置,例如:
font:
  enable: true

  # 外鏈字體庫地址,例如 //fonts.googleapis.com (默認值)
  host:

  # 全局字體,應用在 body 元素上
  global:
    external: true
    family: Monda

  # 標題字體 (h1, h2, h3, h4, h5, h6)
  headings:
    external: true
    family: Roboto Slab

  # 文章字體
  posts:
    external: true
    family:

  # Logo 字體
  logo:
    external: true
    family: Lobster Two
    size: 24

  # 代碼字體,應用于 code 以及代碼塊
  codes:
    external: true
    family: PT Mono
設置代碼高亮主題
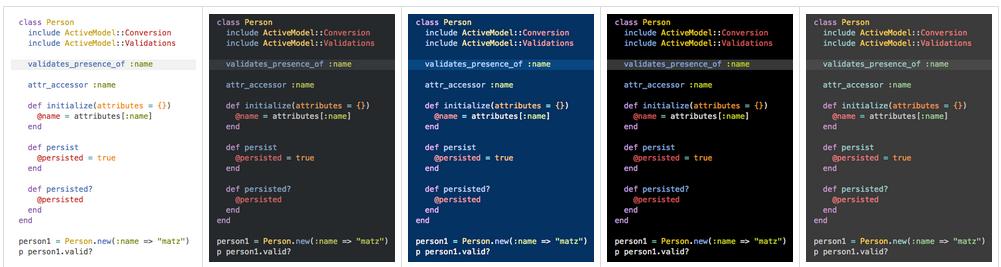
NexT 默認使用的是 normal 主題,可選的值有 normal,night, night blue, night bright, night eighties:
# Code Highlight theme
# Available value:
#    normal | night | night eighties | night blue | night bright
# https://github.com/chriskempson/tomorrow-theme
highlight_theme: normal
效果:
設置小型代碼塊顏色
修改\themes\next\source\css\_variables\base.styl文件,修改code-foreground的值:
// Code & Code Blocks
// --------------------------------------------------
$code-font-family = $font-family-monospace
$code-font-size = 13px
$code-font-size = unit(hexo-config('font.codes.size'), px) if hexo-config('font.codes.size') is a 'unit'
$code-border-radius = 3px
$code-foreground = $black-light
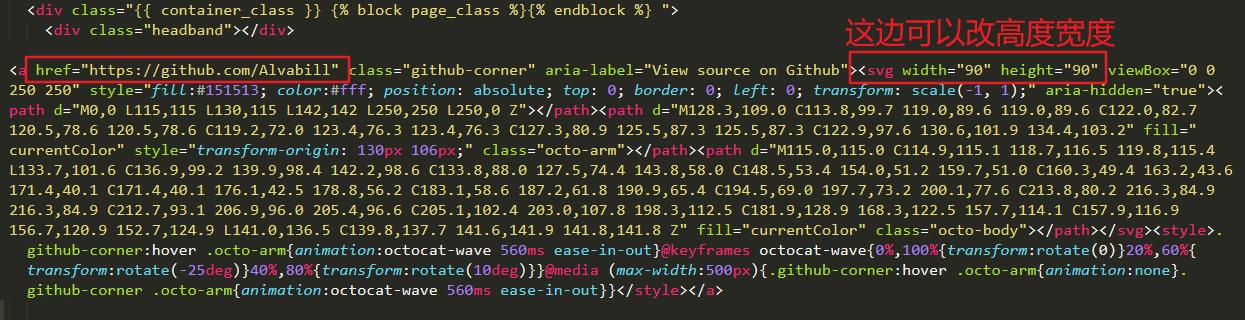
$code-background = $gainsboro左上角或右上角的Github樣式
實現效果有兩種:


具體實現方式便是到樣式1或者樣式2的網站中選擇你喜歡的樣式,復制其中的代碼到themes/next/layout/_layout.swig文件中(放在<div class="headband"></div>的下面),并把href改為你的github地址。
添加背景動畫
NexT已經自帶了多種背景動畫效果,你只需要根據需求在主題配置文件修改其中一個為true即可。
# Canvas-nest
canvas_nest: false

# three_waves
three_waves: false

# canvas_lines
canvas_lines: false

# canvas_sphere
canvas_sphere: false

# Only fit scheme Pisces
# Canvas-ribbon
canvas_ribbon: false
實現效果:
 http://shenzekun.cn” title=”” />
添加頂部加載條
在主題配置文件中搜索pace:
# Progress bar in the top during page loading. 加載條
pace: true
# Themes list:
#pace-theme-big-counter
#pace-theme-bounce
#pace-theme-barber-shop
#pace-theme-center-atom
#pace-theme-center-circle
#pace-theme-center-radar
#pace-theme-center-simple
#pace-theme-corner-indicator
#pace-theme-fill-left
#pace-theme-flash
#pace-theme-loading-bar
#pace-theme-mac-osx
#pace-theme-minimal
# For example
# pace_theme: pace-theme-center-simple
pace_theme: pace-theme-minimal
這里有多種主題選擇,根據自己喜好選擇主題修改便可。
點擊出現小愛心效果
效果:
 http://shenzekun.cn” title=”” />
將love.js文件放到路徑/themes/next/source/js/src里面,然后打開\themes\next\layout\_layout.swig文件,在末尾(在前面引用會出現找不到的bug)添加以下代碼:
<script type="text/javascript" src="/js/src/love.js"></script>修改文章內鏈接文本樣式
修改文件 themes\next\source\css\_common\components\post\post.styl,在末尾添加如下css樣式:
// 文章內鏈接文本樣式
.post-body p a{
color: #0593d3;
border-bottom: none;
border-bottom: 1px solid #0593d3;
&:hover {
color: #fc6423;
border-bottom: none;
border-bottom: 1px solid #fc6423;
}
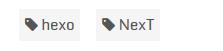
}修改文章底部標簽樣式
修改/themes/next/layout/_macro/post.swig,搜索 rel="tag">#,將 # 換成<i class="fa fa-tag"></i>

實現效果:
文章末尾統一添加“本文結束”標記
在路徑\themes\next\layout\_macro中新建passage-end-tag.swig文件,并添加以下內容:
<div>
    {% if not is_index %}
        <div style="text-align:center;color: #555;font-size:14px;">-------------The End-------------</div>
    {% endif %}
</div>接著打開\themes\next\layout\_macro\post.swig文件,在這個位置添加代碼:
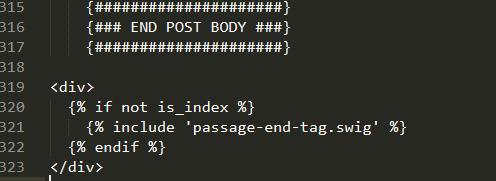
要添加的代碼如下:
<div>
  {% if not is_index %}
    {% include 'passage-end-tag.swig' %}
  {% endif %}
</div>然后打開主題配置文件,在末尾添加:
# 文章末尾添加“本文結束”標記
passage_end_tag:
  enabled: true
實現效果:

修改作者頭像并旋轉
打開\themes\next\source\css\_common\components\sidebar\sidebar-author.styl,在里面添加如下代碼:
.site-author-image {
  display: block;
  margin: 0 auto;
  padding: $site-author-image-padding;
  max-width: $site-author-image-width;
  height: $site-author-image-height;
  border: $site-author-image-border-width solid $site-author-image-border-color;
  /* 頭像圓形 */
  border-radius: 80px;
  -webkit-border-radius: 80px;
  -moz-border-radius: 80px;
  box-shadow: inset 0 -1px 0 #333sf;
  /* 設置循環動畫 [animation: (play)動畫名稱 (2s)動畫播放時長單位秒或微秒 (ase-out)動畫播放的速度曲線為以低速結束
    (1s)等待1秒然后開始動畫 (1)動畫播放次數(infinite為循環播放) ]*/

  /* 鼠標經過頭像旋轉360度 */
  -webkit-transition: -webkit-transform 1.0s ease-out;
  -moz-transition: -moz-transform 1.0s ease-out;
  transition: transform 1.0s ease-out;
}
img:hover {
  /* 鼠標經過停止頭像旋轉
  -webkit-animation-play-state:paused;
  animation-play-state:paused;*/
  /* 鼠標經過頭像旋轉360度 */
  -webkit-transform: rotateZ(360deg);
  -moz-transform: rotateZ(360deg);
  transform: rotateZ(360deg);
}
/* Z 軸旋轉動畫 */
@-webkit-keyframes play {
  0% {
    -webkit-transform: rotateZ(0deg);
  }
  100% {
    -webkit-transform: rotateZ(-360deg);
  }
}
@-moz-keyframes play {
  0% {
    -moz-transform: rotateZ(0deg);
  }
  100% {
    -moz-transform: rotateZ(-360deg);
  }
}
@keyframes play {
  0% {
    transform: rotateZ(0deg);
  }
  100% {
    transform: rotateZ(-360deg);
  }
}
文章添加陰影效果
打開\themes\next\source\css\_custom\custom.styl,向里面加入:
// 主頁文章添加陰影效果
 .post {
   margin-top: 60px;
   margin-bottom: 60px;
   padding: 25px;
   -webkit-box-shadow: 0 0 5px rgba(202, 203, 203, .5);
   -moz-box-shadow: 0 0 5px rgba(202, 203, 204, .5);
  }
實現效果:
修改打賞部分字體動畫
Next打賞部分的動畫是鬼畜一般的不停地抖動,看著很難受,所以博主把它改為只循環三遍,打開文件themes/next/source/css/_common/components/post/post-reward.styl,把微信和支付寶的改為如下:
#wechat:hover p{
    animation: roll 0.1s 3 linear;
    -webkit-animation: roll 0.1s 3 linear;
    -moz-animation: roll 0.1s 3 linear;
}
#alipay:hover p{
    animation: roll 0.1s 3 linear;
    -webkit-animation: roll 0.1s 3 linear;
    -moz-animation: roll 0.1s 3 linear;
}
自定義鼠標樣式
打開themes/next/source/css/_custom/custom.styl,添加代碼:
// 鼠標樣式
  * {
      cursor: url("http://om8u46rmb.bkt.clouddn.com/sword2.ico"),auto!important
  }
  :active {
      cursor: url("http://om8u46rmb.bkt.clouddn.com/sword1.ico"),auto!important
  }
其中 url 里面必須是 ico 圖片,ico 圖片可以上傳到網上(推薦七牛云圖床),然后獲取外鏈,復制到 url 里就行了。
添加看板娘
實現效果:
用git bash在站點根目錄執行如下代碼:
$ npm install hexo-helper-live2d --save然后打開/themes/next/layout/_layout.swig,將下面代碼放到</body>之前:
{{ live2d() }}在站點配置文件末尾添加代碼:
## 看板娘
live2d:
  model: hijiki
  position: left
  bottom: -30
  mobileShow: false  #手機端不顯示
具體設置可以看官方介紹–傳送門。
學習借鑒的文章
智能推薦

Hexo 搭建個人博客學習筆記(2):個性化主題Next
Next 是一款精于心,簡于形 Hexo 主題 也可以獲取 更多主題 安裝 NexT Hexo 安裝主題的方式非常簡單,只需要將主題文件拷貝至站點目錄的 themes 目錄下, 然后修改下配置文件即可。具體到 NexT 來說,安裝步驟如下。 版本 Hexo 版本:5.0.x Next 版本:7.8.0 下載主題 使用Git 克隆主題 在終端窗口下,定位到 Hexo 站點目錄下 注意:官方文檔上克隆...
hexo個人博客next主題使用LaTeX公式
前言 在使用next主題的過程中,碰到寫的markdown中有LaTeX公式不顯示的問題,遂查找資料解決。現已解決,將筆記記錄于此。使用的next主題版本是Release v7.8.0。 第一步 更換Hexo默認渲染引擎 hexo 默認的渲染引擎是 marked,但是 marked 不支持 mathjax。所以需要更換Hexo的markdown渲染引擎為hexo-renderer-kramed引擎...
Hexo博客+Next主題深度優化與定制
寫在前面 本教程只適用于 Next5 或者 Next6 主題,Next7 開始做了大量修改,并刪除了 custom.styl 文件,同時增加了很多在 Next7 之前需要手動配置的功能,請隨個人喜好進行版本選擇。 環境準備 在安裝 hexo 框架之前,我們需要先安裝該框架的依賴環境: Node.js Git 因為 Hexo 博客框架就是基于 Node.js 渲染的,所以必須要先安裝 Node.js...
搭建hexo博客與yilia主題優化
一、目的 作為一個學程序的,有個個人博客,平時寫寫自己的學習筆記,記錄一下自己的生活,寫一些自己在學習過程中遇到的一些坑,還有記錄一下自己的項目作品,我覺得這是一個很有趣的事,另外,個人博客在自己找工作的過程中是一個很好的加分項。 我其實也是一個小白,什么都不會,一些網頁的知識都不知道,而我跟隨大佬一步步搭建出了我的個人博客,故此記錄一下整個過程,寫一些我遇到的坑。 大佬視頻:手把手教你從0開始搭...

猜你喜歡

freemarker + ItextRender 根據模板生成PDF文件
1. 制作模板 2. 獲取模板,并將所獲取的數據加載生成html文件 2. 生成PDF文件 其中由兩個地方需要注意,都是關于獲取文件路徑的問題,由于項目部署的時候是打包成jar包形式,所以在開發過程中時直接安照傳統的獲取方法沒有一點文件,但是當打包后部署,總是出錯。于是參考網上文章,先將文件讀出來到項目的臨時目錄下,然后再按正常方式加載該臨時文件; 還有一個問題至今沒有解決,就是關于生成PDF文件...
電腦空間不夠了?教你一個小秒招快速清理 Docker 占用的磁盤空間!
Docker 很占用空間,每當我們運行容器、拉取鏡像、部署應用、構建自己的鏡像時,我們的磁盤空間會被大量占用。 如果你也被這個問題所困擾,咱們就一起看一下 Docker 是如何使用磁盤空間的,以及如何回收。 docker 占用的空間可以通過下面的命令查看: TYPE 列出了docker 使用磁盤的 4 種類型: Images:所有鏡像占用的空間,包括拉取下來的鏡像,和本地構建的。 Con...

requests實現全自動PPT模板
http://www.1ppt.com/moban/ 可以免費的下載PPT模板,當然如果要人工一個個下,還是挺麻煩的,我們可以利用requests輕松下載 訪問這個主頁,我們可以看到下面的樣式 點每一個PPT模板的圖片,我們可以進入到詳細的信息頁面,翻到下面,我們可以看到對應的下載地址 點擊這個下載的按鈕,我們便可以下載對應的PPT壓縮包 那我們就開始做吧 首先,查看網頁的源代碼,我們可以看到每一...


Linux C系統編程-線程互斥鎖(四)
互斥鎖 互斥鎖也是屬于線程之間處理同步互斥方式,有上鎖/解鎖兩種狀態。 互斥鎖函數接口 1)初始化互斥鎖 pthread_mutex_init() man 3 pthread_mutex_init (找不到的情況下首先 sudo apt-get install glibc-doc sudo apt-get install manpages-posix-dev) 動態初始化 int pthread_...