【Hexo搭建個人博客】:yilia主題配置(三) - 評論系統
本文主要是關于 評論系統 在 hexo-yilia 主題中的添加和配置。使用主題: hexo-theme-yilia-plus
常用系統
目前hexo可用的評論系統比較多,如:暢言、來必力、Disqus、Gitment、gitalk、utterances、Giteement、valine等等。不過有些已關停服務。
這里列舉五個hexo常用的評論系統:
- 1、gitment :基于GitHub issue的評論系統,可參考:簡書;
- 2、gitalk : 基于GitHub issue的評論系統,可參考:gitalk;
- 3、utterance : 基于GitHub issue的評論系統,可參考:詳情
- 4、giteement : 碼云評論系統,國內用戶建議使用這個,相對比較快,詳情;
- 5、valine : valine 評論系統,到 leancloud 進行注冊。
1.Gitment配置
首先要注冊 OAuth Application 當別人評論你的文章時,會需要它是授權。
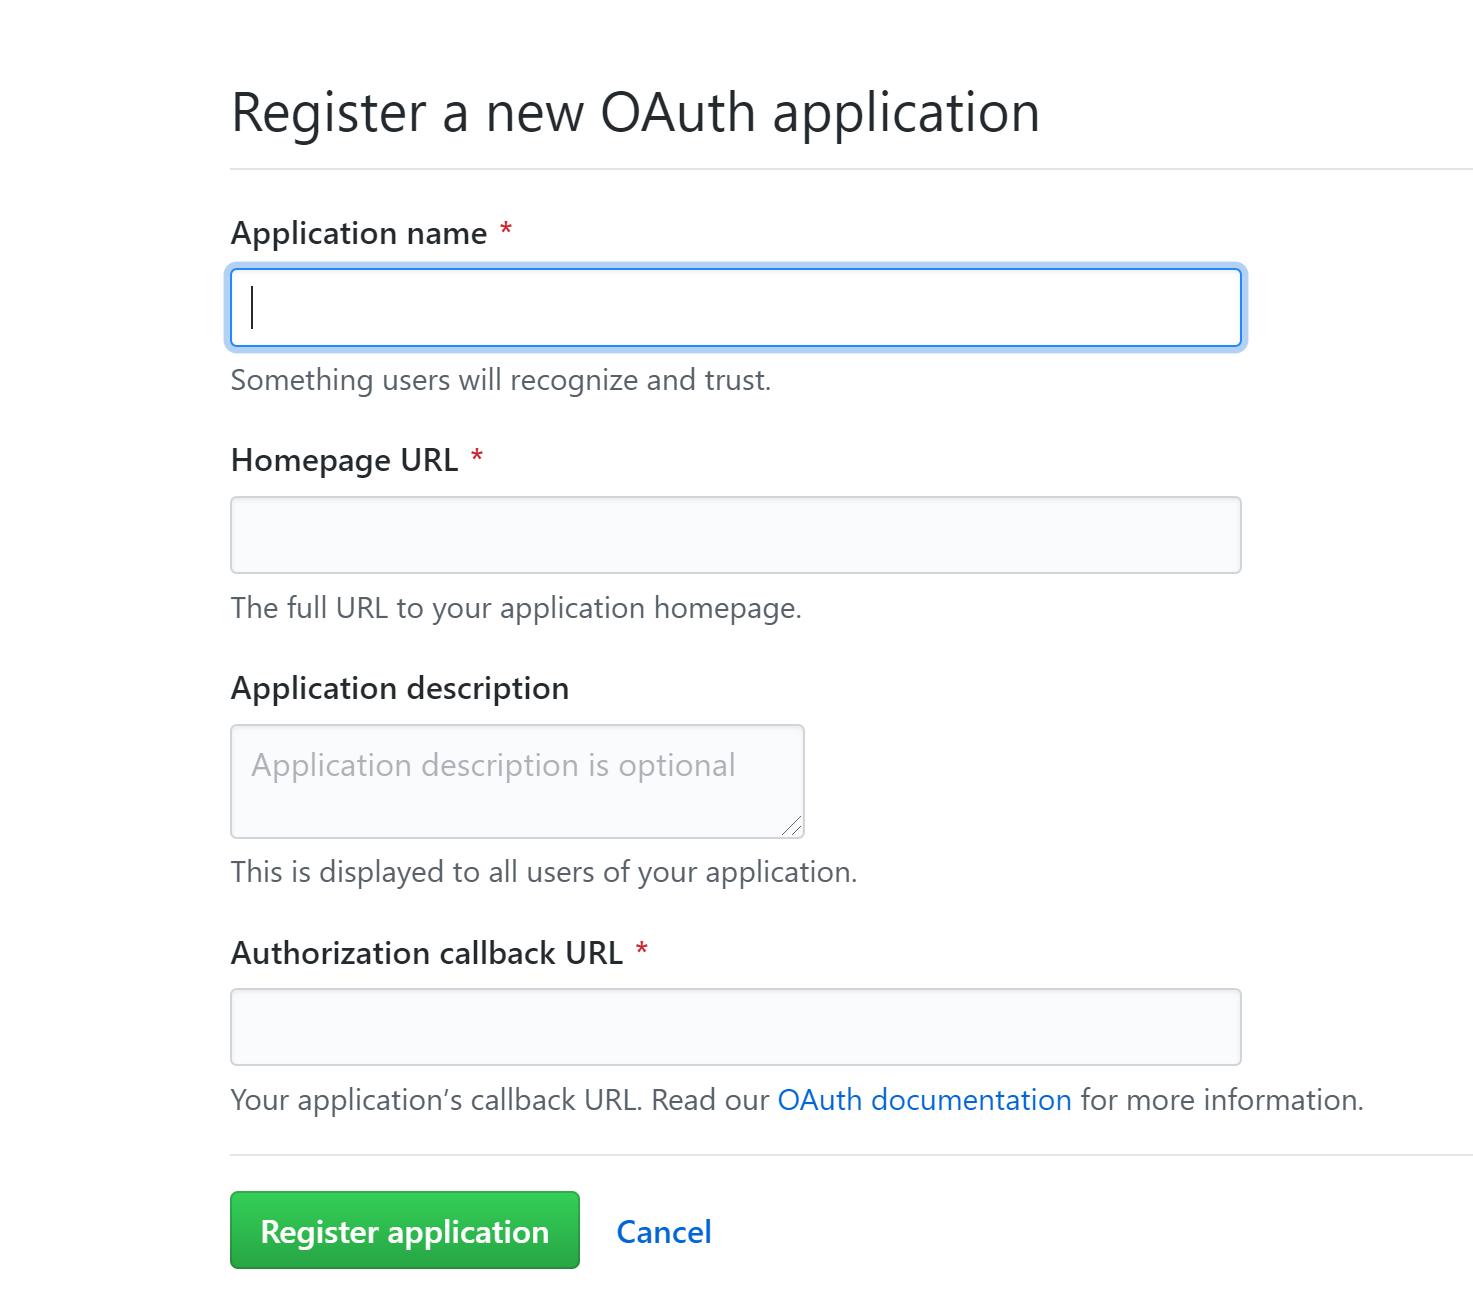
注冊成功后,會獲取到 Client ID/scerct ,需要填入配置文件中。
打開文件 themes\yilia-plus\_config.yml , 修改配置:
gitment_owner: ''      # 你的 GitHub ID (github 賬戶名)
# 是否使用官方js(false可以提升訪問速度,本地修改過一部分的js,官方js可能會出現服務器不穩定,不太建議使用)
gitment_repo: '如:xxx.github.io'  #存儲評論的 repo name(需要在Github創建)
gitment_oauth:
  client_id: ''           #client ID
  client_secret: ''       #client secret
在 themes\yilia-plus\layout\_partial\post 目錄下,會默認有一個 gitment.ejs 文件,可以自定義樣式
對應的 themes\yilia-plus\layout\_partial\article.ejs 文件,會有 gitment 相關的配置。
2.Gitalk配置
2.1.新建 gitalk.ejs 文件
與 gitment 類似配置,首先在 themes\yilia-plus\layout\_partial\post 目錄下,新建 gitalk.ejs 文件,
添加如下內容:
<div id="gitalk-container" style="padding: 0px 30px 0px 30px;"></div>

<link rel="stylesheet" href="https://cdn.jsdelivr.net/npm/gitalk@1/dist/gitalk.css">
<script src="https://cdn.jsdelivr.net/npm/gitalk@1/dist/gitalk.min.js"></script>

<script type="text/javascript">

if(<%=theme.gitalk.enable%>){
    var gitalk = new Gitalk({
    clientID: '<%=theme.gitalk.ClientID%>',
    clientSecret: '<%=theme.gitalk.ClientSecret%>',
    repo: '<%=theme.gitalk.repo%>',
    owner: '<%=theme.gitalk.githubID%>',
    admin: ['<%=theme.gitalk.adminUser%>'],
    id: '<%= page.date %>',
    distractionFreeMode: '<%=theme.gitalk.distractionFreeMode%>'
})
gitalk.render('gitalk-container')
}
</script>
2.2.修改文件 comment.scss
在文件 themes\yilia\source-src\css\comment.scss 中,做如下修改:
#disqus_thread, .duoshuo, .cloud-tie-wrapper, #SOHUCS, #gitment-ctn, #gitalk-container {
    padding: 0 30px !important;
    min-height: 20px;
}

#SOHUCS {
    #SOHU_MAIN .module-cmt-list .block-cont-gw {
        border-bottom: 1px dashed #c8c8c8 !important;
    }
}
2.3.修改主題配置文件 _config.yml
打開文件 themes\yilia-plus\_config.yml , 修改配置:
gitalk:
  enable:  true
  githubID:  ''      # 寫自己github的ID
  repo:  ''          # 新建存放評論的倉庫名
  ClientID:  ''      # 與 `gitment` 一樣
  ClientSecret:  ''  # 同上
  adminUser:  ''     # 也填GitHub的ID
  distractionFreeMode: true
2.4.在文件 article.ejs 中添加配置
打開 themes\yilia-plus\layout\_partial\article.ejs 文件,添加:
<% if(theme.gitalk.enable){ %>
  <%- partial('post/gitalk', {
      key: post.slug,
      title: post.title,
      url: config.url+url_for(post.path)
    }) %>
  <% } %>
3.Utterance配置
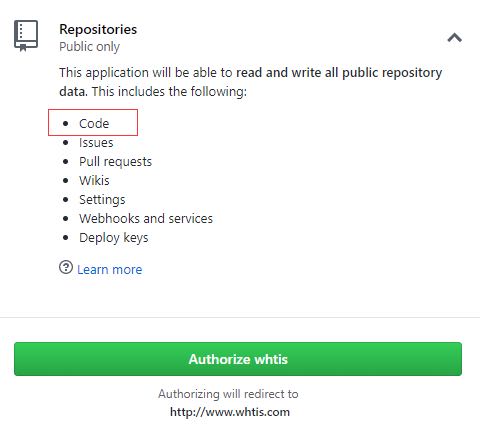
3.1.授權Utterance應用能訪問倉庫的issues
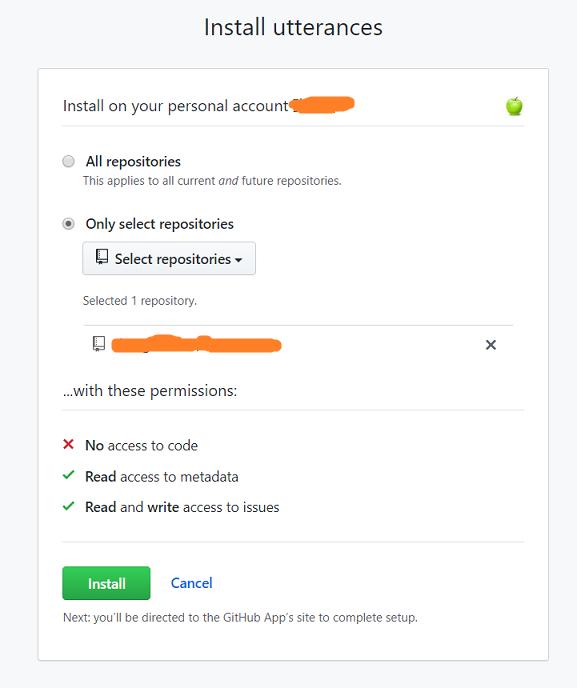
即安裝 Utterance 應用,點擊 install utterances,選擇需要安裝的倉庫。
3.2.fork項目
去 GitHub 上 fork Utterance項目,按照它的教程在 SITES.md 文件中注冊你的博客網址,否則可能會配置失敗。
3.3.修改主題配置文件 _config.yml
打開文件 themes\yilia-plus\_config.yml , 修改配置:
# utteranc評論: https://utteranc.es (參數配置詳見主頁) 替換 gitment、gitalk
utterance:
  enable: true
  repo: ''     #倉庫名字,格式:你的用戶ID/倉庫名稱,如:blog/utterance_repo
  issue_term: 'title'            #映射配置
  theme: 'github-light'          #主題
3.4.在文件 article.ejs 中添加配置
打開 themes\yilia-plus\layout\_partial\article.ejs 文件,添加:
<% if (theme.utterance && theme.utterance.enable){ %>
    <section id="comments" class="comments">
      <style>
        .utterances{max-width: 100%;}
      </style>
        <script src="https://utteranc.es/client.js"
          repo="<%= theme.utterance.repo %>"
          issue-term="<%= theme.utterance.issue_term %>"
          theme="<%= theme.utterance.theme %>"
          crossorigin="anonymous"
          async>
        </script>
    </section>
  <% } %>
4.Giteement配置
基于碼云的評論系統,類似GitHub的配置
4.1.新建 giteement.ejs 文件
在 themes\yilia-plus\layout\_partial\post 目錄下,新建 giteement.ejs 文件,添加如下內容:
<% if (!index && post.comments && theme.giteement && theme.giteement.enable){ %>
  <div id="giteement-ctn"></div>
  <% if (theme.giteement && theme.giteement.remote){ %>
    <link rel="stylesheet" href="https://giteement.oss-cn-beijing.aliyuncs.com/default.css">
    <script src="https://giteement.oss-cn-beijing.aliyuncs.com/giteement.browser.js"></script>
  <% } else { %>
    <link rel="stylesheet" href="<%- url_for('lib/default.css') %>">
    <script src="<%- url_for('lib/giteement.browser.js') %>"></script>
  <% } %>
  <script>
  <!-- id: "<%= page.title %>" -->
  var giteement = new Giteement({
    id: '<%=page.date.format('YYYYMMDDHHmmss')%>',
    owner: '<%=theme.giteement.giteeID%>',
    repo: '<%=theme.giteement.repo%>',
    backcall_uri: '<%=theme.giteement.redirect_uri%>',
    oauth_uri: '<%=theme.giteement.oauth_uri%>',
    oauth: {
      client_id: '<%=theme.giteement.gitment_oauth.client_id%>',
      client_secret: '<%=theme.giteement.gitment_oauth.client_secret%>'
    },
  })
  giteement.render('giteement-ctn')
  </script>
<% } %>
4.2.修改主題配置文件 _config.yml
打開文件 themes\yilia-plus\_config.yml , 修改配置:
giteement:
  enable: true  # 是否啟用碼云評論系統
  # 是否使用官方js(false可以提升訪問速度)
  remote: false
  redirect_uri: ''   # 應用回調地址(請和配置的第三方應用保持一致)
  # 不能更改(網上開源項目https://github.com/Rob--W/cors-anywhere作者提供的專門用來跨域服務器的配置)
  oauth_uri: https://cors-anywhere.herokuapp.com/https://gitee.com/oauth/token
  giteeID: ''  # 你的碼云賬號英文名
  # 存儲評論的 repo
  repo: yilia-plus-demo
  gitment_oauth:
    client_id: '*********'           #client ID
    client_secret: '*********'       #client secret
4.3.在文件 article.ejs 中添加配置
打開 themes\yilia-plus\layout\_partial\article.ejs 文件,添加:
<% if (theme.giteement && theme.giteement.enable){ %>
<%- partial('post/giteement', {
      key: post.slug,
      title: post.title,
      url: config.url+url_for(post.path)
    }) %>
<% } %>
5.Valine配置
5.1.注冊 LeanCloud
先到 leancloud進行注冊、創建應用等等,頁面有幫助教程。
到【設置】-【應用keys】,找到 AppID 和 AppKey ,配置需要。
5.2.部署云引擎
- 在Leancloud 【云引擎】-【設置】界面,創建代碼倉庫,并保存:
https://github.com/DesertsP/Valine-Admin.git - 設置環境變量
- 部署(分支選master)
可參考:Valine配置手冊
5.3.新建 valine.ejs 文件
在 themes\yilia-plus\layout\_partial\post 目錄下,新建 valine.ejs 文件,添加如下內容:
<div class="valine_comment"></div>
<!--載入js,在</body>之前插入即可-->
<!--Leancloud 操作庫:-->
<script src="//cdn1.lncld.net/static/js/3.0.4/av-min.js"></script>
<!--Valine 的核心代碼庫-->
<script src="//unpkg.com/valine/dist/Valine.min.js"></script>
<script>
  var notify = '<%= theme.valine.notify %>' == true ? true : false;
  var verify = '<%= theme.valine.verify %>' == true ? true : false;
  new Valine({
      av: AV,
      el: '.valine_comment',
      emoticon_url: 'https://cloud.panjunwen.com/alu',
      emoticon_list: ["狂汗.png","不說話.png","汗.png","坐等.png","獻花.png","不高興.png","中刀.png","害羞.png","皺眉.png","小眼睛.png","暗地觀察.png"],
      app_id: '<%= theme.valine.appid %>',
      app_key: '<%= theme.valine.appkey %>',
      placeholder: '<%= theme.valine.placeholder %>'
    });
</script>
5.4.修改主題配置文件 _config.yml
打開文件 themes\yilia-plus\_config.yml , 修改配置:
# valine 評論系統,到leancloud進行注冊
# https://leancloud.cn/dashboard/login.html#/signup
valine:
 appid: ''  # Leancloud應用的appId
 appkey: ''          # Leancloud應用的appKey
 verify: false      # 驗證碼
 notify: true       # 評論回復提醒
 avatar: mm        # 評論列表頭像樣式(https://valine.js.org/avatar)
 placeholder: 歡迎您的評論~ # 評論框占位符
5.5.在文件 article.ejs 中添加配置
打開 themes\yilia-plus\layout\_partial\article.ejs 文件,添加:
<% if (theme.valine && theme.valine.appid && theme.valine.appkey){ %>
    <section id="comments" style="margin:10px;padding:10px;background:#fff;">
      <%- partial('post/valine', {
        key: post.slug,
        title: post.title,
        url: config.url+url_for(post.path)
        }) %>
    </section>
  <% } %>
智能推薦
給hexo博客nexT主題添加Gitalk評論系統
寫在前面 注意,此插件基于github開發,授權階段需要獲取的權限不局限于issues,還包括編輯你代碼的權限,因此對這應用授權時需要十分小心 前段時間因為hexo的nexT主題崩了(載入博客時顯示全白,原因在這),換了material主題,這主題很有安卓的風格,我也寫過對它的一些折騰:hexo博客主題—materia...
hexo+yilia主題添加評論
hexo+yilia主題添加評論 因為熱愛,所以拼搏。 –RuiDer 回顧hexo+yilia主題添加訪問量 上一篇文章介紹了hexo+yilia主題添加訪問量,如果需要點擊hexo+yilia主題添加訪問量 常見的評論系統 暢言(搜狐的評論系統,很強大,但需要有備案號) 友言(不需要備案號,功能也比較強大) 多說(功能強大,但是已經停止服務) disqus(國內經常被墻) 本文介紹...
Hexo快速構建個人小站-Fulid主題下添加Valine評論系統(三)
Hexo目錄: Hexo快速構建個人小站-Hexo初始化和將項目托管在Github(一) Hexo快速構建個人小站-自定義域名和自定義主題(二) 背景交代: 前面兩章完成了Hexo的初始化和部分自定義的功能,對于只想展示文章來說也是沒有問題的,但是無法與讀者進行互動,無論讀者對錯誤的反饋還是對優質內容的鼓勵這些統統都不知道,所以我們先給...
Hexo Next主題集成gitalk評論系統
前言 gitalk: 一個基于 Github Issue 和 Preact 開發的評論插件 集成步驟 1、新建評論倉庫 第一步:新建一個空的評論倉庫,個人博客中的評論會提交到這個倉庫中。 第二步:注意在setting中啟用該倉庫的Issues。 第三步:進入倉庫,點擊倉庫上方的Issues,初始化倉庫的Issues。 2、Register Application 配置GitHub Apps的OAu...
Hexo NexT主題集成utterance評論系統
更多干貨內容,可訪問我的技術博客:https://zhangzw.com/ 使用Hexo的Next主題搭建的博客內置了很多種評論系統,如:gitalk,changyan等。 這里講解集成另外一種評論系統:utterance(https://utteranc.es/) 其配置非常簡單,支持Github賬號登錄后才能評論。原理就是使用了Github的Issues功能來保存評論。 配置步驟 創建Gith...
猜你喜歡
hexo之next主題添加評論系統
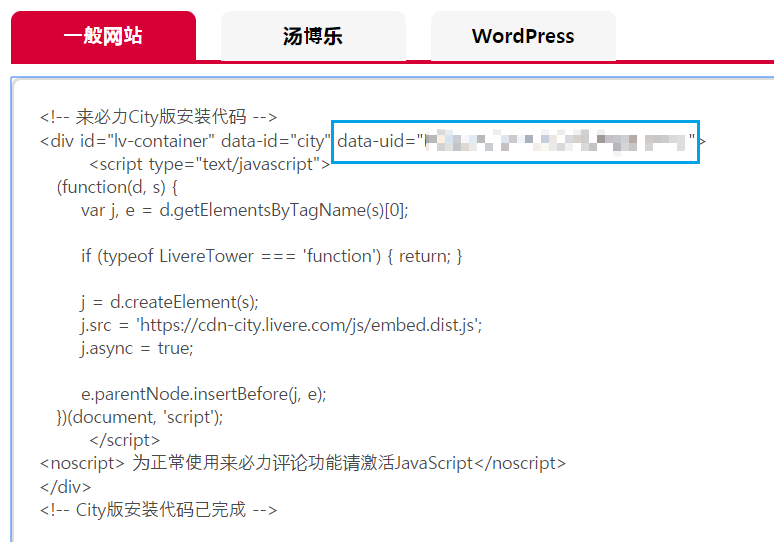
demo:我的博客 1.登錄(注冊)來必力官網 2.安裝 點擊安裝后根據個人需要選擇免費版還是專業版 3.獲取data-uid 在安裝完成后會出現 4.復制data-uid,粘貼到主題配置文件中,找到 將active改為livere 再找到 5.重新部署 hexo clean hexo g hexo s(在本地瀏覽) hexo d(部署到遠端)...


freemarker + ItextRender 根據模板生成PDF文件
1. 制作模板 2. 獲取模板,并將所獲取的數據加載生成html文件 2. 生成PDF文件 其中由兩個地方需要注意,都是關于獲取文件路徑的問題,由于項目部署的時候是打包成jar包形式,所以在開發過程中時直接安照傳統的獲取方法沒有一點文件,但是當打包后部署,總是出錯。于是參考網上文章,先將文件讀出來到項目的臨時目錄下,然后再按正常方式加載該臨時文件; 還有一個問題至今沒有解決,就是關于生成PDF文件...
電腦空間不夠了?教你一個小秒招快速清理 Docker 占用的磁盤空間!
Docker 很占用空間,每當我們運行容器、拉取鏡像、部署應用、構建自己的鏡像時,我們的磁盤空間會被大量占用。 如果你也被這個問題所困擾,咱們就一起看一下 Docker 是如何使用磁盤空間的,以及如何回收。 docker 占用的空間可以通過下面的命令查看: TYPE 列出了docker 使用磁盤的 4 種類型: Images:所有鏡像占用的空間,包括拉取下來的鏡像,和本地構建的。 Con...

requests實現全自動PPT模板
http://www.1ppt.com/moban/ 可以免費的下載PPT模板,當然如果要人工一個個下,還是挺麻煩的,我們可以利用requests輕松下載 訪問這個主頁,我們可以看到下面的樣式 點每一個PPT模板的圖片,我們可以進入到詳細的信息頁面,翻到下面,我們可以看到對應的下載地址 點擊這個下載的按鈕,我們便可以下載對應的PPT壓縮包 那我們就開始做吧 首先,查看網頁的源代碼,我們可以看到每一...