webpack簡介_Webpack簡介
標簽: vue python java js javascript
webpack簡介
什么是webpack? (What is webpack?)
Webpack is a tool that lets you compile JavaScript modules, also known as module bundler.
Webpack是一種工具,可用于編譯JavaScript模塊,也稱為模塊捆綁程序 。
Given a large number of files, it generates a single file (or a few files) that run your app.
給定大量文件,它將生成一個(或幾個文件)運行您的應用程序的文件。
It can perform many operations:
它可以執行許多操作:
- helps you bundle your resources. 幫助您捆綁資源。
- watches for changes and re-runs the tasks. 監視更改并重新運行任務。
can run Babel transpilation to ES5, allowing you to use the latest JavaScript features without worrying about browser support.
可以將Babel轉換運行到ES5,從而使您可以使用最新的JavaScript功能,而不必擔心瀏覽器支持。
- can transpile CoffeeScript to JavaScript 可以將CoffeeScript轉換為JavaScript
- can convert inline images to data URIs. 可以將嵌入式圖像轉換為數據URI。
- allows you to use require() for CSS files. 允許您將require()用于CSS文件。
- can run a development webserver. 可以運行開發Web服務器。
- can handle hot module replacement. 可以處理熱模塊更換。
- can split the output files into multiple files, to avoid having a huge js file to load in the first page hit. 可以將輸出文件拆分為多個文件,以避免在首頁命中時加載巨大的js文件。
can perform tree shaking.
可以搖樹 。
Webpack is not limited to be use on the frontend, it’s also useful in backend Node.js development as well.
Webpack不僅限于在前端使用,它在后端Node.js開發中也很有用。
Predecessors of webpack, and still widely used tools, include:
Webpack的前身以及仍被廣泛使用的工具包括:
- Grunt 咕unt聲
- Broccoli 西蘭花
- Gulp 古爾普
There are lots of similarities in what those and Webpack can do, but the main difference is that those are known as task runners, while webpack was born as a module bundler.
這些和Webpack的功能有很多相似之處,但是主要區別在于它們被稱為任務運行程序 ,而webpack則是模塊捆綁器。
It’s a more focused tool: you specify an entry point to your app (it could even be an HTML file with script tags) and webpack analyzes the files and bundles all you need to run the app in a single JavaScript output file (or in more files if you use code splitting).
它是一種更具針對性的工具:您可以為應用程序指定一個入口點(它甚至可以是帶有腳本標簽HTML文件),然后Webpack會分析這些文件并將所有需要運行的應用程序捆綁在一個JavaScript輸出文件中(或更多)文件(如果您使用代碼拆分)。
安裝webpack (Installing webpack)
Webpack can be installed globally or locally for each project.
Webpack可以在每個項目的全局或本地安裝。
全局安裝 (Global install)
Here’s how to install it globally with Yarn:
這是使用Yarn全局安裝的方法:
yarn global add webpack webpack-cliwith npm:
與npm :
npm i -g webpack webpack-clionce this is done, you should be able to run
完成此操作后,您應該可以運行
webpack-cli本地安裝 (Local install)
Webpack can be installed locally as well. It’s the recommended setup, because webpack can be updated per-project, and you have less resistance to using the latest features just for a small project rather than updating all the projects you have that use webpack.
Webpack也可以在本地安裝。 這是推薦的設置,因為webpack可以按項目進行更新,并且您對僅針對小型項目使用最新功能的阻力較小,而不是更新所有擁有使用webpack的項目的阻力。
With Yarn:
帶紗 :
yarn add webpack webpack-cli -Dwith npm:
與npm :
npm i webpack webpack-cli --save-devOnce this is done, add this to your package.json file:
完成后,將其添加到package.json文件:
{
  //...
  "scripts": {
    "build": "webpack"
  }
}
once this is done, you can run webpack by typing
完成此操作后,您可以通過鍵入以下內容運行webpack
yarn buildin the project root.
在項目根目錄中。
Webpack配置 (Webpack configuration)
By default, webpack (starting from version 4) does not require any config if you respect these conventions:
默認情況下,如果遵守以下約定,則webpack(從版本4開始)不需要任何配置:
the entry point of your app is
./src/index.js您的應用程序的入口點是
./src/index.jsthe output is put in
./dist/main.js.輸出放在
./dist/main.js。- Webpack works in production mode Webpack在生產模式下工作
You can customize every little bit of webpack of course, when you need. The webpack configuration is stored in the webpack.config.js file, in the project root folder.
當然,您可以在需要時自定義Webpack的每一個細節。 Webpack配置存儲在項目根文件夾中的webpack.config.js文件中。
入口點 (The entry point)
By default the entry point is ./src/index.js
This simple example uses the ./index.js file as a starting point:
默認情況下,入口點是./src/index.js這個簡單的示例使用./index.js文件作為起點:
module.exports = {
  /*...*/
  entry: './index.js'
  /*...*/
}
輸出 (The output)
By default the output is generated in ./dist/main.js. This example puts the output bundle into app.js:
默認情況下,輸出是在./dist/main.js生成的。 此示例將輸出包放入app.js :
module.exports = {
  /*...*/
  output: {
    path: path.resolve(__dirname, 'dist'),
    filename: 'app.js'
  }
  /*...*/
}
裝載機 (Loaders)
Using webpack allows you to use import or require statements in your JavaScript code to not just include other JavaScript, but any kind of file, for example CSS.
使用webpack允許您在JavaScript代碼中使用import或require語句,不僅包括其他JavaScript,還包括任何類型的文件,例如CSS。
Webpack aims to handle all our dependencies, not just JavaScript, and loaders are one way to do that.
Webpack旨在處理我們所有的依賴關系,而不僅僅是JavaScript,而加載程序是做到這一點的一種方法。
For example, in your code you can use:
例如,在您的代碼中,您可以使用:
import 'style.css'by using this loader configuration:
通過使用此加載程序配置:
module.exports = {
  /*...*/
  module: {
    rules: [
      { test: /\.css$/, use: 'css-loader' },
    ]
  }
  /*...*/
}
The regular expression targets any CSS file.
正則表達式以任何CSS文件為目標。
A loader can have options:
裝載機可以有以下選擇:
module.exports = {
  /*...*/
  module: {
    rules: [
      {
        test: /\.css$/,
        use: [
          {
            loader: 'css-loader',
            options: {
              modules: true
            }
          }
        ]
      }
    ]
  }
  /*...*/
}
You can require multiple loaders for each rule:
您可以為每個規則要求多個加載程序:
module.exports = {
  /*...*/
  module: {
    rules: [
      {
        test: /\.css$/,
        use:
          [
            'style-loader',
            'css-loader',
          ]
      }
    ]
  }
  /*...*/
}
In this example, css-loader interprets the import 'style.css' directive in the CSS. style-loader is then responsible for injecting that CSS in the DOM, using a <style> tag.
在此示例中, css-loader解釋css-loader import 'style.css'指令。 然后, style-loader負責使用<style>標簽將CSS注入DOM中。
The order matters, and it’s reversed (the last is executed first).
順序很重要,并且順序相反(最后執行的是第一個)。
What kind of loaders are there? Many! You can find the full list here.
那里有什么裝載機? 許多! 您可以在此處找到完整列表 。
A commonly used loader is Babel, which is used to transpile modern JavaScript to ES5 code:
常用的加載器是Babel ,用于將現代JavaScript轉換為ES5代碼:
module.exports = {
  /*...*/
  module: {
    rules: [
      {
        test: /\.js$/,
        exclude: /(node_modules|bower_components)/,
        use: {
          loader: 'babel-loader',
          options: {
            presets: ['@babel/preset-env']
          }
        }
      }
    ]
  }
  /*...*/
}
This example makes Babel preprocess all our React/JSX files:
這個例子使Babel預處理我們所有的React / JSX文件:
module.exports = {
  /*...*/
  module: {
    rules: [
      {
        test: /\.(js|jsx)$/,
        exclude: /node_modules/,
        use: 'babel-loader'
      }
    ]
  },
  resolve: {
    extensions: [
      '.js',
      '.jsx'
    ]
  }
  /*...*/
}
See the babel-loader options here.
外掛程式 (Plugins)
Plugins are like loaders, but on steroids. They can do things that loaders can’t do, and they are the main building block of webpack.
插件就像加載程序一樣,但是在類固醇上。 他們可以完成加載程序無法完成的工作,它們是webpack的主要組成部分。
Take this example:
舉個例子:
module.exports = {
  /*...*/
  plugins: [
    new HTMLWebpackPlugin()
  ]
  /*...*/
}
The HTMLWebpackPlugin plugin has the job of automatically creating an HTML file, adding the output JS bundle path, so the JavaScript is ready to be served.
HTMLWebpackPlugin插件具有自動創建HTML文件,添加輸出JS包路徑的功能,因此可以使用JavaScript。
There are lots of plugins available.
有很多可用的插件 。
One useful plugin, CleanWebpackPlugin, can be used to clear the dist/ folder before creating any output, so you don’t leave files around when you change the name of the output file:
一個有用的插件CleanWebpackPlugin可以用于在創建任何輸出之前清除dist/文件夾,因此在更改輸出文件的名稱時,您不會留下文件:
module.exports = {
  /*...*/
  plugins: [
    new CleanWebpackPlugin(['dist']),
  ]
  /*...*/
}
Webpack模式 (The webpack mode)
This mode (introduced in webpack 4) sets the environment on which webpack works. It can be set to development or production (defaults to production, so you only set it when moving to development)
此模式(在webpack 4中引入)設置了webpack工作的環境。 可以將其設置為development或production (默認為生產,因此僅在進行開發時進行設置)
module.exports = {
  entry: './index.js',
  mode: 'development',
  output: {
    path: path.resolve(__dirname, 'dist'),
    filename: 'app.js'
  }
}
Development mode:
開發方式:
- builds very fast 建立非常快
- is less optimized than production 沒有比生產優化
- does not remove comments 不刪除評論
- provides more detailed error messages and suggestions 提供更詳細的錯誤消息和建議
- provides a better debugging experience 提供更好的調試體驗
Production mode is slower to build, since it needs to generate a more optimized bundle. The resulting JavaScript file is smaller in size, as it removes many things that are not needed in production.
生產模式的構建速度較慢,因為它需要生成更優化的捆綁包。 生成JavaScript文件較小,因為它刪除了生產中不需要的許多東西。
I made a sample app that just prints a console.log statement.
我制作了一個示例應用程序,僅打印console.log語句。
Here’s the production bundle:
這是產品包:

Here’s the development bundle:
這是開發包:
運行webpack (Running webpack)
Webpack can be run from the command line manually if installed globally, but generally you write a script inside the package.json file, which is then run using npm or yarn.
如果Webpack是全局安裝的,則可以從命令行手動運行,但是通常是在package.json文件中編寫一個腳本,然后使用npm或yarn運行它。
For example this package.json scripts definition we used before:
例如,我們之前使用的以下package.json腳本定義:
"scripts": {
  "build": "webpack"
}
allows us to run webpack by running
允許我們通過運行來運行webpack
npm run buildor
要么
yarn run buildor
要么
yarn build觀察變化 (Watching changes)
Webpack can automatically rebuild the bundle when a change in your app happens, and keep listening for the next change.
當您的應用程序發生更改時,Webpack可以自動重建捆綁軟件,并繼續監聽下一個更改。
Just add this script:
只需添加以下腳本:
"scripts": {
  "watch": "webpack --watch"
}
and run
并運行
npm run watchor
要么
yarn run watchor
要么
yarn watchOne nice feature of the watch mode is that the bundle is only changed if the build has no errors. If there are errors, watch will keep listening for changes, and try to rebuild the bundle, but the current, working bundle is not affected by those problematic builds.
監視模式的一個不錯的功能是,僅當構建沒有錯誤時才更改捆綁軟件。 如果有錯誤, watch將繼續偵聽更改,并嘗試重建捆綁軟件,但是當前有效的捆綁軟件不受那些有問題的構建的影響。
處理圖像 (Handling images)
Webpack allows us to use images in a very convenient way, using the file-loader loader.
Webpack允許我們使用file-loader器file-loader器以非常方便的方式使用圖像。
This simple configuration:
這個簡單的配置:
module.exports = {
  /*...*/
  module: {
    rules: [
      {
        test: /\.(png|svg|jpg|gif)$/,
        use: [
          'file-loader'
        ]
      }
    ]
  }
  /*...*/
}
Allows you to import images in your JavaScript:
允許您在JavaScript中導入圖像:
import Icon from './icon.png'

const img = new Image()
img.src = Icon
element.appendChild(img)(img is an HTMLImageElement. Check the Image docs)
( img是HTMLImageElement。請檢查Image文檔 )
file-loader can handle other asset types as well, like fonts, CSV files, xml, and more.
file-loader還可以處理其他資產類型,例如字體,CSV文件,xml等。
Another nice tool to work with images is the url-loader loader.
另一個處理圖像的好工具是url-loader loader。
This example loads any PNG file smaller than 8KB as a data URL.
本示例將小于8KB的任何PNG文件加載為數據URL 。
module.exports = {
  /*...*/
  module: {
    rules: [
      {
        test: /\.png$/,
        use: [
          {
            loader: 'url-loader',
            options: {
              limit: 8192
            }
          }
        ]
      }
    ]
  }
  /*...*/
}
處理您的SASS代碼并將其轉換為CSS (Process your SASS code and transform it to CSS)
Using sass-loader, css-loader and style-loader:
使用sass-loader , css-loader和style-loader :
module.exports = {
  /*...*/
  module: {
    rules: [
      {
        test: /\.scss$/,
        use: [
          'style-loader',
          'css-loader',
          'sass-loader'
        ]
      }
    ]
  }
  /*...*/
}
生成源地圖 (Generate Source Maps)
Since webpack bundles the code, Source Maps are mandatory to get a reference to the original file that raised an error, for example.
由于webpack捆綁了代碼,因此必須使用“源映射”來獲取對引發錯誤的原始文件的引用。
You tell webpack to generate source maps using the devtool property of the configuration:
您告訴webpack使用配置的devtool屬性生成源映射:
module.exports = {
  /*...*/
  devtool: 'inline-source-map',
  /*...*/
}
devtool has many possible values, the most used probably are:
devtool有許多可能的值 ,最常用的是:
none: adds no source mapsnone:不添加源地圖source-map: ideal for production, provides a separate source map that can be minimized, and adds a reference into the bundle, so development tools know that the source map is available. Of course you should configure the server to avoid shipping this, and just use it for debugging purposessource-map:非常適合生產,提供可以最小化的單獨的源映射,并在捆綁包中添加引用,因此開發工具知道該源映射可用。 當然,您應該配置服務器以避免運送它,而僅將其用于調試目的inline-source-map: ideal for development, inlines the source map as a Data URLinline-source-map:非常適合開發,將源映射作為數據URL內聯
webpack簡介
智能推薦

webpack
webpack模塊管理器 概念:webpack是模塊加載器兼打包工具,它能把各種資源,例如JS(含JSX)、coffee、樣式(含less/sass)、圖片等都作為模塊來使 用和處理。 作用和優勢: webpack 是以 commonJS 的形式來書寫腳本,但對 AMD/CMD 的支持也很 全面,方便舊項目進行代碼遷移。 能被模塊化的不僅僅是 JS 了。 開發便捷,能替代部分 grunt/gulp...
WebPack(Ⅰ)
一、什么是webpack? webpack是一個模塊化打包工具,利用遞歸算法,將后端代碼前端化。那么什么是模塊化呢?在現代化技術棧里面有四個概念:模塊化、工程化、組件化、全棧化。想要直到答案,請戳如下鏈接https://www.jianshu.com/p/ee88e9849a1b(引用他人)。 二、首先要安裝node! webpack在使用的時候,要用到npm,那什么是npm(引用他人:http:...
WebPack(Ⅱ)
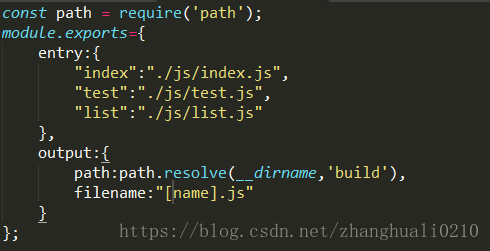
webpack是模塊化打包工具,那么webpack到底是怎么樣進行模塊化的呢?我們在引入js文件的時候是通過許多的<script>標簽進行引入的,那么我們可不可以將這么多js文件合并成一個js文件,再進行引入呢?這樣可以減少香服務器請求次數,加載速度可以加快。下來我們開始! 一、在app-test下面建立一個js文件夾,里面有兩個js文件,一個是test.js文件,一個是index.j...


freemarker + ItextRender 根據模板生成PDF文件
1. 制作模板 2. 獲取模板,并將所獲取的數據加載生成html文件 2. 生成PDF文件 其中由兩個地方需要注意,都是關于獲取文件路徑的問題,由于項目部署的時候是打包成jar包形式,所以在開發過程中時直接安照傳統的獲取方法沒有一點文件,但是當打包后部署,總是出錯。于是參考網上文章,先將文件讀出來到項目的臨時目錄下,然后再按正常方式加載該臨時文件; 還有一個問題至今沒有解決,就是關于生成PDF文件...
猜你喜歡
電腦空間不夠了?教你一個小秒招快速清理 Docker 占用的磁盤空間!
Docker 很占用空間,每當我們運行容器、拉取鏡像、部署應用、構建自己的鏡像時,我們的磁盤空間會被大量占用。 如果你也被這個問題所困擾,咱們就一起看一下 Docker 是如何使用磁盤空間的,以及如何回收。 docker 占用的空間可以通過下面的命令查看: TYPE 列出了docker 使用磁盤的 4 種類型: Images:所有鏡像占用的空間,包括拉取下來的鏡像,和本地構建的。 Con...

requests實現全自動PPT模板
http://www.1ppt.com/moban/ 可以免費的下載PPT模板,當然如果要人工一個個下,還是挺麻煩的,我們可以利用requests輕松下載 訪問這個主頁,我們可以看到下面的樣式 點每一個PPT模板的圖片,我們可以進入到詳細的信息頁面,翻到下面,我們可以看到對應的下載地址 點擊這個下載的按鈕,我們便可以下載對應的PPT壓縮包 那我們就開始做吧 首先,查看網頁的源代碼,我們可以看到每一...


Linux C系統編程-線程互斥鎖(四)
互斥鎖 互斥鎖也是屬于線程之間處理同步互斥方式,有上鎖/解鎖兩種狀態。 互斥鎖函數接口 1)初始化互斥鎖 pthread_mutex_init() man 3 pthread_mutex_init (找不到的情況下首先 sudo apt-get install glibc-doc sudo apt-get install manpages-posix-dev) 動態初始化 int pthread_...

統計學習方法 - 樸素貝葉斯
引入問題:一機器在良好狀態生產合格產品幾率是 90%,在故障狀態生產合格產品幾率是 30%,機器良好的概率是 75%。若一日第一件產品是合格品,那么此日機器良好的概率是多少。 貝葉斯模型 生成模型與判別模型 判別模型,即要判斷這個東西到底是哪一類,也就是要求y,那就用給定的x去預測。 生成模型,是要生成一個模型,那就是誰根據什么生成了模型,誰就是類別y,根據的內容就是x 以上述例子,判斷一個生產出...