Netty(一):BIO、NIO基礎知識詳解
標簽: 面試 Netty java netty java nio NIO BIO
IO相關知識學習
IO模型
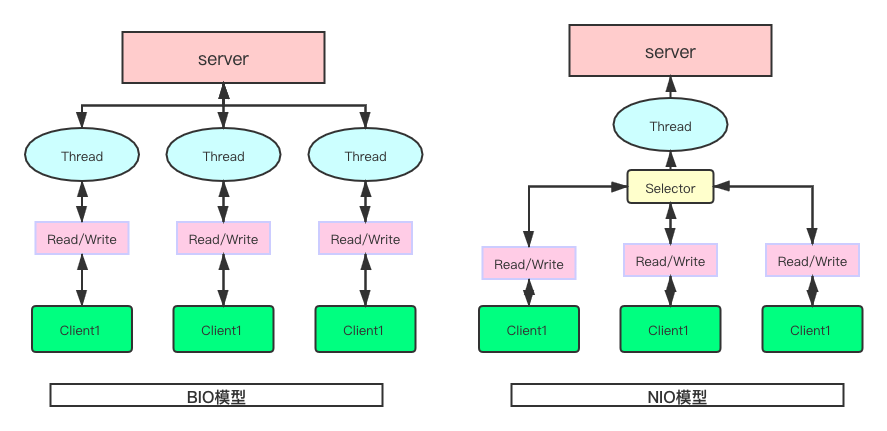
如上圖所示,大致可以總結出BIO與NIO兩種IO模型的特點。
1. BIO(Blocking IO)
- 傳統的IO模型,所有類與接口在java.io包下。
- 同步阻塞:一:等待連接,二:等待響應,線程會在這兩點出阻塞中,同事一,二是同步進行,進一步降低了效率。
- JDK1.4及其以前版本的唯一選擇,程序簡單易于理解。
- 適用于連接數少且固定的架構中,并發局限于項目內部。
BIO工作機制
- server端創建SocketServer,并創建線程來維持通訊。
- client端創建socket,并與server端進行連接。
- 連接過程中,若無(空閑)線程,則會等待。
- 若有線程,且有響應則會等待響應,若無響應則會直接返回。這也就是阻塞的原因。
簡單來講
- 每一個連接都會創建一個線程:這里會導致高并發下,需要創建大量線程,這樣會占用大量系統資源。
- 當連接生成時,線程即被創建,但是Read,業務,Write等操作是同步進行,若無數據返回,線程會阻塞在Read處,線程一直被占用,導致系統資源浪費。
BIO示例代碼
package com.floatcloud.netty;

import java.io.IOException;
import java.io.InputStream;
import java.net.ServerSocket;
import java.net.Socket;
import java.nio.charset.Charset;
import java.util.concurrent.ExecutorService;
import java.util.concurrent.Executors;

import lombok.SneakyThrows;

/**
 * @author floatcloud
 */
public class BlockingIO {


	public static void main(String[] args) {
		ExecutorService threadPool = Executors.newFixedThreadPool(10);
		try {
		    System.out.println("等待連接ing。。。。"); // BIO阻塞的地方
			ServerSocket serverSocket = new ServerSocket(6666); // 創建服務端連接
			System.out.println("應用啟動");
			while (true) {
				Socket socket = serverSocket.accept(); // 獲取連接
				System.out.println("建立連接");
				threadPool.execute(new Runnable() {
					@SneakyThrows
					@Override
					public void run() {
						InputStream inputStream = socket.getInputStream();
						System.out.println("線程id"+ Thread.currentThread().getName());
						byte[] bytes = new byte[1024];
						String msg;
						int num = 0;
						System.out.println("等待讀取ing。。。。"); // 線程阻塞
						while ((num = inputStream.read(bytes)) >= 0) {
							msg = new String(bytes, Charset.forName("UTF-8"));
							System.out.println(msg);
						}
					}
				});
			}
		} catch (IOException e) {
			e.printStackTrace();
		}
	}

}
2. NIO(non-blocking IO)
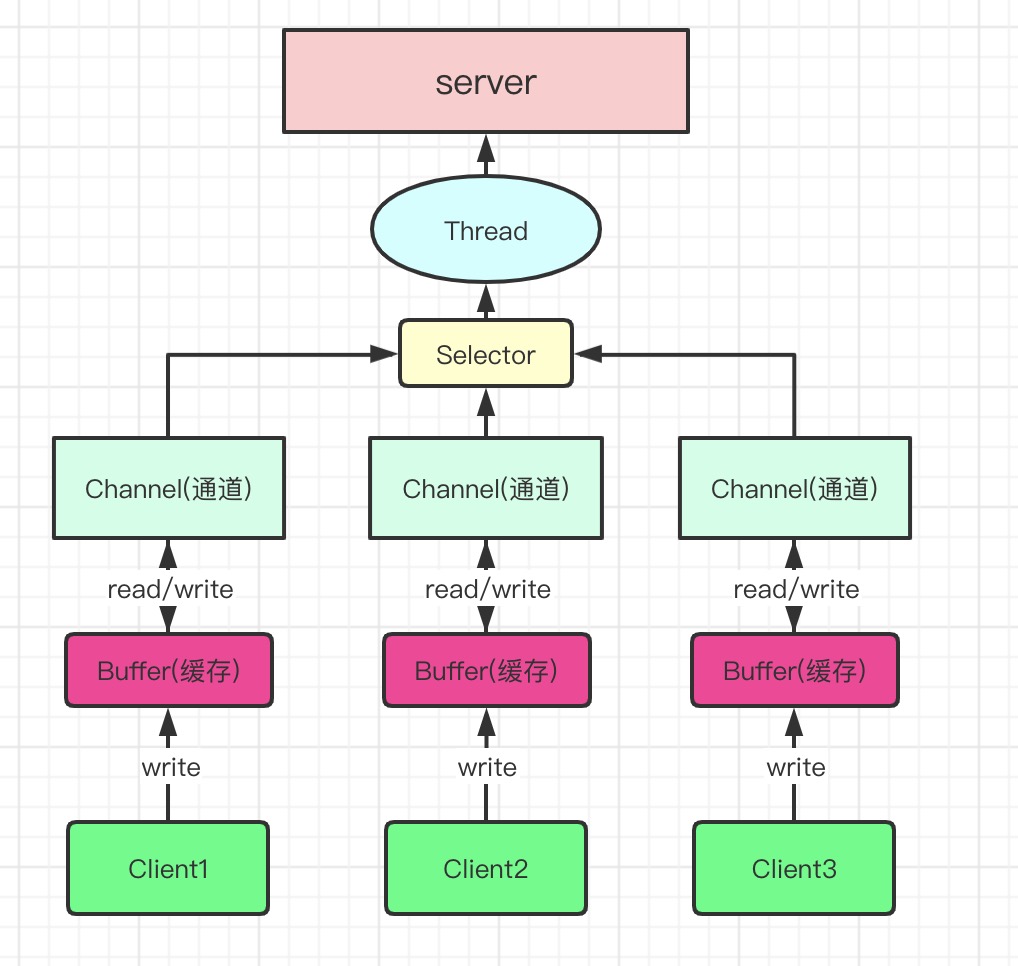
通俗的語言總結下上圖:
- 每一個Buffer對應一個Channel。
- Selector會創建一個線程與自身綁定,并管理多個Channel。
- Buffer底層數據結構為數組(內存塊【連續的內存存儲空間】)。
- Selector根據不同事件(Event)在Channel之間切換。
- Buffer不同于BIO,該流是雙向的,即可讀也可寫,使用flip();方法進行讀寫之間切換。
- Channel與Buffer之間讀寫也是雙向的。
特性
- 同步非阻塞
- 基于jdk1.4版本及其以上
- 面向緩存
- 三大核心部分:Channel(通道),Buffer(緩存),Selector(選擇器)。
Buffer(緩存)
Buffer的子類
ByteBuffer, CharBuffer, DoubleBuffer, FloatBuffer, IntBuffer, LongBuffer, ShortBuffer(除了boolean類型外的所有基本數據類型的buffer)
Buffer類的核心屬性
// Invariants: mark <= position <= limit <= capacity
// 標志位
private int mark = -1;
// 下一次讀取/寫入的位置
private int position = 0;
// 最大讀取/寫入位置
private int limit;
// 數組容量
private int capacity;
Buffer代碼示例
public static void read(){
	// 創建一個IntBuffer,長度為5個字節
	IntBuffer intBuffer = IntBuffer.allocate(5);
	for (int i = 0; i < intBuffer.capacity(); i++) {
		// 存入數據
		intBuffer.put(i);
	}
	// buffer 讀寫切換
	intBuffer.flip();
	// 判斷是否還有數據
	while (intBuffer.hasRemaining()){
		// intBuffer.get(); 方法會依次將數據輸出。
		System.out.println(intBuffer.get());
	}
}
Buffer的注意事項
- ByteBuffer支持類型化的put和get方法,即put什么數據類型的數據,就要使用對應數據類型的get方法獲取,否則會拋出BufferUnderflowException異常。
/**
 * ByteBuffer的類型化put、get
 */
public static void putGetByType(){
	ByteBuffer byteBuffer = ByteBuffer.allocate(3);
	byteBuffer.putChar('a');
	byteBuffer.putInt(12);
	byteBuffer.putLong((long)0.89);
	byteBuffer.flip();
	char aChar = byteBuffer.getChar();
	// 這里報錯
	char bChar = byteBuffer.getChar();
	long aLong = byteBuffer.getLong();
}
- 可以通過asReadOnlyBuffer方法,將buffer轉化為一個只讀的buffer
ByteBuffer readOnlyBuffer = byteBuffer.asReadOnlyBuffer();
- NIO提供MappedByteBuffer,可以使文件直接在內存(堆外內存【物理內存】)中修改,同步到文件也由NIO來完成。
    /**
	 * 使用MappedByteBuffer對文件在物理內存中進行修改,并同步。(JVM外內存)
	 */
	public static void mappedBufferRW(){
		try {
			// 文件modefied.md,擁有讀寫權限
			RandomAccessFile randomAccessFile = new RandomAccessFile("modefied.md","rw");
			FileChannel channel = randomAccessFile.getChannel();
			/*
			* MapMode.READ_WRITE :表示MappedByteBuffer擁有讀寫權限
			* position 0 :表示可以修改的起始位置(數組下標)
			* size 10 :表示從可以修改的下標開始,往后可修改字節的最大大小為10
			* 可以修改范圍的計算公式為:[position,size+position)
			*/
			MappedByteBuffer mappedByteBuffer = channel.map(MapMode.READ_WRITE, 0, 10);
			mappedByteBuffer.put(0, (byte) 'a');
			mappedByteBuffer.put(7, (byte) 'b');
			mappedByteBuffer.put(8, (byte) 'b');
			mappedByteBuffer.put(9, (byte) 'b');
		} catch (FileNotFoundException e) {
			e.printStackTrace();
		} catch (IOException e) {
			e.printStackTrace();
		}
	}
- NIO還支持多個Buffer進行數據的讀寫操作。
Channel(通道)
核心代碼如下
- FileChannel fileChannel = fileInputStream.getChannel(); 獲取輸入流綁定的FileChannel。
- ByteBuffer byteBuffer = ByteBuffer.allocate(1024); 創建buffer
- fileChannel.read(byteBuffer); 通道讀取buffer中的數據。
從核心代碼可以看出,輸入流和輸出流與Channel綁定,而流數據的讀取采用的是Buffer的形式。
代碼示例
/**
	 * FileChannel讀取文件內容
	 */
	public static void fileChannel(){

		File file = new File("/Users/floatcloud/Downloads/java/aaa.txt");
		FileInputStream fileInputStream = null;
		try {
			fileInputStream = new FileInputStream(file);
			FileChannel fileChannel = fileInputStream.getChannel();
			ByteBuffer byteBuffer = ByteBuffer.allocate(1024);
			int read = 0;
			byteBuffer.clear();
			while ((read = fileChannel.read(byteBuffer)) >= 0) {
				System.out.println(new String(byteBuffer.array()));
			}
			fileChannel.close();
		} catch (FileNotFoundException e) {
			e.printStackTrace();
		} catch (IOException e) {
			e.printStackTrace();
		} finally {
			if (fileInputStream != null){
				try {
					fileInputStream.close();
				} catch (IOException e) {
					e.printStackTrace();
				}
			}
		}
	}


	/**
	 * FileChannel向本地文件寫入數據
	 */
	public static void writeFileChannel(){
		File file = new File("/Users/floatcloud/Downloads/java/aaa.txt");
		FileOutputStream fileOutputStream = null;
		Scanner scanner = new Scanner(System.in);
		String line = "";
		String goOn = "y";
		StringBuilder stringBuilder = new StringBuilder();
		while (!"n".equalsIgnoreCase(goOn)){
			System.out.println("請輸入寫入的值:");
			line = scanner.nextLine();
			stringBuilder.append(line);
			System.out.println("是否繼續輸入?停止輸入:輸入n/N,繼續輸入");
			goOn = scanner.nextLine();
		}
		try {
			fileOutputStream = new FileOutputStream(file);
			FileChannel fileChannel = fileOutputStream.getChannel();
			byte[] bytes = stringBuilder.toString().getBytes("UTF-8");
			ByteBuffer byteBuffer = ByteBuffer.allocate(bytes.length);
			byteBuffer.put(bytes);
			byteBuffer.flip();
			fileChannel.write(byteBuffer);
			fileChannel.close();
		} catch (FileNotFoundException e) {
			e.printStackTrace();
		} catch (IOException e) {
			e.printStackTrace();
		} finally {
			if (fileOutputStream != null){
				try {
					fileOutputStream.close();
				} catch (IOException e) {
					e.printStackTrace();
				}
			}
		}
	}


	/**
	 * 使用FileChannel復制文件
	 */
	public static void copyFile(){
		FileOutputStream fileOutputStream = null;
		FileInputStream fileInputStream = null;
		File file = new File("/Users/floatcloud/Downloads/java/aaa.txt");
		File copyFile = new File("copy.md");
		try {
			if (!copyFile.exists()){
				copyFile.createNewFile();
			}
			ByteBuffer byteBuffer = ByteBuffer.allocate(1024);
			fileOutputStream = new FileOutputStream(copyFile);
			fileInputStream = new FileInputStream(file);
			FileChannel inputStreamChannel = fileInputStream.getChannel();
			FileChannel outputStreamChannel = fileOutputStream.getChannel();
			int read = 0;
			do {
				byteBuffer.flip();
				outputStreamChannel.write(byteBuffer);
				// byteBuffer標志位的清空
				byteBuffer.clear();
			} while ((read = inputStreamChannel.read(byteBuffer)) > 0 );
			inputStreamChannel.close();
			outputStreamChannel.close();
		} catch (FileNotFoundException e) {
			e.printStackTrace();
		} catch (IOException e) {
			e.printStackTrace();
		} finally {
			if (fileInputStream != null){
				try {
					fileInputStream.close();
				} catch (IOException e) {
					e.printStackTrace();
				}
			}
			if (fileOutputStream != null){
				try {
					fileOutputStream.close();
				} catch (IOException e) {
					e.printStackTrace();
				}
			}
		}
	}

	/**
	 * 復制照片--通過transferFrom方法進行復制
	 */
	public static void copyPicture(){
		FileInputStream fileInputStream = null;
		FileOutputStream fileOutputStream = null;
		File file = new File("/Users/floatcloud/Downloads/java/WechatIMG16.png");
		File copyFile = new File("WechatIMG16.png");
		try {
			fileInputStream = new FileInputStream(file);
			fileOutputStream = new FileOutputStream(copyFile);
			FileChannel inputStreamChannel = fileInputStream.getChannel();
			FileChannel outputStreamChannel = fileOutputStream.getChannel();
			outputStreamChannel.transferFrom(inputStreamChannel, 0, inputStreamChannel.size());
			inputStreamChannel.close();
			outputStreamChannel.close();
		} catch (FileNotFoundException e) {
			e.printStackTrace();
		} catch (IOException e) {
			e.printStackTrace();
		} finally {
			ioClose(fileInputStream, fileOutputStream);
		}
	}
Selector(選擇器)
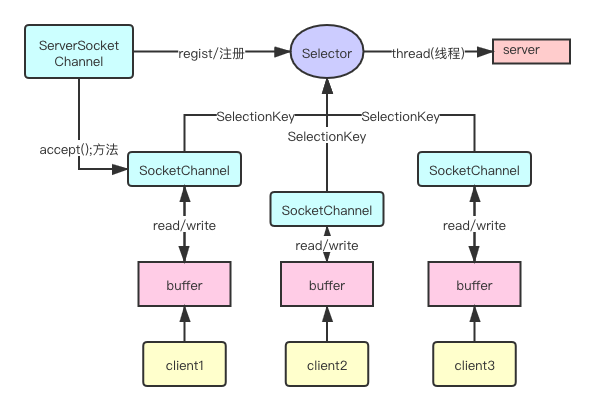
- Chennal注冊到Selector中,并生成SelectionKey,Selector根據SelectionKey來獲取注冊的Chennal以及該Chennal的事件,并根據事件類型執行對應的業務邏輯。
- 實現了一個線程管理多個連接(Chennal)。
- 單線程也避免了因為不同連接而切換線程的消耗(BIO)。
Selector常用方法
- selectNow(); // 非阻塞,立刻獲取所有信息
- select(); // 阻塞,獲取所有返回Selection
- select(long timeout); // 指定時間內返回所有Selection
- wakeup(); // 喚醒阻塞的想成。
示例代碼
package com.floatcloud.netty.utils;

import java.io.IOException;
import java.net.InetSocketAddress;
import java.nio.ByteBuffer;
import java.nio.channels.*;
import java.util.Iterator;
import java.util.Set;

/**
 * @author floatcloud
 */
public class LocalSockerServer {

	/**
	 * 根據nio寫一個服務端,實現非阻塞的網絡傳輸
	 */
	public static void server(){
		try {
			// 1.服務端創建 ServerSocketChannel
			ServerSocketChannel serverSocketChannel = ServerSocketChannel.open();
			// 2.創建selector
			Selector selector = Selector.open();
			// serverSocketChannel監聽的端口6666
			serverSocketChannel.socket().bind(new InetSocketAddress(6666));
			// 設置為非阻塞
			serverSocketChannel.configureBlocking(false);
			// 3.將ServerSocketChannel注冊到selector;事件為SelectionKey.OP_ACCEPT
			serverSocketChannel.register(selector, SelectionKey.OP_ACCEPT);
			// 監聽(輪詢)是否有連接生成
			do {
				// 是否存在連接(通道)
				int selectNum = selector.select(1000);
				if (selectNum == 0){
					System.out.println("無客戶端連接");
					continue;
				}
				// 4.獲取所有的SelectionKey
				Set<SelectionKey> selectionKeys = selector.selectedKeys();
				// 遍歷selectionKeys
				Iterator<SelectionKey> keyIterator = selectionKeys.iterator();
				while (keyIterator.hasNext()){
					// 獲取selectionKey
					SelectionKey selectionKey = keyIterator.next();
					// 新連接(通道)
					if(selectionKey.isAcceptable()){
						// 5.首次:根據ServerSocketChannel獲取對應的SocketChannel
						try {
							SocketChannel accept = serverSocketChannel.accept();
							// 將accept通道設置為不阻塞
							accept.configureBlocking(false);
							// 6.將SocketChannel注冊到Selector
							SelectionKey register = accept.register(selector, SelectionKey.OP_READ, ByteBuffer.allocate(1024));
							System.out.println("啟動的新通道的key為"+ register);
						} catch (IOException e) {
							e.printStackTrace();
						}
					}
					// Chennal:讀取事件
					if(selectionKey.isReadable()) {
						// 7.根據selectionKey反向獲取對應的SocketChannel
						SocketChannel channel = (SocketChannel) selectionKey.channel();
						// 8.根據key獲取對應的buffer
						ByteBuffer byteBuffer = (ByteBuffer) selectionKey.attachment();
						// 9.通道讀取bytebuffer數據
						try {
							channel.read(byteBuffer);
						} catch (IOException e) {
							e.printStackTrace();
						}
						System.out.println("讀取數據讀取成功!" + new String(byteBuffer.array()));
					}
					// 防止多線程并發下,導致使用該selectionKey重復操作
					keyIterator.remove();
				}
			} while (true);
		} catch (IOException e) {
			e.printStackTrace();
		}
	}

	public static void main(String[] args) {
		server();
	}
}
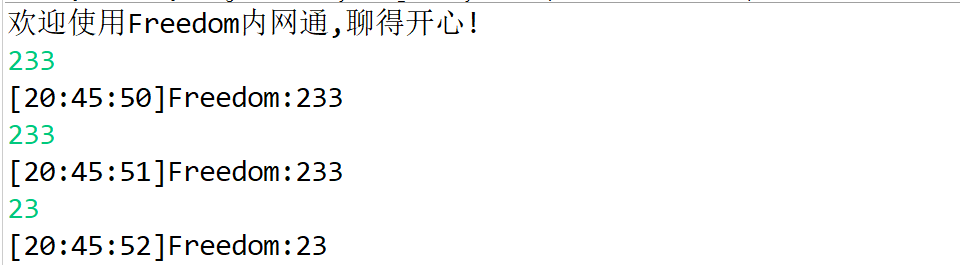
客戶端調用代碼
package com.floatcloud.netty.utils;

import java.io.IOException;
import java.net.InetSocketAddress;
import java.nio.ByteBuffer;
import java.nio.channels.SocketChannel;
import java.nio.charset.Charset;

/**
 * 客戶端調用測試
 * @author floatcloud
 */
public class LocalSocketClient {

	public static void main(String[] args) {
		try {
			SocketChannel socketChannel = SocketChannel.open();
			socketChannel.configureBlocking(false);
			InetSocketAddress inetSocketAddress = new InetSocketAddress("127.0.0.1", 6666);
			if (!socketChannel.connect(inetSocketAddress)){
				while (!socketChannel.finishConnect()) {
					System.out.println("連接中。。。。非阻塞");
				}
			}
			String sendStr = "張三+1111222255";
			ByteBuffer byteBuffer = ByteBuffer.wrap(sendStr.getBytes(Charset.forName("UTF-8")));
			socketChannel.write(byteBuffer);
			// 保持連接,線程在此處停止。
			System.in.read();
		} catch (IOException e) {
			e.printStackTrace();
		}
	}
}
SelectionKey API
屬性
// 事件類型
// 讀操作
public static final int OP_READ = 1 << 0;
// 寫操作
public static final int OP_WRITE = 1 << 2;
// 連接已建成
public static final int OP_CONNECT = 1 << 3;
// 有新的連接生成
public static final int OP_ACCEPT = 1 << 4;
方法
// 獲取與其綁定的SocketChennal
public abstract SelectableChannel channel();
// 獲取與其綁定的Selector
public abstract Selector selector();
// 判斷selectionKey是否有效
public abstract boolean isValid();
// 改變selectionKey的事件
public abstract SelectionKey interestOps(int ops);
// 事件類型為讀操作
public final boolean isReadable() {
    return (readyOps() & OP_READ) != 0;
}
// 事件類型為寫操作
public final boolean isWritable() {
    return (readyOps() & OP_WRITE) != 0;
}
// 事件類型為已連接
public final boolean isConnectable() {
    return (readyOps() & OP_CONNECT) != 0;
}
// 事件類型為新建連接
public final boolean isAcceptable() {
    return (readyOps() & OP_ACCEPT) != 0;
}
ServerSocket API
方法
// 綁定地址、端口
public void bind(SocketAddress endpoint) throws IOException {
        bind(endpoint, 50);
}
// 獲取連接地址信息-SocketAddress
public SocketAddress getLocalSocketAddress() {
    if (!isBound())
        return null;
    return new InetSocketAddress(getInetAddress(), getLocalPort());
}
// 獲取對應的Socket
public Socket accept() throws IOException {
    if (isClosed())
        throw new SocketException("Socket is closed");
    if (!isBound())
        throw new SocketException("Socket is not bound yet");
    Socket s = new Socket((SocketImpl) null);
    implAccept(s);
    return s;
}
SocketChennal API
// 獲取一個SocketChannel
 public static SocketChannel open(SocketAddress remote)
        throws IOException
    {
        SocketChannel sc = open();
        try {
            sc.connect(remote);
        } catch (Throwable x) {
            try {
                sc.close();
            } catch (Throwable suppressed) {
                x.addSuppressed(suppressed);
            }
            throw x;
        }
        assert sc.isConnected();
        return sc;
}
//  連接服務端
public abstract boolean connect(SocketAddress remote) throws IOException;
// 上方法連接失敗后,會調用的方法(結束連接)。
public abstract boolean finishConnect() throws IOException;
// 從通道中讀數據
public abstract int read(ByteBuffer dst) throws IOException;
// 往通道中寫數據
public abstract int write(ByteBuffer src) throws IOException;
// 設置模式:阻塞、非阻塞
public final SelectableChannel configureBlocking(boolean block)
// 向selector中注冊,并設置監聽事件
public final SelectionKey register(Selector sel,int ops,Object att)
throws ClosedChannelException
ServerSocketChennal API
// 得到一個ServerSocketChannel通道
public static ServerSocketChannel open() throws IOException {
        return SelectorProvider.provider().openServerSocketChannel();
}
// AbstractSelectableChannel類中設置是否阻塞、非阻塞模式
public final SelectableChannel configureBlocking(boolean block) throws IOException {
    synchronized (regLock) {
        if (!isOpen())
            throw new ClosedChannelException();
        if (blocking == block)
            return this;
        if (block && haveValidKeys())
            throw new IllegalBlockingModeException();
        implConfigureBlocking(block);
        blocking = block;
    }
    return this;
}
// 向Selector中注冊一個Chennal,并設置其監聽事件
public final SelectionKey register(Selector sel, int ops) throws ClosedChannelException {
    return register(sel, ops, null);
}
// 綁定地址、端口
public final ServerSocketChannel bind(SocketAddress local)
    throws IOException
{
    return bind(local, 0);
}
// 獲取新建連接的通道SocketChannel
public abstract SocketChannel accept() throws IOException;

智能推薦
電腦空間不夠了?教你一個小秒招快速清理 Docker 占用的磁盤空間!
Docker 很占用空間,每當我們運行容器、拉取鏡像、部署應用、構建自己的鏡像時,我們的磁盤空間會被大量占用。 如果你也被這個問題所困擾,咱們就一起看一下 Docker 是如何使用磁盤空間的,以及如何回收。 docker 占用的空間可以通過下面的命令查看: TYPE 列出了docker 使用磁盤的 4 種類型: Images:所有鏡像占用的空間,包括拉取下來的鏡像,和本地構建的。 Con...

requests實現全自動PPT模板
http://www.1ppt.com/moban/ 可以免費的下載PPT模板,當然如果要人工一個個下,還是挺麻煩的,我們可以利用requests輕松下載 訪問這個主頁,我們可以看到下面的樣式 點每一個PPT模板的圖片,我們可以進入到詳細的信息頁面,翻到下面,我們可以看到對應的下載地址 點擊這個下載的按鈕,我們便可以下載對應的PPT壓縮包 那我們就開始做吧 首先,查看網頁的源代碼,我們可以看到每一...


Linux C系統編程-線程互斥鎖(四)
互斥鎖 互斥鎖也是屬于線程之間處理同步互斥方式,有上鎖/解鎖兩種狀態。 互斥鎖函數接口 1)初始化互斥鎖 pthread_mutex_init() man 3 pthread_mutex_init (找不到的情況下首先 sudo apt-get install glibc-doc sudo apt-get install manpages-posix-dev) 動態初始化 int pthread_...

統計學習方法 - 樸素貝葉斯
引入問題:一機器在良好狀態生產合格產品幾率是 90%,在故障狀態生產合格產品幾率是 30%,機器良好的概率是 75%。若一日第一件產品是合格品,那么此日機器良好的概率是多少。 貝葉斯模型 生成模型與判別模型 判別模型,即要判斷這個東西到底是哪一類,也就是要求y,那就用給定的x去預測。 生成模型,是要生成一個模型,那就是誰根據什么生成了模型,誰就是類別y,根據的內容就是x 以上述例子,判斷一個生產出...
猜你喜歡
styled-components —— React 中的 CSS 最佳實踐
https://zhuanlan.zhihu.com/p/29344146 Styled-components 是目前 React 樣式方案中最受關注的一種,它既具備了 css-in-js 的模塊化與參數化優點,又完全使用CSS的書寫習慣,不會引起額外的學習成本。本文是 styled-components 作者之一 Max Stoiber 所寫,首先總結了前端組件化樣式中的最佳實踐原則,然后在此基...
19.vue中封裝echarts組件
19.vue中封裝echarts組件 1.效果圖 2.echarts組件 3.使用組件 按照組件格式整理好數據格式 傳入組件 home.vue 4.接口返回數據格式...
【一只蒟蒻的刷題歷程】【藍橋杯】歷屆試題 九宮重排 (八數碼問題:BFS+集合set)
資源限制 時間限制:1.0s 內存限制:256.0MB 問題描述 如下面第一個圖的九宮格中,放著 1~8 的數字卡片,還有一個格子空著。與空格子相鄰的格子中的卡片可以移動到空格中。經過若干次移動,可以形成第二個圖所示的局面。 我們把第一個圖的局面記為:12345678. 把第二個圖的局面記為:123.46758 顯然是按從上到下,從左到右的順序記錄數字,空格記為句點。 本題目的任務是已知九宮的初態...