python學習之web框架--Django 002
Django連接mysql數據庫
涉及的內容有:1,創建app,
2,注冊app
3, 逆向生成models.py
4,增刪改查數據
5,結合前端提交數據保存到數據庫
連接數據庫:
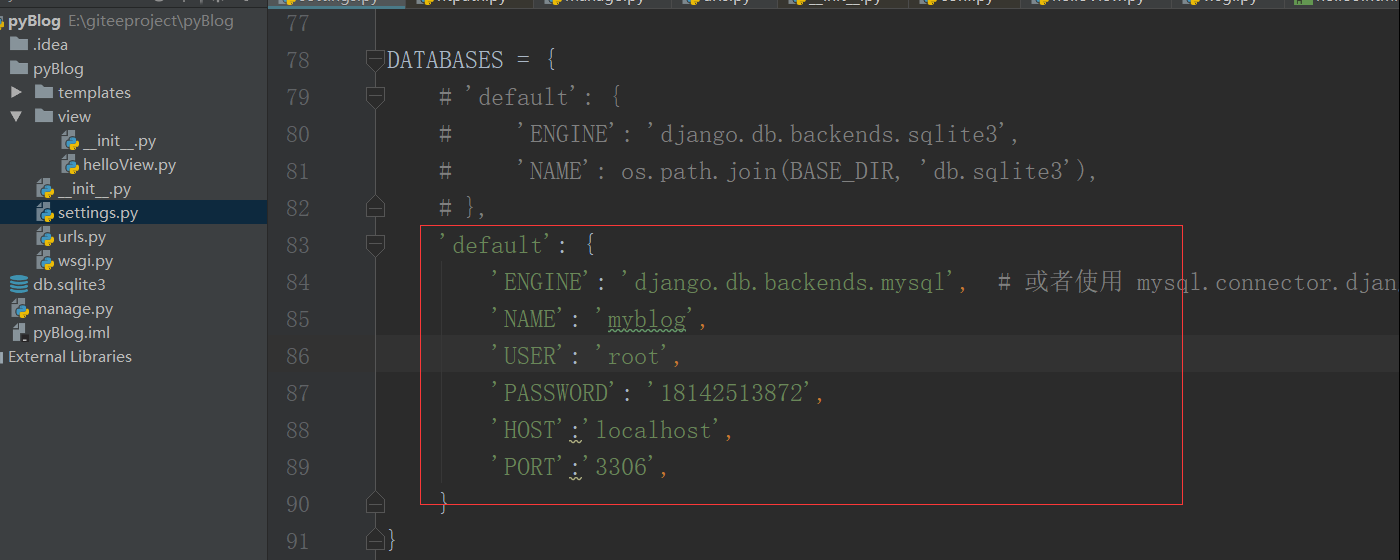
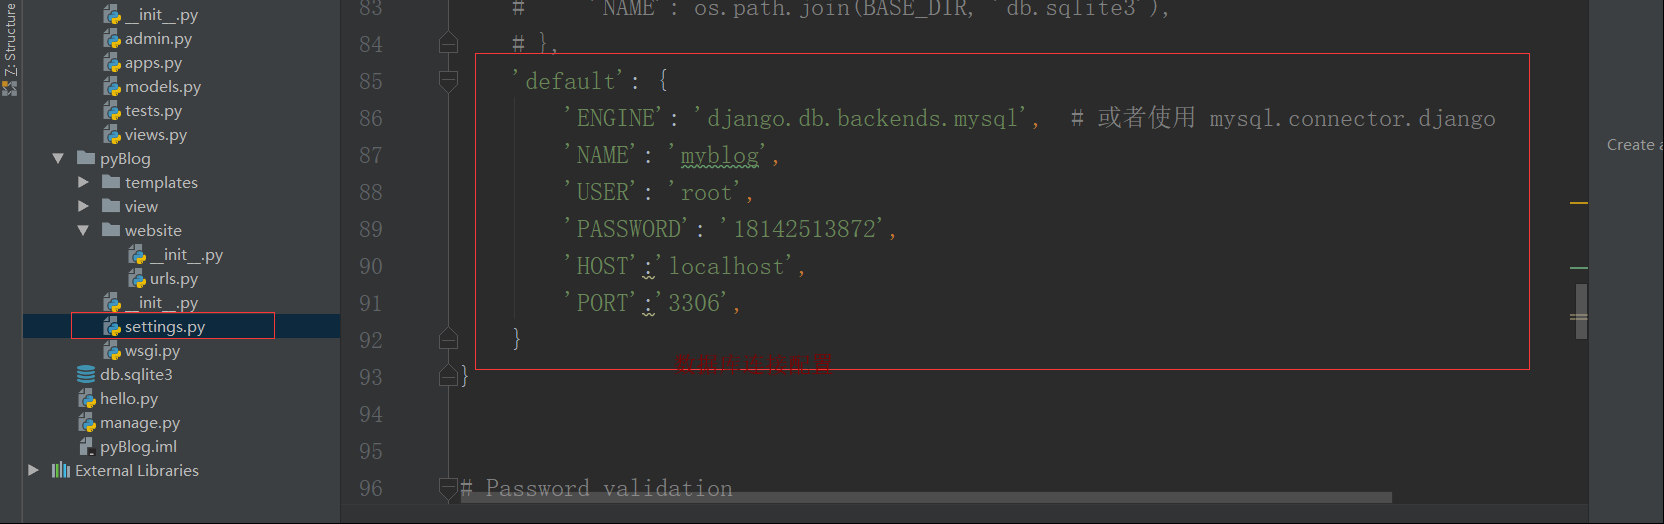
步驟1,settings.py設置數據庫連接信息
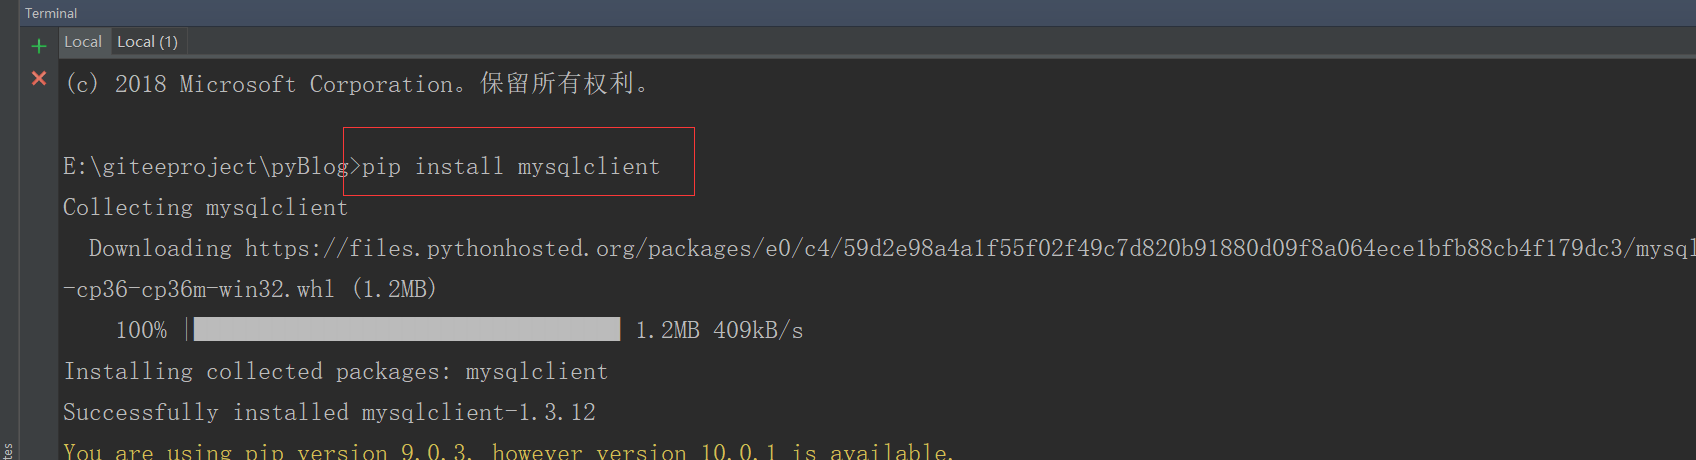
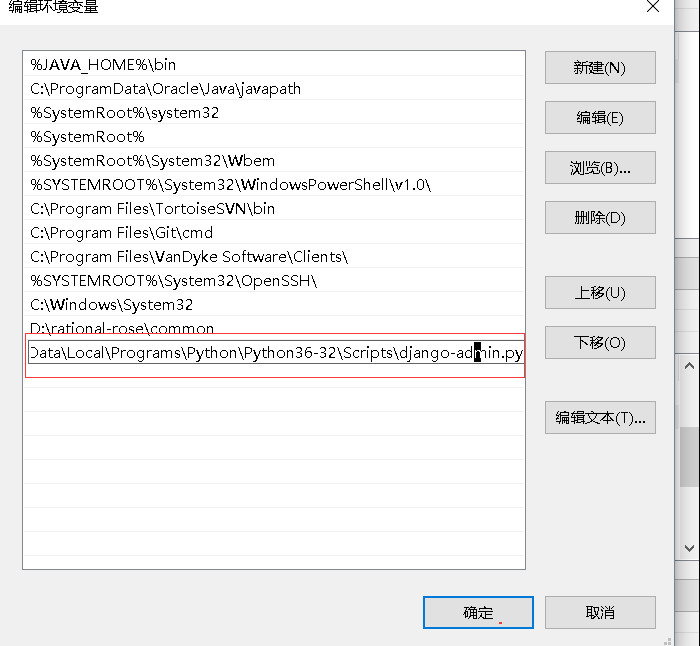
步驟2,安裝mysqlclient (mysql客戶端)
pip install mysqlclient
步驟3,啟動項目

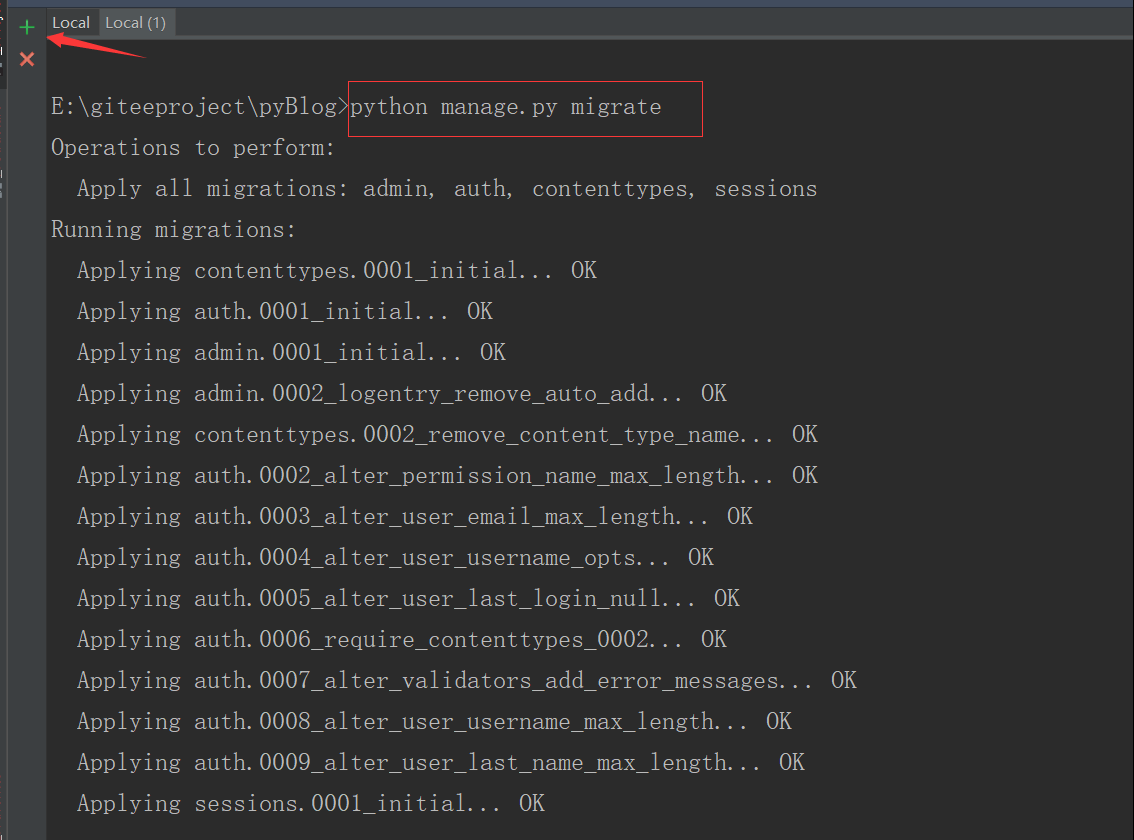
到現在,啟動程序不報錯,接下來建立數據表與實體(models.py中的類)的聯系
步驟4,新建app,名字為Models

idea terminal 執行:python manage.py startapp Models
或者:

效果:

步驟5:通過數據庫逆向獲得models.py需要的實體類代碼

在idea terminal 執行:python manage.py inspectdb
則會將生成的實體類代碼輸出到控制臺
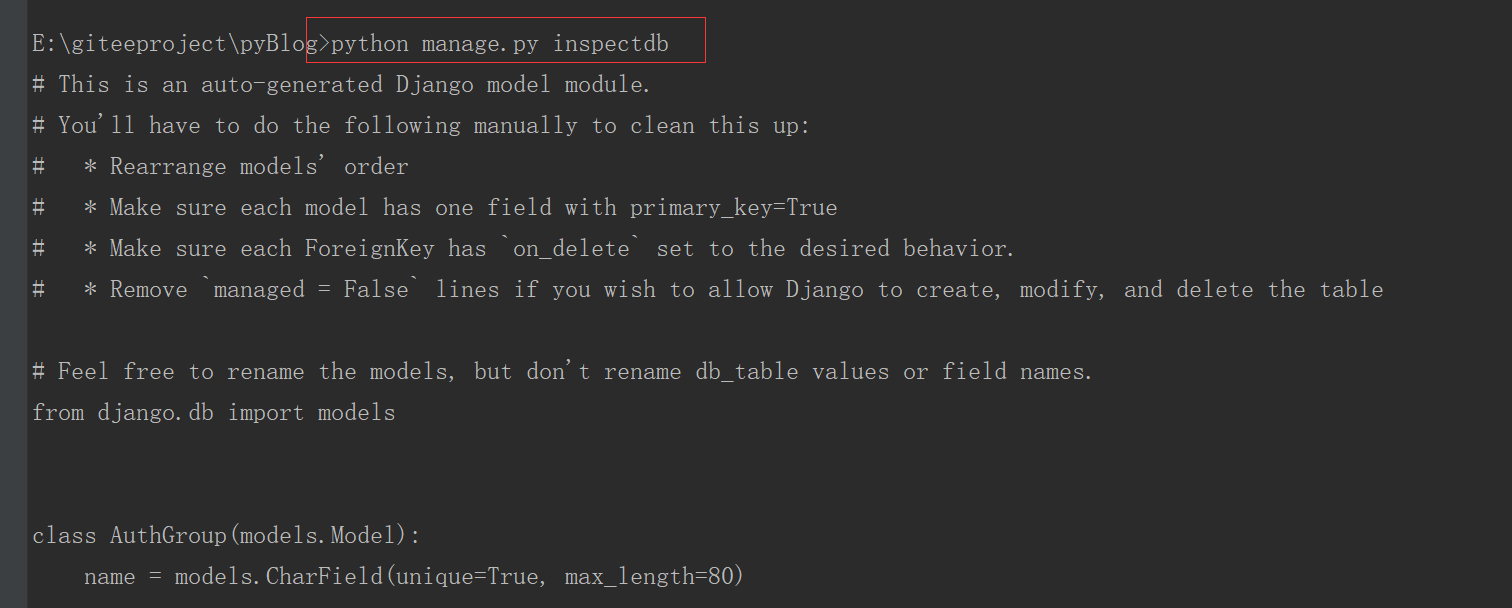

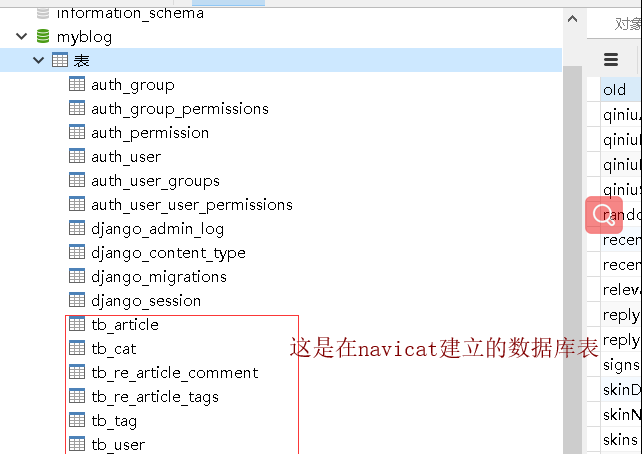
將其復制拷到models.py中:(tb_* 是我在navicat里面生成的表,其余的是自動生成的,似乎是用來記錄其他信息的,不需要管)
# Create your models here.
# 類名對應表名,如果不指定id,會自動在數據表生成主鍵
# This is an auto-generated Django model module.
# You'll have to do the following manually to clean this up:
#   * Rearrange models' order
#   * Make sure each model has one field with primary_key=True
#   * Make sure each ForeignKey has `on_delete` set to the desired behavior.
#   * Remove `managed = False` lines if you wish to allow Django to create, modify, and delete the table

# Feel free to rename the models, but don't rename db_table values or field names.
from django.db import models


class AuthGroup(models.Model):
    name = models.CharField(unique=True, max_length=80)

    class Meta:
        managed = False
        db_table = 'auth_group'


class AuthGroupPermissions(models.Model):
    group = models.ForeignKey(AuthGroup, models.DO_NOTHING)
    permission = models.ForeignKey('AuthPermission', models.DO_NOTHING)

    class Meta:
        managed = False
        db_table = 'auth_group_permissions'
        unique_together = (('group', 'permission'),)


class AuthPermission(models.Model):
    name = models.CharField(max_length=255)
    content_type = models.ForeignKey('DjangoContentType', models.DO_NOTHING)
    codename = models.CharField(max_length=100)

    class Meta:
        managed = False
        db_table = 'auth_permission'
        unique_together = (('content_type', 'codename'),)


class AuthUser(models.Model):
    password = models.CharField(max_length=128)
    last_login = models.DateTimeField(blank=True, null=True)
    is_superuser = models.IntegerField()
    username = models.CharField(unique=True, max_length=150)
    first_name = models.CharField(max_length=30)
    last_name = models.CharField(max_length=150)
    email = models.CharField(max_length=254)
    is_staff = models.IntegerField()
    is_active = models.IntegerField()
    date_joined = models.DateTimeField()

    class Meta:
        managed = False
        db_table = 'auth_user'


class AuthUserGroups(models.Model):
    user = models.ForeignKey(AuthUser, models.DO_NOTHING)
    group = models.ForeignKey(AuthGroup, models.DO_NOTHING)

    class Meta:
        managed = False
        db_table = 'auth_user_groups'
        unique_together = (('user', 'group'),)


class AuthUserUserPermissions(models.Model):
    user = models.ForeignKey(AuthUser, models.DO_NOTHING)
    permission = models.ForeignKey(AuthPermission, models.DO_NOTHING)

    class Meta:
        managed = False
        db_table = 'auth_user_user_permissions'
        unique_together = (('user', 'permission'),)


class DjangoAdminLog(models.Model):
    action_time = models.DateTimeField()
    object_id = models.TextField(blank=True, null=True)
    object_repr = models.CharField(max_length=200)
    action_flag = models.PositiveSmallIntegerField()
    change_message = models.TextField()
    content_type = models.ForeignKey('DjangoContentType', models.DO_NOTHING, blank=True, null=True)
    user = models.ForeignKey(AuthUser, models.DO_NOTHING)

    class Meta:
        managed = False
        db_table = 'django_admin_log'


class DjangoContentType(models.Model):
    app_label = models.CharField(max_length=100)
    model = models.CharField(max_length=100)

    class Meta:
        managed = False
        db_table = 'django_content_type'
        unique_together = (('app_label', 'model'),)


class DjangoMigrations(models.Model):
    app = models.CharField(max_length=255)
    name = models.CharField(max_length=255)
    applied = models.DateTimeField()

    class Meta:
        managed = False
        db_table = 'django_migrations'


class DjangoSession(models.Model):
    session_key = models.CharField(primary_key=True, max_length=40)
    session_data = models.TextField()
    expire_date = models.DateTimeField()

    class Meta:
        managed = False
        db_table = 'django_session'


class TbArticle(models.Model):
    id = models.IntegerField(primary_key=True)
    title = models.CharField(max_length=255, blank=True, null=True)
    content = models.CharField(max_length=255, blank=True, null=True)
    publish_time = models.DateTimeField(blank=True, null=True)
    update_time = models.DateTimeField(blank=True, null=True)
    read_number = models.IntegerField(blank=True, null=True)
    cat = models.ForeignKey('TbCat', models.DO_NOTHING, blank=True, null=True)

    class Meta:
        managed = False
        db_table = 'tb_article'


class TbCat(models.Model):
    id = models.IntegerField(primary_key=True)
    cat_name = models.CharField(max_length=255, blank=True, null=True)

    class Meta:
        managed = False
        db_table = 'tb_cat'


class TbReArticleComment(models.Model):
    id = models.IntegerField(primary_key=True)
    article = models.ForeignKey(TbArticle, models.DO_NOTHING, blank=True, null=True)
    comment = models.CharField(max_length=255, blank=True, null=True)
    email = models.CharField(max_length=255, blank=True, null=True)
    blog_address = models.CharField(max_length=255, blank=True, null=True)
    name = models.CharField(max_length=255, blank=True, null=True)
    update_time = models.DateTimeField(blank=True, null=True)

    class Meta:
        managed = False
        db_table = 'tb_re_article_comment'


class TbReArticleTags(models.Model):
    id = models.IntegerField(primary_key=True)
    article = models.ForeignKey(TbArticle, models.DO_NOTHING, blank=True, null=True)
    tag = models.ForeignKey('TbTag', models.DO_NOTHING, blank=True, null=True)

    class Meta:
        managed = False
        db_table = 'tb_re_article_tags'


class TbTag(models.Model):
    id = models.IntegerField(primary_key=True)
    tag_name = models.CharField(max_length=20, blank=True, null=True)
    state = models.CharField(max_length=255, blank=True, null=True)

    class Meta:
        managed = False
        db_table = 'tb_tag'


class TbUser(models.Model):
    id = models.IntegerField(primary_key=True)
    name = models.CharField(max_length=255, blank=True, null=True)
    password = models.CharField(max_length=255, blank=True, null=True)
    signature = models.CharField(max_length=255, blank=True, null=True)
    login_id = models.CharField(max_length=20, blank=True, null=True)

    class Meta:
        managed = False
        db_table = 'tb_user'
測試增刪改查操作:
以save為例:
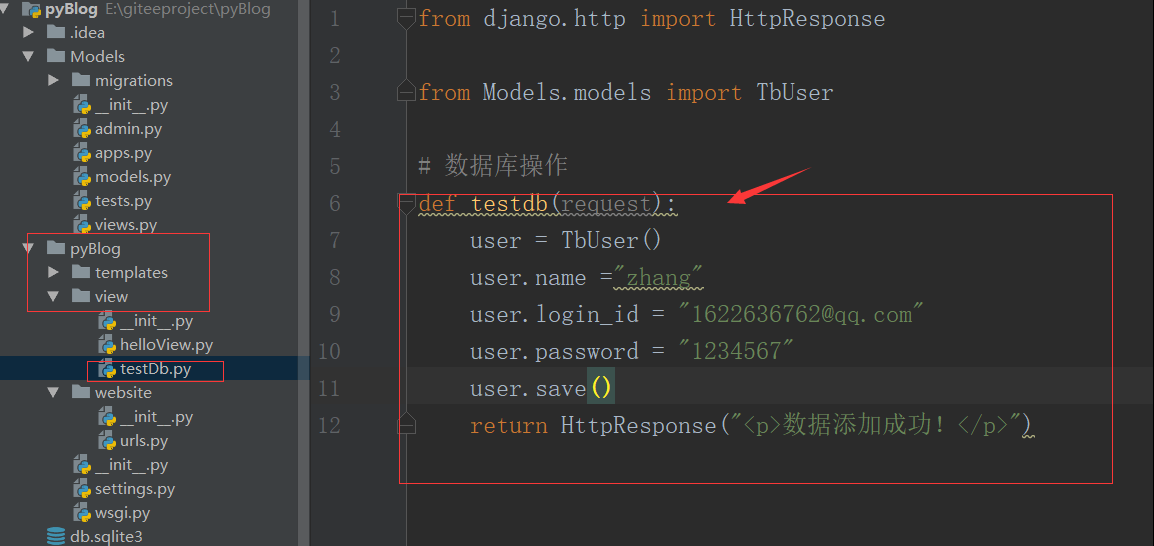
testDb.py代碼
from django.http import HttpResponse
from Models.models import TbUser
# 數據庫操作
def testdb(request):
user = TbUser()
user.name ="zhang"
user.login_id = "[email protected]"
user.password = "1234567"
user.save()
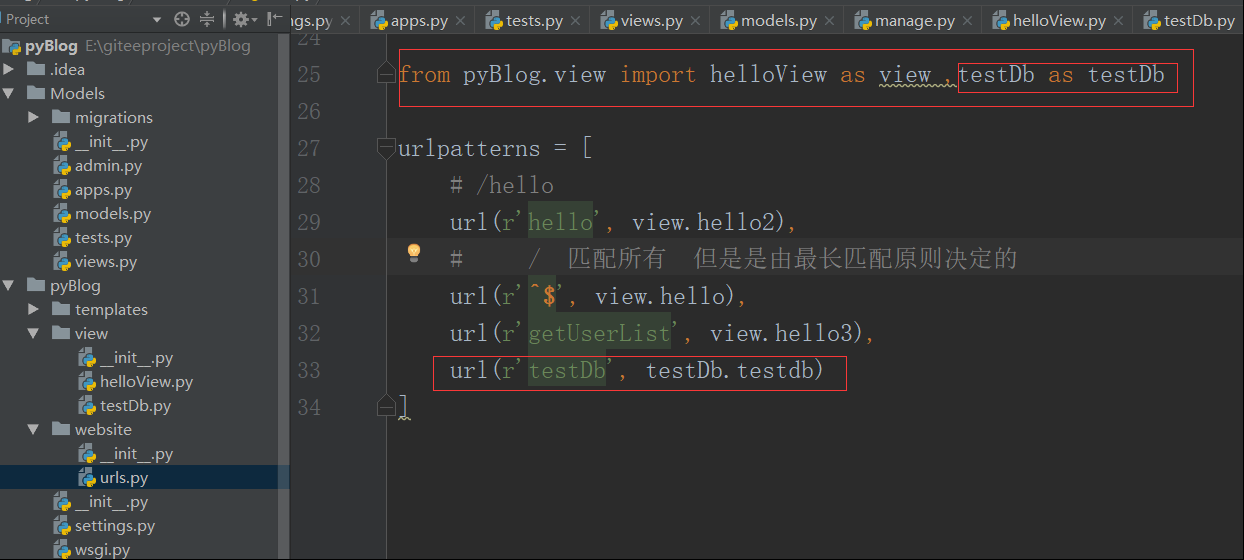
return HttpResponse("<p>數據添加成功!</p>")urls.py添加url攔截(相當于controller)
啟動項目:python manage.py runserver 0.0.0.0:8080
瀏覽器輸入url測試:

查看數據庫,刷新

數據查詢,很方便,
比如:查詢id>10的所有user
數據庫操作搞定!
有些時候出現新增的url攔截不起作用,需要手動重新啟動一下!(一般是會自動更新的)
備注:主鍵自增:
id = models.AutoField(primary_key=True)
url傳參數:注意這里是path了,不再是url
urlpatterns = [
    # /hello
    url(r'hello', view.hello2),
    #     /  匹配所有  但是是由最長匹配原則決定的
    url(r'^$', view.hello),
    url(r'getUserList', view.hello3),
    # url(r'testDb', testDb.testdb),
    url(r'testDb2', testDb.testdb2),
    url(r'testDb3', testDb.testdb3),
path('articles/<int:page>', view.hello1),#注意:<int:page>是將url中的articles/10的10轉為int存放到變量page中,對應的view.hello1方法應該是這樣的,形參中有名為page的]

效果:

官方示例:
urlpatterns = [
    path('articles/2003/', views.special_case_2003),
    path('articles/<int:year>/', views.year_archive),
    path('articles/<int:year>/<int:month>/', views.month_archive),
    path('articles/<int:year>/<int:month>/<slug:slug>/', views.article_detail),
]
Notes:
- To capture a value from the URL, use angle brackets.
- Captured values can optionally include a converter type. For example, use
<int:name>to capture an integer parameter. If a converter isn’t included, any string, excluding a/character, is matched. - There’s no need to add a leading slash, because every URL has that. For example, it’s
articles, not/articles.
Example requests:
- A request to
/articles/2005/03/would match the third entry in the list. Django would call the functionviews.month_archive(request, year=2005, month=3). /articles/2003/would match the first pattern in the list, not the second one, because the patterns are tested in order, and the first one is the first test to pass. Feel free to exploit the ordering to insert special cases like this. Here, Django would call the functionviews.special_case_2003(request)/articles/2003would not match any of these patterns, because each pattern requires that the URL end with a slash./articles/2003/03/building-a-django-site/would match the final pattern. Django would call the functionviews.article_detail(request, year=2003, month=3, slug="building-a-django-site")
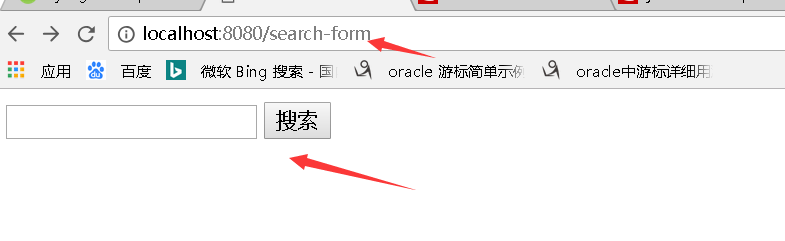
獲取表單提交信息:searchform.html
表單:
<!DOCTYPE html>
<html lang="en">
<head>
    <meta charset="UTF-8">
    <title>搜索表單</title>
</head>
<body>
<body>
<form action="/articles/search" method="get">
    <input type="text" name="q">
    <input type="submit" value="搜索">
</form>
</body>
</body>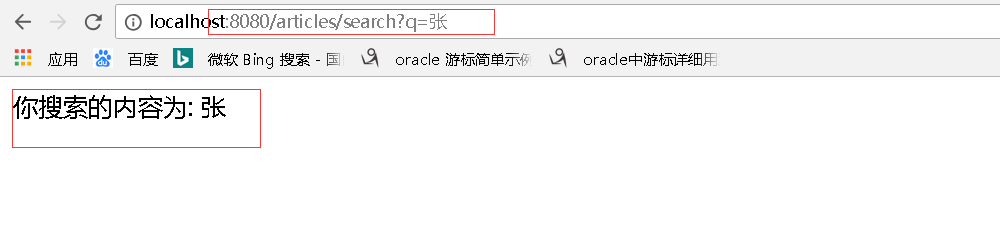
</html>from django.http import HttpResponse
from django.shortcuts import render_to_response
#搜索
# 跳轉到搜索表單頁面
def openSearchForm(request):
return render_to_response('searchform.html')
# 響應搜索請求
def searchArticleByTag(request):
request.encoding = 'utf-8'
if 'q' in request.GET:
message = '你搜索的內容為: ' + request.GET['q']
else:
message = '你提交了空表單'
print(message)
return HttpResponse(message)urls.py配置:
url(r'^search-form$', search.openSearchForm), path('articles/search', search.searchArticleByTag),效果:
智能推薦
CrackMe160 學習筆記 之 002
前言 打開程序,是一個很簡單的界面。看來是要我們根據用戶名寫出對應的***。 如圖。 分析 輸入任意字符,搜索字符串 "You get Wrong" "Try Again" , 找到判斷關鍵跳轉的地方。 可以得知,根據si的值來判斷是否注冊成功。繼續向上尋找。 通過比較字符串是否相等確定si的值。 將計算得出的字符串與AKA-拼接得到最終的字符串。 字符串計...


freemarker + ItextRender 根據模板生成PDF文件
1. 制作模板 2. 獲取模板,并將所獲取的數據加載生成html文件 2. 生成PDF文件 其中由兩個地方需要注意,都是關于獲取文件路徑的問題,由于項目部署的時候是打包成jar包形式,所以在開發過程中時直接安照傳統的獲取方法沒有一點文件,但是當打包后部署,總是出錯。于是參考網上文章,先將文件讀出來到項目的臨時目錄下,然后再按正常方式加載該臨時文件; 還有一個問題至今沒有解決,就是關于生成PDF文件...
電腦空間不夠了?教你一個小秒招快速清理 Docker 占用的磁盤空間!
Docker 很占用空間,每當我們運行容器、拉取鏡像、部署應用、構建自己的鏡像時,我們的磁盤空間會被大量占用。 如果你也被這個問題所困擾,咱們就一起看一下 Docker 是如何使用磁盤空間的,以及如何回收。 docker 占用的空間可以通過下面的命令查看: TYPE 列出了docker 使用磁盤的 4 種類型: Images:所有鏡像占用的空間,包括拉取下來的鏡像,和本地構建的。 Con...

requests實現全自動PPT模板
http://www.1ppt.com/moban/ 可以免費的下載PPT模板,當然如果要人工一個個下,還是挺麻煩的,我們可以利用requests輕松下載 訪問這個主頁,我們可以看到下面的樣式 點每一個PPT模板的圖片,我們可以進入到詳細的信息頁面,翻到下面,我們可以看到對應的下載地址 點擊這個下載的按鈕,我們便可以下載對應的PPT壓縮包 那我們就開始做吧 首先,查看網頁的源代碼,我們可以看到每一...
猜你喜歡


Linux C系統編程-線程互斥鎖(四)
互斥鎖 互斥鎖也是屬于線程之間處理同步互斥方式,有上鎖/解鎖兩種狀態。 互斥鎖函數接口 1)初始化互斥鎖 pthread_mutex_init() man 3 pthread_mutex_init (找不到的情況下首先 sudo apt-get install glibc-doc sudo apt-get install manpages-posix-dev) 動態初始化 int pthread_...

統計學習方法 - 樸素貝葉斯
引入問題:一機器在良好狀態生產合格產品幾率是 90%,在故障狀態生產合格產品幾率是 30%,機器良好的概率是 75%。若一日第一件產品是合格品,那么此日機器良好的概率是多少。 貝葉斯模型 生成模型與判別模型 判別模型,即要判斷這個東西到底是哪一類,也就是要求y,那就用給定的x去預測。 生成模型,是要生成一個模型,那就是誰根據什么生成了模型,誰就是類別y,根據的內容就是x 以上述例子,判斷一個生產出...
styled-components —— React 中的 CSS 最佳實踐
https://zhuanlan.zhihu.com/p/29344146 Styled-components 是目前 React 樣式方案中最受關注的一種,它既具備了 css-in-js 的模塊化與參數化優點,又完全使用CSS的書寫習慣,不會引起額外的學習成本。本文是 styled-components 作者之一 Max Stoiber 所寫,首先總結了前端組件化樣式中的最佳實踐原則,然后在此基...