Android組件Content Provider
標簽: android開發基本 Content Provider
ContentResolver的基本用法
對于每一個應用程序來說,如果想要訪問內容提供器中共享的數據,就一定要借助Content- Resolver 類,可以通過 Context 中的 getContentResolver() 方法獲取到該類的實例。 Content- Resolver中提供了一系列的方法用于對數據進行CRUD操作,其中insert()方法用于添加數據, update()方法用于更新數據,delete()方法用于刪除數據,query()方法用于查詢數據。有沒 有似曾相識的感覺?沒錯,SQLiteDatabase中也是使用這幾個方法來進行CRUD操作的,只不過 它們在方法參數上稍微有一些區別。
不同于SQLiteDatabase,ContentResolver中的增刪改查方法都是不接收表名參數的,而是使 用一個Uri參數代替,這個參數被稱為內容URI。內容URI給內容提供器中的數據建立了唯一 標識符,它主要由兩部分組成:authority和path。authority是用于對不同的應用程序做區分的, 一般為了避免沖突,都會采用程序包名的方式來進行命名。比如某個程序的包名是com.example. app,那么該程序對應的authority就可以命名為com.example.app. provider。path則是用于對同一 應用程序中不同的表做區分的,通常都會添加到authority的后面。比如某個程序的數據庫里存在 兩張表:tablel和table2,這時就可以將path分別命名為/tablel和/table2,然后把authority和path 進行組合,內容 URI 就變成了 com.example.app.provider/tablel 和 com.example.app.provider/table2。
不過,目前還很難辨認出這兩個字符串就是兩個內容URI,我們還需要在字符串的頭部加上協議
聲明。因此,內容URI最標準的格式寫法如下:
content://com.example.app.provider/tablel1
content://com.example.app.provider/table2
有沒有發現,內容URI可以非常清楚地表達出我們想要訪問哪個程序中哪張表里的數據。 也正是因此,ContentResolver中的增刪改查方法才都接收Uri對象作為參數,因為如果使用表名 的話,系統將無法得知我們期望訪問的是哪個應用程序里的表。
在得到了內容URI字符串之后,我們還需要將它解析成Uri對象方可以作為參數傳人。解 析的方法也相當簡單,代碼如下所示:
Uri uri = Uri.parse("content://com.example.app.provider/table1")
只需要調用Uri.parse方法,就可以將內容URI字符串解析成Uri對象了。
現在我們就可以使用這個Uri對象來查詢tablet表中的數據了,代碼如下所示:
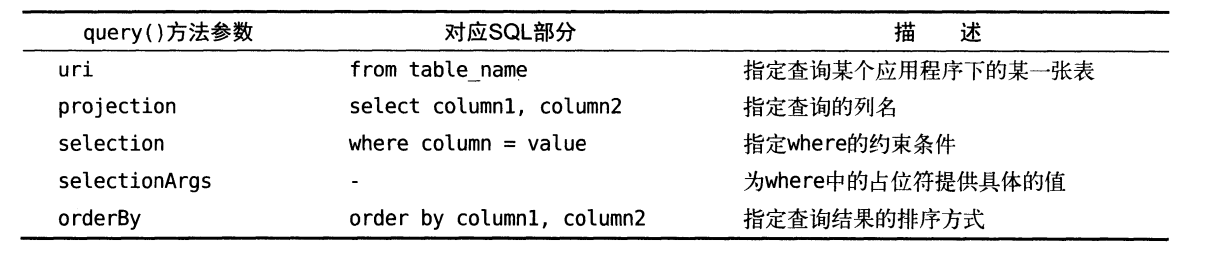
Cursor cursor = getContentResolver().query(
uri,
projection,
selection,
selectionArgs,
sortOrder);
這些參數和SQLiteDatabase中query()方法里的參數很像,但總體來說要簡單一些,畢竟這是在訪問其他程序中的數據,沒必要構建過于復雜的查詢語句。下表對使用到的這部分參數進行了詳細的解釋。
查詢完成后返間的仍然是一個Cursor對象,這時我們就可以將數據從Cursor對象中逐個讀取出來了。讀取的思路仍然是通過移動游標的位置來遍歷Cursor的所有行,然后再取出每一行中相應列的數據,代碼如下所示:
if (cursor != null) {
while (cursor.moveToNext()) {
String column1 = cursor.getString(cursor.getColumnIndex{"column1"));
int column2 = cursor.getInt(cursor.getColumnIndex("column2"));
}
cursor.close();
}
掌握了最難的查詢操作,剩下的增加、修改、刪除操作就更不在話下了。我們先來看看如何向table1表中添加一條數據,代碼如下所示:
ContentValues values = new ContentValues();
values.put("column1", ''text");
values.put("column2", 1);
getContentResolver().insert(uri, values);
可以看到,仍然是將待添加的數據組裝到ContentValues中,然后調用ContentResolver的insert ()方法,將Uri和ContentValues作為參數傳人即可。
現在如果我們想要更新這條新添加的數據,把column1的值清空,可以借助ContentResolver的update()方法實現,代碼如下所示:
ContentValues values = new ContentValues();
values.put("column1","");
getContentResolver(),update(uri, values, "column1 = ? and column2 = ?",new String[] {"text","1"});
注意上述代碼使用了 selection和selectionArgs參數來對想要更新的數據進行約束,以防止所有的行都會受影響。
最后,可以調用ContentResolver的delete()方法將這條數據刪除掉,代碼如下所示:
getContentResolver().delete(uri, "column2 = ?", new String[] { "1" });
到這為止,我們就把ContentResolver中的增刪改查方法全部學完了。
創建自己的內容提供器(實現跨程序數據共享)
新建DatabaseTest項目
創建MyDatabaseHelper 繼承SQLiteOpenHelperpublic class MyDatabaseHelper extends SQLiteOpenHelper {
public static final String CREATE_BOOK = "create table Book("
+ "id integer primary key autoincrement,"
+ "author text,"
+ "price real,"
+ "pages integer,"
+ "name text)";
private Context mContext;
public MyDatabaseHelper(Context context, String name, SQLiteDatabase.CursorFactory factory, int version) {
super(context, name, factory, version);
mContext = context;
}
@Override
public void onCreate(SQLiteDatabase db) {
db.execSQL(CREATE_BOOK);
}
@Override
public void onUpgrade(SQLiteDatabase db, int oldVersion, int newVersion) {
}
}
創建DatabaseProvider 繼承ContentProvider
public class DatabaseProvider extends ContentProvider {
    public static final int BOOK_DIR = 0;
    public static final int BOOK_ITEM = 1;
    public static final int CATEGORY_DIR = 2;
    public static final int CATEGORY_ITEM = 3;

    public static final String AUTHORITY = "com.zjsos.www.databasetest.provider";

    private static UriMatcher uriMatcher;

    private MyDatabaseHelper dbHepler;

    static {
        uriMatcher = new UriMatcher(UriMatcher.NO_MATCH);
        uriMatcher.addURI(AUTHORITY, "book", BOOK_DIR);
        uriMatcher.addURI(AUTHORITY, "book/#", BOOK_ITEM);
        uriMatcher.addURI(AUTHORITY, "category", CATEGORY_DIR);
        uriMatcher.addURI(AUTHORITY, "category/#", CATEGORY_ITEM);
    }

    @Override
    public boolean onCreate() {
        dbHepler = new MyDatabaseHelper(getContext(), "BookStore.db", null, 2);
        return true;
    }

    @Nullable
    @Override
    public Cursor query(@NonNull Uri uri, @Nullable String[] projection, @Nullable String selection, @Nullable String[] selectionArgs, @Nullable String sortOrder) {
        SQLiteDatabase db = dbHepler.getWritableDatabase();
        Cursor cursor = null;
        switch (uriMatcher.match(uri)) {
            case BOOK_DIR:
                cursor = db.query("Book", projection, selection, selectionArgs, null, null, sortOrder);
                break;
            case BOOK_ITEM:
                String bookId = uri.getPathSegments().get(1);
                cursor = db.query("Book", projection, "id=?", new String[]{bookId}, null, null, sortOrder);
                break;
            case CATEGORY_DIR:
                cursor = db.query("Category", projection, selection, selectionArgs, null, null, sortOrder);
                break;
            case CATEGORY_ITEM:
                String categoryId = uri.getPathSegments().get(1);
                cursor = db.query("Category", projection, "id=?", new String[]{categoryId}, null, null, sortOrder);
                break;
            default:
                break;
        }
        return cursor;
    }

    @Nullable
    @Override
    public Uri insert(@NonNull Uri uri, @Nullable ContentValues values) {
        SQLiteDatabase db = dbHepler.getWritableDatabase();
        Uri uriReturn = null;
        switch (uriMatcher.match(uri)) {
            case BOOK_DIR:
            case BOOK_ITEM:
                long newBookId = db.insert("Book", null, values);
                uriReturn = Uri.parse("content://" + AUTHORITY + "/book/" + newBookId);
                break;
            case CATEGORY_DIR:
            case CATEGORY_ITEM:
                long newCategoryId = db.insert("Category", null, values);
                uriReturn = Uri.parse("content://" + AUTHORITY + "/category/" + newCategoryId);
                break;
            default:
                break;
        }
        return uriReturn;
    }


    @Override
    public int update(@NonNull Uri uri, @Nullable ContentValues values, @Nullable String selection, @Nullable String[] selectionArgs) {
        //更 新 教 據
        SQLiteDatabase db = dbHepler.getWritableDatabase();
        int updatedRows = 0;
        switch (uriMatcher.match(uri)) {
            case BOOK_DIR:
                updatedRows = db.update("Book", values, selection, selectionArgs);
                break;
            case BOOK_ITEM:
                String bookId = uri.getPathSegments().get(1);
                updatedRows = db.update("Book", values, "id = ?", new String[]{bookId});
                break;
            case CATEGORY_DIR:
                updatedRows = db.update("Category", values, selection, selectionArgs);
                break;
            case CATEGORY_ITEM:
                String categoryId = uri.getPathSegments().get(1);
                updatedRows = db.update("Category", values, "id = ?", new String[]{categoryId});
                break;
            default:
                break;
        }
        return updatedRows;
    }

    @Override
    public int delete(@NonNull Uri uri, @Nullable String selection, @Nullable String[]
            selectionArgs) {
        //刪除數據
        SQLiteDatabase db = dbHepler.getWritableDatabase();
        int deletedRow = 0;
        switch (uriMatcher.match(uri)) {
            case BOOK_DIR:
                deletedRow = db.delete("Book", selection, selectionArgs);
                break;
            case BOOK_ITEM:
                String bookId = uri.getPathSegments().get(1);
                deletedRow = db.delete("Book", "id =?", new String[]{bookId});
                break;
            case CATEGORY_DIR:
                deletedRow = db.delete("Category", selection, selectionArgs);
                break;
            case CATEGORY_ITEM:
                String categoryId = uri.getPathSegments().get(1);
                deletedRow = db.delete("Category", "id =?", new String[]{categoryId});
                break;
            default:
                break;
        }
        return deletedRow;
    }


    @Override
    public String getType(Uri uri) {
        switch (uriMatcher.match(uri)) {
            case BOOK_DIR:
                return "vnd.android.cursor.dir/vnd.com.example.databasetest.provider.book";
            case BOOK_ITEM:
                return "vnd.android.cursor.item/vnd.com.example.databasetest.provider.book";
            case CATEGORY_DIR:
                return "vnd.android.cursor.dir/vnd.com.example.databasetest.provider.category";
            case CATEGORY_ITEM:
                return "vnd.android.cursor.item/vnd.com.example.databasetest.provider.category";
        }
        return null;
    }
}
getType ( )說明
根據傳入的內容 URI 來返回相應的 MIME 類型。
可以看到,兒乎每一個方法都會帶有 uri 這個參數,這個參數也正是調用 ContentResolver 的增刪改查方法時傳遞過來的。而現在,我們需要對傳人的 Uri 參數進行解析,從中分析出調用方期望訪問的表和數據。
回顧一下,一個標準的內容 URI 寫法是這樣的:
content : / / com . example . app .provider / table1
這就表示調用方期望訪問的是 com . example . app 這個應用的 tablel1表中的數據。除此之外,我們還可以在這個內容 URI的后面加上一個id,如下所示:
content : / / com . example . app . provider/tablel / 1
這就表示調用方期望訪問的是 com . example . app 這個應用的 tablel 表中 id 為 1 的數據。
內容 URI 的格式主要就只有以上兩種,以路徑結尾就表示期望訪問該表中所有的數據,以 id 結尾就表示期望訪問該表中擁有相應 id 的數據。我們可以使用通配符的方式來分別匹配這兩種格式的內容URI,規則如下。
* 表示匹配任意長度的任意字符。
# 表示匹配任意長度的數字。
所以,一個能夠匹配任意表的內容URI格式就可以寫成:
content://com.example.app.provider/*
而一個能夠匹配tablel表中任意一行數據的內容URI格式就可以寫成:
content://com.example.app.provider/tablel/#
接著,我們借助UriMatcher這個類就可以輕松地實現匹配內容URI的功能。UriMatcher中提供了一個addUR()方法,這個方法接收3個參數,可以分別把authority、path和一個自定義代碼傳進去。這樣,當調用UriMatcher的match()方法時,就可以將一個Uri對象傳入,返回值是某個能夠匹配這個Uri對象所對應的自定義代碼,利用這個代碼,我們就可以判斷出調用方期望訪問的是哪張表中的數據了。
配置Provider
<provider
    android:name=".DatabaseProvider"
    android:authorities="com.zjsos.www.databasetest.provider"
    android:enabled="true"
    android:exported="true" />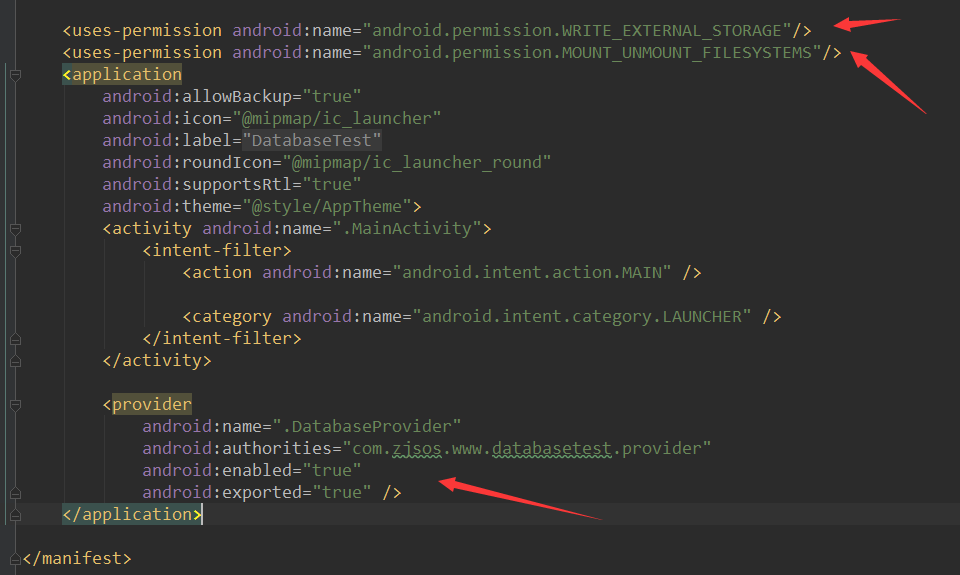
添加數據讀寫權限
<uses-permission android:name="android.permission.WRITE_EXTERNAL_STORAGE"/>
<uses-permission android:name="android.permission.MOUNT_UNMOUNT_FILESYSTEMS"/>
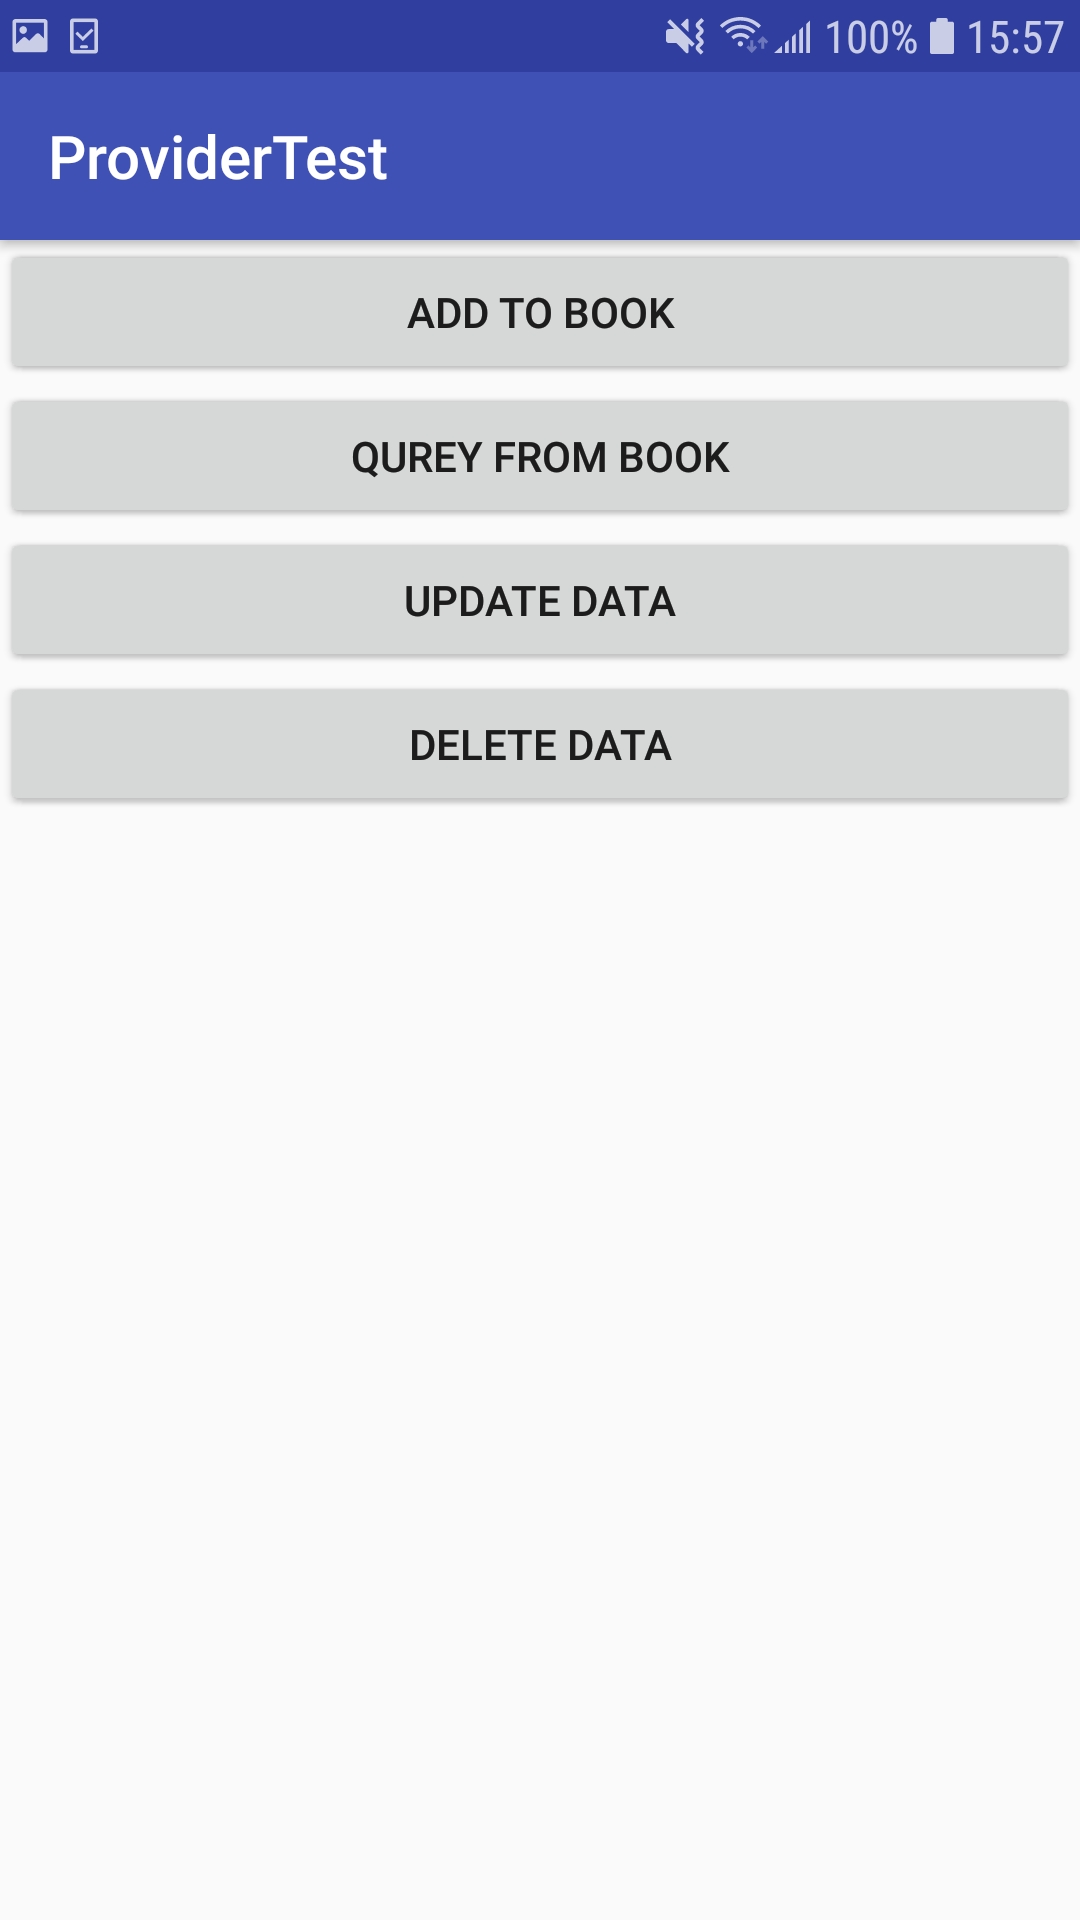
新建ProviderTest項目
通過新建項目去訪問DatabaseTest項目中數據
編寫activity_main.xml布局
<LinearLayout xmlns:android="http://schemas.android.com/apk/res/android"
    android:layout_width="match_parent"
    android:layout_height="match_parent"
    android:orientation="vertical">


    <Button
        android:id="@+id/add_data"
        android:layout_width="match_parent"
        android:layout_height="wrap_content"
        android:text="Add To Book" />

    <Button
        android:id="@+id/query_data"
        android:layout_width="match_parent"
        android:layout_height="wrap_content"
        android:text="Qurey From Book" />

    <Button
        android:id="@+id/update_data"
        android:layout_width="match_parent"
        android:layout_height="wrap_content"
        android:text="Update Data" />

    <Button
        android:id="@+id/delete_data"
        android:layout_width="match_parent"
        android:layout_height="wrap_content"
        android:text="Delete Data" />

</LinearLayout>
編寫主頁面MainActivity代碼
public class MainActivity extends AppCompatActivity {

    private String newId;

    @Override
    protected void onCreate(Bundle savedInstanceState) {
        super.onCreate(savedInstanceState);
        setContentView(R.layout.activity_main);


        Button addData = (Button) findViewById(R.id.add_data);
        addData.setOnClickListener(new View.OnClickListener() {
            @Override
            public void onClick(View v) {
                Uri uri = Uri.parse("content://com.zjsos.www.databasetest.provider/book");
                ContentValues values = new ContentValues();
                values.put("name", "A Clash of Kings");
                values.put("author", "George Martin");
                values.put("pages", 1040);
                values.put("price", 22.85);
                Uri newUri = getContentResolver().insert(uri, values);
                newId = newUri.getPathSegments().get(1);
            }
        });
        Button queryData = (Button) findViewById(R.id.query_data);
        queryData.setOnClickListener(new View.OnClickListener() {
            @Override
            public void onClick(View v) {
                Uri uri = Uri.parse("content://com.zjsos.www.databasetest.provider/book");
                Cursor cursor = getContentResolver().query(uri, null, null, null, null);
                if (cursor != null) {
                    while (cursor.moveToNext()) {
                        String name = cursor.getString(cursor.getColumnIndex("name"));
                        String author = cursor.getString(cursor.getColumnIndex("author"));
                        int pages = cursor.getInt(cursor.getColumnIndex("pages"));
                        double price = cursor.getDouble(cursor.getColumnIndex("price"));
                        Log.e("MainActivity", "book name is" + name);
                        Log.e("MainActivity", "book author is" + author);
                        Log.e("MainActivity", "book pages is" + pages);
                        Log.e("MainActivity", "book price is" + price);

                        if (Integer.parseInt(Build.VERSION.SDK) < 14) {
                            //只有4.0以下才需要手動關閉
                            cursor.close();
                        }
                    }
                }
            }
        });


        Button updateData = (Button) findViewById(R.id.update_data);
        updateData.setOnClickListener(new View.OnClickListener() {
            @Override
            public void onClick(View v) {
                Uri uri = Uri.parse("content://com.zjsos.www.databasetest.provider/book/" + newId);
                ContentValues values = new ContentValues();
                values.put("name", " A Storm of Swords");
                values.put("pages", 1216);
                values.put("price", 24.85);
                getContentResolver().update(uri, values, null, null);

            }
        });


        Button deleteData = (Button) findViewById(R.id.delete_data);
        deleteData.setOnClickListener(new View.OnClickListener() {
            @Override
            public void onClick(View v) {
                Uri uri = Uri.parse("content://com.zjsos.www.databasetest.provider/book/" + newId);
                getContentResolver().delete(uri, null, null);
            }
        });

    }
}
運行安裝DatabaseTest項目,打開項目,然后運行安裝ProviderTest項目
點擊ProviderTest項目中ADD TO BOOK按鈕,此時數據應該已經添加到DatabaseTest項目,點擊QUREY FROM BOOK按鈕查看打印日志就可以查看到數據了

點擊upadte data修改按鈕,在點擊query from book查詢,查看數據庫已經改變
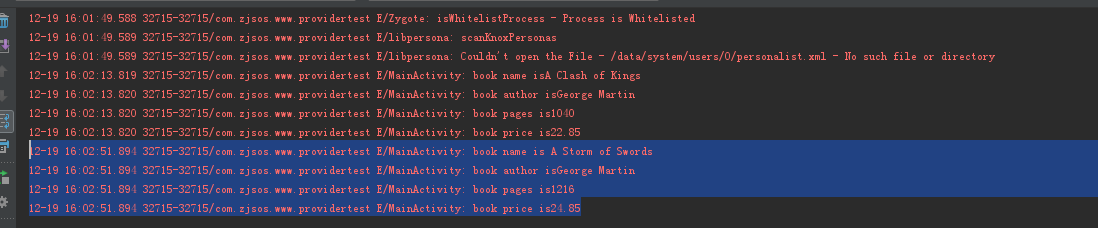
點擊delete data按鈕,在點擊query from book按鈕,就查詢不到數據了,測試完成
參考:第一行代碼Android 第2版 郭霖 著 建議大家去買下正版書 支持下郭老師
智能推薦

Android Provider用法
https://blog.csdn.net/forwardto9/article/details/79771388 ContentProvider ContentProvider一般為存儲和獲取數據提供統一的接口,可以在不同的應用程序之間共享數據。 之所以使用ContentProvider,主要有以下幾個理由: 1,ContentProvider提供了對底層數據存儲方式的抽象。比如下圖中,底層使用...
【Android】【Provider】ContentProvider,ContentResolver
轉載自:http://blog.csdn.net/u011240877/article/details/72848608 保存 標簽 2018-03-16 blog.csdn.net/u011240877/article/details/72848608 學習啟艦大神,每篇文章寫一句勵志的話,與大家共勉。 When you are content to be simply yourself and...


freemarker + ItextRender 根據模板生成PDF文件
1. 制作模板 2. 獲取模板,并將所獲取的數據加載生成html文件 2. 生成PDF文件 其中由兩個地方需要注意,都是關于獲取文件路徑的問題,由于項目部署的時候是打包成jar包形式,所以在開發過程中時直接安照傳統的獲取方法沒有一點文件,但是當打包后部署,總是出錯。于是參考網上文章,先將文件讀出來到項目的臨時目錄下,然后再按正常方式加載該臨時文件; 還有一個問題至今沒有解決,就是關于生成PDF文件...
電腦空間不夠了?教你一個小秒招快速清理 Docker 占用的磁盤空間!
Docker 很占用空間,每當我們運行容器、拉取鏡像、部署應用、構建自己的鏡像時,我們的磁盤空間會被大量占用。 如果你也被這個問題所困擾,咱們就一起看一下 Docker 是如何使用磁盤空間的,以及如何回收。 docker 占用的空間可以通過下面的命令查看: TYPE 列出了docker 使用磁盤的 4 種類型: Images:所有鏡像占用的空間,包括拉取下來的鏡像,和本地構建的。 Con...
猜你喜歡

requests實現全自動PPT模板
http://www.1ppt.com/moban/ 可以免費的下載PPT模板,當然如果要人工一個個下,還是挺麻煩的,我們可以利用requests輕松下載 訪問這個主頁,我們可以看到下面的樣式 點每一個PPT模板的圖片,我們可以進入到詳細的信息頁面,翻到下面,我們可以看到對應的下載地址 點擊這個下載的按鈕,我們便可以下載對應的PPT壓縮包 那我們就開始做吧 首先,查看網頁的源代碼,我們可以看到每一...


Linux C系統編程-線程互斥鎖(四)
互斥鎖 互斥鎖也是屬于線程之間處理同步互斥方式,有上鎖/解鎖兩種狀態。 互斥鎖函數接口 1)初始化互斥鎖 pthread_mutex_init() man 3 pthread_mutex_init (找不到的情況下首先 sudo apt-get install glibc-doc sudo apt-get install manpages-posix-dev) 動態初始化 int pthread_...

統計學習方法 - 樸素貝葉斯
引入問題:一機器在良好狀態生產合格產品幾率是 90%,在故障狀態生產合格產品幾率是 30%,機器良好的概率是 75%。若一日第一件產品是合格品,那么此日機器良好的概率是多少。 貝葉斯模型 生成模型與判別模型 判別模型,即要判斷這個東西到底是哪一類,也就是要求y,那就用給定的x去預測。 生成模型,是要生成一個模型,那就是誰根據什么生成了模型,誰就是類別y,根據的內容就是x 以上述例子,判斷一個生產出...
styled-components —— React 中的 CSS 最佳實踐
https://zhuanlan.zhihu.com/p/29344146 Styled-components 是目前 React 樣式方案中最受關注的一種,它既具備了 css-in-js 的模塊化與參數化優點,又完全使用CSS的書寫習慣,不會引起額外的學習成本。本文是 styled-components 作者之一 Max Stoiber 所寫,首先總結了前端組件化樣式中的最佳實踐原則,然后在此基...