Android學習筆記整理(12)--XML解析及天氣預報案例
標簽: XML解析 Android學習筆記 天氣預報案例 Android天氣預報
1.XML解析
若想要操作XML文檔,首先需要將XML文檔解析出來。通常情況下,解析XML文件有三種方式
- DOM解析
DOM(Document Object Mode)解析是一種基于對象的API,它會將XML文件的所有內容以文檔樹方式存放在內存中,然后允許使用DOM API遍歷XML樹、檢索所需的數據,這樣便能根據樹的結構以節點的形式來
DOM操作XML代碼看起來是比較直觀,編碼比SAX解析簡單,但DOM需要將整個XML文檔以文檔樹的形式存放在內存,消耗內存比較大。
- SAX解析
SAX解析會逐行掃描XML文檔,當遇到標簽時觸發解析處理器,采用事件處理方式解析XML。由于它是邊讀取邊解析,因此不存在內存占用的問題,可以解析超大XML。缺點是SAX解析只能讀取XML中的數據,無法進行增刪改
- PULL解析
PULL解析器是一個開源的Java項目,既可以用于Android應用,也可以用于JavaEE程序。Android已經集成了PULL解析器,所以在Android中最常用的解析方式是PULL解析。
使用PULL解析XML文檔,首先要創建XmlPullParser解析器,該解析器提供了很多屬性
XmlPullParser.START_DOCUMENT:XML文檔的開始
XmlPullParser.END_DUCUMENT:XML文檔的結束
XmlPullParser.START_TAG:開始節點,在XML文件中,帶<>的都是開始節點
XmlPullParser.END_TAG:結束節點,帶有</>都是結束節點
PULL解析器的用法:
(1)通過調用Xml.newPullParser();得到一個XmlPullParser對象
(2)通過parser.getEventType()獲取到當前的事件類型
(3)通過while循環判斷當前操作事件類型是否為文檔結束,是則跳出while循環
(4)while循環中通過switch語句判斷當前事件類型是否為開始標簽,是則獲取該標簽內容
2.案例--天氣預報(解析XML文件)
第一步,編寫主布局(activity_main.xml)
<RelativeLayout xmlns:android="http://schemas.android.com/apk/res/android"
xmlns:tools="http://schemas.android.com/tools"
android:layout_width="match_parent"
android:layout_height="match_parent"
android:background="@drawable/weather"
tools:context=".MainActivity" >
<LinearLayout
android:id="@+id/ll_btn"
android:layout_width="wrap_content"
android:layout_height="wrap_content"
android:layout_alignParentBottom="true"
android:layout_centerHorizontal="true"
android:orientation="horizontal" >
<Button
android:id="@+id/city_bj"
android:layout_width="wrap_content"
android:layout_height="wrap_content"
android:text="北京" />
<Button
android:id="@+id/city_sh"
android:layout_width="wrap_content"
android:layout_height="wrap_content"
android:text="上海" />
<Button
android:id="@+id/city_Harbin"
android:layout_width="wrap_content"
android:layout_height="wrap_content"
android:text="吉林" />
</LinearLayout>
<TextView
android:id="@+id/select_city"
android:layout_width="wrap_content"
android:layout_height="wrap_content"
android:layout_alignParentTop="true"
android:layout_marginTop="34dp"
android:layout_toLeftOf="@+id/icon"
android:text="上海"
android:textSize="20sp" />
<ImageView
android:id="@+id/icon"
android:layout_width="70dp"
android:layout_height="70dp"
android:layout_alignLeft="@+id/ll_btn"
android:layout_below="@+id/select_city"
android:layout_marginTop="25dp"
android:paddingBottom="5dp"
android:src="@drawable/ic_launcher" />
<TextView
android:id="@+id/select_weather"
android:layout_width="wrap_content"
android:layout_height="wrap_content"
android:layout_alignRight="@+id/icon"
android:layout_below="@+id/icon"
android:layout_marginRight="15dp"
android:layout_marginTop="18dp"
android:gravity="center"
android:text="多云"
android:textSize="18sp" />
<LinearLayout
android:id="@+id/linearLayout1"
android:layout_width="wrap_content"
android:layout_height="wrap_content"
android:layout_alignBottom="@+id/select_weather"
android:layout_alignRight="@+id/ll_btn"
android:layout_marginBottom="10dp"
android:gravity="center"
android:orientation="vertical" >
<TextView
android:id="@+id/temp"
android:layout_width="wrap_content"
android:layout_height="wrap_content"
android:layout_marginTop="10dp"
android:gravity="center_vertical"
android:text="-7℃"
android:textSize="22sp" />
<TextView
android:id="@+id/wind"
android:layout_width="wrap_content"
android:layout_height="wrap_content"
android:text="風力:3級"
android:textSize="18sp" />
<TextView
android:id="@+id/pm"
android:layout_width="73dp"
android:layout_height="wrap_content"
android:text="pm"
android:textSize="18sp" />
</LinearLayout>
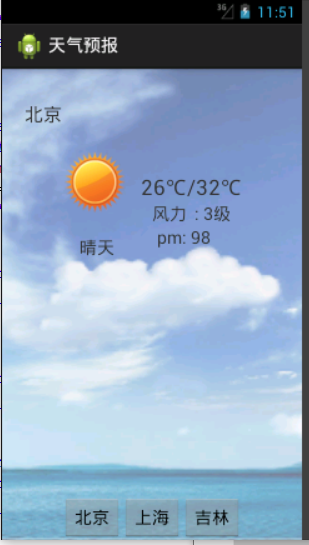
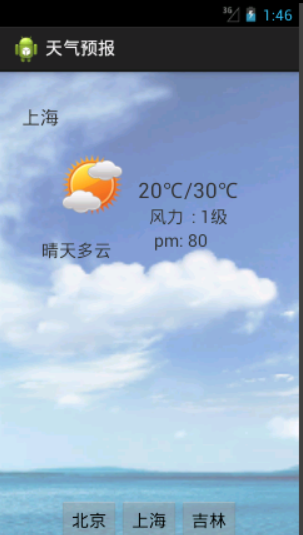
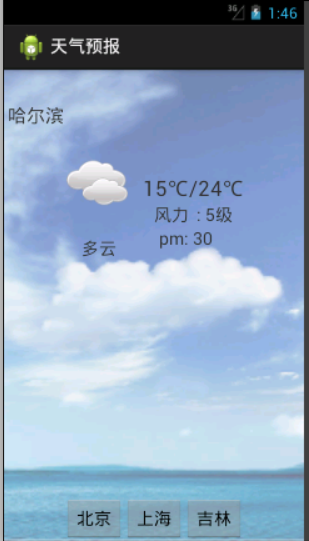
</RelativeLayout>顯示效果如圖
第二步,創建weather,xml文件
在src根目錄中創建一個weather.xml文件,該文件包含三個城市的天氣信息
<?xml version="1.0" encoding="utf-8"?>
<infos>
<city id="1">
		<temp>20℃/30℃</temp>
		<weather>晴天多云</weather>
		<name>上海</name>
		<pm>80</pm>
		<wind>1級</wind>
</city>
<city id="2">
		<temp>26℃/32℃</temp>
		<weather>晴天</weather>
		<name>北京</name>
		<pm>98</pm>
		<wind>3級</wind>
</city>
<city id="3">
		<temp>15℃/24℃</temp>
		<weather>多云</weather>
		<name>哈爾濱</name>
		<pm>30</pm>
		<wind>5級</wind>
</city>
</infos>
第三步,創建WeatherInfo類
每個城市天氣信息都包含id,temp,weather,name,pm和wind屬性
public class WeatherInfo {
	private int id;
	private String name;
	private String weather;
	private String temp;
	private String pm;
	private String wind;

	public int getId() {
		return id;
	}
	public void setId(int id) {
		this.id = id;
	}
	public String getName() {
		return name;
	}
	public void setName(String name) {
		this.name = name;
	}
	public String getWeather() {
		return weather;
	}
	public void setWeather(String weather) {
		this.weather = weather;
	}
	public String getTemp() {
		return temp;
	}
	public void setTemp(String temp) {
		this.temp = temp;
	}
	public String getPm() {
		return pm;
	}
	public void setPm(String pm) {
		this.pm = pm;
	}
	public String getWind() {
		return wind;
	}
	public void setWind(String wind) {
		this.wind = wind;
	}
}
第四步,創建WeatherService工具類
為了避免大量代碼都在一個類中,因此創建了一個的工具類,類中定義了一個getWeatherInfo()方法,用來解析XML文件
import java.io.InputStream;
import java.util.ArrayList;
import java.util.List;
import org.xmlpull.v1.XmlPullParser;
import android.util.Xml;
public class WeatherService {
	//返回天氣信息的集合
		public static List<WeatherInfo> getWeatherInfos(InputStream is)
	throws Exception {
			//得到pull解析器
			XmlPullParser parser = Xml.newPullParser();
			// 初始化解析器,第一個參數代表包含xml的數據
			parser.setInput(is, "utf-8");
			List<WeatherInfo> weatherInfos = null;
			WeatherInfo weatherInfo = null;
			//得到當前事件的類型
			int type = parser.getEventType();
			// END_DOCUMENT文檔結束標簽
			while (type != XmlPullParser.END_DOCUMENT) {
				switch (type) {
				//一個節點的開始標簽
				case XmlPullParser.START_TAG:
					//解析到全局開始的標簽 infos 根節點
					if("infos".equals(parser.getName())){
						weatherInfos = new ArrayList<WeatherInfo>();
					}else if("city".equals(parser.getName())){
						weatherInfo = new WeatherInfo();
						String idStr = parser.getAttributeValue(0);
						weatherInfo.setId(Integer.parseInt(idStr));
					}else if("temp".equals(parser.getName())){
					     //parset.nextText()得到該tag節點中的內容
						String temp = parser.nextText();
						weatherInfo.setTemp(temp);
					}else if("weather".equals(parser.getName())){
						String weather = parser.nextText();
						weatherInfo.setWeather(weather);
					}else if("name".equals(parser.getName())){
						String name = parser.nextText();
						weatherInfo.setName(name);
					}else if("pm".equals(parser.getName())){
						String pm = parser.nextText();
						weatherInfo.setPm(pm);
					}else if("wind".equals(parser.getName())){
						String wind = parser.nextText();
						weatherInfo.setWind(wind);
					}
					break;
				//一個節點結束的標簽
				case XmlPullParser.END_TAG:
					//一個城市的信息處理完畢,city的結束標簽
					if("city".equals(parser.getName())){
						//一個城市的信息 已經處理完畢了.
						weatherInfos.add(weatherInfo);
						weatherInfo = null;
					}
					break;
				}
				//只要不解析到文檔末尾,就解析下一個條目。得到下一個節點的事件類型
				//注意,這個一定不能忘,否則會成為死循環
				type = parser.next();
			}
			return weatherInfos;
		}
}
注意的是,type=parser.next()這行代碼不能忘記,因為在while循環中,當一個節點信息解析完畢,會繼續解析下一個節點,只有type的類型為END_DOCUMENT時才會結束循環。
第五步,編寫界面交互代碼(MainActivity類)
public class MainActivity extends Activity implements OnClickListener {
	private TextView select_city, select_weather, select_temp, select_wind,select_pm;
	private Map<String, String> map;
	private List<Map<String, String>> list;
	private String temp, weather, name, pm, wind;
	private ImageView icon;

	protected void onCreate(Bundle savedInstanceState) {
		super.onCreate(savedInstanceState);
		setContentView(R.layout.activity_main);
		// 初始化文本控件
		select_city = (TextView) findViewById(R.id.select_city);
		select_weather = (TextView) findViewById(R.id.select_weather);
		select_temp = (TextView) findViewById(R.id.temp);
		select_wind = (TextView) findViewById(R.id.wind);
		select_pm = (TextView) findViewById(R.id.pm);
		icon = (ImageView) findViewById(R.id.icon);
		findViewById(R.id.city_sh).setOnClickListener(this);
		findViewById(R.id.city_bj).setOnClickListener(this);
		findViewById(R.id.city_Harbin).setOnClickListener(this);
		try {
			// 調用上邊寫好的解析方法,weather.xml就在類的目錄下,使用類加載器進行加載
			// infos就是每個城市的天氣信息集合,里邊有我們所需要的所有數據。
			List<WeatherInfo> infos = WeatherService
					.getWeatherInfos(MainActivity.class.getClassLoader()
							.getResourceAsStream("weather.xml"));
			// 循環讀取infos中的每一條數據
			list = new ArrayList<Map<String, String>>();
			for (WeatherInfo info : infos) {
				map = new HashMap<String, String>();
				map.put("temp", info.getTemp());
				map.put("weather", info.getWeather());
				map.put("name", info.getName());
				map.put("pm", info.getPm());
				map.put("wind", info.getWind());
				list.add(map);
			}
			// 顯示天氣信息到文本控件中
		} catch (Exception e) {
			e.printStackTrace();
			Toast.makeText(this, "解析信息失敗", 0).show();
		}
		getMap(1, R.drawable.sun);
	}
	@Override
	public void onClick(View v) {
		switch (v.getId()) {
		case R.id.city_sh:
			getMap(0, R.drawable.cloud_sun);
			break;
		case R.id.city_bj:
			getMap(1, R.drawable.sun);
			break;
		case R.id.city_Harbin:
			getMap(2, R.drawable.clouds);
			break;
		}
	}
	private void getMap(int number, int iconNumber) {
		Map<String, String> bjMap = list.get(number);
		temp = bjMap.get("temp");
		weather = bjMap.get("weather");
		name = bjMap.get("name");
		pm = bjMap.get("pm");
		wind = bjMap.get("wind");
		select_city.setText(name);
		select_weather.setText(weather);
		select_temp.setText("" + temp);
		select_wind.setText("風力  : " + wind);
		select_pm.setText("pm: " + pm);
		icon.setImageResource(iconNumber);
	}
}
第六步,運行程序查看天氣
運行當前程序,分別選擇,能看到圖中所示結果,代表著程序成功地解析了存儲在weather.xml文件中的天氣信息
智能推薦

android軟件開發--天氣預報
為什么80%的碼農都做不了架構師?>>> 這兩天開發了一個天氣預報軟件。基本上用到了很多之前學習的內容,然后發現,只有實踐,才能發現更加多的問題,也才能了解其中的原理,甚至可以辨別你以前的知識是否是正確。 本來我想把源碼發上來的,但是發現沒有添加附件的功能。只有通過代碼分享了。http://www....

空空天氣預報
之前寫了一款基于Android的空空天氣預報,能夠查看全國各個省、市、縣的未來三天的天氣預報,有穿衣指數和運動指數建議; 最近準備找工作了,現在重新回顧一下思路。 主要用到的知識有解析xml技術,解析json,mvc架構。 1、首先看下界面結果; 2、代碼思路 2-1 代碼架構圖 2-2 設計思路 2-2-1 首先解析一個省市縣xml文件,里面的代碼樣式如...

天氣預報部分
一、代碼 index.html sky.html index.css sky.css index.js 二、效果 三、注意知識點 1、get post 2、jsonp 3、ajax...

天氣預報項目
微服務搭建天氣預報項目 使用的技術 springboot、mybatis、mysql、quartz、springcloud等技術 首先是框架的搭建 父工程: 父工程只負責引入基本的依賴。 在創建服務注冊中心; 導入相關的依賴; 寫配置文件 服務中心創建完畢就該創建一個服務的提供者。 首先創建的是三級聯動動的城市服務。 導入相關的依賴 書寫配置文件 創建文件目錄 創建相關的類 pojo基本類 第一個...
猜你喜歡


freemarker + ItextRender 根據模板生成PDF文件
1. 制作模板 2. 獲取模板,并將所獲取的數據加載生成html文件 2. 生成PDF文件 其中由兩個地方需要注意,都是關于獲取文件路徑的問題,由于項目部署的時候是打包成jar包形式,所以在開發過程中時直接安照傳統的獲取方法沒有一點文件,但是當打包后部署,總是出錯。于是參考網上文章,先將文件讀出來到項目的臨時目錄下,然后再按正常方式加載該臨時文件; 還有一個問題至今沒有解決,就是關于生成PDF文件...
電腦空間不夠了?教你一個小秒招快速清理 Docker 占用的磁盤空間!
Docker 很占用空間,每當我們運行容器、拉取鏡像、部署應用、構建自己的鏡像時,我們的磁盤空間會被大量占用。 如果你也被這個問題所困擾,咱們就一起看一下 Docker 是如何使用磁盤空間的,以及如何回收。 docker 占用的空間可以通過下面的命令查看: TYPE 列出了docker 使用磁盤的 4 種類型: Images:所有鏡像占用的空間,包括拉取下來的鏡像,和本地構建的。 Con...

requests實現全自動PPT模板
http://www.1ppt.com/moban/ 可以免費的下載PPT模板,當然如果要人工一個個下,還是挺麻煩的,我們可以利用requests輕松下載 訪問這個主頁,我們可以看到下面的樣式 點每一個PPT模板的圖片,我們可以進入到詳細的信息頁面,翻到下面,我們可以看到對應的下載地址 點擊這個下載的按鈕,我們便可以下載對應的PPT壓縮包 那我們就開始做吧 首先,查看網頁的源代碼,我們可以看到每一...
