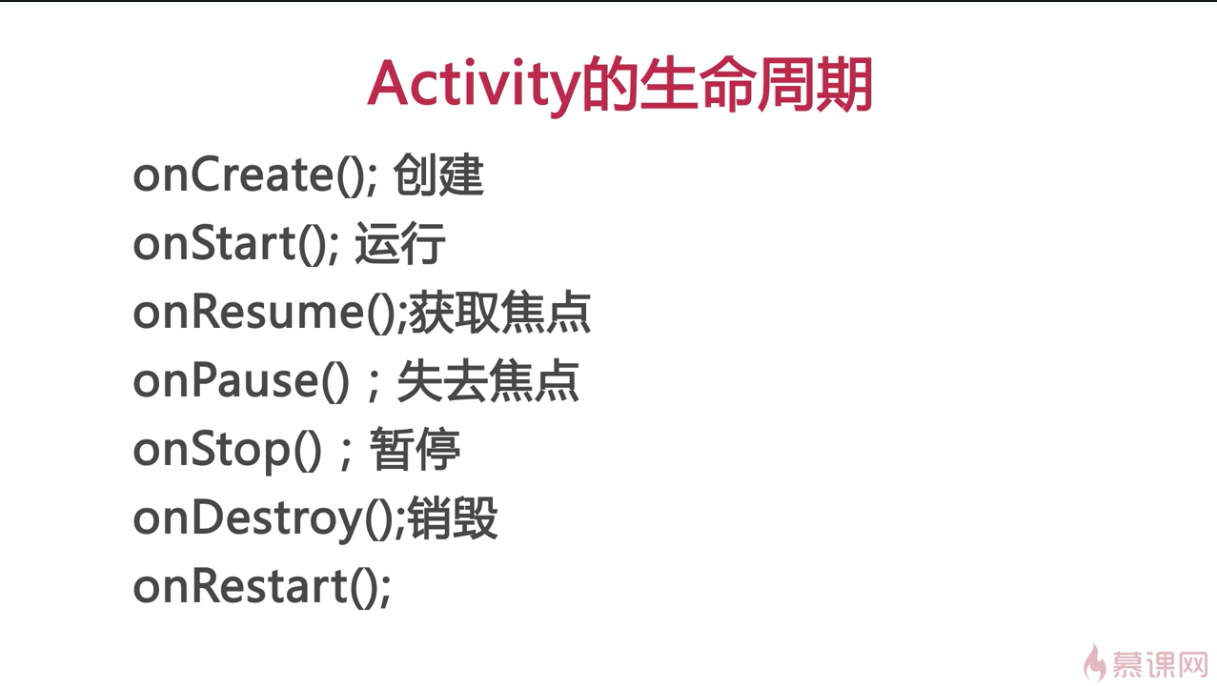
安卓——Activity的生命周期

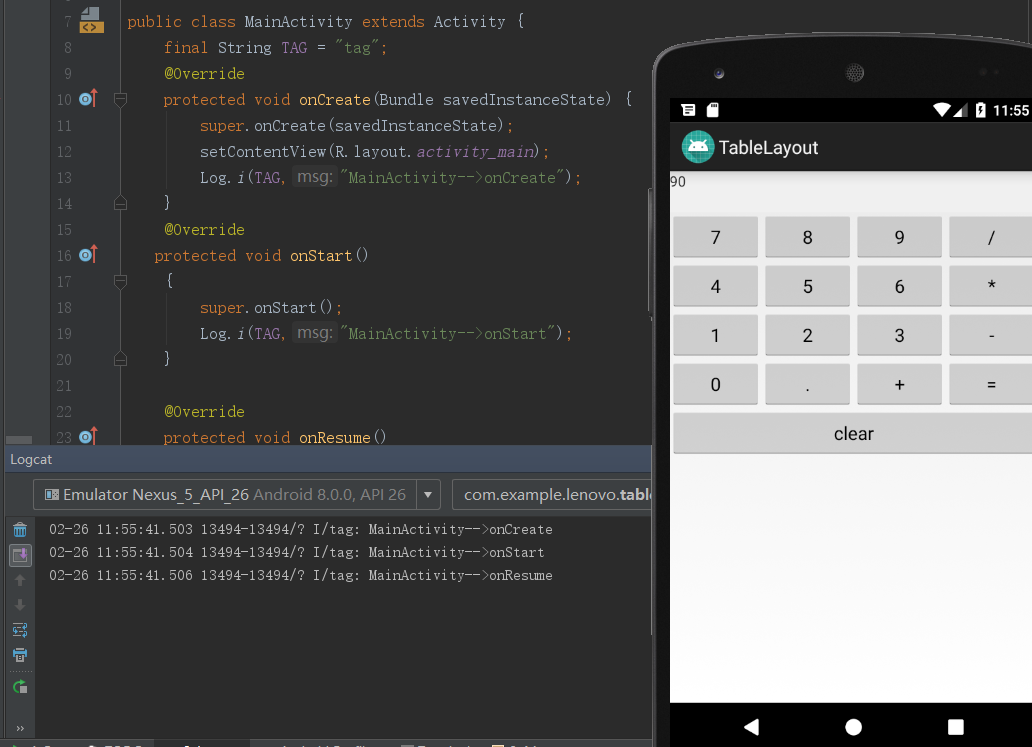
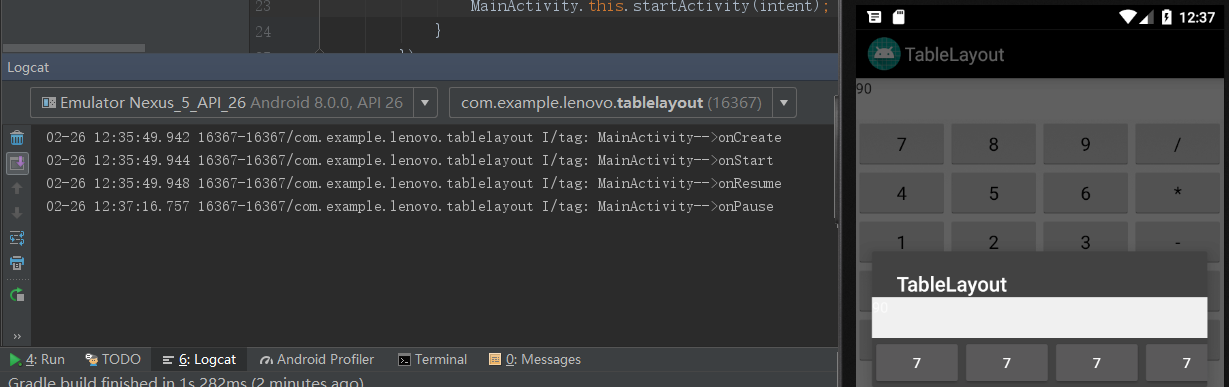
運行程序先經過前三個步驟:打印在Logcat里,如下圖
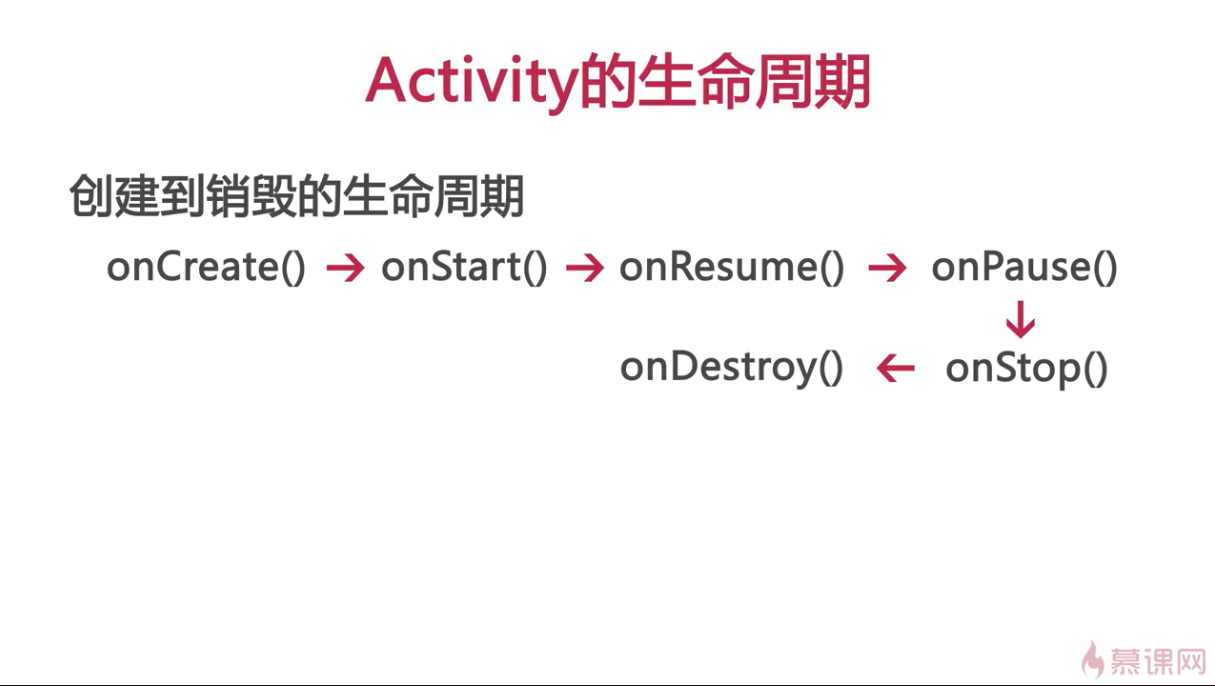
退出程序,點擊手機下方的后退按鈕,就會執行后三個步驟

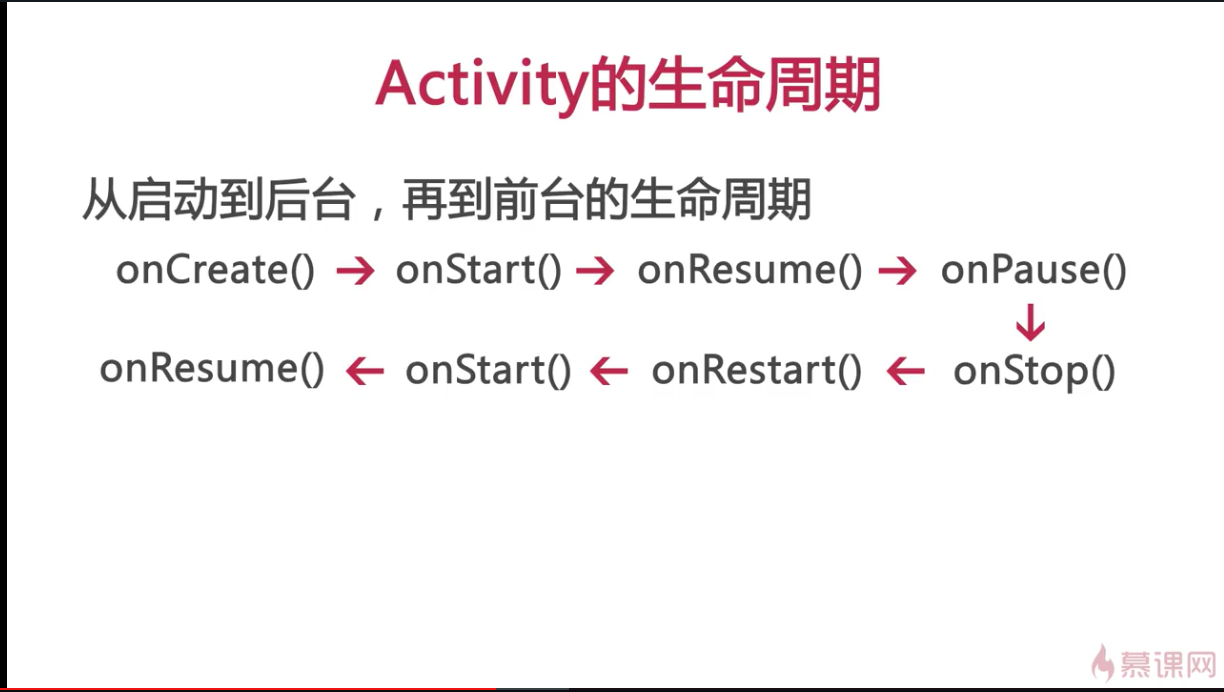
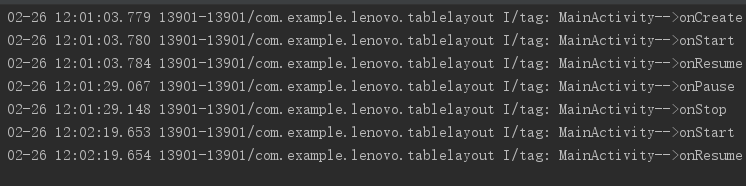
先打印前三個步驟,然后按手機的home鍵,打印onPause方法和onStop方法,這樣程序就到后臺了。再打開程序打印上圖中最后三個步驟
上面兩個不同的Activity周期基于下面這個代碼查看的
package com.example.lenovo.tablelayout;

import android.app.Activity;
import android.os.Bundle;
import android.util.Log;

public class MainActivity extends Activity {
    final String TAG = "tag";
    @Override
    protected void onCreate(Bundle savedInstanceState) {
        super.onCreate(savedInstanceState);
        setContentView(R.layout.activity_main);
        Log.i(TAG,"MainActivity-->onCreate");
    }
    @Override
   protected void onStart()
    {
        super.onStart();
        Log.i(TAG,"MainActivity-->onStart");
    }

    @Override
    protected void onResume()
    {
        super.onResume();
        Log.i(TAG,"MainActivity-->onResume");
    }
    @Override
    protected void onPause()
    {
        super.onPause();
        Log.i(TAG,"MainActivity-->onPause");
    }
    @Override
    protected void onStop()
    {
        super.onStop();
        Log.i(TAG,"MainActivity-->onStop");
    }
    @Override
    protected void onDestroy()
    {
        super.onDestroy();
        Log.i(TAG,"MainActivity-->onDestroy");
    }
}
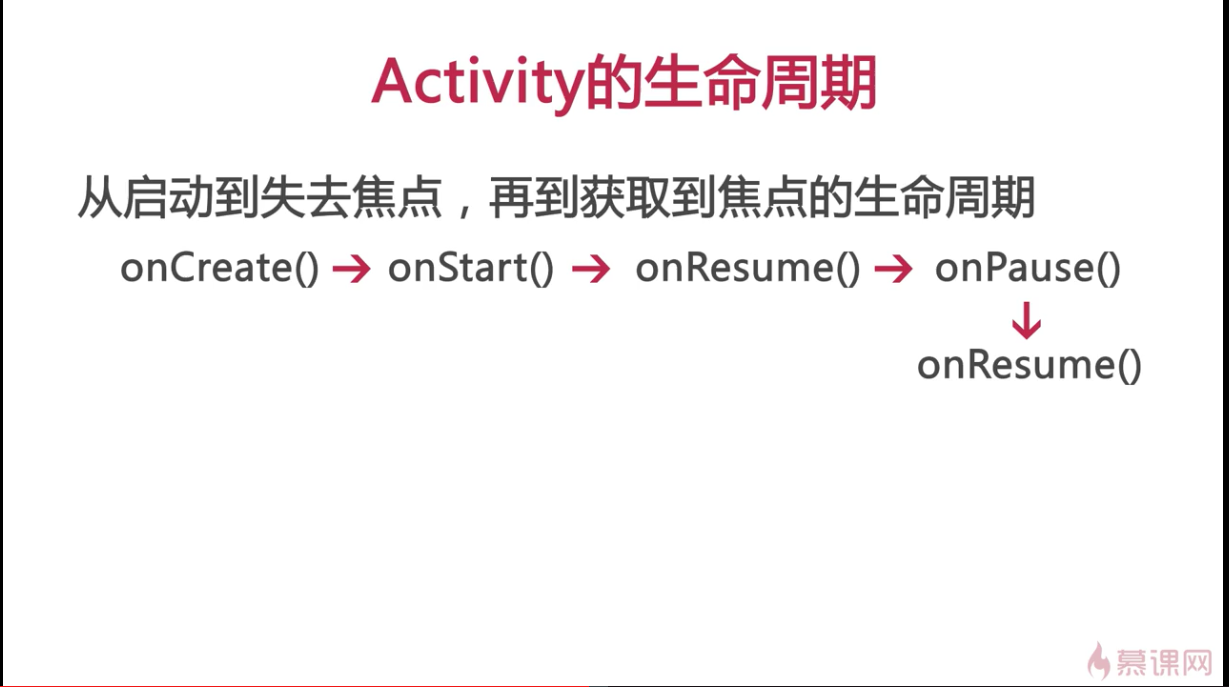
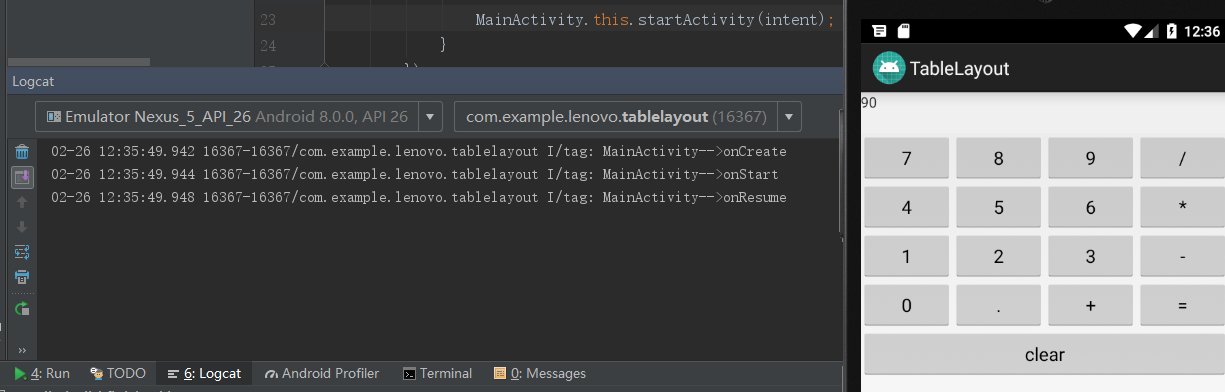
啟動第一個Activity,,先執行前面三個流程。
然后我點擊屏幕中的clear按鈕,就會出現下圖。
又出現一個Activity,而且他的風格是透明的,可以看見第一個Activity。然后又打印了一個onPause方法,表明第一個Activity失去了焦點。
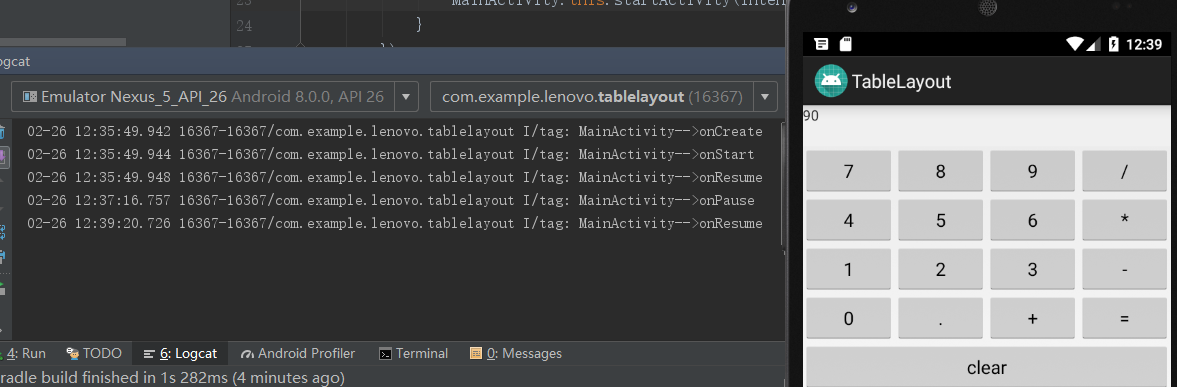
然后點擊手機下方的后退按鈕第一個Activity又出現了,說明它又得到了焦點。此時屏幕下方又打印了一個onResume方法。
這流程的所有代碼如下
第一個Activity
package com.example.lenovo.tablelayout;

import android.app.Activity;
import android.content.Intent;
import android.os.Bundle;
import android.util.Log;
import android.view.View;
import android.widget.Button;

public class MainActivity extends Activity {
    final String TAG = "tag";
    @Override
    protected void onCreate(Bundle savedInstanceState) {
        super.onCreate(savedInstanceState);
        setContentView(R.layout.activity_main);
        Log.i(TAG,"MainActivity-->onCreate");
        //用第一個Activity中的xml(activity_main.xml)文件中的id為clear的按鈕,添加一個點擊事件,實現Activity的變化
        Button btn=(Button) findViewById(R.id.clear);
        btn.setOnClickListener(new View.OnClickListener() {
            @Override
            public void onClick(View view) {
                Intent intent = new Intent(MainActivity.this,Secend_Activity.class);

                MainActivity.this.startActivity(intent);
            }
        });
    }
    @Override
   protected void onStart()
    {
        super.onStart();
        Log.i(TAG,"MainActivity-->onStart");
    }

    @Override
    protected void onResume()
    {
        super.onResume();
        Log.i(TAG,"MainActivity-->onResume");
    }
    @Override
    protected void onPause()
    {
        super.onPause();
        Log.i(TAG,"MainActivity-->onPause");
    }
    @Override
    protected void onStop()
    {
        super.onStop();
        Log.i(TAG,"MainActivity-->onStop");
    }
    @Override
    protected void onDestroy()
    {
        super.onDestroy();
        Log.i(TAG,"MainActivity-->onDestroy");
    }
}
第二個Activity
package com.example.lenovo.tablelayout;

import android.app.Activity;
import android.os.Bundle;

/**
 * Created by lenovo on 2018/2/26.
 *
 * 第二Activity類,繼承了Activity,加載了一個xml文件(calculator。xml)
 */

public class Secend_Activity extends Activity {
    @Override
    protected  void onCreate(Bundle savedInstanceState){

        super.onCreate(savedInstanceState);
        setContentView(R.layout.calculator);
    }
}
第一個Activity的xml文件(activity_main.xml)
<?xml version="1.0" encoding="utf-8"?>
<TableLayout xmlns:android="http://schemas.android.com/apk/res/android"

    android:layout_width="match_parent"
    android:layout_height="match_parent"
    android:stretchColumns="*">
    <TextView
        android:background="#f0f0f0"
        android:id="@+id/textView1"
        android:layout_height="40dp"
        android:layout_width="wrap_content"
        android:text="90"
        />


    <TableRow
        android:layout_width="match_parent"
        android:layout_height="match_parent">

        <Button
            android:layout_width="wrap_content"
            android:layout_height="wrap_content"
            android:text="7" />

        <Button
            android:layout_width="wrap_content"
            android:layout_height="wrap_content"
            android:text="8" />

        <Button
            android:layout_width="wrap_content"
            android:layout_height="wrap_content"
            android:text="9" />

        <Button
            android:layout_width="wrap_content"
            android:layout_height="wrap_content"
            android:text="/" />
   </TableRow>
    <TableRow
        android:layout_width="match_parent"
        android:layout_height="match_parent">

        <Button
            android:layout_width="wrap_content"
            android:layout_height="wrap_content"
            android:text="4" />

        <Button
            android:layout_width="wrap_content"
            android:layout_height="wrap_content"
            android:text="5" />

        <Button
            android:layout_width="wrap_content"
            android:layout_height="wrap_content"
            android:text="6" />

        <Button
            android:layout_width="wrap_content"
            android:layout_height="wrap_content"
            android:text="*" />
    </TableRow>
    <TableRow
        android:layout_width="match_parent"
        android:layout_height="match_parent">

        <Button
            android:layout_width="wrap_content"
            android:layout_height="wrap_content"
            android:text="1" />

        <Button
            android:layout_width="wrap_content"
            android:layout_height="wrap_content"
            android:text="2" />

        <Button
            android:layout_width="wrap_content"
            android:layout_height="wrap_content"
            android:text="3" />

        <Button
            android:layout_width="wrap_content"
            android:layout_height="wrap_content"
            android:text="-" />

    </TableRow>

    <TableRow
        android:layout_width="match_parent"
        android:layout_height="match_parent">

        <Button
            android:layout_width="wrap_content"
            android:layout_height="wrap_content"
            android:text="0" />

        <Button
            android:layout_width="wrap_content"
            android:layout_height="wrap_content"
            android:text="." />

        <Button
            android:layout_width="wrap_content"
            android:layout_height="wrap_content"
            android:text="+" />

        <Button
            android:layout_width="wrap_content"
            android:layout_height="wrap_content"
            android:text="=" />

    </TableRow>

    <Button
        android:id="@+id/clear"
        android:layout_width="wrap_content"
        android:layout_height="wrap_content"
        android:text="clear" />

</TableLayout>
第二個Activity的xml文件(caculator.xml)
<?xml version="1.0" encoding="utf-8"?>
<TableLayout xmlns:android="http://schemas.android.com/apk/res/android"

    android:layout_width="match_parent"
    android:layout_height="match_parent">
    <TextView
        android:background="#f0f0f0"
            android:id="@+id/textView1"
            android:layout_height="40dp"
        android:layout_width="wrap_content"
        android:text="90"
         />

    <TableRow
        android:id="@+id/rw1"
            android:layout_width="wrap_content"
            android:layout_height="wrap_content"
        >
    <Button
        android:text="7"
        android:layout_width="wrap_content"
        android:layout_height="wrap_content"
        />
        <Button
            android:text="7"
            android:layout_width="wrap_content"
            android:layout_height="wrap_content"
            />
        <Button
            android:text="7"
            android:layout_width="wrap_content"
            android:layout_height="wrap_content"
            />
        <Button
            android:text="7"
            android:layout_width="wrap_content"
            android:layout_height="wrap_content"
            />

    </TableRow>

</TableLayout>
要想讓第二Activity能夠出現,需要注冊一下。
在AndroidMainfiles.xml文件中添加這樣兩句話
<activity
    android:name="com.example.lenovo.tablelayout.Secend_Activity"

    android:theme="@android:style/Theme.DeviceDefault.Dialog"
    />
下面是添加完后整個AndroidMainfiles.xml文件的內容
<?xml version="1.0" encoding="utf-8"?>
<manifest xmlns:android="http://schemas.android.com/apk/res/android"
    package="com.example.lenovo.tablelayout">

    <application
        android:allowBackup="true"
        android:icon="@mipmap/ic_launcher"
        android:label="@string/app_name"
        android:roundIcon="@mipmap/ic_launcher_round"
        android:supportsRtl="true"
        android:theme="@style/AppTheme">
        <activity android:name=".MainActivity">
            <intent-filter>
                <action android:name="android.intent.action.MAIN" />

                <category android:name="android.intent.category.LAUNCHER" />
            </intent-filter>
        </activity>
        <activity
            android:name="com.example.lenovo.tablelayout.Secend_Activity"

            android:theme="@android:style/Theme.DeviceDefault.Dialog"
            />
    </application>

</manifest>
智能推薦


Activity的生命周期
I.何為Activity? 是Android的四大組件中最直觀的一個,可以狹義地理解為Activity是與用戶交互的界面,可以處理與用戶交互的事件。簡單說就是看到的界面。 常見的 Activity 類型有 ListActivity,FragmentActivitiy,TabAcitivty 等。當然開發中可根據自己的功能設計自己的公共基類: BaseActivity。...

Activity的生命周期
Activity作為Android的四大組件之首,生命周期當然是重中之重了。 雖然都是老生常談的面試題了。。。但是被面試官問到了,還是不會的話, 尷尬不是一點點啊。(⊙﹏⊙)b Activity—其實我更愿意喊它一聲“界面”唄。我們在手機上看到的一個窗口,就是它啊。 它的生命周期也分為兩種情況: 第一:正常情況下的生命周期 第二:非正常情況下的生命周期:比如屏幕...
Activity的生命周期
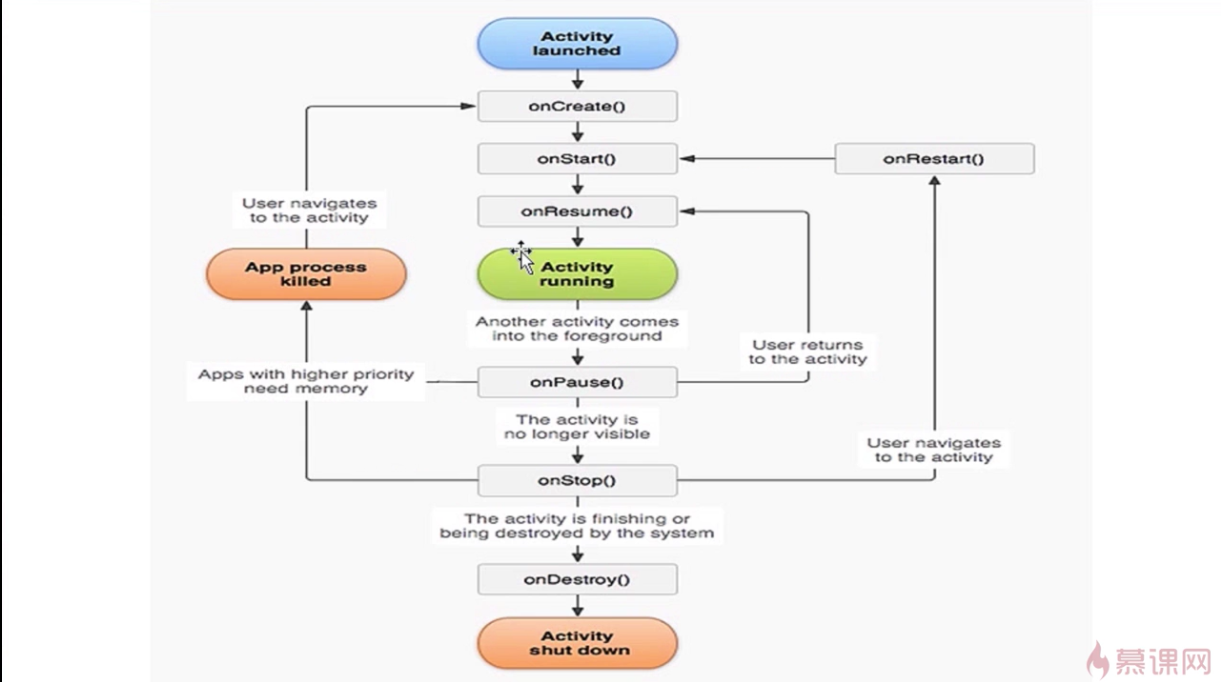
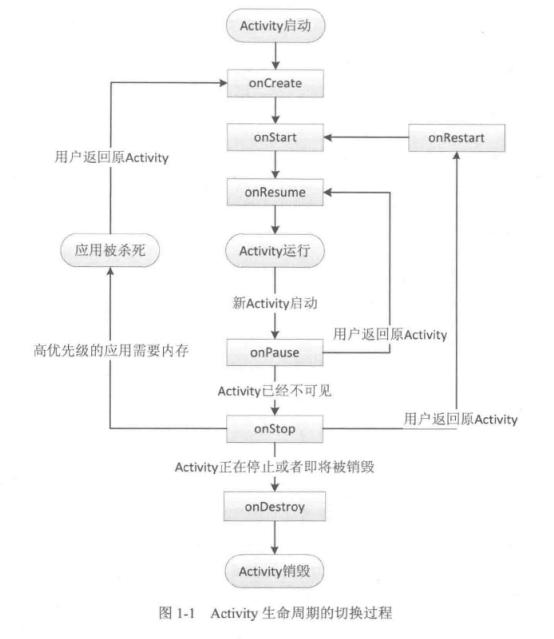
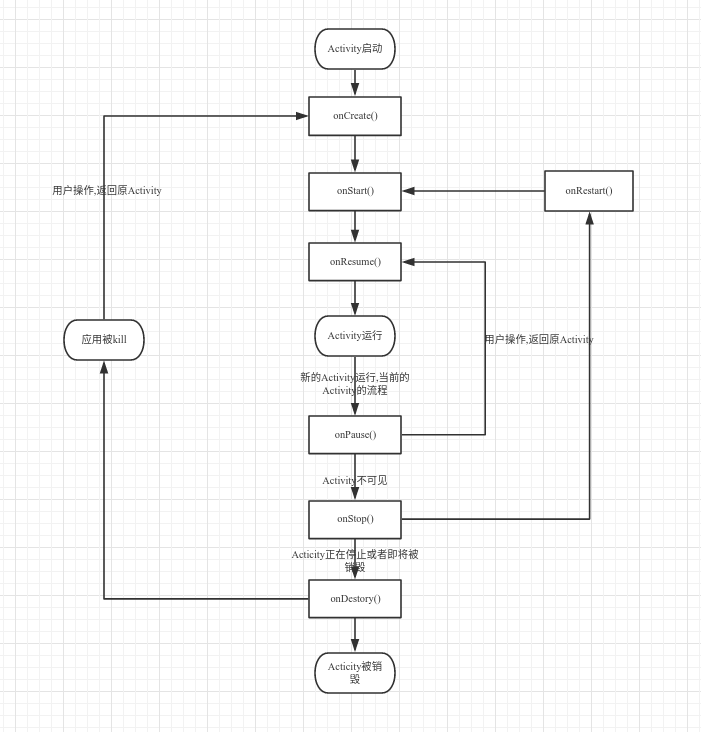
Activity的生命周期 工作一年多,發現很多基礎的東西都忘了,抽空在學習一哈 Activity的生命周期,總共分為:onCreate(), onStart(), onRestart(), onResume(),onStop()以及onDestory().一個Activity一般情況下是如何切換的呢,文字表達太麻煩,直接上圖: 那么當新的Acticity被啟動時,原Activity的流程,如下:...
猜你喜歡


freemarker + ItextRender 根據模板生成PDF文件
1. 制作模板 2. 獲取模板,并將所獲取的數據加載生成html文件 2. 生成PDF文件 其中由兩個地方需要注意,都是關于獲取文件路徑的問題,由于項目部署的時候是打包成jar包形式,所以在開發過程中時直接安照傳統的獲取方法沒有一點文件,但是當打包后部署,總是出錯。于是參考網上文章,先將文件讀出來到項目的臨時目錄下,然后再按正常方式加載該臨時文件; 還有一個問題至今沒有解決,就是關于生成PDF文件...
電腦空間不夠了?教你一個小秒招快速清理 Docker 占用的磁盤空間!
Docker 很占用空間,每當我們運行容器、拉取鏡像、部署應用、構建自己的鏡像時,我們的磁盤空間會被大量占用。 如果你也被這個問題所困擾,咱們就一起看一下 Docker 是如何使用磁盤空間的,以及如何回收。 docker 占用的空間可以通過下面的命令查看: TYPE 列出了docker 使用磁盤的 4 種類型: Images:所有鏡像占用的空間,包括拉取下來的鏡像,和本地構建的。 Con...

requests實現全自動PPT模板
http://www.1ppt.com/moban/ 可以免費的下載PPT模板,當然如果要人工一個個下,還是挺麻煩的,我們可以利用requests輕松下載 訪問這個主頁,我們可以看到下面的樣式 點每一個PPT模板的圖片,我們可以進入到詳細的信息頁面,翻到下面,我們可以看到對應的下載地址 點擊這個下載的按鈕,我們便可以下載對應的PPT壓縮包 那我們就開始做吧 首先,查看網頁的源代碼,我們可以看到每一...
