SpringCloud 學習筆記
標簽: spring boot java
SpringCloud 學習筆記
文章目錄
1 簡介
1.1 什么是 SpringCloud
SpringCloud 是一系列框架的有序集合,它利用 SpringBoot 的開發便利性巧妙地簡化了分布式系統基礎設施的開發,如服務發現注冊、配置中心、消息總線、負載均衡、斷路器、數據監控等,都可以用 SpringBoot 的開發風格做到一鍵啟動和部署。Spring Cloud 并沒有重復制造輪子,它只是將各家公司開發的比較成熟、經得起考驗的服務框架組合起來,通過 SpringBoot 風格進行再封裝屏蔽掉了復雜的配置和實現原理
1.2 SpringCloud 能干什么
springCloud 可以實現服務發現注冊、配置中心、消息總線、負載均衡、斷路器、數據監控。
-
服務注冊發現(Eureka)
相當于 Zookeeper,好處是服務調用方不直接依賴于服務提供方,保證服務高可用
-
服務熔斷(Hystrix)
可以保證某個服務提供方的異常不會影響整體系統的穩定
-
數據監控(Zuul)
Zuul 是在云平臺上提供動態路由,監控,彈性,安全等邊緣服務的框架,相當于網關
-
配置中心(Archaius)
配置管理 API,包含一系列配置管理 API,提供動態類型化屬性、線程安全配置操作、輪詢框架、回調機制等功能
-
消息總線(Bus)
時間、消息總線,用于在集群(例如,配置變化事件)中傳播狀態變化
-
日志追蹤(Sleuth)
日志收集工具包,封裝了 Dapper 和 log-based 追蹤以及 Zipkin 和 HTrace 操作,為 SpringCloud 應用實現了一種分布式追蹤解決方案
-
大數據處理(Data Flow)
Data Flow 是一個用于開發和執行大范圍數據處理其模式包括 ETL,批量運算和持續運算的統一編程模型和托管服務。
2. 微服務
2.1 什么是微服務
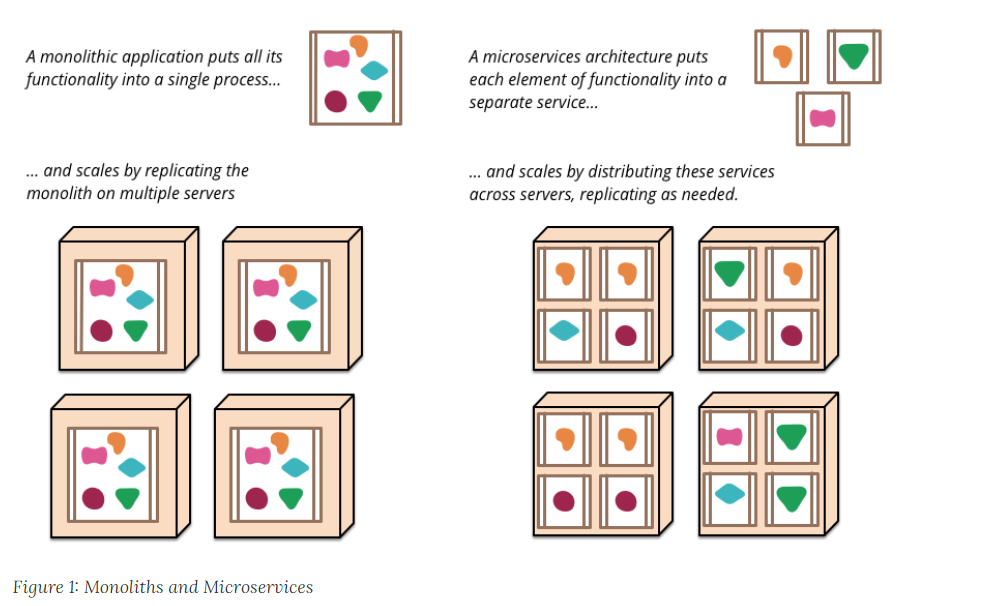
微服務(Microservice Architecture)是最近幾年流行的一種架構思想,關于它的概念很難一言以蔽之。
究竟什么是微服務呢?我們在此引用 ThoughtWorks 公司的首席科學家 Martin Fowler 于2014年提出的一段話:
微服務原文:https://martinfowler.com/articles/microservices.html
- 就目前而言,對于微服務,業界并沒有一個統一的,標準的定義
- 但通常而言,微服務架構是一種架構模式,或者說是一種架構風格,它提倡將單一的應用程序劃分成一組小的服務,每個服務運行在其獨立的自己的進程內,服務之間互相協調,互相配置,為用戶提供最終價值。服務之間采用輕量級的通信機制互相溝通,每個服務都圍繞著具體的業務進行構建,并且能夠被獨立的部署到生產環境中,另外,應盡量避免統一的,集中式的服務管理機制,對具體的一個服務而言,應根據業務上下文,選擇合適的語言,工具對其進行構建,可以有一個非常輕量級的集中式管理來協調這些服務,可以使用不同的語言來編寫服務,也可以使用不同的數據存儲。
可能有的人覺得官方的話太過生澀,我們從技術維度來理解下:
- 微服務化的核心就是將傳統的一站式應用,根據業務拆分成一個一個的服務,徹底地請耦合,每一個微服務提供單個業務功能的服務,一個服務做一件事情,從技術角度看就是一種小而獨立的處理過程,類似進程的概念,能夠自行單獨啟動或銷毀,擁有自己獨立的數據庫。
2.2 微服務與微服務架構
微服務
強調的是服務的大小,他關注的是某一個點,是具體解決某一問題提供落地對應服務的一個服務應用,狹義地看,可以看做 IDEA 中一個個微服務工程,或者是Module。
IDEA 工具里面使用Maven開發的一個個獨立的Module,它具體是使用SpringBoot開發的一個小模塊,一個模塊就做一件事
強調的是一個個的個體,每個個體完成一個具體的任務或者功能!
微服務架構
微服務架構是一種新的架構形式,它提倡將單一應用程序劃分成為一組小的服務,服務之間相互協調,互相配合,為用戶提供最終價值。每個服務運行在其獨立的進程中,服務與服務間采用輕量級的通信機制互相協作,每個服務都圍繞著具體的業務進行構建,并且能夠獨立地部署到生產環境中,另外,應精良避免統一的,集中式地服務管理機制,對具體地一個服務而言,應根據業務上下文,選擇合適地語言,工具進行構建
2.3 微服務架構的四個核心問題
問題:
- 服務很多,客戶端該如何訪問?
- 這么多服務,服務之間如何通信?
- 這么多服務,如何治理?
- 服務掛了怎么辦?
解決方案:
-
Spring Cloud NetFlix 一站式解決方案
API網關: zuul 組件
Feign:基于 HttpClient,使用 Http通信方式,比如同步,阻塞
Eureka:服務注冊發現
熔斷機制:Hystrix
-
Apache Dubbo Zookeeper 半自動,需要整合別人的
API網關:沒有,找第三方組件,或者自己實現
Dubbo:基于RPC高性能開源的Java框架
Zookeeper:服務注冊發現
熔斷機制:需要借助 Hystrix
Dubbo 這個方案并不完善,但它是RPC框架中最好的
-
Spring Cloud Alibaba 一站式解決方案
比 Spring Cloud NetFlix 更簡單
雖然主流是這三個方案,但萬變不離其宗:
- API 網關:提供路由支持,客戶端通過 API 網關來訪問對應的微服務
- HTTP,RPC:解決微服務之間的通信問題
- 服務注冊和發現:統一管理微服務,使得服務高可用
- 熔斷機制:解決服務掛了的問題,服務掛了的時候,服務降級,防止服務雪崩
綜合上面所說的,其實就是網絡不可靠引起了這些問題
2.4 微服務優缺點
優點
- 每個服務足夠內聚,足夠小,代碼容易理解,這樣能聚集一個指定的業務功能或業務需求
- 開發簡單,開發效率高,一個服務可能只是專一地干一件事
- 微服務能夠被小團隊單獨開發
- 微服務是松耦合地,是有功能意義的服務,無論是在開發階段或部署階段都是獨立的
- 微服務能使用不同的語言開發。
- 易于和第三方集成,微服務允許容易且靈活的方式集成自動部署,通過持續集成工具,如 jenkins,Hudson,bamboo
- 微服務易于被一個開發人員理解,修改和維護,這樣小團隊能夠更關注自己的工作成果。無需通過合作才能體現價值
- 微服務允許你利用融合新技術
- 微服務只是業務邏輯的代碼,不會和 HTML、CS或其他界面混合
- 每個微服務都有自己的存儲能力,可以有自己的數據庫,也可以統一數據庫
缺點
- 開發人員要處理分布式的復雜性
- 多服務運維難度會隨著服務的增加而增加,運維的壓力也在增大
- 系統部署依賴
- 服務間通信成本
- 數據一致性
- 系統集成測試
- 性能監控
2.5 微服務技術棧有哪些?
| 微服務條目 | 落地技術 |
|---|---|
| 服務開發 | SpringBoot,Spring,SpringMVC |
| 服務配置與管理 | Netflix公司的Archaius、阿里的Diamond等 |
| 服務注冊與發現 | Eureka、Consul、Zookeeper等 |
| 服務調用 | Rest、RPC、gRPC |
| 服務熔斷器 | Hystrix、Envoy等 |
| 負載均衡 | Ribbon、Nginx等 |
| 服務接口調用(客戶端調用服務的簡化工具) | Feign等 |
| 消息隊列 | Kafka、RabbitMQ、ActiveMQ 等 |
| 服務配置中心管理 | SpringCloudConfig、Chef等 |
| 服務路由(API網關) | Zuul等 |
| 服務監控 | Zabbix、Nagios、Metrics、Specatator等 |
| 全鏈路追蹤 | Zipkin、Brave、Dapper等 |
| 服務部署 | Docker、OpenStack、Kubernetes等 |
| 數據流操作開發包 | SpringCloud Stream(封裝與 Redis,RabbitMQ,Kafka等發送接收消息) |
| 事件消息總線 | SpringCloud Bus |
2.6 為什么選擇 SpringCloud 作為微服務架構
1. 選型依據
- 整體解決方案和框架成熟度
- 社區熱度
- 可維護性
- 學習區縣
2. 當前各大IT公司用得微服務架構有哪些?
- 阿里:dubbo+HFS
- 京東:JSF
- 新浪:Motan
- 當當網:DubboX
- …
3. 各微服務框架對比
| 功能點/服務框架 | Netflix/SpringCloud | Motan | gRPC | Thrift | Dubbo/DubboX |
|---|---|---|---|---|---|
| 功能定位 | 完整的微服務框架 | RPC框架,但整合了ZK或Consul,實現了集群環境的基本服務注冊/發現 | RPC框架 | RPC框架 | 服務框架 |
| 支持 Rest | 是,Ribbon支持多種可插拔的序列化選擇 | 否 | 否 | 否 | 否 |
| 支持 RPC | 否 | 是(Hession2) | 是 | 是 | 是 |
| 支持多語言 | 是(Rest形式)? | 否 | 是 | 是 | 否 |
| 負載均衡 | 是(服務端zuul+客戶端Ribbon),zuul服務,動態路由,云端負載均衡 Eureka(針對中間層服務器) | 是(客戶端) | 否 | 否 | 是(客戶端) |
| 配置服務 | Netfix Archius,Spring Cloud Config Server 幾種配置 | 是(zookeeper提供) | 否 | 否 | 否 |
| 服務調用鏈監控 | 是(zuul),zuul提供邊緣服務,API網關 | 否 | 否 | 否 | 否 |
| 高可用/容錯 | 是(服務端Hystrix+客戶端Ribbon) | 是(客戶端) | 否 | 否 | 是(客戶端) |
| 典型應用案例 | Netfix | Sina | |||
| 社區活躍程度 | 高 | 一般 | 高 | 一般 | 2017年后重新開始維護,之前斷了5年 |
| 學習難度 | 中低 | 低 | 高 | 高 | 低 |
| 文檔豐富度 | 高 | 一般 | 一般 | 一般 | 高 |
| 其他 | SpringCloud Bus 為我們的應用程序帶來了更多管理斷點 | 支持降級 | Netflix內部再開發集成gRPC | IDL定義 | 實踐的公司比較多 |
3. SpringCloud 入門概述
3.1 什么是 SpringCloud
SpringCloud 官方學習文檔:https://spring.io/projects/spring-cloud#learn
SpringCloud,基于 SpringBoot 提供了一套微服務解決方案,包括服務注冊于發現,配置中心,全鏈路監控,服務網關,負載均衡,熔斷器等組件,除了基于 NetFlix 的開源組件做高度抽象封裝之外,還有一些選型中立的開源組件。
SpringCloud 了 SpringBoot 的開發便利,巧妙地簡化了分布式系統基礎設施的開發,SpringCloud為開發人員提供了快速構建分布式系統的一些工具,包括配置管理,服務發現,斷路器,路由,微代理,事件總線,全局鎖,決策競選,分布式會話等等,他們都可以用 SpringBoot 的開發風格做到一鍵啟動和部署。
SpringBoot 并沒有重復造輪子,它只是將目前各家公司開發的比較成熟,經得起考研的服務框架組合起來,通過 SpringBoot 風格進行再封裝,屏蔽掉了復雜的配置和實現原理,最終給開發者留出了一套簡單易懂,易部署和易維護的分布式系統開發工具包。
SpringCloud 是分布式微服務架構下的一站式解決方案,是各個微服務架構落地技術的集合體,俗稱微服務全家桶。
3.2 SpringCloud 和 SpringBoot 關系
- SpringBoot 專注于快速方便地開發單個個體微服務。-jar
- SpringCloud 是關注全局地微服務協調整理治理框架,它將 SpringBoot 開發地一個個體單體微服務整合并管理起來,為各個微服務之間提供:配置管理,服務發現,斷路器,路由,微代理,事件中線,全局鎖,決策競選,分布式會話等等集成服務。
- SpringBoot 可以離開 SpringCloud 獨立使用,開發項目,但是 SpringCloud 離不開 SpringBoot,屬于依賴關系
- SpringBoot 專注于快速、方便地開發單個個體微服務,SpringCloud關注全局地服務治理框架
3.3 Dubbo 和 SpringCloud 對比
| Dubbo | SpringCloud | |
|---|---|---|
| 服務注冊中心 | Zookeeper | SpringCloud NetFlix Eureka |
| 服務調用方式 | RPC | REST API |
| 服務監控 | Dubbo-monitor | Spring Boot Admin |
| 斷路器 | 不完善 | Spring Cloud Netflix Hystrix |
| 服務網關 | 無 | Spring Cloud Netflix Zuul |
| 分布式配置 | 無 | Spring Cloud Config |
| 服務跟蹤 | 無 | Spring Cloud Sleuth |
| 消息總線 | 無 | Spring Cloud Bus |
| 數據流 | 無 | Spring Cloud Stream |
| 批量任務 | 無 | Spring Cloud Task |
最大區別:SpringCloud 拋棄了 Dubbo 的 RPC 通信,采用的是基于HTTP的REST方式。
嚴格來說,這兩種方式各有優劣,雖然從一定程度上來說,后者犧牲了服務調用的性能,但也避免了上面提到的原生 RPC 帶來的問題。而且 REST 相比于 RPC 更靈活,服務提供方和調用方的依賴只依靠一紙契約,不存在代碼級別的強依賴,這再強調快速研發的微服務環境下,顯得更加合適。
品牌機和組裝機的區別
很明顯,SpringCloud 的功能比 Dubbo 更加強大,涵蓋面更廣,而且作為 Spring 的拳頭項目,它也能夠于 Spring Framework、SpringBoot、Spring Data、Spring Batch等其他 Spring 項目完美融合,這些對于微服務而言是至關重要的。使用 Dubbo 構建的微服務架構就像組裝電腦,各環節我們的選擇自由度很高,但是最終結果很有可能因為一條內存條質量不行就點不亮了,總是讓人不怎么放心,但是如果你是一名高手,那這些都不是問題。而 SpringCloud 就像是品牌機,再 Spring Source 的整合下,做了大量的兼容性測試,保證了機器擁有更高的穩定性,但是如果要在使用非原裝組件外的東西,就需要對其基礎有足夠了解。
社區支持度和更新力度
最為重要的是,Dubbo 停止了5年左右的更新,雖然 2017.7 重啟了,對于技術發展的新需求,需要由開發者自行拓展升級(比如當當網弄出了 DubboX),這對于很多想要采用微服務架構的中小軟件組織,顯然是不太合適的,中小公司沒有這么強大的技術能力去修改 Dubbo 源碼+周邊的一整套解決方案,并不是每一個公司都有阿里的大牛+真實的線上生產環境測試過。
總結:
曾風靡國內的開源 RPC 服務框架 Dubbo 在重啟維護后,令許多用戶為之雀躍,但同時,也迎來了一些之一的聲音,互聯網技術發展迅速,Dubbo 是否還能跟上時代?Dubbo 與 SpringCloud 相比又有何優勢何差異?是否會由相關舉措保證 Dubbo 的后續更新頻率?
解決的問題域不一樣:Dubbo的定位是一款RPC框架,SpringCloud的目標是微服務架構下的一站式解決方案
3.4 SpringCloud 版本號
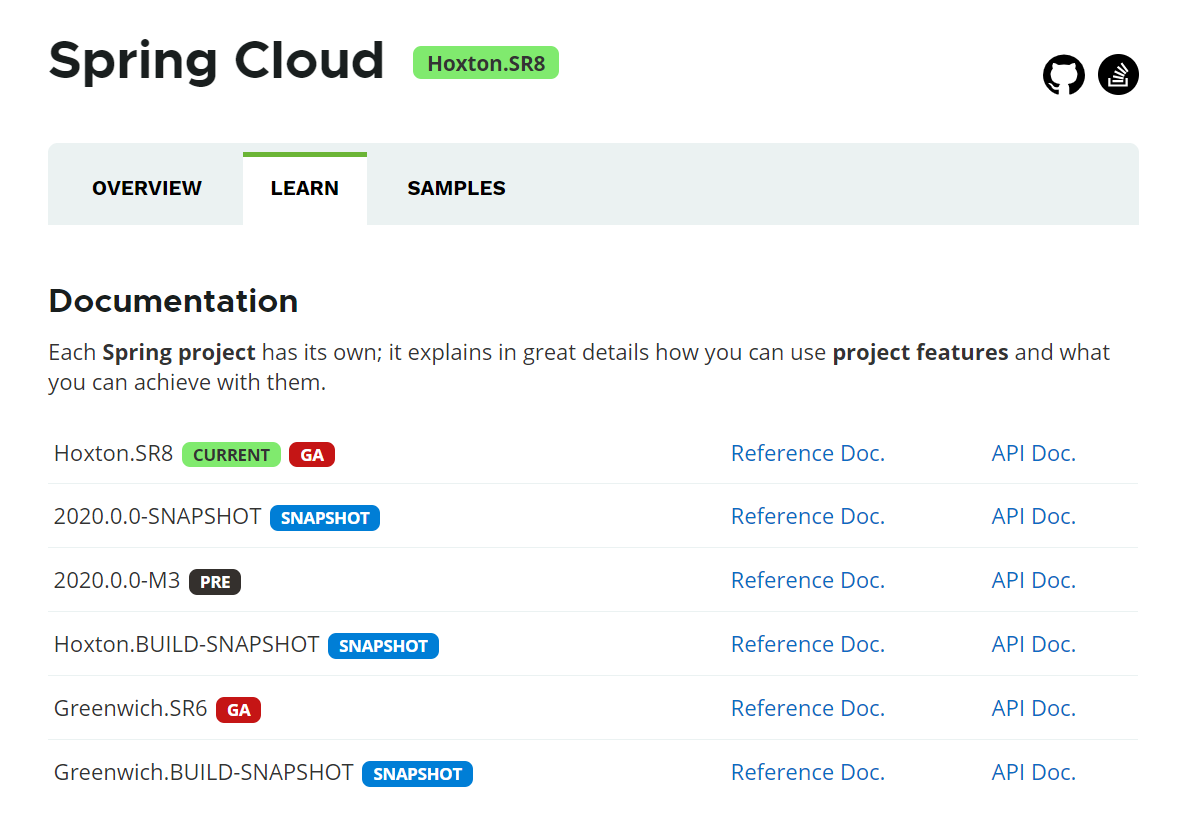
SpringCloud 是一個由眾多獨立項目組成的大型綜合項目,每個子項目有不同的發行節奏,都維護者自己的發布版本號,SpringCloud 通過一個資源清單BOM(Bill of Materals)來管理每個版本的項目清單。為了避免與子項目的發布號混淆,所以沒有采用版本號的方式,而是通過命名的方式。
這些版本名稱的命名方式采用了倫敦地鐵站的名稱,同時根據字母表的順序來對應版本事件順序。比如:最早的 Release 版本:Angel,第二個 Release 版本:Brixton,然后是 Camden、Dalston、Edgware,目前最新版本是 Hoxton
大版本說明
| SpringBoot | SpringCloud | 關系 |
|---|---|---|
| 1.2.x | Angel版本(天使) | 兼容 SpringBoot 1.2.x |
| 1.3.x | Brixton版本(布里克斯頓) | 兼容 SpringBoot 1.3.x,也兼容 SpringBoot 1.4.x |
| 1.4.x | Camden版本(卡姆登) | 兼容 SpringBoot 1.4.x,也兼容 SpringBoot 1.5.x |
| 1.5.x | Dalston版本(多爾斯頓) | 兼容 SpringBoot 1.5.x,不兼容 SpringBoot 2.0.x |
| 1.5.x | Edgware版本(埃奇韋爾) | 兼容 SpringBoot 1.5.x, 不兼容 SpringBoot 2.0.x |
| 2.0.x | Finchley版本(芬奇利) | 兼容 SpringBoot 2.0.x,不兼容 SpringBoot 1.5.x |
| 2.1.x | Greenwich版本(格林威治) | 兼容 SpringBoot 2.1.x |
| 2.2.x | Hoxton版本(霍克斯頓) | 兼容 SpringBoot 2.2.x |
實際開發版本關系
| spring-boot-starter-parent | spring-cloud-dependencies |
|---|---|
| 1.5.2.RELEASE | Daiston.RC1 |
| 1.5.9.RELEASE | Edgware.RELEASE |
| 1.5.16.RELEASE | Edgware.SR5 |
| 1.5.20.RELEASE | Edgware.SR5 |
| 2.0.2.RELEASE | Finchiey.BUILD-SNAPSHOT |
| 2.0.6.RELEASE | Finchiey.SR2 |
| 2.1.4.RELEASE | Greenwich.SR1 |
| 2.1.0.RELEASE-2.1.14.RELEASE | Greenwich.SR5 |
| 2.2.0.M4 | Hoxton.SR4 |
4. 第一個 SpringCloud 案例
我們模擬一下生產者和消費者的案例
創建一個Maven父工程 SpringCloud-Study ,并規范好子工程依賴版本
父工程的 pom.xml 如下
注:SpringBoot 和 SpringCloud 的版本要匹配(可以參考上面開發版本號,或者查詢官網),不然可能會出現很多意想不到的錯誤
<properties>
    <mysql.version>5.1.46</mysql.version>
    <lombok.version>1.18.12</lombok.version>
    <log4j.version>1.2.17</log4j.version>
    <druid.version>1.1.23</druid.version>
    <mybatisplus.version>3.3.2</mybatisplus.version>
</properties>

<dependencyManagement>
    <dependencies>
        <!-- SpringBoot 版本依賴 -->
        <dependency>
            <groupId>org.springframework.boot</groupId>
            <artifactId>spring-boot-dependencies</artifactId>
            <version>2.1.14.RELEASE</version>
            <type>pom</type>
            <scope>import</scope>
        </dependency>
        <!-- SpringCloud 版本依賴 -->
        <dependency>
            <groupId>org.springframework.cloud</groupId>
            <artifactId>spring-cloud-dependencies</artifactId>
            <version>Greenwich.SR3</version>
            <type>pom</type>
            <scope>import</scope>
        </dependency>
        <!-- mysql -->
        <dependency>
            <groupId>mysql</groupId>
            <artifactId>mysql-connector-java</artifactId>
            <version>${mysql.version}</version>
        </dependency>
        <!-- lombok -->
        <dependency>
            <groupId>org.projectlombok</groupId>
            <artifactId>lombok</artifactId>
            <version>${lombok.version}</version>
        </dependency>
        <!-- log4j -->
        <dependency>
            <groupId>log4j</groupId>
            <artifactId>log4j</artifactId>
            <version>${log4j.version}</version>
        </dependency>
        <!-- log4j 日志門面 -->
        <dependency>
            <groupId>ch.qos.logback</groupId>
            <artifactId>logback-core</artifactId>
            <version>1.2.3</version>
        </dependency>
        <!-- druid -->
        <dependency>
            <groupId>com.alibaba</groupId>
            <artifactId>druid</artifactId>
            <version>${druid.version}</version>
        </dependency>
        <!-- MyBatisPlus -->
        <dependency>
            <groupId>com.baomidou</groupId>
            <artifactId>mybatis-plus-boot-starter</artifactId>
            <version>${mybatisplus.version}</version>
        </dependency>
    </dependencies>
</dependencyManagement>

<build>
    <plugins>
        <plugin>
            <groupId>org.springframework.boot</groupId>
            <artifactId>spring-boot-maven-plugin</artifactId>
        </plugin>
    </plugins>
</build>
創建數據庫和表
創建一個名為 “db01” 的的數據庫,并創建 dept 表
dept 表的建表 SQL 語句如下
create table dept
(
    deptno      bigint auto_increment primary key,
    dname       varchar(255) null,
    db_resource varchar(255) null
);
往表中插入數據
-- 插入數據 DATABASE() 這個函數是顯示具體是當前數據庫的名稱
insert into dept (dname, db_resource) VALUES ('開發部',DATABASE());
insert into dept (dname, db_resource) VALUES ('人事部',DATABASE());
insert into dept (dname, db_resource) VALUES ('財務部',DATABASE());
insert into dept (dname, db_resource) VALUES ('市場部',DATABASE());
insert into dept (dname, db_resource) VALUES ('運維部',DATABASE());
-- 查詢插入后的所有數據
select * from dept;
創建API工程
創建一個子工程,工程名為 SpringCloud-API,并創建表對應的實體類
該子工程的 pom.xml 中依賴配置如下
<dependencies>
    <!-- lombok -->
    <dependency>
        <groupId>org.projectlombok</groupId>
        <artifactId>lombok</artifactId>
    </dependency>
    <!-- MybatisPlus -->
    <dependency>
        <groupId>com.baomidou</groupId>
        <artifactId>mybatis-plus</artifactId>
        <version>3.3.2</version>
    </dependency>
</dependencies>
實體類 Dept.java
@Data
@AllArgsConstructor
@NoArgsConstructor
@Accessors(chain = true)
public class Dept implements Serializable {

    /**
     * 逐漸
     */
    @TableId(value = "deptno" ,type = IdType.AUTO)
    private Long deptNo;
    /**
     * 部門名
     */
    @TableField("dname")
    private String dname;
    /**
     * 這個數據存在哪個數據庫,一個服務對應一個數據庫,同一個信息可能存在不同的數據庫
     */
    @TableField("db_resource")
    private String db_resource;

}
創建生產者
創建一個子工程,工程名為 SpringCloud-Provider-8001
該子工程的 pom.xml 如下
<dependencies>
    <!-- 我們需要拿到實體類,所以需要配置 api module -->
    <dependency>
        <groupId>com.xp</groupId>
        <artifactId>SpringCloud-API</artifactId>
        <version>1.0-SNAPSHOT</version>
    </dependency>
    <dependency>
        <groupId>mysql</groupId>
        <artifactId>mysql-connector-java</artifactId>
    </dependency>
    <dependency>
        <groupId>log4j</groupId>
        <artifactId>log4j</artifactId>
    </dependency>
    <dependency>
        <groupId>ch.qos.logback</groupId>
        <artifactId>logback-core</artifactId>
    </dependency>
    <dependency>
        <groupId>com.alibaba</groupId>
        <artifactId>druid</artifactId>
    </dependency>
    <!-- MybatisPlus -->
    <dependency>
        <groupId>com.baomidou</groupId>
        <artifactId>mybatis-plus-boot-starter</artifactId>
        <version>3.3.2</version>
    </dependency>
    <!-- test -->
    <dependency>
        <groupId>org.springframework.boot</groupId>
        <artifactId>spring-boot-test</artifactId>
    </dependency>
    <!-- web -->
    <dependency>
        <groupId>org.springframework.boot</groupId>
        <!-- 排除tomcat依賴,使用jetty服務器 -->
        <exclusions>
            <exclusion>
                <groupId>org.springframework.boot</groupId>
                <artifactId>spring-boot-starter-tomcat</artifactId>
            </exclusion>
        </exclusions>
    </dependency>
    <!-- jetty -->
    <dependency>
        <groupId>org.springframework.boot</groupId>
        <artifactId>spring-boot-starter-jetty</artifactId>
    </dependency>
</dependencies>
然后配置 SpringBoot 的配置文件 applicaton.yml
# 配置端口號
server:
  port: 8001
# 配置 mybatis
mybatis-plus:
  type-aliases-package: com.xp.model.entity
  configuration:
    map-underscore-to-camel-case: false
    cache-enabled: true
  mapper-locations: classpath:mapper/*Mapper.xml
# 配置數據源
spring:
  application:
    name: springcloud-study-provider
  datasource:
    type: com.alibaba.druid.pool.DruidDataSource
    driver-class-name: org.gjt.mm.mysql.Driver
    url: jdbc:mysql://localhost:3306/db01?useUnicode=true&characterEncoding=utf-8&useSSL=false
    username: root
    password: root
搭建 mvc 三層
創建 mapper 包并創建 DeptMapper 接口
@Mapper
@Repository
public interface DeptMapper extends BaseMapper<Dept> {

    boolean addDept(Dept dept);

}
在 resource 目錄下創建mapper包并在mapper包內創建 DeptMapper.xml 實現 DeptMapper 接口
<?xml version="1.0" encoding="UTF-8" ?>
<!DOCTYPE mapper
        PUBLIC "-//mybatis.org//DTD Config 3.0//EN"
        "http://mybatis.org/dtd/mybatis-3-mapper.dtd">
<mapper namespace="com.xp.mapper.DeptMapper">
    <insert id="addDept">
        insert into dept (dname, db_resource)
        values (#{dname},DATABASE());
    </insert>
</mapper>
在 SpringbBoot 程序主啟動類上加上 mapper 掃描的注解
@SpringBootApplication
@MapperScan("com.xp.mapper") // 掃描mapper接口所在的包
public class Application {

    public static void main(String[] args) {
        SpringApplication.run(Application.class,args);
    }

}
創建 service 包并創建 DeptService 接口及其實現類
DeptService 接口
public interface DeptService extends IService<Dept> {

    boolean addDept(Dept dept);

}
DeptService 接口實現類
@Service
public class DeptServiceImpl extends ServiceImpl<DeptMapper, Dept> implements DeptService {

    @Override
    public boolean addDept(Dept dept) {
        return this.baseMapper.addDept(dept);
    }
}
創建 controller 包,并創建 DeptController 對外提供服務
@RestController
public class DeptController {
@Autowired
DeptService deptService;
@PostMapping("/dept/add")
public boolean addDept(Dept dept){
return deptService.addDept(dept);
}
@GetMapping("/dept/get/{id}")
public Dept get(@PathVariable("id")Long id){
return deptService.getById(id);
}
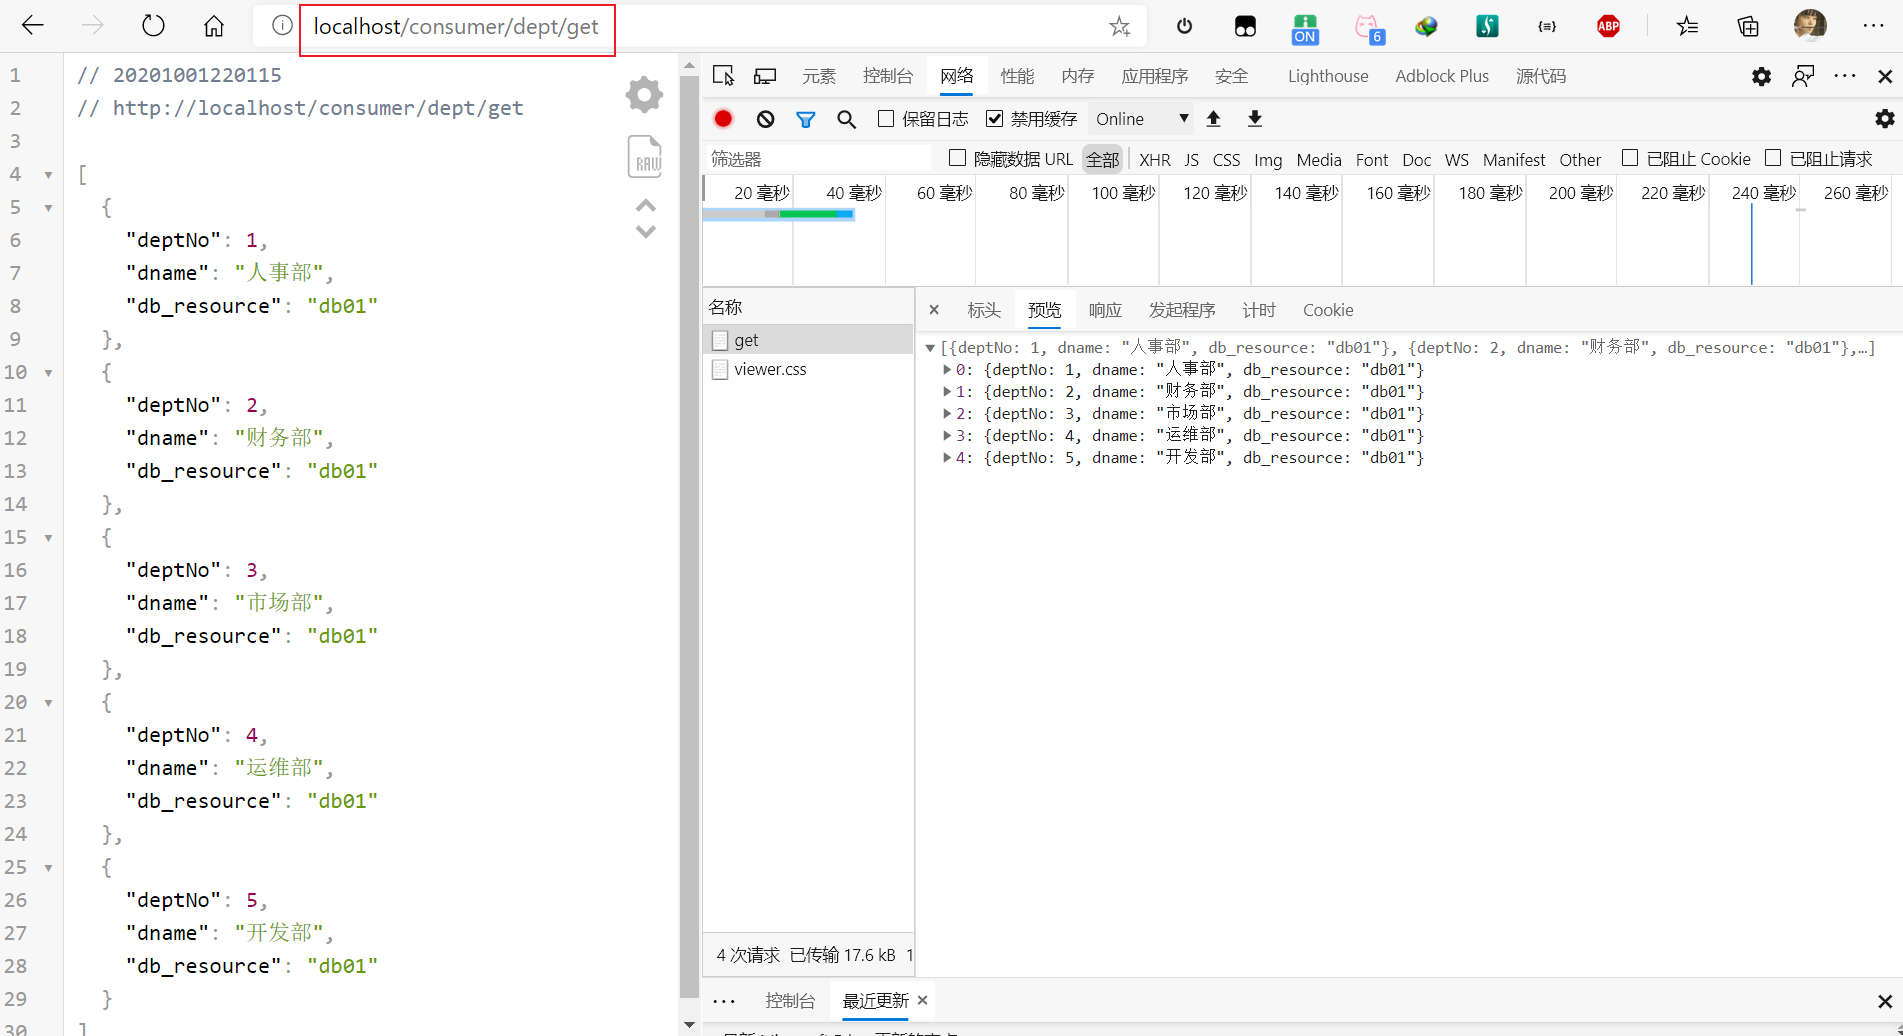
@GetMapping("/dept/get")
public List<Dept> getList(){
return deptService.list();
}
}
到這里,一個簡單的服務生產(提供)者就完成了
我們可以測試一下是否能夠成功使用這個服務
啟動項目,然后訪問 8001 端口的具體接口,比如 http://localhost:8001/dept/get

創建消費者
創建一個子工程,工程名為 SpringCloud-Consumer-80
該工程的 pom.xml 配置文件如下
<dependencies>
    <!-- 我們需要使用到實體類,所以需要引入 api module -->
    <dependency>
        <groupId>com.xp</groupId>
        <artifactId>SpringCloud-API</artifactId>
        <version>1.0-SNAPSHOT</version>
    </dependency>
    <!-- SpringBoot -->
    <dependency>
        <groupId>org.springframework.boot</groupId>
        <artifactId>spring-boot-starter-web</artifactId>
        <exclusions>
            <exclusion>
                <groupId>org.springframework.boot</groupId>
                <artifactId>spring-boot-starter-tomcat</artifactId>
            </exclusion>
        </exclusions>
    </dependency>
    <!-- jetty -->
    <dependency>
        <groupId>org.springframework.boot</groupId>
        <artifactId>spring-boot-starter-jetty</artifactId>
    </dependency>
</dependencies>
application.yml 配置文件如下:
只修改了端口號為 80,因為我們網站默認是80端口訪問,所以如果我們設置服務器啟動的端口號為80端口,我們可以直接使用 http://localhost/XXXX 來訪問具體的項目接口,就跟我們平時上網直接訪問網站一樣(比如百度:http://www.baidu.com,不是http://www.baidu.com:8080),不需要在網址后面加上端口號。
server:
  port: 80
我們學過 SpringBoot 就會知道,SpringBoot 中會有很多 XXXTemplate(比如 JdbcTemplate)。我們也知道 SpringCloud 搭建的微服務是通過 HTTP 的 REST 來進行通信的,所以消費者要調用生產者的服務,就得通過 HTTP 得 REST 來進行調用,SpringCloud 中有提供 RestTemplate 這個類來簡化我們的調用過程。
那么如何使用 RestTemplate 這個類來進行服務的調用呢?
我們只需要將 RestTemplate 這個類注入到 Spring 容器中,然后在需要調用遠程服務的 Controller 中自動注入使用即可
創建一個配置類ConfigBean,并將 RestTemplate 注入到 Spring 容器中
@Configuration
public class ConfigBean {

    // 將 RestTemplate 注入到 Spring 容器中
    @Bean
    public RestTemplate restTemplate(){
        return new RestTemplate();
    }

}
創建 DeptConsumerController 類,并使用 RestTemplate 調用遠程的服務
@RestController
public class DeptConsumerController {

    /**
     * 消費者不應該有 Service 層
     * 所以使用 RestTemplate 來通過 Restful風格請求來調用具體的 service
     * 首先需要將 RestTemplate 注入到 Spring 容器中
     * RestTemplate 提供多種編寫訪問遠程 http 服務的方法,簡單的 RESTFUL 服務模板
     * RestTemplate 中 getForObject 是使用get方式來獲取服務提供者的服務
     * RestTemplate 中 postForObject 是使用post方式來獲取服務提供者的服務
     */
    @Autowired
    private RestTemplate restTemplate;

    // 由于遠程調用服務者的地址前綴是一樣的,所以直接使用常量來防止寫錯
    private static final String REST_URL_PREFIX = "http://localhost:8001";

    @RequestMapping("/consumer/dept/get/{id}")
    public Dept get(@PathVariable("id") Long id){
        return restTemplate.getForObject(REST_URL_PREFIX+"/dept/get/"+id,Dept.class);
    }

    @RequestMapping("/consumer/dept/add")
    public boolean add(Dept dept){
        return restTemplate.postForObject(REST_URL_PREFIX+"/dept/add",dept,Boolean.class);
    }

    @RequestMapping("/consumer/dept/get")
    public List<Dept> getList(){
        return restTemplate.getForObject(REST_URL_PREFIX+"/dept/get",List.class);
    }

}
可能會有小伙伴會問,這個項目怎么沒有 Service 層,這是因為消費者不應該有 Servcie 層,而是應該通過遠程調用 Service 層來完成業務需求。微服務不正是將以前單體應用(all in one)中的服務拆分出來,然后根據具體的項目(消費者)需求調用不同的服務。
接下來,我們測試下消費者是否可以調用生產者提供的服務
先啟動生產者,然后啟動消費者訪問消費者的具體接口
到這里,第一個簡單的 SpringCloud 生產者消費者案例就完成了
5. Eureka 服務注冊與發現
5.1 什么是 Eureka
- 怎么讀? ju?ri?k?
- Netflix 在設計 Eureka 時,遵循的就是 AP 原則
- Eureka 是 Netflix 的一個子模塊,也是核心 模塊之一,Eureka 是一個基于 REST 的服務,用于定位服務,以之實現云端中間件層服務發現和故障轉移,服務注冊與發現對于微服務來說是非常重要的,有了服務注冊于發現,只需要使用服務的標識符,就可以訪問到服務,而不需要修改服務調用的配置文件了,功能類似于 Dubbo 的注冊中心,比如 Zookeeper
5.2 原理講解
-
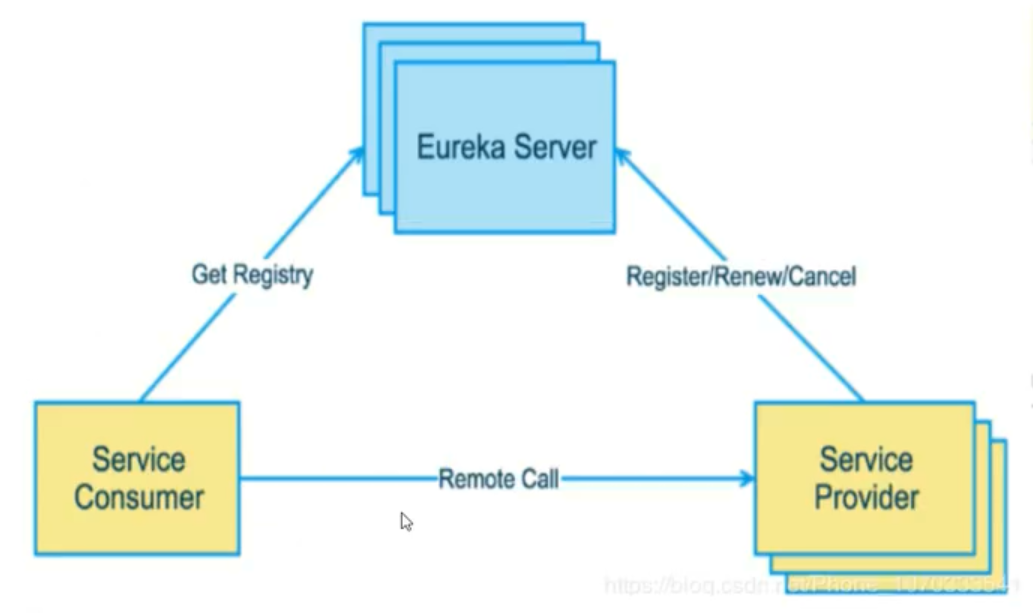
Eureka 的基本架構
-
SpringCloud 封裝了 Netflix 公司開發的 Eureka 模塊來實現服務注冊和發現(對比 Zookeeper)
-
Eureka 采用了 C-S 架構設計,Eureka Server 作為服務注冊功能的服務器,他是服務注冊中心
-
而系統中的其他微服務,使用 Eureka 的客戶端連接到 Eureka Server 并維持心跳鏈接。這樣系統的維護人員就可以通過 Eureka Server 來監控系統中各個微服務是否正常運行,SpringCloud 的一些其他模塊(比如 Zuul)就可以通過 Eureka Server 來發現系統中的其他微服務,并執行相關的邏輯
-
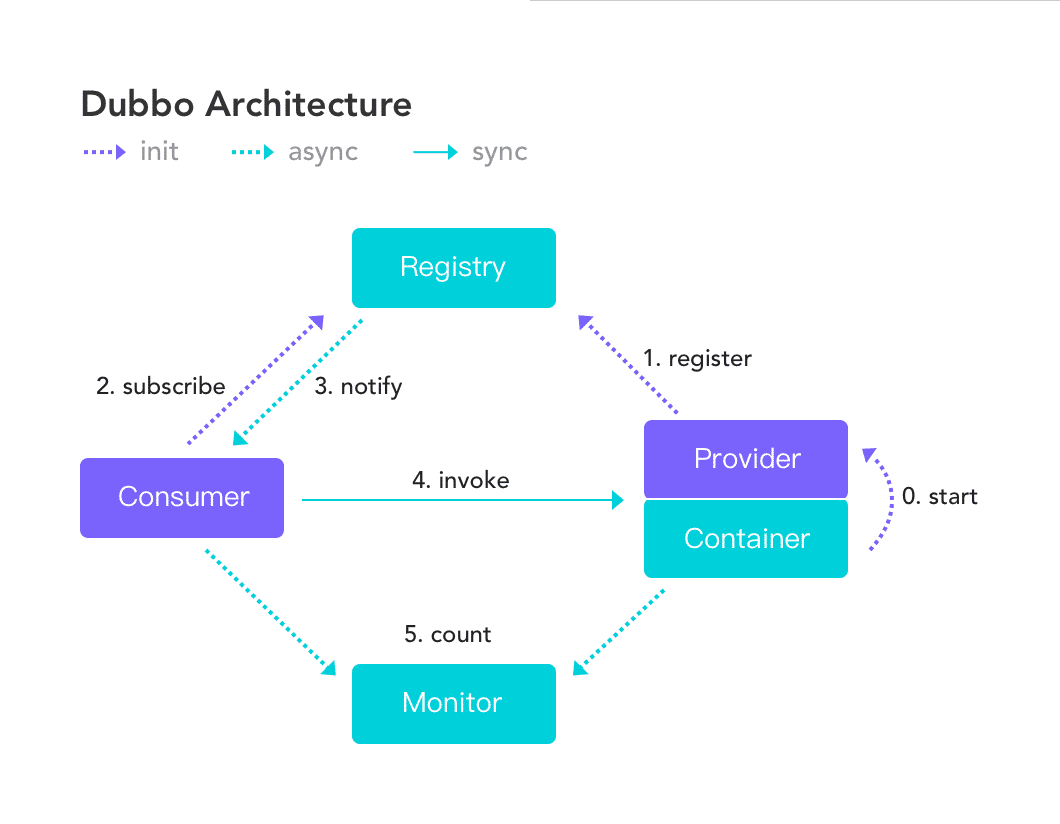
和 Dubbo 架構的對比
-
Eureka 包含兩個組件: Eureka Server 何 Eureka Client
-
Eureka Server 提供服務注冊服務,各個節點啟動后,會在 Eureka Server 中進行注冊,這樣 Eureka Server 中的服務注冊表中存儲所有服務器節點的信息,服務器節點的信息可以在界面中直觀的看到
-
Eureka Client 是一個 Java 客戶端,用于簡化 Eureka Server 的交互,客戶端同時也具備一個內置的,使用輪詢負載算法的負載均衡器。在啟動后,將會向 Eureka Server 發送心跳(默認周期為30秒)。如果 Eureka Server 在多個心跳周期內沒有接收到某個節點的心跳,Eureka Server 將會從服務注冊表中把這個服務節點移除掉(默認周期為90秒)
-
-
三大角色
-
Eureka Server:提供服務的注冊與發現
-
Service Provider:將自身服務注冊到 Eureka 中,從而使消費者方能夠找到
-
Service Consumer:服務消費方從 Eureka 中獲取注冊服務列表,從而找到消費服務
-
5.3 構建步驟
1. eureka-server:
-
創建一個SpringBoot項目 SpringCloud-Eureka-7001
-
導入依賴
pom.xml的依賴如下:
<dependencies> <!-- Eureka --> <dependency> <groupId>org.springframework.cloud</groupId> <artifactId>spring-cloud-starter-eureka-server</artifactId> <version>1.4.7.RELEASE</version> <exclusions> <exclusion> <groupId>org.springframework.boot</groupId> <artifactId>spring-boot-starter-tomcat</artifactId> </exclusion> </exclusions> </dependency> <!-- jetty --> <dependency> <groupId>org.springframework.boot</groupId> <artifactId>spring-boot-starter-jetty</artifactId> </dependency> </dependencies> -
配置 eureka-server
在 resources 目錄下創建 application.yml,然后配置 eureka-server
server: port: 7001 # 端口號 # eureka 配置 eureka: instance: hostname: localhost # 服務端的實例名稱 client: register-with-eureka: false # 表示是否向 eureka 注冊中心注冊自己 fetch-registry: false # fetch-registry 如果為 false,則表示自己為注冊中心,,不去檢索服務 service-url: # 監控頁面 defaultZone: http://${eureka.instance.hostname}:${server.port}/eureka/ -
開啟 eureka-server
在主啟動類上加上 @EnableEurekaServer 注解
// 啟動之后訪問 http://localhost:7001 @SpringBootApplication @EnableEurekaServer // 表示是服務端的啟動類,可以接受別人注冊進來 public class EurekaApplication { public static void main(String[] args) { SpringApplication.run(EurekaApplication.class,args); } } -
啟動項目,測試訪問 Eureka 監控中心
打開瀏覽器,輸入 http://localhost:7001 ,測試訪問 Eureka 監控中心
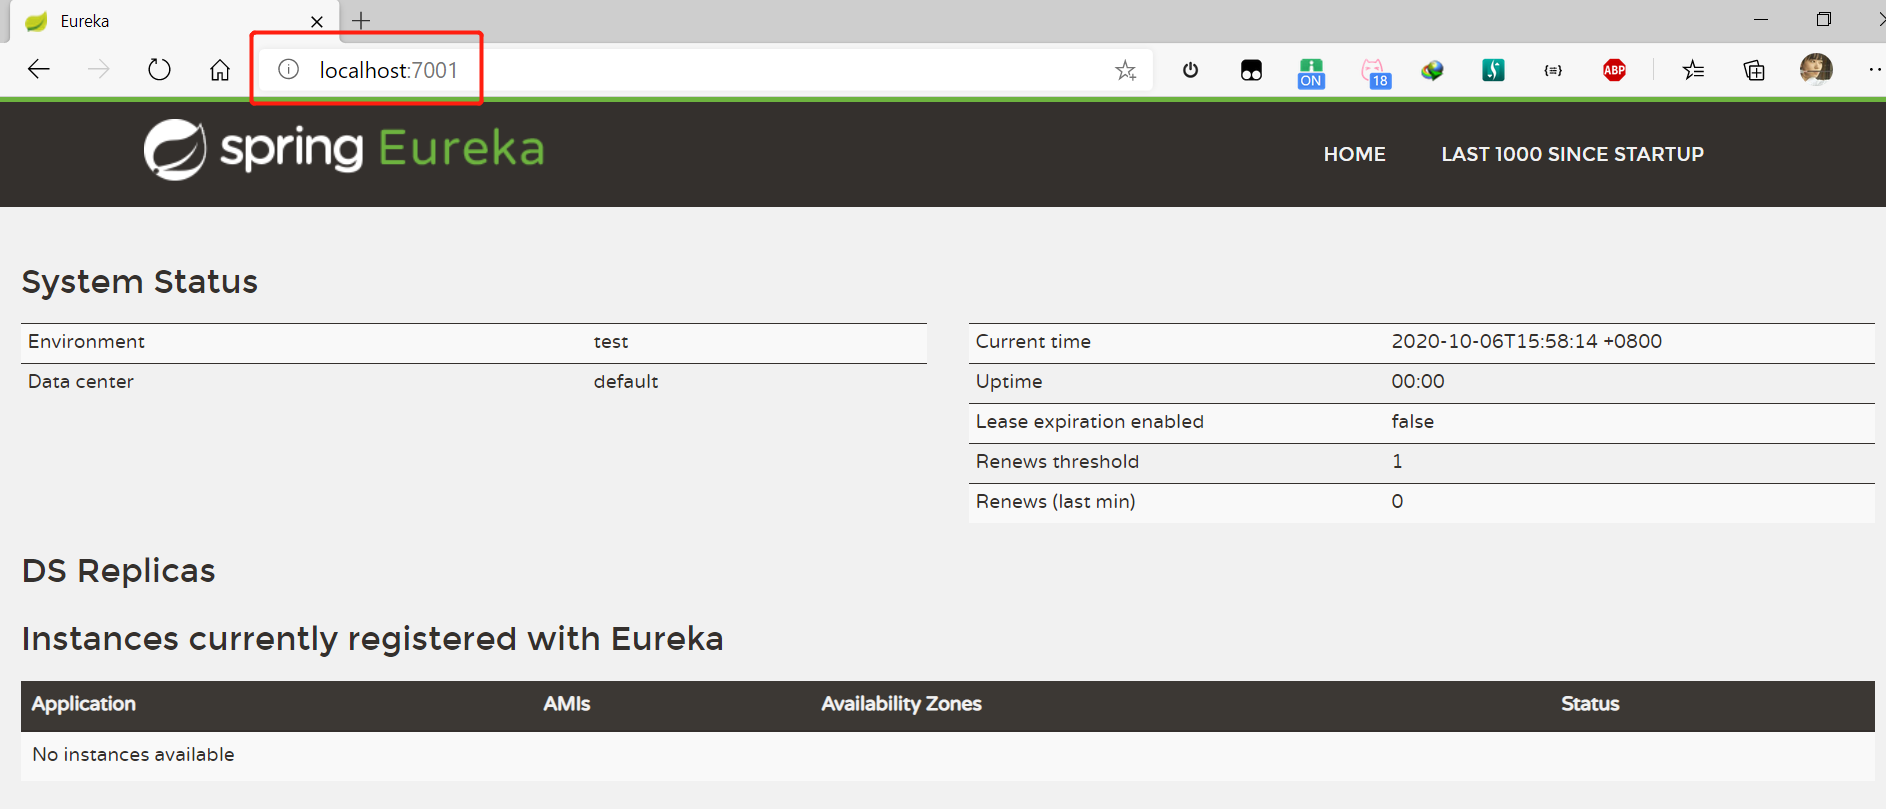
如果可以訪問,代表 eureka-server 啟動成功
2. Service Provider
將我們之前寫的8001服務提供者注冊到7001的eureka中
-
修改8001服務的pom文件,增加eureka支持
<!-- Eureka --> <dependency> <groupId>org.springframework.cloud</groupId> <artifactId>spring-cloud-starter-eureka</artifactId> <version>1.4.7.RELEASE</version> </dependency> <dependency> <groupId>org.springframework.cloud</groupId> <artifactId>spring-cloud-starter-config</artifactId> <version>2.1.4.RELEASE</version> </dependency> -
修改 yml
增加eureka的配置
# eureka 配置 eureka: client: service-url: defaultZone: http://localhost:7001/eureka/ instance: instance-id: springcloud-provider-8001 # 修改 Eureka 中默認描述信息 -
開啟注解支持,讓服務自動注冊到 Eureka 中
@SpringBootApplication @EnableEurekaClient // 在服務啟動后自動注冊到 Eureka 中 @MapperScan("com.xp.mapper") public class Application { public static void main(String[] args) { SpringApplication.run(Application.class,args); } } -
啟動,測試是否成功注冊
訪問 http://localhost:7001 Eureka 監控中心
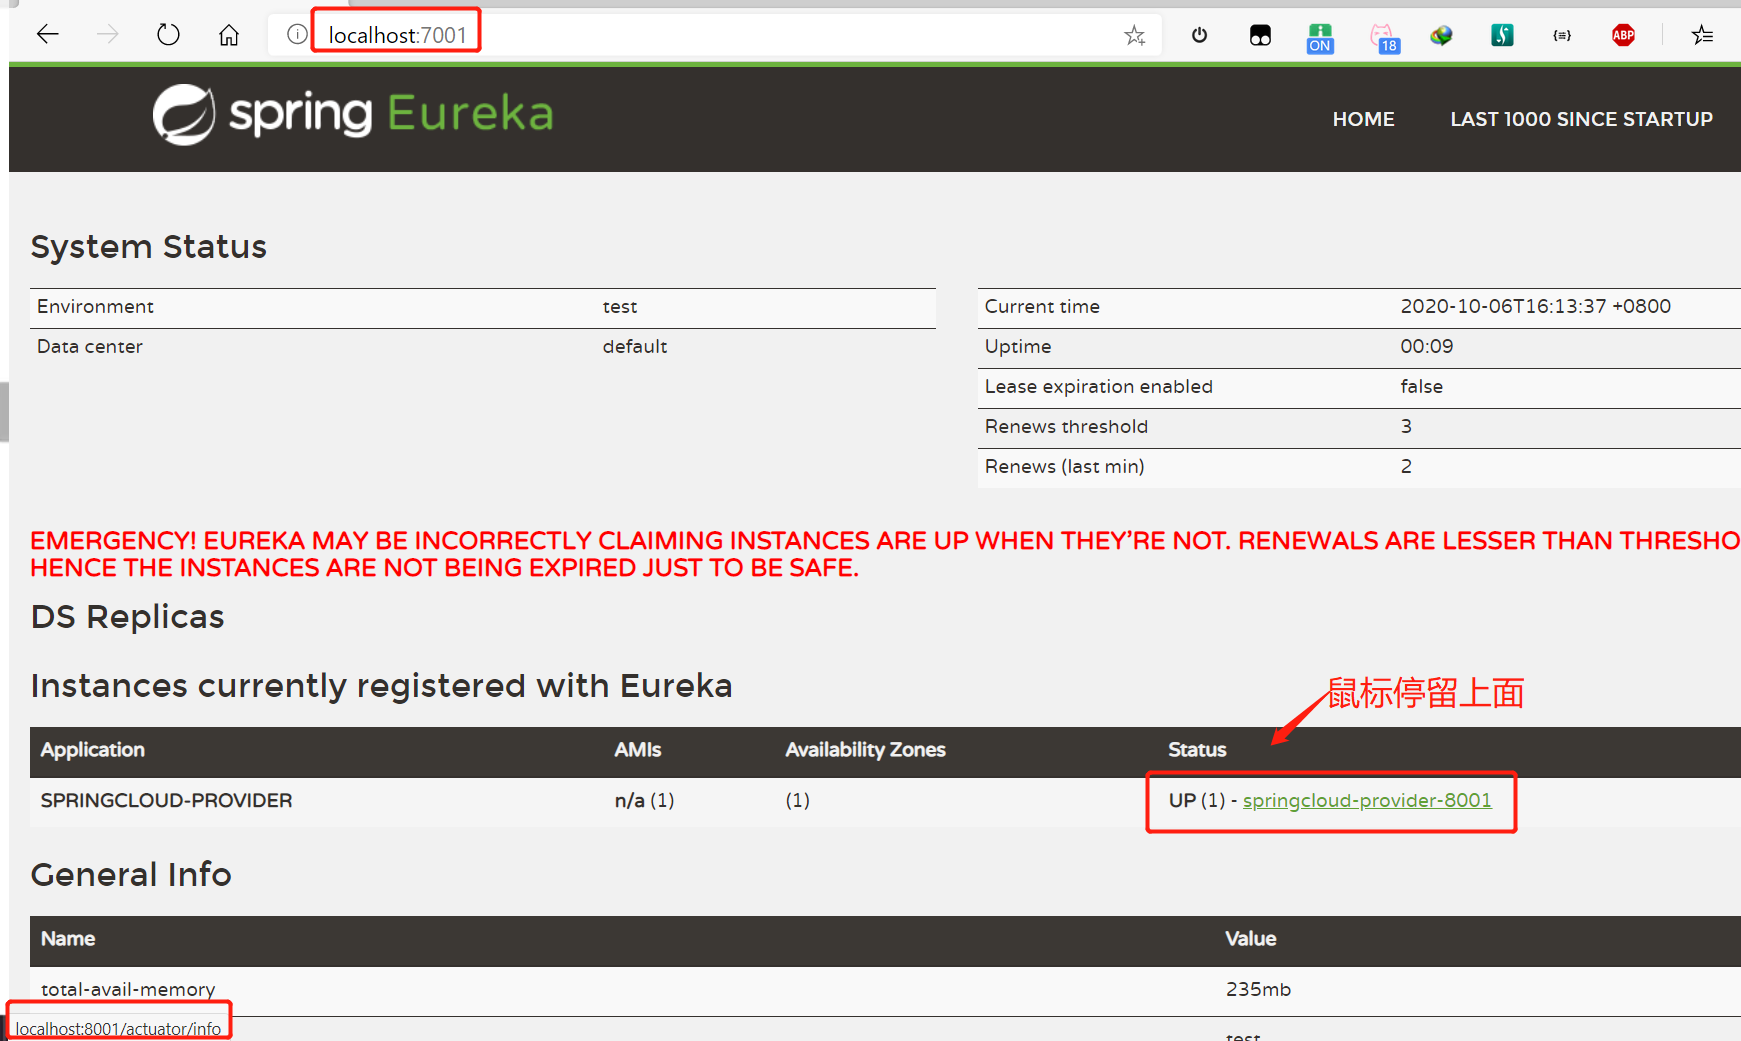
鼠標懸停在如圖所在位置,可以看到該服務的IP信息
3. actuator與注冊微服務信息完善
在yml配置文件中加多一個配置
# eureka 配置
eureka:
  client:
    service-url:
      defaultZone: http://localhost:7001/eureka/
  instance:
    instance-id: springcloud-provider-8001 # 修改 Eureka 中默認描述信息
    prefer-ip-address: true # 訪問路徑可以顯示ip地址
然后重啟刷新
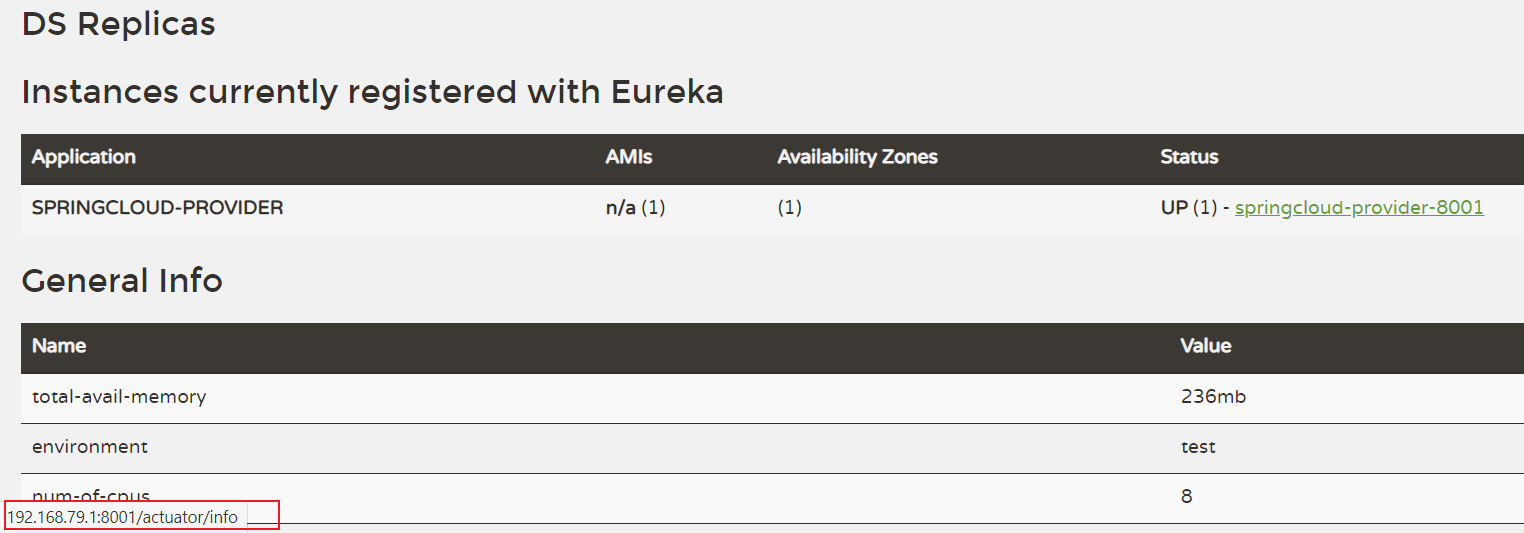
會發現原本的項目訪問地址顯示出了ip地址
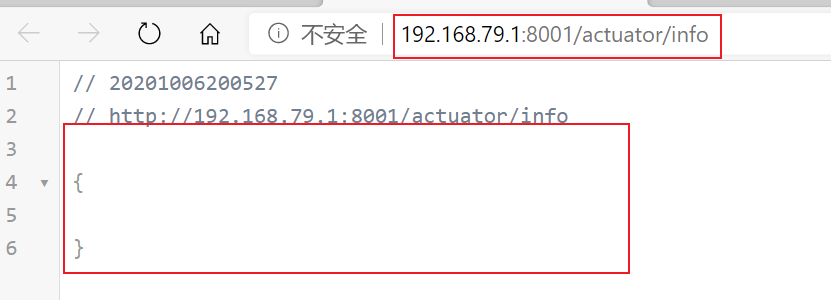
如果我們點擊這個鏈接,會顯示空白錯誤頁,在pom文件中增加如下依賴
<dependency>
    <groupId>org.springframework.boot</groupId>
    <artifactId>spring-boot-starter-actuator</artifactId>
</dependency>
重啟刷新這時會顯示空內容
增加yml配置
# info 配置
info:
  app.name: xp-springcloud
  company.name: xp
然后重啟刷新
就會顯示我們自定義的內容了

4. Eureka 的自我保護機制
在之前的重啟中,應該會出現下面這段紅字,這段紅字的意思是我們Eureka注冊中心注冊的某個服務可能掛了

在 Dubbo+Zookeeper 中,如果注冊的服務檢測到未能連接,則會整個注冊中的服務都不能訪問。刷新頁面,我們仍能在Eureka監控中心中看到這個服務,并且點進取還能查看到這個服務的信息,這是為什么呢?
這是因為Eureka中有自我保護機制。
自我保護機制:好似不如賴活著
一句話總結:某時刻某一個微服務不可以用了,eureka不會立刻清理,依舊會對該微服務的信息進行保存!
- 默認情況下:如果EurekaServer 在一定時間內沒有接收到某個微服務實例的心跳,EurekaServer將會注銷該實例(默認90秒)。但是當時網絡分區故障發生時,微服務與Eureka之間無法正常通信,以上行為可能變得非常危險了——因為微服務本身其實是健康的,此時本部應該注銷這個服務,Eureka通過自我保護機制來解決這個問題——當EurekaServer節點在短時間內丟失過多客戶端時(可能發生了網絡分區故障),那么這個節點就會進入自我保護模式。一旦進入該模式,EurekaServer就會保護服務注冊表中的信息,不再刪除服務注冊表中的數據(也就是不會注銷任何微服務)。當網絡故障恢復猴,該EurekaServer節點會自動推出自我保護模式。
- 在自我保護模式中,EurekaServer會保護服務注冊表中的信息,不再注銷任何服務實例。當它收到的心跳數恢復到閾值以上時,該EurekaServer節點就會自動推出自我保護模式。它的設計哲學就是寧可保留錯誤的服務注冊信息,也部不盲目注銷任何可能健康的服務實例。一句話:好死不如賴活著
- 綜上,自我保護模式是一種應對網絡異常的安全保護措施。它的架構哲學是寧可同時保留所有微服務(健康的微服務和不健康的微服務都會保留),也不盲目注銷任何健康的微服務,使用自我保護模式,可以讓Eureka集群更加的健壯和穩定
- 在SpringCloud中,可以使用eureka.server.enable-self-preservation = false 禁用自我保護模式【不推薦關閉自我保護機制】
5. 8001服務發現Discovery
-
對于注冊進 Eureka 里面的微服務,可以通過服務發現來獲得該服務的信息。【對外暴露服務】
-
修改 DeptController
先自動注入 DiscoveryClient
@Autowired
private DiscoveryClient client;
編寫一個接口,用于我們獲得該服務的信息
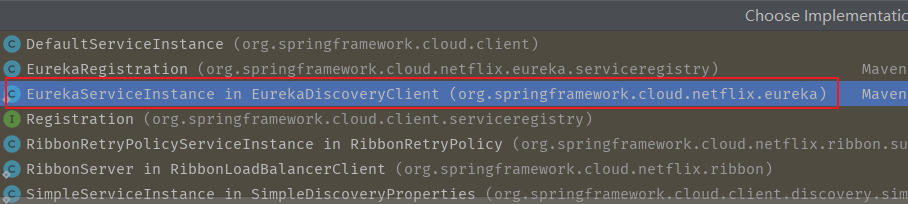
// 注冊進來的微服務,獲取一些消息
@GetMapping("/dept/discovery")
public Object discovery(){
    // 獲得微服務列表的清單
    List<String> services = client.getServices();
    List<ServiceInstance> instances = client.getInstances("SPRINGCLOUD-PROVIDER");
    for (ServiceInstance instance : instances) {
        System.out.println(instance.getHost()+"\t"+instance.getPort()+"\t"+instance.getUri()+"\t"+instance.getServiceId());
    }
    return this.client;
}
點進 ServiceInstance 這個類,發現這個類提供了獲取注冊服務信息的方法
public interface ServiceInstance {
    default String getInstanceId() {
        return null;
    }

    String getServiceId();

    String getHost();

    int getPort();

    boolean isSecure();

    URI getUri();

    Map<String, String> getMetadata();

    default String getScheme() {
        return null;
    }
}
我們使用的這些方法在EurekaServiceInstance中實現
然后在消費者的 DeptConsumerController 中遠程調用這個服務
@RequestMapping("/consumer/dept/discovery")
public Object discovery(){
    return restTemplate.getForObject(REST_URL_PREFIX+"/dept/discovery",Object.class);
}
依次啟動注冊中心,服務提供者,服務消費者,使用瀏覽器訪問測試
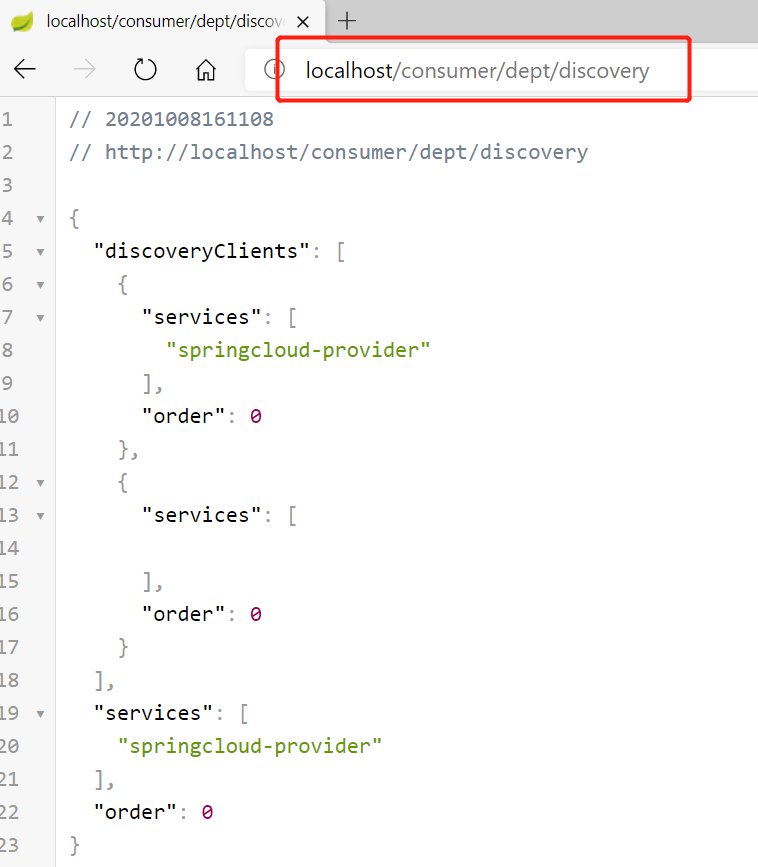
控制臺輸出如下:

5.4 集群配置
-
新建 SpringCloud-Eureka-7002 和 SpringCloud-Eureka-7003 兩個工程項目
-
將 7001 的內容復制到 7002 和 7003 中
-
修改映射配置
windows域名映射
使用資源管理器進入 C:\Windows\System32\drivers\etc 目錄,修改 host 文件
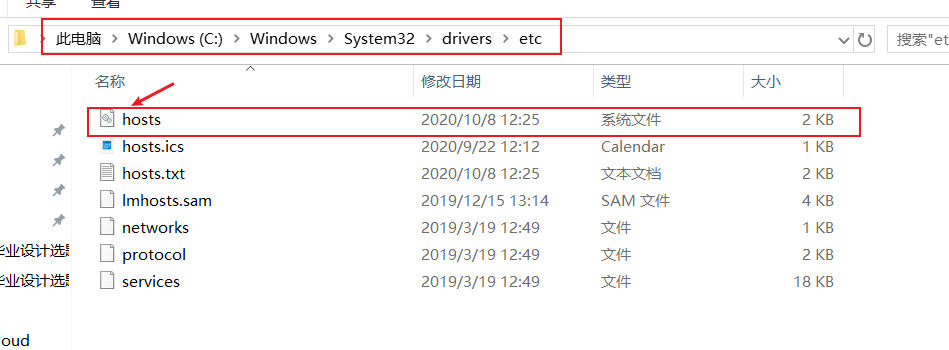
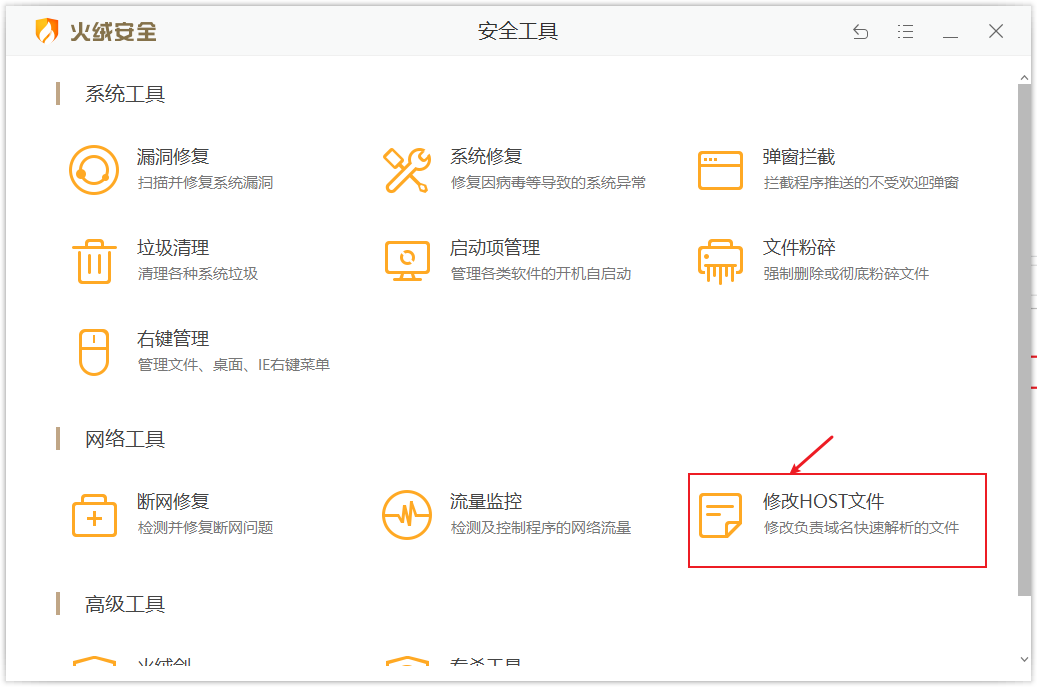
或者使用火絨安全軟件自帶的功能修改
向 host 文件中增加域名映射
127.0.0.1 eureka7001.com
127.0.0.1 eureka7002.com
127.0.0.1 eureka7003.com
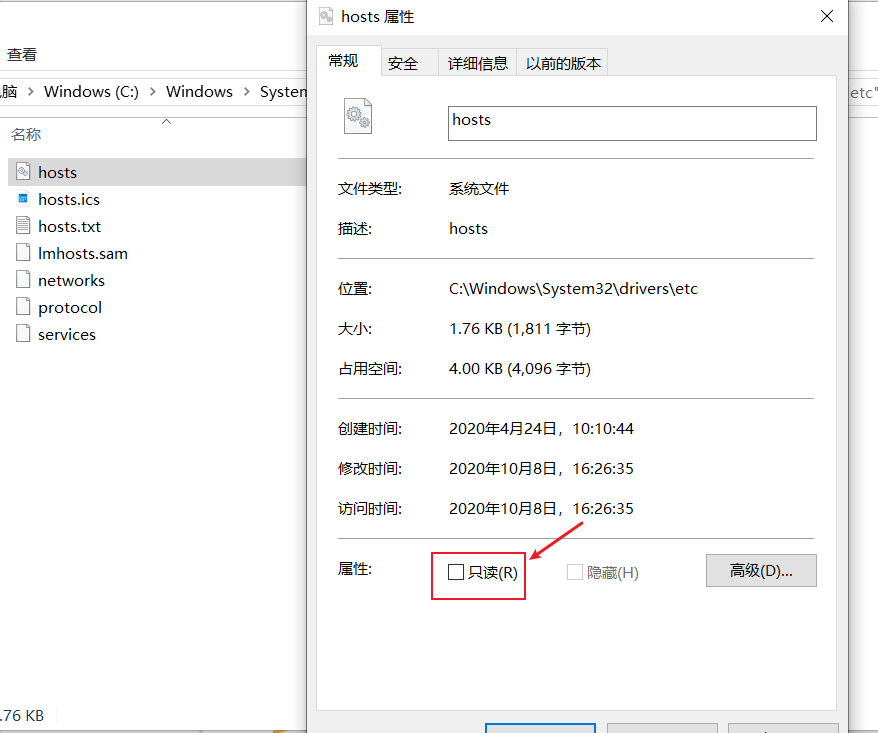
若無法修改,則可能是因為host文件被設置成只讀文件
右鍵–>屬性–>將只讀勾選去掉
-
修改 yml 配置文件
修改注冊中心啟動的端口號以及實例的主機名,并關聯集群
register-with-eureka設置為true或者不設置
關聯集群時,將其他注冊中心的訪問地址填寫在 eureka.client.service-url.defaultZone 中,使用逗號隔開
server: port: 7003 # Eureka eureka: instance: hostname: eureka7003.com client: register-with-eureka: true # 向Eureka注冊中心注冊自己 fetch-registry: false # 表示自己是注冊中心,不去檢索服務 service-url: # 單機:http://${eureka.instance.hostname}:${server.port}/eureka/ # 集群(關聯):使用逗號隔開,關聯其他的注冊中心 defaultZone: http://eureka7001.com:7001/eureka/,http://eureka7002.com:7002/eureka/ -
啟動 Eureka 集群
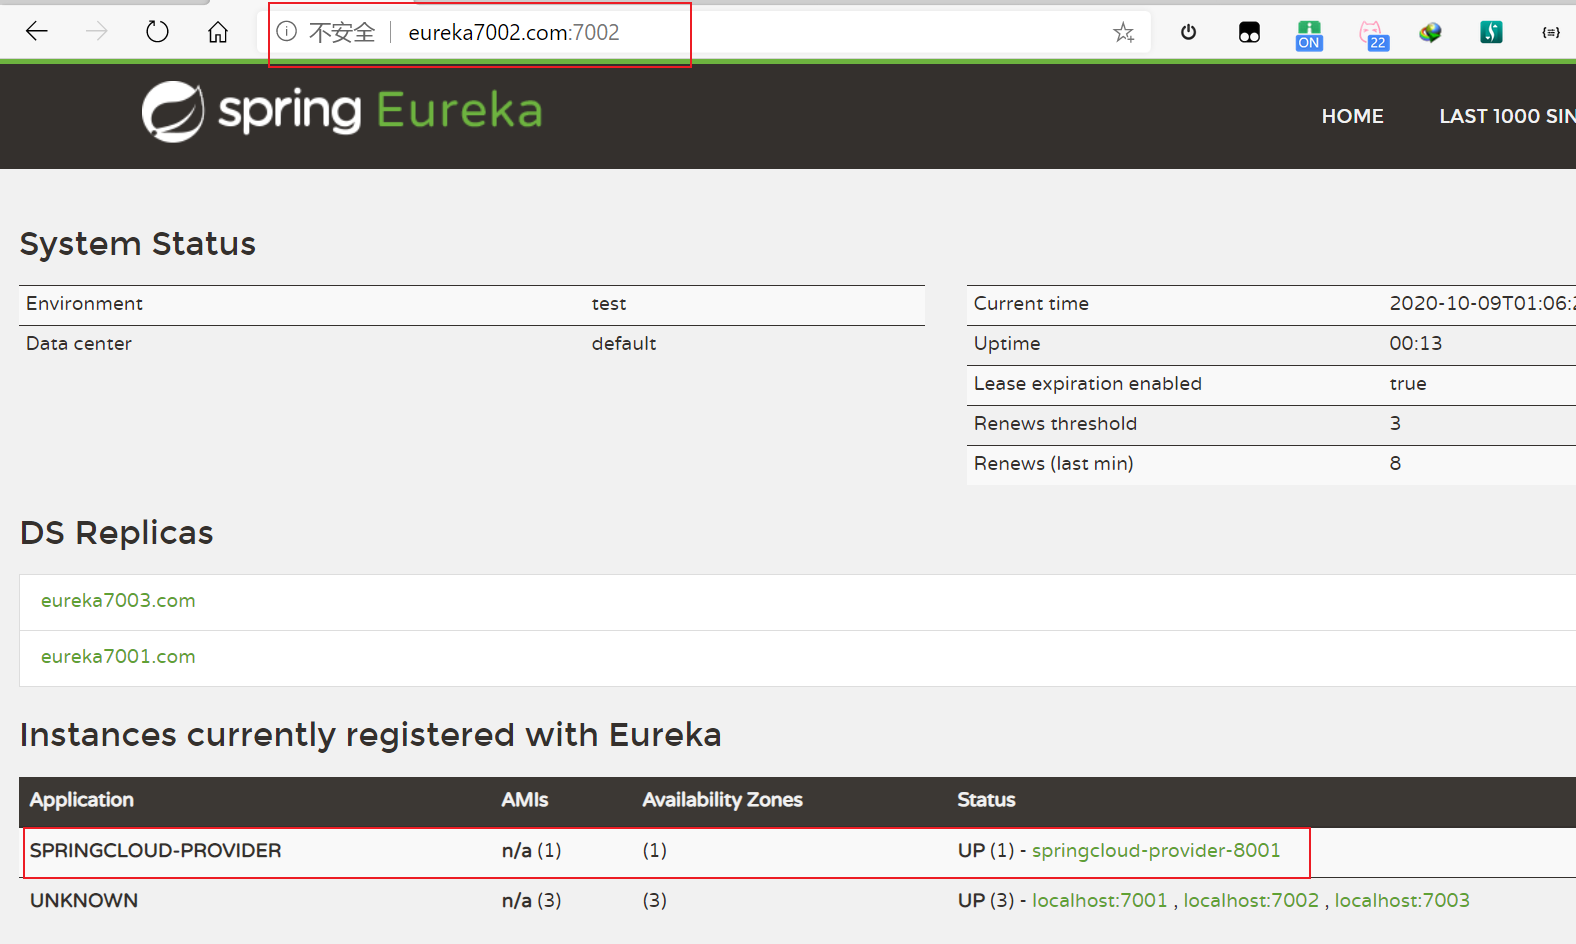
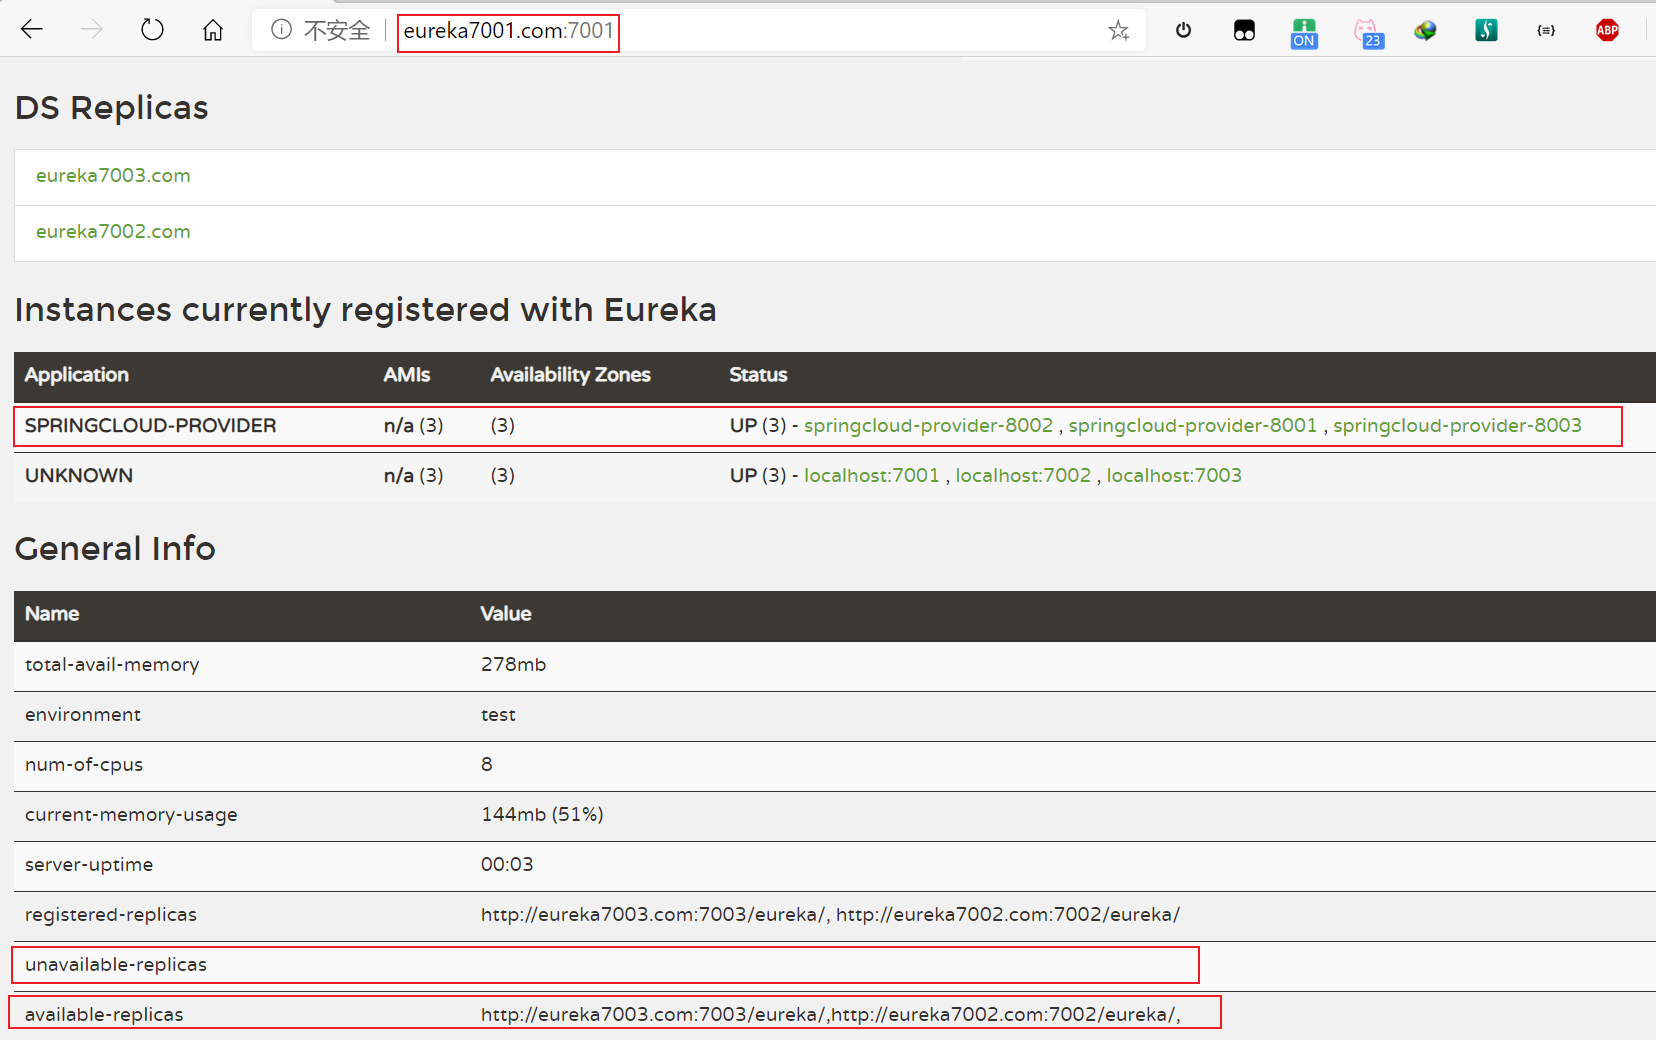
啟動 7001,7002和7003注冊中心,訪問任意一個服務注冊中心監控頁面
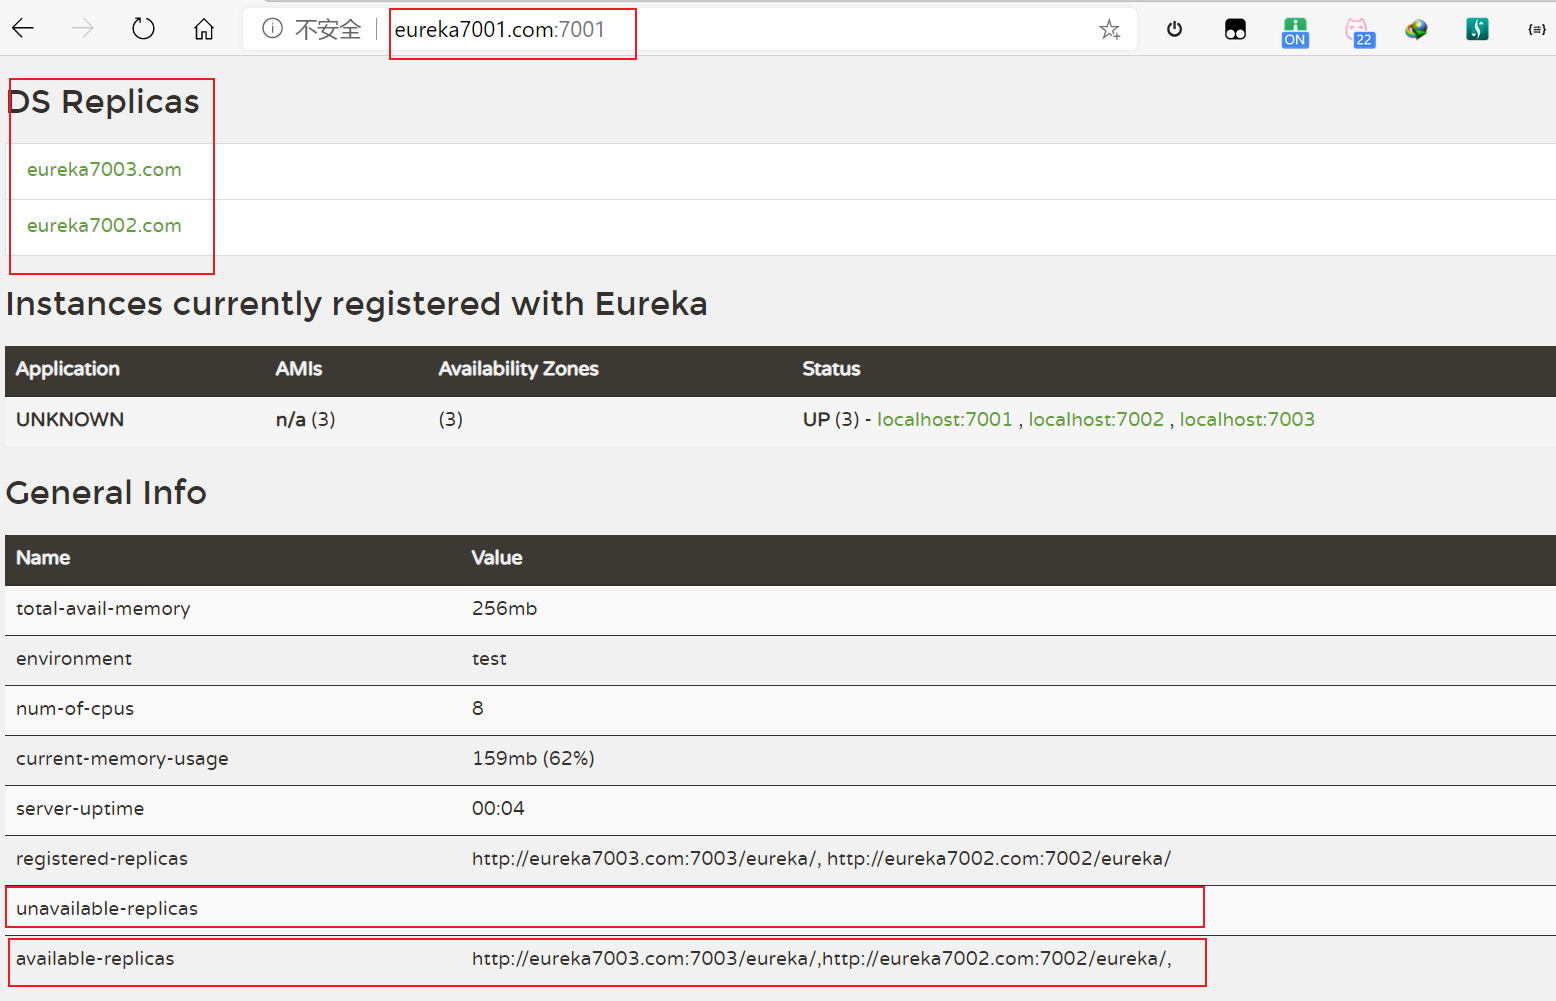
DS Replicas 中有其他注冊中心且unavailable-replicas為空,available-replicas中有其他注冊中心,則表示Eureka集群搭建成功
-
將服務注冊到集群中
修改8001服務提供者的 yml 配置文件,defaultZone中增加Eureka注冊中心,并使用逗號隔開
# eureka 配置
eureka:
  client:
    service-url:
      defaultZone: http://eureka7001.com:7001/eureka/,http://eureka7002.com:7002/eureka/,http://eureka7003.com:7003/eureka/
  instance:
    instance-id: springcloud-provider-8001 # 修改 Eureka 中默認描述信息
    prefer-ip-address: true # 訪問路徑可以顯示ip地址
開啟8001服務,然后分別訪問每個注冊中心的監控頁面,會發現每個注冊中心中都注冊了這個服務
5.5 對比 Zookeeper
回顧CAP原則
RDBMS(MySQL、Oracle、sqlServer) —> ACID
NoSQL(redis、mongodb) —> CAP11
ACID是什么?
- A(Atomicity)原子性
- C(Consistency)一致性
- I(Isolation)隔離性
- D(Durability)持久性
CAP是什么?
- C(Consistency)強一致性
- A(Availability)可用性
- P(Partition tolerance)分區容錯性
CAP的三進二:CA、AP、CP
作為服務注冊中心,Eureka比Zookeeper好在哪里?
著名的CAP理論指出,一個分布式系統不可能同時C(一致性)、A(可用性)、P(容錯性),由于分區容錯性P在分布式系統中是必須要保證的,因此我們只能在A和C之間進行權衡
- Zookeeper 保證的是CP
- Eureka 保證的是AP
Zookeeper保證的是CP
當向服務注冊中心查詢服務列表時,我們可以容注冊中心返回的是幾分鐘以前的注冊信息,但不能接受服務直接down掉不可用,也就是說,服務注冊功能對可用性的要求要高于一致性。但是zk會出現這樣一種情況,當master節點因為網絡故障與其他節點失去聯系時,剩余節點會重新進行leader選舉。問題在于,選舉leader的時間太長,30-120s,且選舉期間整個zk集群都是不可用的,這就導致在選舉期間注冊服務癱瘓,在云部署的環境下,因為網絡問題使得zk集群失去master節點是較大概率會發生的事件,雖然服務最終能夠恢復,但是漫長的選舉事件導致的注冊長期不可用是不能容忍的。
Eureka保證的是AP
Eureka看明白了這一點,因此在設計時就優先保證可用性,Eureka各個節點都是平等的,幾個節點掛掉不會影響正常節點的工作,剩余的節點依然可以提供注冊和查詢服務。而Eureka的客戶端在向某個Eureka注冊時,如果發現連接失敗,則會自動切換至其他節點,只要有一臺Eureka還在,就能保證注冊服務的可用性,只不過查到的信息可能不是最新的,除此之外,Eureka還有一種自我保護機制,日過在15分鐘內超過85%的節點都沒有正常的心跳,那么Eureka默認為客戶端與注冊中心出現了網絡故障,此時會出現一下幾種情況:
- Eureka不再從注冊列表中移除因為長時間沒收到心跳而應該過期的服務
- Eureka任然能夠接受新服務的注冊和查詢請求,但是不會被同步到其他節點(即保證當前節點依然可用)
- 當網絡穩定時,當前實例新的注冊信息會被同步到其他節點中
因此,Eureka可以很好地應對因網絡故障導致部分節點失去聯系地情況,而不會像Zookeeper那樣使整個注冊服務癱瘓
6. Spring Cloud Ribbon
6.1 Ribbon 是什么?
-
Spring Cloud Ribbon 是基于 Netflix Ribbon 實現的一套==客戶端負載均衡的工具==
-
簡單的說,Ribbon 是 Netflix發布的開源項目,主要功能是提供客戶端的軟件負載均衡算法,將 NetFlix 的中間層服務連接在一起。Ribbon 的客戶端組件提供一系列完整的配置項如:連接超時,重試等等。簡單的說,就是在配置文件中列出 LoadBalancer(簡稱LB:負載均衡)后面所有的機器,Ribbon 會自動地幫助你基于某種規則(如簡單輪詢,隨機連接等等)去連接這些機器,我們也很容易使用 Ribbon 實現自定義地負載均衡算法!
6.2 Ribbon 能干嘛?
-
LB,即負載均衡(Load Balance),在微服務或分布式集群中經常用地一種應用。
-
負載均衡簡單地說就是將用戶地請求平攤地分配到多個服務上,從而達到系統的HA(高可用)。
-
常見的負載均衡軟件有 Nginx,Lvs 等等
-
dubbo、SpringCloud 中均給我們提供了負載均衡,SpringCloud的負載均衡算法可以自定義
-
負載均衡簡單分類:
-
集中式LB
- 即在服務的消費方和提供方之間使用獨立的LB設施,如Nginx,由該實施負責把訪問請求通過某種策略轉發至服務的提供方!
-
進程式LB
- 將LB邏輯集成到消費方,消費方從服務注冊中心獲知有哪些地址可用,然后自己再從這些地址中選出一個合適的服務器。
- Ribbon就是屬于進程式LB,它只是一個類庫,集成于消費方進程,消費方通過它來獲取提供方的地址!
-
6.3 使用Ribbon實現負載均衡
創建2個數據庫,分別為db02和db03,出了db_resourece 字段的內容不相同,其他的數據內容完全相同
# 創建數據庫
create database db03;
# 使用剛剛創建的數據庫
use db03;
# 創建 dept 表
create table dept
(
    deptno      bigint auto_increment
        primary key,
    dname       varchar(255) null,
    db_resource varchar(255) null
);
# 插入數據
insert into dept (dname, db_resource) VALUES ('開發部',DATABASE());
insert into dept (dname, db_resource) VALUES ('人事部',DATABASE());
insert into dept (dname, db_resource) VALUES ('財務部',DATABASE());
insert into dept (dname, db_resource) VALUES ('市場部',DATABASE());
insert into dept (dname, db_resource) VALUES ('運維部',DATABASE());
新建2個工程項目SpringCloud-Provider-8002、SpringCloud-Provider-8003,復制8001中的代碼以及配置文件到這兩個項目中(相當于將8001項目復制兩份)
修改8002和8003中yml配置文件中的服務端口號,連接的數據庫和eureka實例描述
注:yml配置中 spring.application.name 不能修改,因為負載均衡的前提是服務名一致
# 修改端口號為800x
server:
  port: 8002
# 修改數據庫為800x
spring:
  application:
  	name: springcloud-provider # 這個不能改,服務名稱一致是負載均衡的前提
  datasource:
      type: com.alibaba.druid.pool.DruidDataSource
      driver-class-name: org.gjt.mm.mysql.Driver
      url: jdbc:mysql://localhost:3306/db02?useUnicode=true&characterEncoding=utf-8&useSSL=false
      username: root
      password: root
# eureka 配置,修改實例描述為800x
eureka:
  client:
    service-url:
      defaultZone: http://eureka7001.com:7001/eureka/,http://eureka7002.com:7002/eureka/,http://eureka7003.com:7003/eureka/
  instance:
    instance-id: springcloud-provider-8002 # 修改 Eureka 中默認描述信息
    prefer-ip-address: true # 訪問路徑可以顯示ip地址
修改消費者80的pom文件,添加eureka和ribbon依賴
<!-- ribbon -->
<dependency>
    <groupId>org.springframework.cloud</groupId>
    <artifactId>spring-cloud-starter-ribbon</artifactId>
    <version>1.4.7.RELEASE</version>
</dependency>
<!-- eureka -->
<dependency>
    <groupId>org.springframework.cloud</groupId>
    <artifactId>spring-cloud-starter-eureka</artifactId>
    <version>1.4.7.RELEASE</version>
</dependency>
修改消費者80的yml,添加eureka配置
server:
  port: 80

# eureka
eureka:
  client:
    register-with-eureka: false # 不向Eureka注冊中心注冊自己
    service-url:
      defaultZone: http://eureka7001.com:7001/eureka/,http://eureka7002.com:7002/eureka/,http://eureka7003.com:7003/eureka/
開啟負載均衡
在 ConfigBean 類中將 RestTemplate 添加 @LoadBalanced 注解開啟負載均衡
@Configuration
public class ConfigBean {

    // 配置負載均衡實現 RestTemplate
    @Bean
    @LoadBalanced // ribbon
    public RestTemplate restTemplate(){
        return new RestTemplate();
    }

}
修改消費者80的Controller,因為我們使用負載均衡,所以我們應該訪問服務名
// 沒有負債均衡前 private static final String REST_URL_PREFIX = "http://localhost:8001";
// 使用負載均衡,這里應該是一個變量,我們使用服務名來訪問
private static final String REST_URL_PREFIX = "http://SPRINGCLOUD-PROVIDER";
消費者80的啟動類,添加 @RibbonClient 注解
@SpringBootApplication
@EnableEurekaClient
@RibbonClient
public class ConsumerApplication {

    public static void main(String[] args) {
        SpringApplication.run(ConsumerApplication.class,args);
    }

}
分別依次啟動7001、7002、7003 eureka注冊中心,8001、8002、8003 服務提供者,80 服務消費者
先訪問 eureka 監控頁面,查看服務是否注冊成功
然后通過消費者訪問接口遠程調用服務: http://localhost/consumer/dept/get/1
查看db_resource的變化,我們會發現它會循環出現db01,db02,db03,至此我們成功使用Ribbon實現負載均衡
6.4 Ribbon 負載均衡算法
6.4.1 IRule
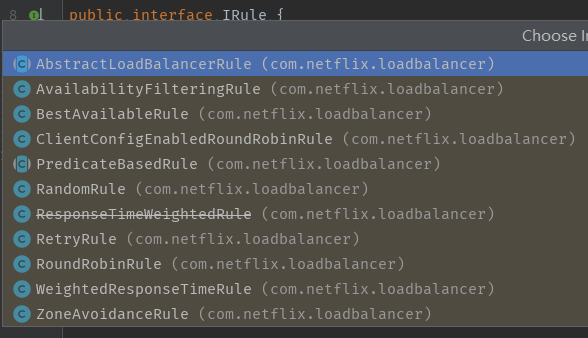
Ribbon 的負載均衡算法都是實現了 IRule 接口
點進 IRule 接口,查看其實現類以及繼承關系
實現類
繼承關系
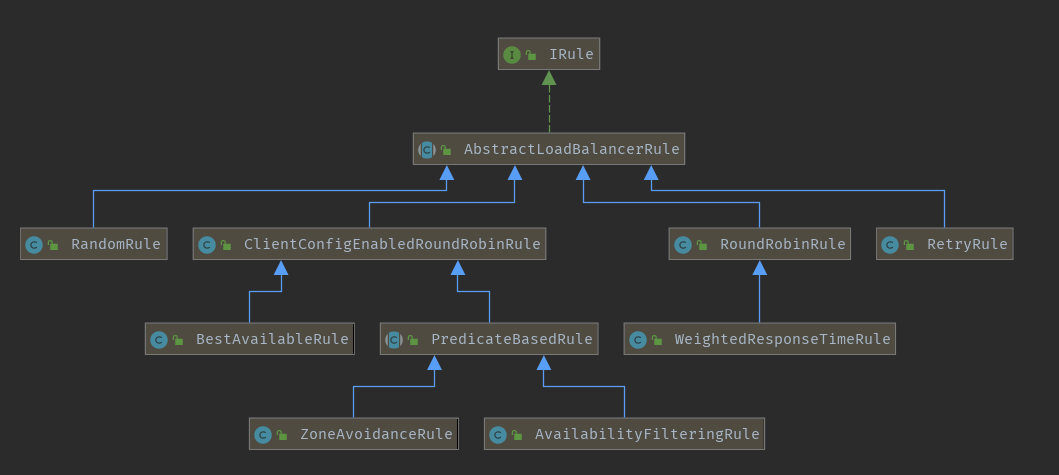
算法說明:
RoundRobinRule:默認輪詢方式
RandomRule:隨機方式
AvailabilityFilteringRule:會先過濾掉跳閘,訪問故障的服務,對剩下的服務進行輪詢方式
RetryRule:會先按照輪詢獲取服務,如果服務獲取失敗,會在指定的時間內進行重試,若再獲取不到則會放棄
BestAvaliableRule:會先過濾掉由于多次訪問故障而處于斷路器跳閘狀態的服務,然后選擇一個并發量最小的服務
ZoneAvoidanceRule:根據性能和可用性來選擇
6.4.2 分析RoundRobinRule算法源碼
RoundRobinRule 類中核心的算法就在 choose(ILoadBalancer lb, Object key) 這個方法中
public Server choose(ILoadBalancer lb, Object key) {
    // 判斷是否進行負載均衡
    if (lb == null) {
        log.warn("no load balancer");
        return null;
    }

    Server server = null;
    // 嘗試獲取下一個服務的次數,用于計數
    int count = 0;
    while (server == null && count++ < 10) {
        // 獲取存活的服務
        List<Server> reachableServers = lb.getReachableServers();
        // 獲取所有服務
        List<Server> allServers = lb.getAllServers();
        // 存活服務的數量
        int upCount = reachableServers.size();
        // 所有服務的數量
        int serverCount = allServers.size();

        // 如果存活服務的數量為0或者總服務數量為0,則不會進行負載均衡
        if ((upCount == 0) || (serverCount == 0)) {
            log.warn("No up servers available from load balancer: " + lb);
            return null;
        }

        // 獲取下一個服務的索引值
        int nextServerIndex = incrementAndGetModulo(serverCount);
        // 通過索引值獲取下一服務
        server = allServers.get(nextServerIndex);

        // 如果下一個服務為 null(空),線程禮讓,稍等片刻后進行下一次嘗試獲取下一個服務
        if (server == null) {
            Thread.yield();
            continue;
        }

        // 如果下一個服務存在,則返回下一個服務
        if (server.isAlive() && (server.isReadyToServe())) {
            return (server);
        }

        // 上面的條件都不成立,則認為服務不存在,為 null,進行下一次負載均衡嘗試
        server = null;
    }

    // 如果嘗試獲取下一個服務的次數達到10次或以上,則提示嘗試10次后,沒有可用的服務
    if (count >= 10) {
        log.warn("No available alive servers after 10 tries from load balancer: "
                + lb);
    }
    // 嘗試10次或以上后沒有獲取到服務,返回null
    return server;
}

//下一次獲取的位置
private AtomicInteger nextServerCyclicCounter;
private int incrementAndGetModulo(int modulo) {
    for (;;) {
        int current = nextServerCyclicCounter.get();
        int next = (current + 1) % modulo;
        // 由于可能是多線程同時訪問,所有使用 CAS 來確保線程安全
        if (nextServerCyclicCounter.compareAndSet(current, next))
            return next;
    }
}
6.4.3 自定義負載均衡算法
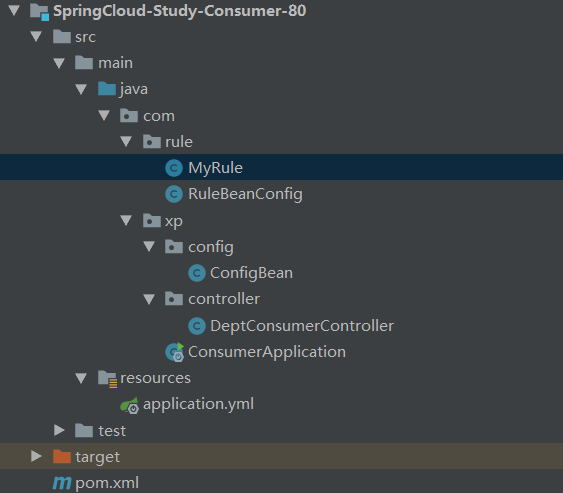
在消費者80啟動類的上一級目錄創建一個包rule,然后創建兩個類 MyRule 和 RuleBeanConfig,具體結構如下:
為什么不能放在啟動類的上下文中呢?
在 Ribbon 的官方文檔中6.2 Customizing the Ribbon Client(定制 Ribbon 客戶端)有明確的提示 (官方文檔:https://cloud.spring.io/spring-cloud-static/spring-cloud-netflix/2.1.0.RC2/single/spring-cloud-netflix.html#spring-cloud-ribbon)
自定義配置類必須是有@Configuration注解的類s,不過需要注意的是它不能在主應用程序上下文的@ComponentScan中。否則,它會被所有的@RibbonClients共享。如果你使用@ComponentScan(或者@SpringBootApplication),你應該采取措施避免包含它(例如:可以將其放在不重疊的包中或在@ComponentScan指定顯式掃描包)
The
CustomConfigurationclas must be a@Configurationclass, but take care that it is not in a@ComponentScanfor the main application context. Otherwise, it is shared by all the@RibbonClients. If you use@ComponentScan(or@SpringBootApplication), you need to take steps to avoid it being included (for instance, you can put it in a separate, non-overlapping package or specify the packages to scan explicitly in the@ComponentScan).
編寫 MyRule ,自定義負載均衡算法
先隨便將 IRule 的一個算法子類復制粘貼到 MyRule 中(這里是將 RandomRule 內的代碼拷貝修改的)作為算法框架,然后根據自己的算法修改其中的內容
這里的算法是每個服務循環5次后切換到其他服務
public class MyRule extends AbstractLoadBalancerRule {

	// 用于記錄循環次數
    private int total = 0;
    // 當前服務索引值
    private int currentIndex = 0;

    /**
     * 自定義負載均衡算法
     * 每個服務循環5次后切換到其他服務
     */
    public Server choose(ILoadBalancer lb, Object key) {
        if (lb == null) {
            return null;
        }
        Server server = null;

        while (server == null) {
            if (Thread.interrupted()) {
                return null;
            }
            List<Server> upList = lb.getReachableServers();
            List<Server> allList = lb.getAllServers();

            int serverCount = allList.size();
            if (serverCount == 0) {
                return null;
            }

            // --------------自定義的 ribbon 負載均衡算法
            // 當訪問了5次時
            if(total>4){
                // 重置計數
                total = 0;
                // 當前服務索引值+1 = 下一個服務的索引值
                currentIndex ++;
                // 如果下一個服務索引值 >= 存活的服務數
                if (currentIndex >= upList.size()){
                    // 重置服務索引值,重新開始輪詢
                    currentIndex = 0;
                }
            }
            // 獲取下一個服務
            server = upList.get(currentIndex);
            // 計數+1
            total ++;
            // --------------

            if (server == null) {
                Thread.yield();
                continue;
            }

            if (server.isAlive()) {
                return (server);
            }

            server = null;
            Thread.yield();
        }

        return server;

    }

    @Override
    public Server choose(Object key) {
        return choose(getLoadBalancer(), key);
    }

    @Override
    public void initWithNiwsConfig(IClientConfig clientConfig) {
        // TODO Auto-generated method stub
    }
}
將 MyRule 注冊到 Spring 容器中
@Configuration
public class RuleBeanConfig {

    @Bean
    public MyRule myRule(){
        return new MyRule();
    }

}
在主啟動類中關聯 Rule 配置
@SpringBootApplication
@EnableEurekaClient
// name 為服務名,configuration為自定義算法規則的 Spring 配置類
@RibbonClient(name = "SPRINGCLOUD-PROVIDER",configuration = RuleBeanConfig.class)
public class ConsumerApplication {

    public static void main(String[] args) {
        SpringApplication.run(ConsumerApplication.class,args);
    }

}
依次啟動注冊中心,服務提供者,服務消費者,訪問 http://localhost/consumer/dept/get/1 ,查看算法是否成功生效
7. Feign 負載均衡
7.1 簡介
feign 是聲明式的 web service 客戶端,它讓微服務之間的調用變得更簡單了,類似 Controller 調用 Service,Spring Cloud 集成了 Ribbon 和 Eureka,可在使用 Feign 時提供負載均衡的 http 客戶端。
只需要創建一個接口,然后天界注解即可!
Feign,主要是社區,大家都習慣面向接口編程,這個是很多開發人員的規范,調用微服務訪問的兩種方法:
- 微服務名字【Ribbon】
- 接口和注解【Feign】
Feign 能干什么
- Feign 旨在使編寫 Java http 客戶端變得更容易
- 前面在使用 Ribbon + RestTemplate 時,利用 RestTemplate 對 Http 請求的封裝處理,形成了一套模板化的調用方法,但是在實際開發中,由于對服務依賴的調用可能不止一處,往往一個接口會被多處調用,所以通常都會針對每個微服務自行封裝一些客戶端類來包裝這些依賴服務的調用,所以,Feign 在此基礎上做了進一步封裝,由他來幫助我們定義和實現依賴服務接口的定義,==在Feign的實現下,我們只需要創建一個接口并使用注解的方式來配置它(類似于以前Dao接口上標注 Mapper 注解,現在是一個微服務接口上面標注一個 Feign 注解即可。)==即可完成對服務提供方的接口綁定,簡化了使用 Spring Cloud Ribbon時,自動封裝服務調用客戶端的開發量。
Feign集成了Ribbon
- 利用 Ribbon 維護了微服務的服務列表信息,并且通過輪詢實現了客戶端的負載均衡,而與 Ribbon 不同的是,通過 Feign 只需要定義服務綁定接口且以聲明式的方法,優雅而簡單的實現了服務調用。
7.2 Feign 使用步驟
創建一個新的工程 SpringCloud-Consumer-Feign-80,將原來的消費者80代碼以及配置復制到這個工程項目中
修改pom文件,添加 Feign 依賴
<!-- Feign -->
<dependency>
    <groupId>org.springframework.cloud</groupId>
    <artifactId>spring-cloud-starter-feign</artifactId>
    <version>1.4.7.RELEASE</version>
</dependency>
編寫接口 DeptService
注:@FeignClient 注解中 value/name 的值為要綁定的微服務的名稱
這里的 @GetMapping
@FeignClient(value = "SPRINGCLOUD-PROVIDER") // value的值為綁定的微服務名稱
public interface DeptClientService {

    // 不使用 Feign 之前,遠程調用服務是使用 RestTemplate 的 getForObject 和 @RequestMapping 獲取的
    // @Autowired
    // private RestTemplate restTemplate;
    // @RequestMapping("/consumer/dept/get/{id}")
    // public Dept get(@PathVariable("id") Long id){
    //     return restTemplate.getForObject(REST_URL_PREFIX+"/dept/get/"+id,Dept.class);
    // }

    @GetMapping("/dept/get/{id}")
    Dept queryById(@PathVariable("id") Long id);

    @GetMapping("/dept/get")
    List<Dept> queryAll();

    @PostMapping("/dept/add")
    boolean addDept(Dept dept);

}
修改Controlle
因為 Feign 使用的是接口和注解,所以不需要使用 REST 的 RestTemplate
@RestController
public class DeptConsumerController {

    @Autowired
    private DeptClientService service;

    @RequestMapping("/consumer/dept/get/{id}")
    public Dept get(@PathVariable("id") Long id){
        return this.service.queryById(id);
    }

    @RequestMapping("/consumer/dept/add")
    public boolean add(Dept dept){
        return this.service.addDept(dept);
    }

    @RequestMapping("/consumer/dept/get")
    public List<Dept> getList(){
        return this.service.queryAll();
    }

}
依次啟動注冊中心,服務提供者,SpringCloud-Consumer-Feign-80 ,測試是否能夠成功獲取服務
8. Hystrix
8.1 簡介
分布式系統面臨的問題
復雜分布式體系結構中的應用程序有數十個依賴關系,每個依賴關系在某些 時候將不再避免的失敗!
服務雪崩
多個微服務之間調用的時候,假設服務A調用微服務B 和微服務C,微服務B 和微服務C 又調用其他的微服務,這就是所謂的“扇出”,如果扇出的鏈路上某個微服務的調用響應時間過長或者不可用,對微服務A 的調用就會占用越來越多的系統資源,進而引起系統崩潰,所謂的“雪崩效應”。
對于高流量的應用來說,單一的后端依賴可能會導致所有服務器上的所有資源都在幾秒中飽和。比失敗更糟糕的是,這些應用程序還可能導致服務之間的延遲增加,備份隊列,線程和其他系統資源緊張,導致整個系統發生更多的級聯故障,這些都表示需要對故障和延遲進行隔離和管理,以便單個依賴關系的失敗,不能取消整個應用程序或系統。
我們需要棄車保帥
什么是Hystrix
Hystrix 是一個用于處理分布式系統的延遲和容錯的開源庫,在分布式系統里,許多依賴不可避免地都會調用失敗,比如超時、異常等,Hystrix 能夠保證在一個依賴出問題的情況下,不會導致整體服務失敗,避免級聯故障,以便提高分布式系統的彈性。
“斷路器”本省是一種開關裝置,當某個服務但愿發生故障后,通過斷路器的故障監控(類似熔斷保險絲),向調用方返回一個服務預期的,可處理的備選響應(FailBack),而不是長時間地等待或者拋出調用方式無法處理的異常,這樣就可以保證服務調用方的線程不會被長時間,不必要的占用,從而避免了故障在分布式系統中的蔓延,乃至雪崩
能干嘛
- 服務降級
- 服務熔斷
- 服務限流
- 接近實時的監控
- …
8.2 服務熔斷
是什么
熔斷機制是對應雪崩效應的一種微服務鏈路保護機制。
當扇出鏈路的某個微服務不可用或者響應時間太長時,會進行服務的降級,進而熔斷該節點微服務的調用,快速返回錯誤的響應信息。當檢測到該節點微服務調用響應正常后恢復調用鏈路。在 SpringCloud框架里熔斷機制通過 Hystrix 實現。Hystrix 會監控微服務間調用的狀況,當失敗的調用到一定閾值,缺省是5秒內20此調用失敗就會啟動熔斷機制,熔斷機制的注解是 @HystrixCommand
如何使用
創建一個新的工程項目 SpringCloud-Hystrix-8001,將原來的 8001 服務提供者的代碼和配置復制一份過來
在pom文件中添加 Hystrix 依賴
<!-- Hystrix -->
<dependency>
    <groupId>org.springframework.cloud</groupId>
    <artifactId>spring-cloud-starter-hystrix</artifactId>
    <version>1.4.7.RELEASE</version>
</dependency>
修改 DeptController
@RestController
public class DeptController {
@Autowired
DeptService deptService;
// 熔斷后調用 hystrixGet 備選方法
@HystrixCommand(fallbackMethod = "hystrixGet")
@GetMapping("/dept/get/{id}")
public Dept get(@PathVariable("id")Long id){
Dept dept = deptService.getById(id);
// id 傳的是空或者是無法查詢到id對應的部門信息時
if (dept==null){
throw new RuntimeException("id-->"+id+", is not exist or can not find it");
}
return dept;
}
// /dept/get/{id} 熔斷時調用的方法
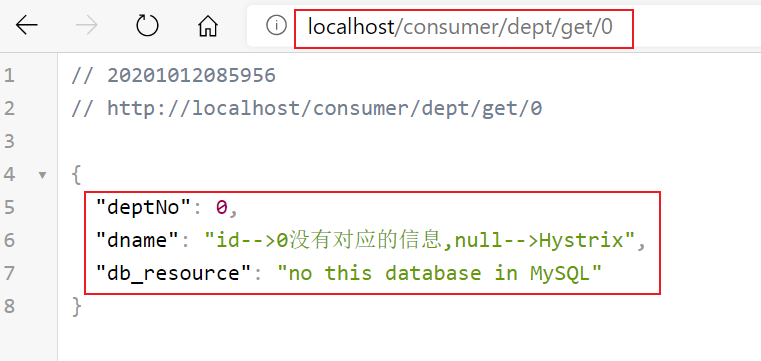
public Dept hystrixGet(@PathVariable("id") Long id){
return new Dept()
.setDeptNo(id)
.setDname("id-->"+id+"沒有對應的信息,null-->Hystrix")
.setDb_resource("no this database in MySQL");
}
}
當發生熔斷時,我們需要快速返回錯誤信息,上面的代碼中,如果 get 方法無法使用或太長無法響應,則會因為使用了熔斷的注解 @HystrixCommand(fallbackMethod = "hystrixGet") 在異常時不會進行拋出,而是使用 hystrixGet 方法代替 get 方法來返回錯誤信息
添加熔斷支持 @EnableCircuitBreaker
@SpringBootApplication
@EnableEurekaClient // 在服務啟動后自動注冊到 Eureka 中
@EnableDiscoveryClient // 服務發現
@MapperScan("com.xp.mapper")
@EnableCircuitBreaker // 添加對熔斷的支持  CircuitBreaker:斷路器
public class ApplicationHystrix8001 {

    public static void main(String[] args) {
        SpringApplication.run(ApplicationHystrix8001.class,args);
    }

}
依次啟動注冊中心,SpringCloud-Hystrix-8001,服務消費者,訪問 http://localhost/consumer/dept/get/0 測試是否能夠觸發熔斷
然后我們停止 SpringCloud-Hystrix-8001
8.3 服務降級
是什么
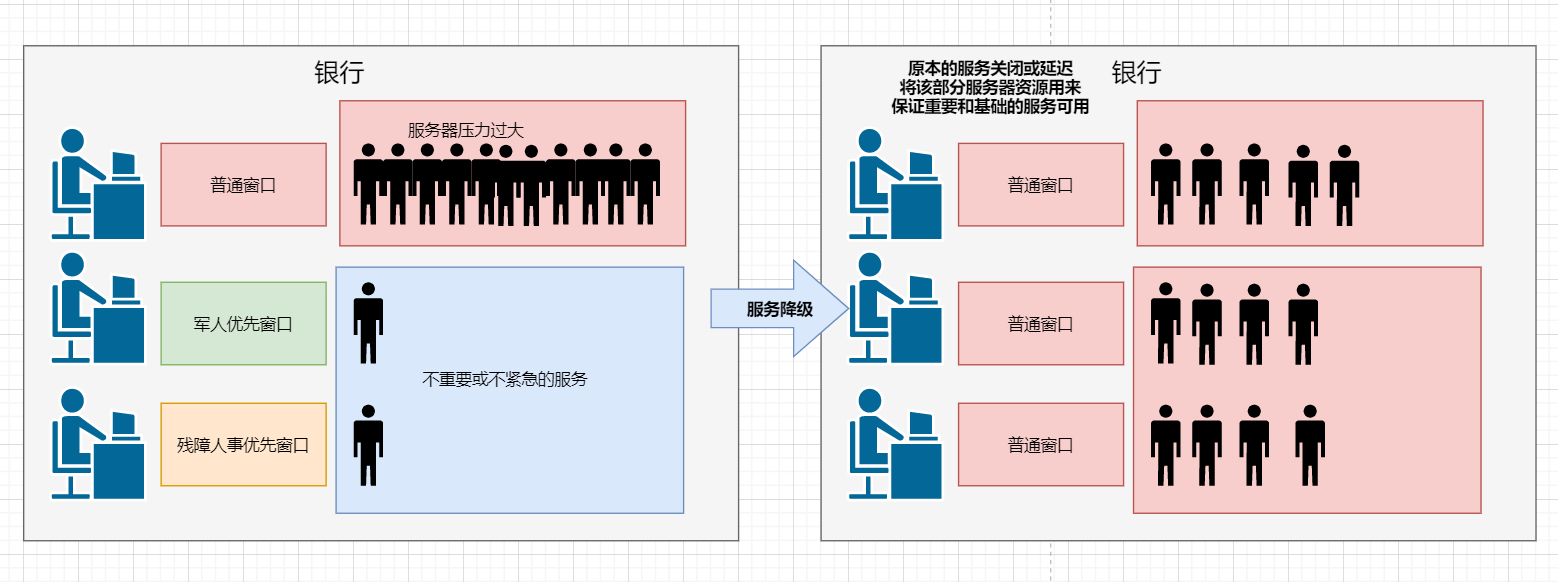
當服務器壓力劇增的情況下,根據當前業務情況及流量對一些服務和頁面有策略地降級,以此釋放資源以保證核心任務的正常運行。也就是說,當整個微服務整體的負載超出了預設的上限閾值或即將到來的流量預計將會超過預設的閾值時,為了保證重要或基本的服務能正常運行,我們可以將一些不重要或不緊急的服務或任務進行服務的延遲使用或暫停使用。
舉個例子,在銀行中,有很多個服務窗口可以辦理業務,其中也有特殊窗口(比如軍人優先,殘障人士優先的窗口),當銀行來了很多人進行辦理業務(服務器壓力劇增,服務器負載超過了上限閾值),普通窗口已經排了很多人了。這時候,銀行會暫時地關閉或延遲特殊窗口的服務,將特殊窗口變成普通窗口來辦理所有人的業務,待到銀行中辦理業務的人不那么多時(下降到上限閾值以下)(將一些不重要或不緊急的服務或任務進行延遲使用或暫停使用),這就是服務降級。
如何使用
使用 Feign 實現服務降級
服務降級是客戶端來實現的,所以我們需要修改 SpringCloud-Consumer-Feign-80 工程項目
創建一個工廠類 DeptClientServiceFallbackFactory 用來統一對 DeptClentService 類里的服務進行降級
@Component // 將這個類注冊到 Spring 容器中
public class DeptClientServiceFallbackFactory implements FallbackFactory {
@Override
public Object create(Throwable throwable) {
// 服務降級,當客戶端服務關閉或延遲使用時,顯示對應的信息告知用戶
return new DeptClientService() {
@Override
public Dept queryById(Long id) {
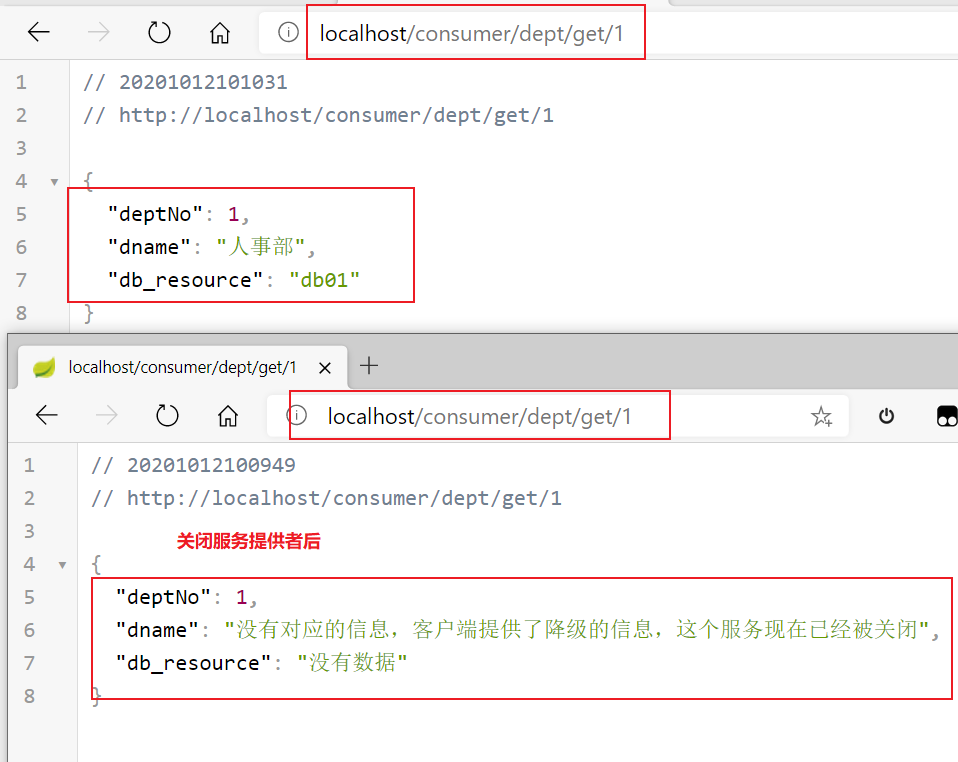
return new Dept().setDeptNo(id).setDname("沒有對應的信息,客戶端提供了降級的信息,這個服務現在已經被關閉").setDb_resource("沒有數據");
}
@Override
public List<Dept> queryAll() {
return null;
}
@Override
public boolean addDept(Dept dept) {
return false;
}
};
}
}
修改 DeptClientService
// fallbackFactory 的值為服務降級的工廠類
@FeignClient(value = "SPRINGCLOUD-PROVIDER",fallbackFactory = DeptClientServiceFallbackFactory.class)
public interface DeptClientService {

    @GetMapping("/dept/get/{id}")
    Dept queryById(@PathVariable("id") Long id);

    @GetMapping("/dept/get")
    List<Dept> queryAll();

    @PostMapping("/dept/add")
    boolean addDept(Dept dept);

}
測試
依次打開注冊中心,服務提供者,SpringCloud-Consumer-Feign-80,先測試服務是否能成功使用,然后再關閉服務提供者,刷新查看顯示結果
8.4 監控中心
創建一個新的工程項目 SpringCloud-Hystrix-Dashboard-9001
添加依賴
<dependencies>
    <!-- 我們需要使用到實體類,所以需要引入 api module -->
    <dependency>
        <groupId>com.xp</groupId>
        <artifactId>SpringCloud-Study-API</artifactId>
        <version>1.0-SNAPSHOT</version>
    </dependency>
    <!-- SpringBoot -->
    <dependency>
        <groupId>org.springframework.boot</groupId>
        <artifactId>spring-boot-starter-web</artifactId>
        <exclusions>
            <exclusion>
                <groupId>org.springframework.boot</groupId>
                <artifactId>spring-boot-starter-tomcat</artifactId>
            </exclusion>
        </exclusions>
    </dependency>
    <!-- jetty -->
    <dependency>
        <groupId>org.springframework.boot</groupId>
        <artifactId>spring-boot-starter-jetty</artifactId>
    </dependency>
    <!-- ribbon -->
    <dependency>
        <groupId>org.springframework.cloud</groupId>
        <artifactId>spring-cloud-starter-ribbon</artifactId>
        <version>1.4.7.RELEASE</version>
    </dependency>
    <!-- Feign -->
    <dependency>
        <groupId>org.springframework.cloud</groupId>
        <artifactId>spring-cloud-starter-feign</artifactId>
        <version>1.4.7.RELEASE</version>
    </dependency>
    <!-- eureka -->
    <dependency>
        <groupId>org.springframework.cloud</groupId>
        <artifactId>spring-cloud-starter-eureka</artifactId>
        <version>1.4.7.RELEASE</version>
    </dependency>
    <!-- hystrix -->
    <dependency>
        <groupId>org.springframework.cloud</groupId>
        <artifactId>spring-cloud-starter-hystrix</artifactId>
        <version>1.4.7.RELEASE</version>
    </dependency>
    <!-- hystrixDashboard -->
    <dependency>
        <groupId>org.springframework.cloud</groupId>
        <artifactId>spring-cloud-starter-hystrix-dashboard</artifactId>
        <version>1.4.7.RELEASE</version>
    </dependency>
</dependencies>
配置 aplication.yml 文件
配置服務啟動的端口號
server:
  port: 9001
開啟監控頁面
在 SpringCloud-Hystrix-Dashboard-9001 主啟動類上加上 @EnableHystrixDashboard 注解
@SpringBootApplication
@EnableHystrixDashboard // 開啟 hystrix 監控頁面
public class ApplicationDashBoard9001 {

    public static void main(String[] args) {
        SpringApplication.run(ApplicationDashBoard9001.class,args);
    }

}
啟動 SpringCloud-Hystrix-Dashboard-9001 ,訪問 http://localhost:9001/hystrix 查看是否能成功啟動
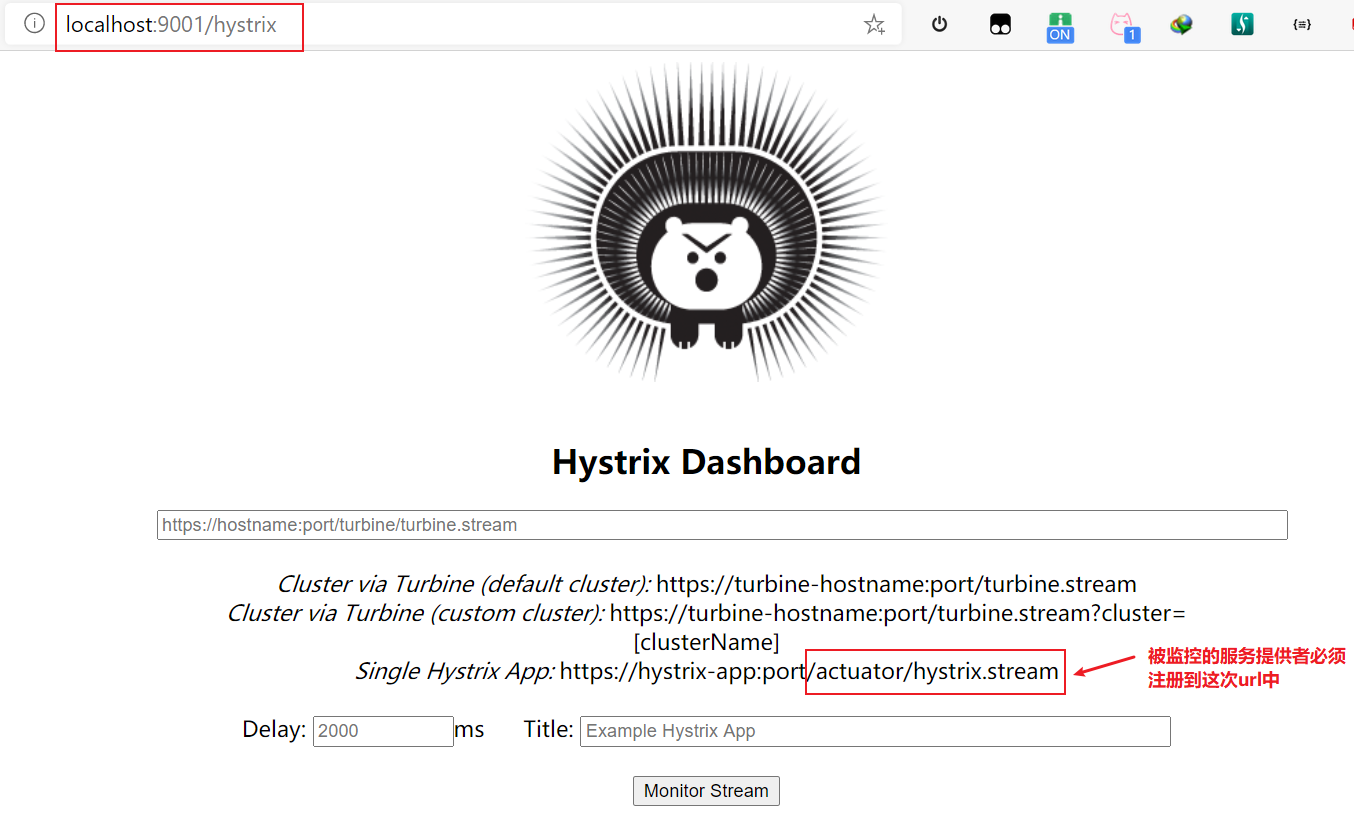
這個監控頁面首頁可以看出,如果某個服務提供者需要被監控,則需要注冊到 /actuator/hystrix.stream
監控服務提供者 SpringCloud-Hystrix-8001
在 SpringCloud-Hystrix-8001 主啟動類中注冊監控
@SpringBootApplication
@EnableEurekaClient // 在服務啟動后自動注冊到 Eureka 中
@EnableDiscoveryClient // 服務發現
@MapperScan("com.xp.mapper")
@EnableCircuitBreaker // 添加對熔斷的支持  CircuitBreaker:斷路器
public class ApplicationHystrix8001 {

    public static void main(String[] args) {
        SpringApplication.run(ApplicationHystrix8001.class,args);
    }

    @Bean
    public ServletRegistrationBean hystrixMetricsStreamServlet(){
        ServletRegistrationBean registrationBean = new ServletRegistrationBean(new HystrixMetricsStreamServlet());
        registrationBean.addUrlMappings("/actuator/hystrix.stream");
        return registrationBean;
    }

}
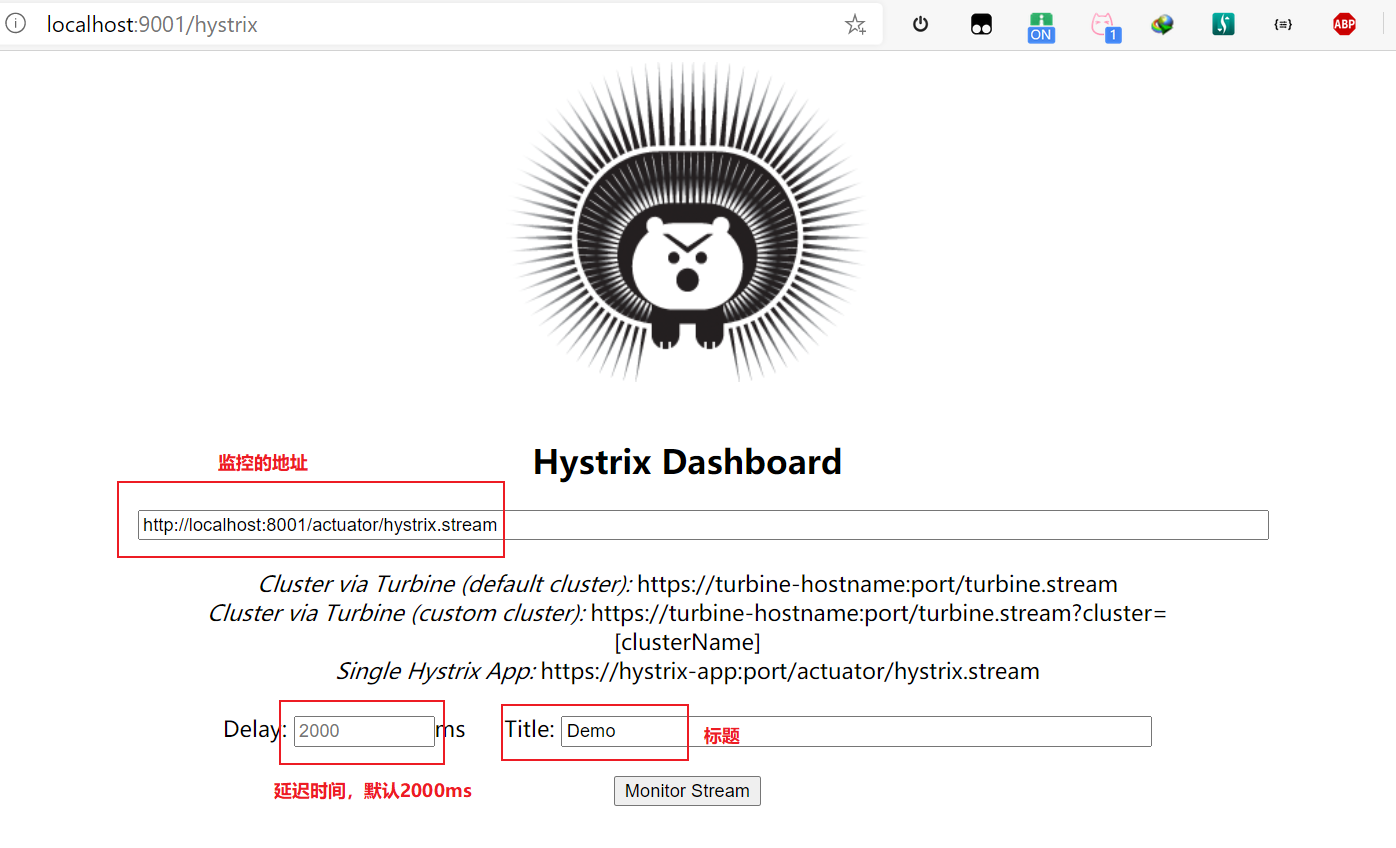
在 http://localhost:9001/hystrix 頁面輸入監控地址,點擊Monitor Stream 按鈕進行監控
監控分析:
- 七色:進入監控界面后會有其中顏色的數字,其含義可以對用右上角相同顏色的單詞表示的狀態,其值代表該狀態下觸發的次數
- 一圈:圈的大小代表該服務器的流量,圖越大流量越大
- 一線:代表監控間隔中,服務被訪問的頻率的折線圖
- 通過觀察這些就可以在大量的實例中找出故障實例和高壓實例進行修復和維護
Dashboard監控說明圖:
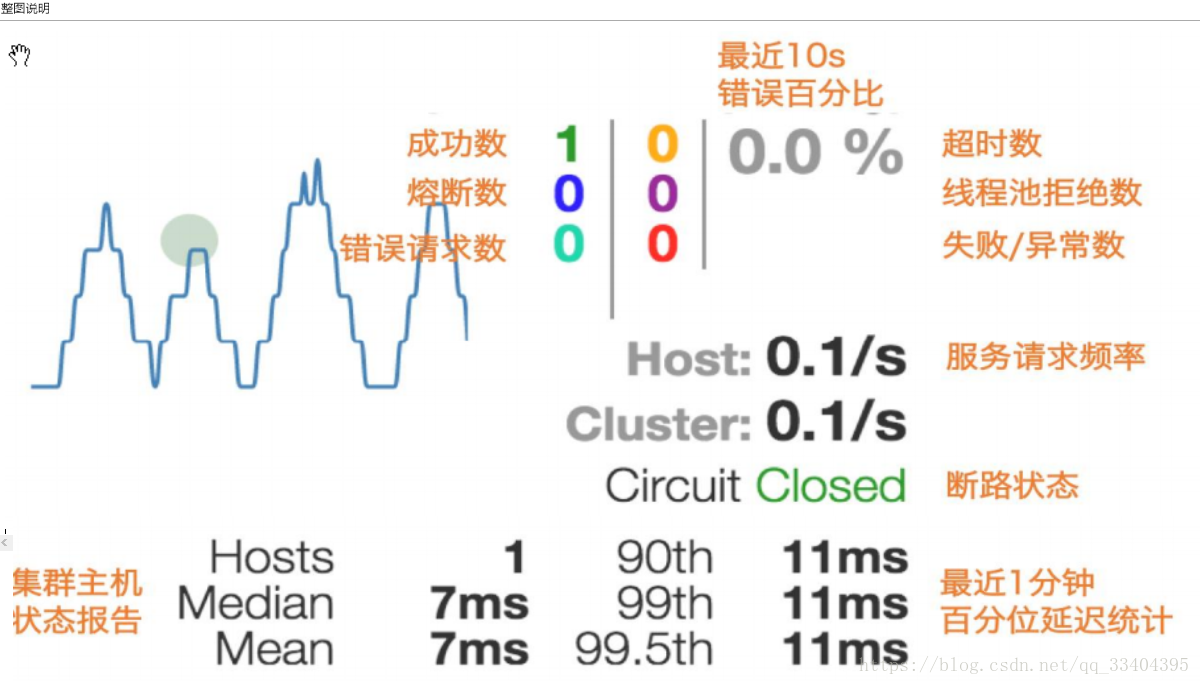
(圖引自 https://blog.csdn.net/qq_33404395/article/details/80917484)
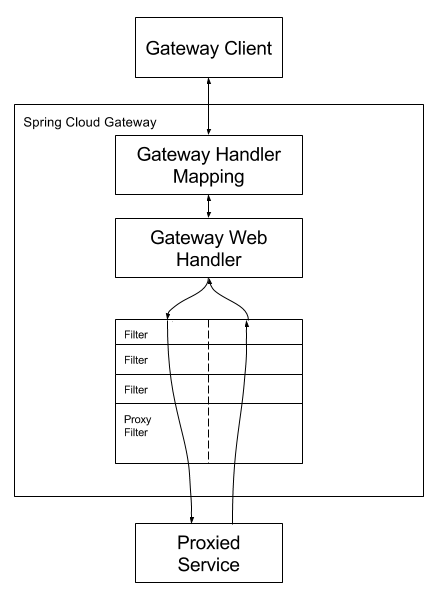
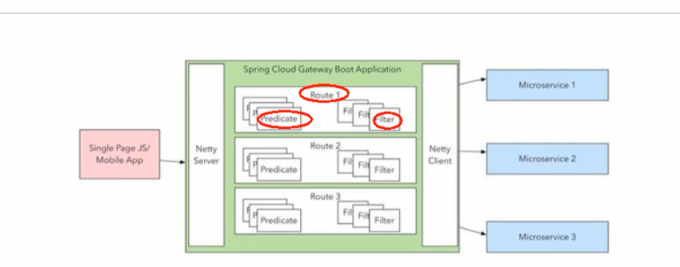
9. Zuul 路由網關
什么是Zuul
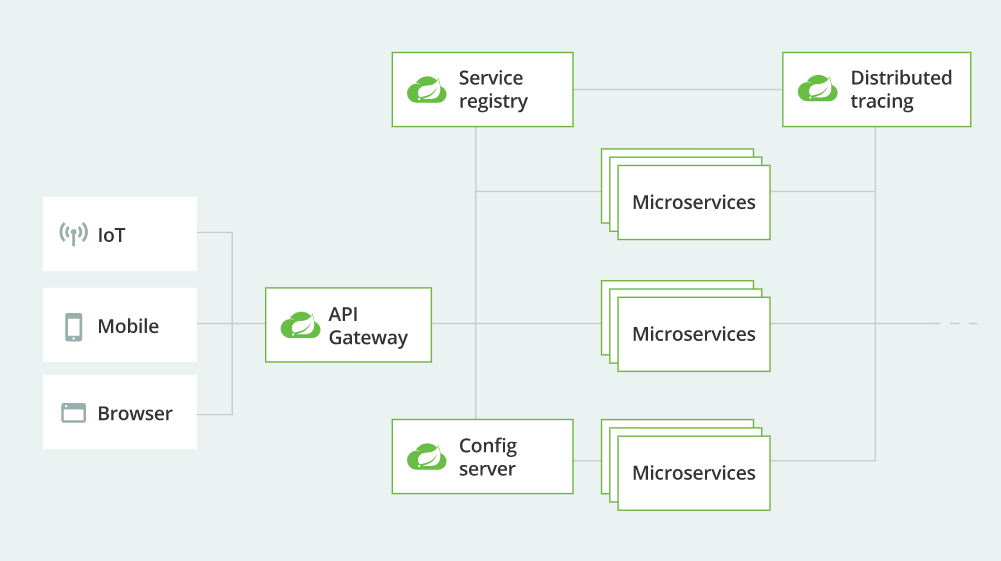
在 SpringCloud 官網中有這么一個圖

其中的 API Gateway,就是路由網關,Zuul 就是用來充當這個架構圖中的 API Gateway
Zuul 包含了對請求的路由和過濾兩個主要的功能
其中路由功能負責將外部請求轉發到具體的微服務實例上,是實現外部訪問統一入口的基礎,而過濾器功能則是負責對請求的處理過程進行干預,是實現請求校驗,服務聚合等功能的基礎。Zuul和Eureka進行整合,將 Zuul 自身注冊為 Eureka 服務治理下的應用,同時從 Eureka 中獲得其他微服務的信息,也即以后的訪問微服務都是通過 Zuul 跳轉后獲得
注意:Zuul 服務最終還是會注冊 Eureka
提供:代理+路由+過濾器 三大功能!
如何使用
創建一個新的工程項目 SpringCloud-Zuul-9527
添加依賴
<dependencies>
    <!-- SpringBoot -->
    <dependency>
        <groupId>org.springframework.boot</groupId>
        <artifactId>spring-boot-starter-web</artifactId>
        <exclusions>
            <exclusion>
                <groupId>org.springframework.boot</groupId>
                <artifactId>spring-boot-starter-tomcat</artifactId>
            </exclusion>
        </exclusions>
    </dependency>
    <!-- jetty -->
    <dependency>
        <groupId>org.springframework.boot</groupId>
        <artifactId>spring-boot-starter-jetty</artifactId>
    </dependency>
    <!-- eureka -->
    <dependency>
        <groupId>org.springframework.cloud</groupId>
        <artifactId>spring-cloud-starter-eureka</artifactId>
        <version>1.4.7.RELEASE</version>
    </dependency>
    <!-- zuul -->
    <dependency>
        <groupId>org.springframework.cloud</groupId>
        <artifactId>spring-cloud-starter-zuul</artifactId>
        <version>1.4.7.RELEASE</version>
    </dependency>
</dependencies>
編寫 application.yml 配置文件
配置 zuul 路由
server:
  port: 9527

spring:
  application:
    name: springcloud-zuul

# euerka
eureka:
  client:
    service-url:
      defaultZone: http://eureka7001.com:7001/eureka/,http://eureka7002.com:7002/eureka/,http://eureka7003.com:7003/eureka/
  instance:
    instance-id: zuul9527.com

# zuul
zuul:
  routes:
    dept.serviceId: springcloud-provider # 服務名
    dept.path: /mydept/** # 訪問該服務的路徑
  ignored-services: "*" # 禁止直接通過服務名訪問服務,需要加上雙引號
  prefix: /xp # 前綴,如果不加上前綴則無法訪問

info:
  app.name: xp-springcloud-zuul
  company.name: xp
開啟注解
在主啟動類中增加 @EnableZuulProxy 注解
@SpringBootApplication
@EnableZuulProxy // 開啟 zuul 代理
public class ApplicationZuul9527 {

    public static void main(String[] args) {
        SpringApplication.run(ApplicationZuul9527.class,args);
    }

}
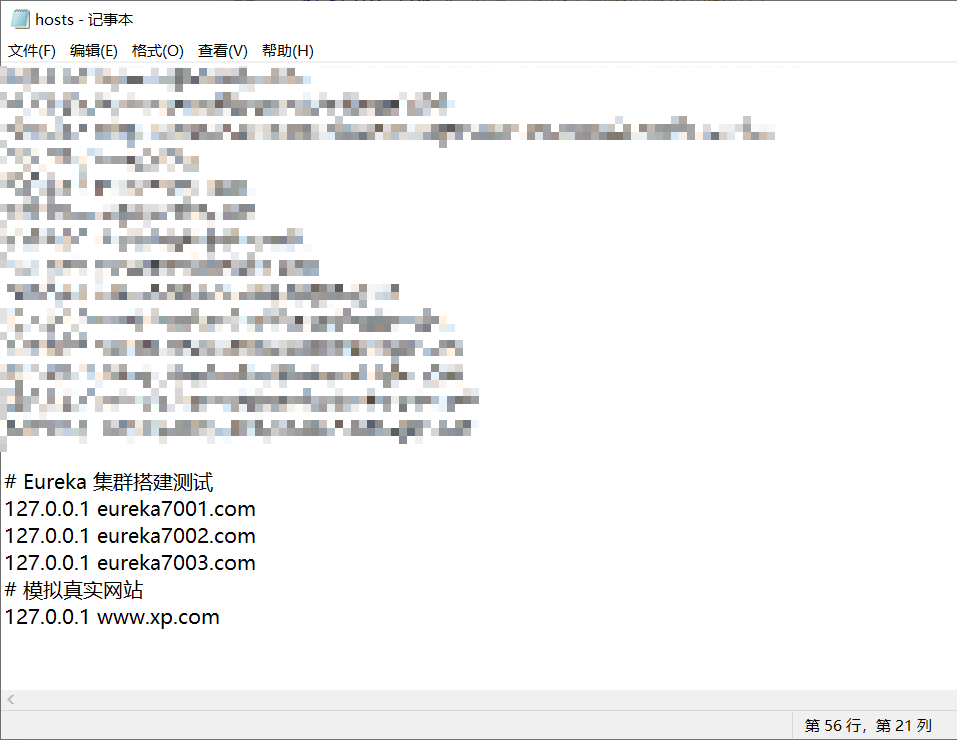
域名映射
為了模仿我們真實開發中使用網址進行訪問,所以進行域名映射
127.0.0.1 www.xp.com
測試
依次啟動注冊中心,服務提供者,SpringCloud-Zuul-9527
訪問 http://www.xp.com:9527/xp/mydept/dept/get/1 測試
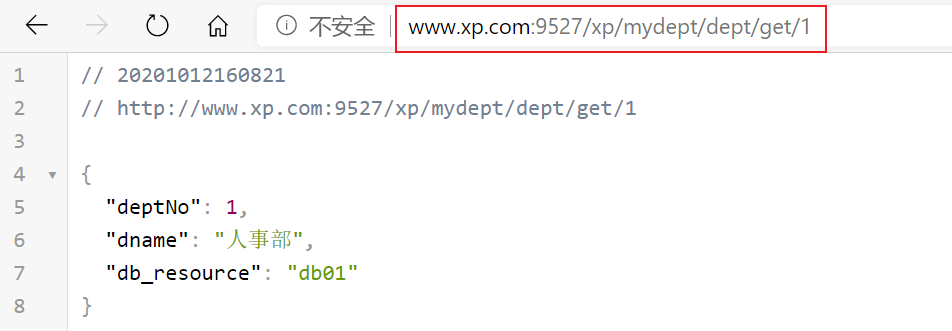
如果端口號使用 80 端口,則與真實的網站訪問無異
10. SpringCloud Config 分布式配置
10.1 概述
分布式系統面臨的配置文件問題
微服務意味著要將單體應用中的業務拆分成一個個子服務,每個自服務的粒度相對較小,因此系統中會出現大量的服務,由于每個服務都需要必要的配置信息才能運行,所以一套集中式的,動態的配置管理設施是必不可少的。SpringCloud 提供了 ConfigServer 來解決這個問題,我們每一個微服務自己帶著一個 application.yml,那上百個的配置文件要修改起來,豈不是要發瘋。
什么是 SpringCloud Config 分布式配置中心
Spring Cloud Config 為微服務架構中心的微服務提供集中化的外部配置支持,配置服務器為各個不同微服務應用的所有環節提供了一個中心化的外部配置
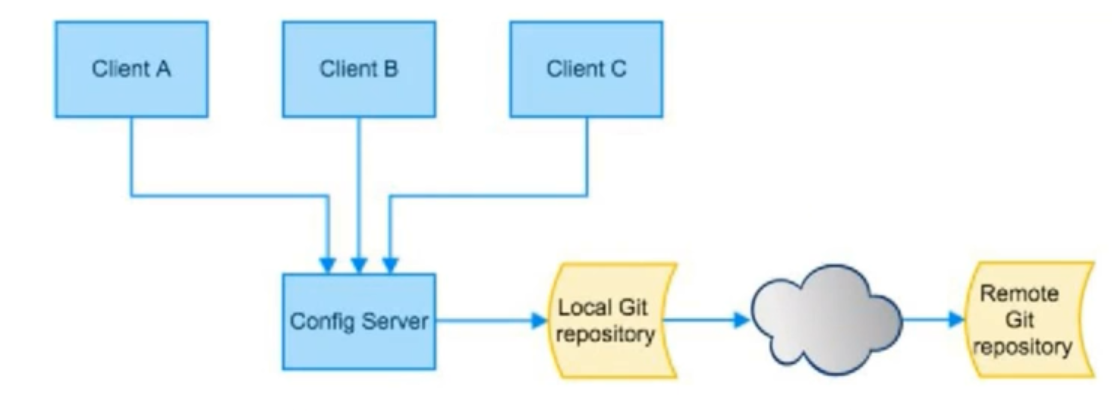
Spring Cloud Config 分為服務端和客戶端兩部分
服務端也成為分布式配置中心,它是一個獨立的微服務應用,用來連接配置服務器并為客戶端提供獲取配置信息,加密,解密信息等訪問接口。
客戶端則是通過指定的配置中心來管理應用資源,以及與業務相關的配置內容,并在啟動的時候從配置中心獲取和加載配置信息。配置服務器默認采用git來存儲配置信息,這樣有助于對環境配置進行版本管理。并且可以通過git客戶端工具來方便的管理和訪問配置內容。
Spring Cloud Config 分布式配置中心能干嘛
- 集中管理配置文件
- 不同環境,不同配置,動態化的配置更新,分環境部署,比如 /dev,/test,/prod,/beta,/release 等等
- 運行期間動態調整配置,不再需要在每個服務部署的機器上編寫配置文件,服務會向配置中心統一拉去配置自己的信息
- 當配置發生變動時,服務不需要重啟,即可感知配置的變化,并應用新的配置
- 將配置信息以REST接口的形式暴露
10.2 Spring Cloud Config 分布式配置中心與 git 整合
由于 Spring Cloud Config 默認使用 git 來存儲配置文件(也有其他方式,比如支持 SVN 和本地文件 ),但是最推薦的還是 git,而且使用的是 http/https 訪問的形式
由于國內碼云gitee比github速度要快,所以這里使用gitee來當作git的遠程倉庫
服務端
在碼云上創建一個新的遠程倉庫,然后使用ssh克隆到本地

在本地克隆遠程倉庫
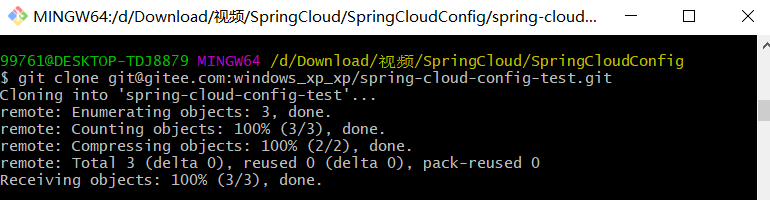
新建一個文件 application.yml ,使用記事本打開,然后編寫配置提交到遠程倉庫
這里所說的提交到遠程倉庫,都是使用如下的git命令操作
git add .
git commit -m 提交的信息
git push
application.yml 的配置內容如下
spring:
  profiles:
  active: dev

---
spring:
  profiles: dev
  application:
    name: springcloud-config-dev

---
spring:
  profiles: test
  application:
    name: springcloud-config-test
創建一個新的工程項目 SpringCloud-Config-3344,作為 Spring Cloud Config 的服務端
導入依賴
<dependencies>
    <!-- SpringCloudConfig-server 服務端 -->
    <dependency>
        <groupId>org.springframework.cloud</groupId>
        <artifactId>spring-cloud-config-server</artifactId>
    </dependency>
    <!-- springboot -->
    <dependency>
        <groupId>org.springframework.boot</groupId>
        <artifactId>spring-boot-starter-web</artifactId>
        <exclusions>
            <exclusion>
                <groupId>org.springframework.boot</groupId>
                <artifactId>spring-boot-starter-tomcat</artifactId>
            </exclusion>
        </exclusions>
    </dependency>
    <!-- jetty -->
    <dependency>
        <groupId>org.springframework.boot</groupId>
        <artifactId>spring-boot-starter-jetty</artifactId>
    </dependency>
</dependencies>
編寫 application.yml 配置文件
server:
  port: 3344
spring:
  application:
    name: SpringCloud-Config-server
  cloud:
    config:
      server:
        git:
          uri: https://gitee.com/windows_xp_xp/spring-cloud-config-test.git # https 鏈接,不是 ssh 鏈接
在啟動類上加上 @EnableConfigServer 注解
@SpringBootApplication
@EnableConfigServer // 開啟 SpringCloudConfig 服務端
public class ApplicationConfig3344 {

    public static void main(String[] args) {
        SpringApplication.run(ApplicationConfig3344.class,args);
    }

}
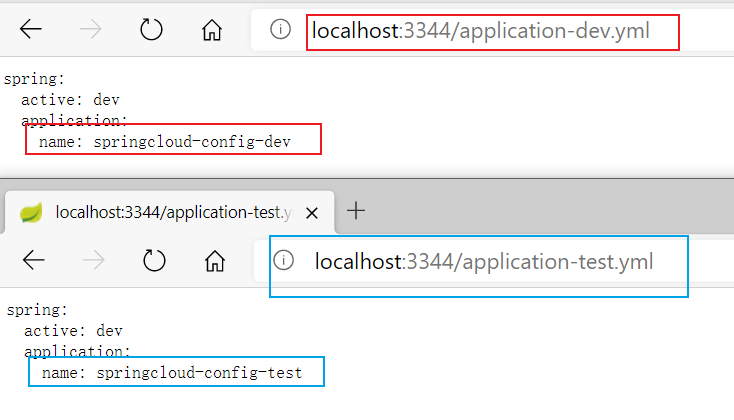
啟動該項目并訪問 http://localhost:3344/application-dev.yml 查看是否配置成功
觀察 http://localhost:3344/application-dev.yml 和 http://localhost:3344/application-test.yml 的不同
在官網中有寫到具體怎么訪問 Config 服務端中的配置文件
官網地址:https://docs.spring.io/spring-cloud-config/docs/2.2.5.RELEASE/reference/html/#_spring_cloud_config_client
/{application}/{profile}[/{label}]
/{application}-{profile}.yml
/{label}/{application}-{profile}.yml
/{application}-{profile}.properties
/{label}/{application}-{profile}.properties
其中 application 表示配置文件的名字,profile 表示配置的環境(比如:dev,test),label 表示遠程倉庫的分支
注:有可能會出現訪問失敗的可能,報錯信息為 Authentication is required but no CredentialsProvider has been registered,此時,需要將倉庫權限設置為公開或在服務端配置文件中添加碼云的賬號和密碼
server:
  port: 3344
spring:
  application:
    name: SpringCloud-Config-server
  cloud:
    config:
      server:
        git:
          uri: https://gitee.com/windows_xp_xp/spring-cloud-config-test.git # https 鏈接,不是 ssh 鏈接
          # 配置賬號和密碼,一般來說,為了安全起見,建議使用賬號密碼的方式來獲取遠程倉庫的文件配置
          username: xxxx # 碼云賬號
          password: xxxx # 碼云密碼
客戶端
在我們本地的git倉庫中創建配置文件 application-client.yml
spring:
  profiles:
  active: dev

---
server:
  port: 8021
spring:
  application:
    name: springcloud-config-dev
  profiles: dev
  datasource:
    type: com.alibaba.druid.pool.DruidDataSource
    driver-class-name: org.gjt.mm.mysql.Driver
    url: jdbc:mysql://localhost:3306/db01?useUnicode=true&characterEncoding=utf-8&useSSL=false
    username: root
    password: root
# eureka 配置
eureka:
  client:
    service-url:
      defaultZone: http://eureka7001.com:7001/eureka/,http://eureka7002.com:7002/eureka/,http://eureka7003.com:7003/eureka/
  instance:
    instance-id: springcloud-config # 修改 Eureka 中默認描述信息
    prefer-ip-address: true # 訪問路徑可以顯示ip地址

---
server:
  port: 8022
spring:
  application:
    name: springcloud-config-test
  profiles: test
  datasource:
    type: com.alibaba.druid.pool.DruidDataSource
    driver-class-name: org.gjt.mm.mysql.Driver
    url: jdbc:mysql://localhost:3306/db01?useUnicode=true&characterEncoding=utf-8&useSSL=false
    username: root
    password: root
# eureka 配置
eureka:
  client:
    service-url:
      defaultZone: http://eureka7001.com:7001/eureka/,http://eureka7002.com:7002/eureka/,http://eureka7003.com:7003/eureka/
  instance:
    instance-id: springcloud-config # 修改 Eureka 中默認描述信息
    prefer-ip-address: true # 訪問路徑可以顯示ip地址
將 application-client.yml 提交到碼云遠程倉庫中
創建一個新的工程項目 SpringCloud-Config-Client ,模擬獲取 Config 配置的客戶端
編寫配置文件 application.yml,bootstrap.yml
application.yml 用戶級別的配置
# 用戶級別的配置
spring:
  application:
    name: SpringCloud-Config-Client-3355
bootstrap.yml 系統級別的配置
# 系統級別的配置
spring:
  cloud:
    config:
      uri: http://localhost:3344 # 提供遠程使用配置文件的微服務uri
      profile: test # 環境選擇
      label: master # 分支
      name: application-client # 需要從git讀取的資源名稱,不需要后綴,這里獲取的就是 applicaiont-client.yml
編寫 Controller 訪問從遠程配置文件配置的變量參數
@RestController
public class ConfigClientController {
@Value("${spring.application.name}")
private String applicationName;
@Value("${eureka.client.service-url.defaultZone}")
private String defaultZone;
@Value("${server.port}")
private String serverPort;
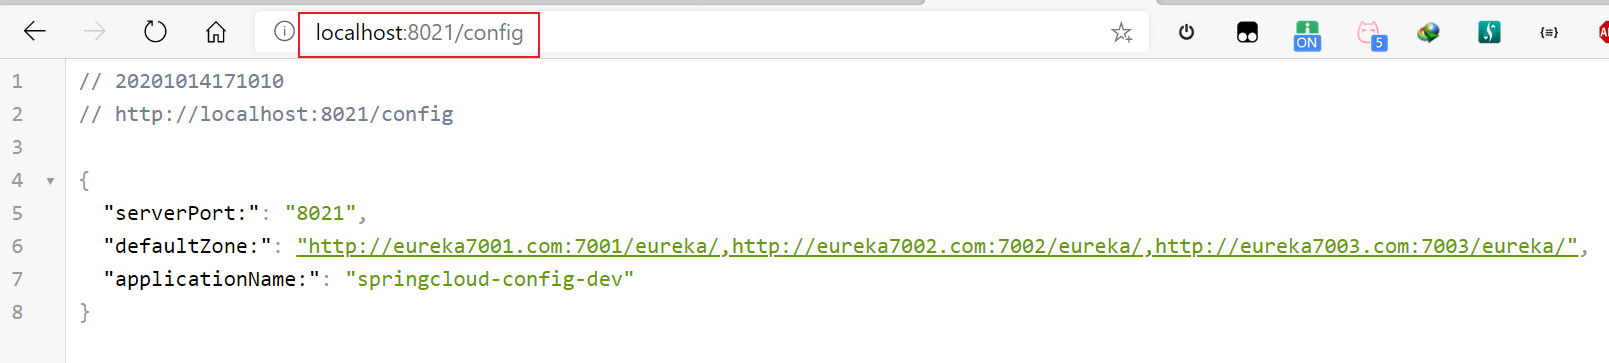
@RequestMapping("/config")
public HashMap<String, String> config(){
HashMap<String, String> configMap = new HashMap<>();
configMap.put("applicationName:",applicationName);
configMap.put("defaultZone:",defaultZone);
configMap.put("serverPort:",serverPort);
return configMap;
}
}
啟動 SpringCloud-Config-Client ,訪問 http://localhost:8021/config
我們需要修改配置的時候,在 bootstarp.yml 中修改 spring.cloud.config.profile 即可
智能推薦

SpringCloud學習筆記
SpringCloud學習筆記 ESB企業服務總線:用來連接各個服務節點,為了集成各種不同的服務。 1.系統架構演變 目標: 了解項目架構的演變歷程。 小結: 集中式架構 垂直拆分 分布式架構 SOA面向服務架構 微服務架構 2.微服務架構說明 目標: 了解SOA與微服務架構的區別以及說出微服務架構的特點。 分析: &emsp...
SpringCloud學習筆記-Eureka
注冊中心-Eureka Spring Cloud 封裝了 Netflix 公司開發的 Eureka 模塊來實現服務注冊和發現。Eureka 采用了 C-S 的設計架構。Eureka Server 作為服務注冊功能的服務器,它是服務注冊中心。而系統中的其他微服務,使用 Eureka 的客戶端連接到 Eureka Server,并維持心跳連接。這樣系統的維護人員就可以通過 Eureka Server ...
SpringCloud學習筆記------Feign
feign有假裝的意思 為什么要叫假裝? Feign可以把Rest的請求進行隱藏,偽裝成類似SpringMVC的Controller一樣。你不用再自己拼接url,拼接參數等等操作,一切都交給Feign去做。 快速入門 先用起來,我們在使用的時候揭開它神秘的面紗吧 導入依賴 pom.xml 引入: Feign的客戶端 寫一個Controller dao層 啟...
SpringCloud學習筆記
介紹 Spring Cloud是一系列技術的有序整合。它利用Spring Boot的開發便利性巧妙地簡化了分布式系統基礎設施的開發。 Spring Boot擅長的是集成,把世界上最好的框架集成到自己項目中,Spring Cloud也是一樣,把非常流行的微服務的技術整合到一起。 Spring Cloud從架構層面上降低了對大型系統構建的要求和難度,使我們以非常低的成本(技術或者硬件)搭建一套高效、分...
SpringCloud 學習筆記
SpringCloud 學習筆記 文章目錄 SpringCloud 學習筆記 1 簡介 1.1 什么是 SpringCloud 1.2 SpringCloud 能干什么 2. 微服務 2.1 什么是微服務 2.2 微服務與微服務架構 2.3 微服務架構的四個核心問題 2.4 微服務優缺點 2.5 微服務技術棧有哪些? 2.6 為什么選擇 SpringCloud 作為微服務架構 1. 選型依據 2....
猜你喜歡
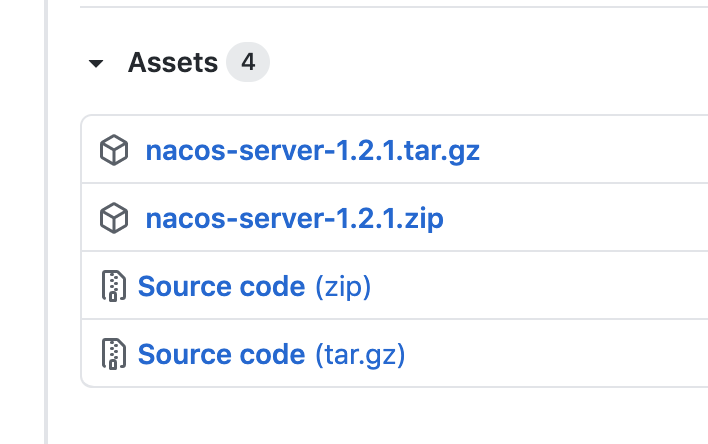
SpringCloud - Nacos學習筆記
Nacos學習筆記 nacos簡介 Nacos使用 Nacos Server安裝 Nacos啟動 Nacos關閉 單機模式支持mysql 集群部署 配置管理 客戶端使用方式 動態刷新 命名空間與分組 命名空間 分組 自定義擴展的 Data Id 配置 服務注冊發現 nacos簡介 Nacos 支持幾乎所有主流類型的“服務”的發現、配置和管理: Spring Cloud Du...
SpringCloud Gateway學習筆記
SpringCloud Gateway是Spring cloud的一個全新項目,是基于Spring5.0、Spring Boot 2.0和project Reactor等技術開發的網關,它旨在為微服務架構提供一個簡單有效的統一的API路由管理方式。 SrpingCloud Gateway作為spring cloud生態系統的網關,目標是替代Zuul,為了提升網關的性能,SpringCloud Ga...
springcloud 學習筆記
1. Eureka 注冊中心 Spring cloud 封裝了Netflix開發的Eureka來實現服務的注冊和發現 1.引入依賴 2.書寫配置文件 3.書寫啟動類 Eureka 注冊中心需要在啟動類上添加@@EnableEurekaServer 在服務提供者和消費者的啟動類上添加@EnableEurekaClient 同時在配置文件中添加上相關配置 4. 服務提供者和消費者配置 添加相關的mav...


freemarker + ItextRender 根據模板生成PDF文件
1. 制作模板 2. 獲取模板,并將所獲取的數據加載生成html文件 2. 生成PDF文件 其中由兩個地方需要注意,都是關于獲取文件路徑的問題,由于項目部署的時候是打包成jar包形式,所以在開發過程中時直接安照傳統的獲取方法沒有一點文件,但是當打包后部署,總是出錯。于是參考網上文章,先將文件讀出來到項目的臨時目錄下,然后再按正常方式加載該臨時文件; 還有一個問題至今沒有解決,就是關于生成PDF文件...