深度學習21天實戰caffe學習筆記《6 : Caffe代碼梳理》
Caffe代碼梳理
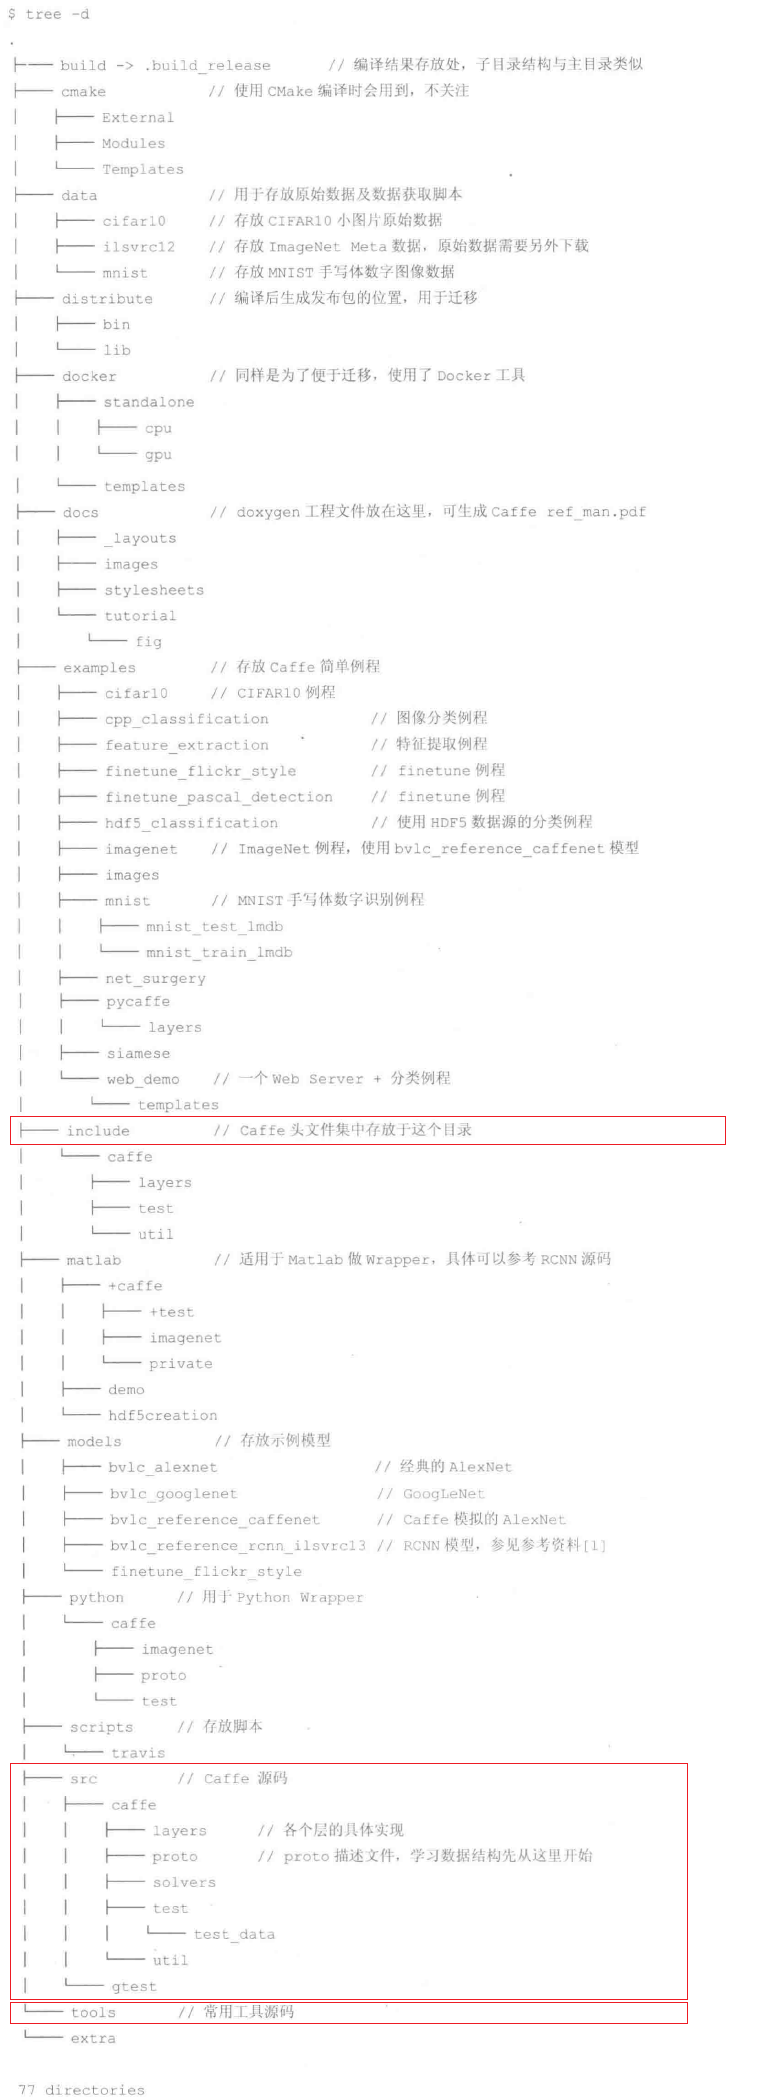
1、caffe目錄結構
2、caffe閱讀路線:
- src/caffe/proto/caffe.proto 了解基本數據結構內存對象和磁盤文件的一一映射,主要由ProtoBuffer工具完成;
- include頭文件 理解整個框架,從基類向派生類順藤摸瓜;
- .cpp和.cu文件 caffe框架不需要大改,只需要按需求派生出新的類實現即可;
- 編寫各類工具集成到caffe內部 如tools下的工具;
3、caffe支持的速度學習特性
message ReLUParameter {

  optional float negative_slope = 1 [default = 0];
  enum Engine {
    DEFAULT = 0;
    CAFFE = 1;
    CUDNN = 2;
  }
  optional Engine engine = 2 [default = DEFAULT];
}
#ifndef CAFFE_RELU_LAYER_HPP_
#define CAFFE_RELU_LAYER_HPP_

#include <vector>

#include "caffe/blob.hpp"
#include "caffe/layer.hpp"
#include "caffe/proto/caffe.pb.h"

#include "caffe/layers/neuron_layer.hpp"

namespace caffe {

/**
 * @brief Rectified Linear Unit non-linearity @f$ y = \max(0, x) @f$.
 *        The simple max is fast to compute, and the function does not saturate.
 */
template <typename Dtype>
class ReLULayer : public NeuronLayer<Dtype> {      //派生于NeuronLayer,實現Relu**函數的計算
 public:
  /**
   * @param param provides ReLUParameter relu_param,
   *     with ReLULayer options:
   *   - negative_slope (\b optional, default 0).
   *     the value @f$ \nu @f$ by which negative values are multiplied.
   */
  //顯示構造函數
  explicit ReLULayer(const LayerParameter& param)
      : NeuronLayer<Dtype>(param) {}
//返回類名字符串
  virtual inline const char* type() const { return "ReLU"; }

 protected:
  //前向傳播函數
  virtual void Forward_cpu(const vector<Blob<Dtype>*>& bottom,
      const vector<Blob<Dtype>*>& top);
  virtual void Forward_gpu(const vector<Blob<Dtype>*>& bottom,
      const vector<Blob<Dtype>*>& top);

  //反向傳播函數
  virtual void Backward_cpu(const vector<Blob<Dtype>*>& top,
      const vector<bool>& propagate_down, const vector<Blob<Dtype>*>& bottom);
  virtual void Backward_gpu(const vector<Blob<Dtype>*>& top,
      const vector<bool>& propagate_down, const vector<Blob<Dtype>*>& bottom);
};

}  // namespace caffe

#endif  // CAFFE_RELU_LAYER_HPP_
src/caffe/layers/relu_layer.cpp
#include <algorithm>
#include <vector>

#include "caffe/layers/relu_layer.hpp"

namespace caffe {

template <typename Dtype>
void ReLULayer<Dtype>::Forward_cpu(const vector<Blob<Dtype>*>& bottom,
    const vector<Blob<Dtype>*>& top) {
  const Dtype* bottom_data = bottom[0]->cpu_data();
  Dtype* top_data = top[0]->mutable_cpu_data();
  const int count = bottom[0]->count();
  Dtype negative_slope = this->layer_param_.relu_param().negative_slope();
  for (int i = 0; i < count; ++i) {
    top_data[i] = std::max(bottom_data[i], Dtype(0))
        + negative_slope * std::min(bottom_data[i], Dtype(0));
  }
}

template <typename Dtype>
void ReLULayer<Dtype>::Backward_cpu(const vector<Blob<Dtype>*>& top,
    const vector<bool>& propagate_down,
    const vector<Blob<Dtype>*>& bottom) {
  if (propagate_down[0]) {
    const Dtype* bottom_data = bottom[0]->cpu_data();
    const Dtype* top_diff = top[0]->cpu_diff();
    Dtype* bottom_diff = bottom[0]->mutable_cpu_diff();
    const int count = bottom[0]->count();
    Dtype negative_slope = this->layer_param_.relu_param().negative_slope();
    for (int i = 0; i < count; ++i) {
      bottom_diff[i] = top_diff[i] * ((bottom_data[i] > 0)
          + negative_slope * (bottom_data[i] <= 0));
    }
  }
}


#ifdef CPU_ONLY
STUB_GPU(ReLULayer);
#endif

INSTANTIATE_CLASS(ReLULayer);

}  // namespace caffe
智能推薦
深度學習Caffe實戰筆記(1)環境搭建
(1)環境搭建 從知道深度學習開始,就一直想學習使用caffe,礙于各種事情一直沒有如愿,這幾天終于找了個時間搞了一下,打算把學習的過程整理成筆記,包括環境搭建、跑車牌識別數據,跑mnist數據,用Alexnet跑自己的數據,用Siamese網絡跑mnist數據,用Siamese網絡跑自己的數據以及如何調整網絡結構等等。。。。后續我會慢慢更新,筆記的主要內容是如何使用caffe,主要側重于實戰,基...
《21天實戰caffe》 讀書筆記(六)
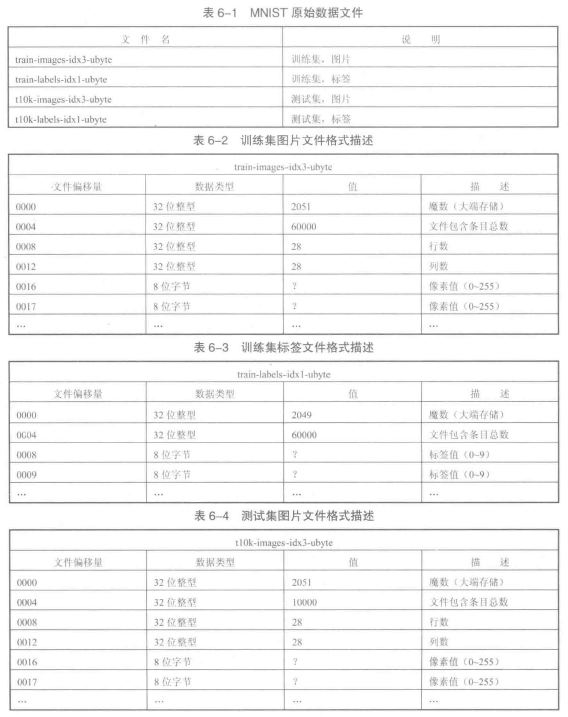
第六天 運行手寫體數字識別例程 1、MNIST數據集 MNIST數據集包括60000個訓練集和10000個測試集,每張圖都已經進行尺寸歸一化、數字居中處理,固定尺寸為28像素*28像素。 MNIST數據集可以在Caffe源碼框架的data/mnist下用get_mnist.sh腳本下載。 MNIST原始數據為4個文件,數據格式描述見下圖。 下載到的原始數據集為二進制文件,需要轉換為LEVELDB或...
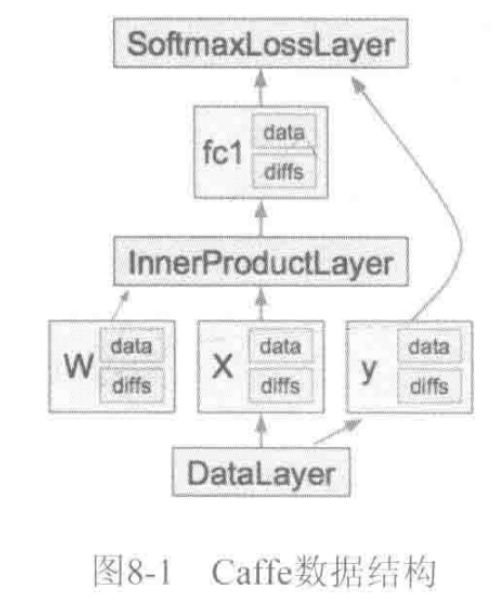
《深度學習——實戰caffe》——caffe數據結構
caffe中一個CNN模型由Net表示,Net由多個Layer堆疊而成。 caffe的萬丈高樓(Net)是由圖紙(prototxt),用blob這些磚塊筑成一層層(Layer),最后通過SGD方法(Solver)進行簡裝修(train)、精裝修(finetune)實現的。 Blob數據結構介紹 Blob提供了統一的存儲器接口,TensorFlow中的Tensor也有對應的Blob數據結構。 Caf...
深度學習caffe實戰筆記(4)Windows caffe平臺下跑cifar10
上一篇博客介紹了如何用alexnet跑自己的數據,能跑自己的數據按理說再跑cifar10應該沒問題了啊,但是想想還是要把cifar10的記錄下來,因為cifar10數據格式是屬于特殊的數據格式,需要用caffe環境把數據轉換文件編譯出來,這也是后面Siamese網絡所必須的一個步驟,說到Siamese網絡,,,,我要再哭5分鐘。好,五分鐘時間到,我們開始train。另外,如果是Ubuntu系統,跑...

《深度學習——實戰caffe》——繪制網絡模型
python/draw_net.py, 這個文件,就是用來繪制網絡模型的。也就是將網絡模型由prototxt變成一張圖片。 在繪制之前,需要先安裝兩個庫 1、安裝GraphViz 注意,這里用的是apt-get來安裝,而不是pip. 2 、安裝pydot 用的是pip來安裝,而不是apt-get 安裝好了,就可以調用腳本來繪制圖片了 draw_net.py執行的時候帶三個參數 第一個參數:網絡模型...
猜你喜歡
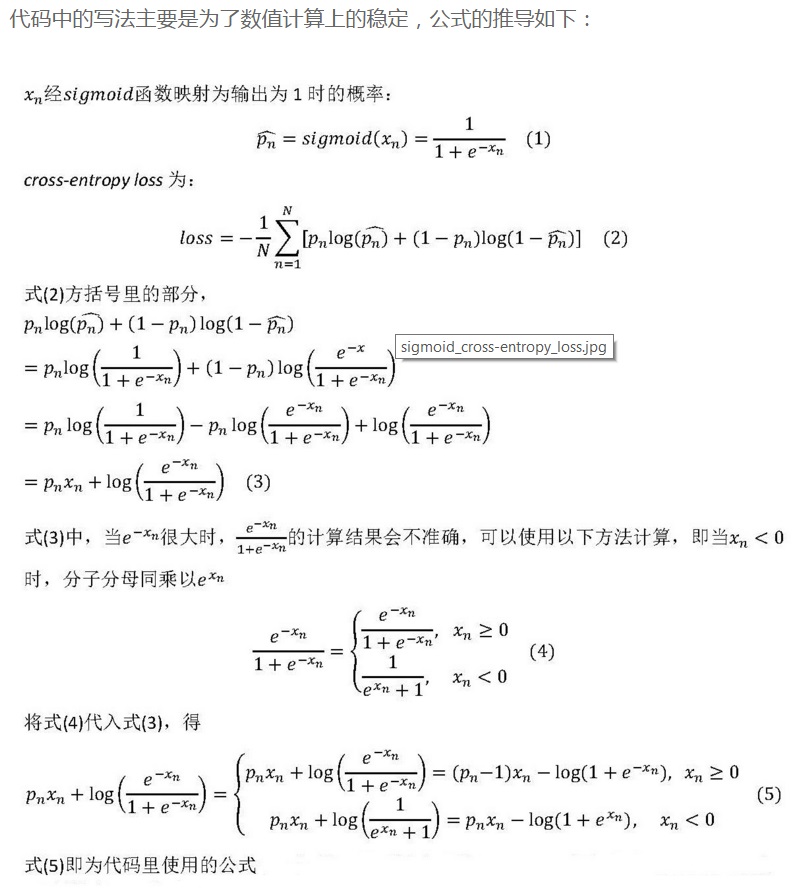
caffe SigmoidCrossEntropyLossLayer 理論代碼學習
交叉熵損失函數 交叉熵損失函數的簡單介紹的鏈接 下面我們就介紹一下caffe里面實現交叉熵的流程: 首先:下面這個式子就是交叉熵的損失表達式 SigmoidCrossEntropyLossLayer的輸入bottom[0],bottom[1],其中bottom[0]是輸入的預測的結果,bottom[1]是標簽值。bottom的維度都是,bottom的表示符號是x...
深度學習Caffe實戰筆記(7)Caffe平臺下,如何調整卷積神經網絡結構
授人以魚不如授人以漁,紅鯉魚家有頭小綠驢叫驢屢屢。至于修改網絡結構多虧了課題組大師姐老龐,在小米實習回校修整,我問她怎么修改網絡,她說改網絡就是改協議,哎呀,一語驚醒夢中人啊!老龐師姐,你真美!雖然博主之前也想過修改網絡協議試一試,鑒于一直不懂網絡結構中的各個參數是干啥的,所以一直沒去實施,這次終于開始嘗試了。 caffe平臺實現卷積神經網絡實在方便的很啊,只需要一個協議文件定義一下網...
caffe學習筆記
修改solver文件參數 首先打開模型優化文件,lenet_solver.prototxt。 關鍵參數如下: 然后我把學習率調整到了0.02,保存退出。進行訓練: 我們可以發現,把學習率調高之后,訓練時的loss(損失程度)也增大了。 Finetune 所謂fine tune就是用別人訓練好的模型,加上我們自己的數據,來訓練新的模型。fine tune相當于使用別人的模型的前幾層,來提取淺層特征,...
caffe學習——caffe安裝
一,引言 安裝環境:VMware里裝的ubuntu14.04,(由于是虛擬機,好像只能裝cpu版的caffe,反正是學習嗎,暫時不追求速度了) 二,安裝步驟 1.安裝一些依賴庫 2.安裝Python 的一些依賴庫 ATLAS是python下的一個線性代數庫,是基于線性代數庫lapack的; 安裝gfortran,后面編譯過程中會用到 BLAS,全稱Basic Linear Algebr...
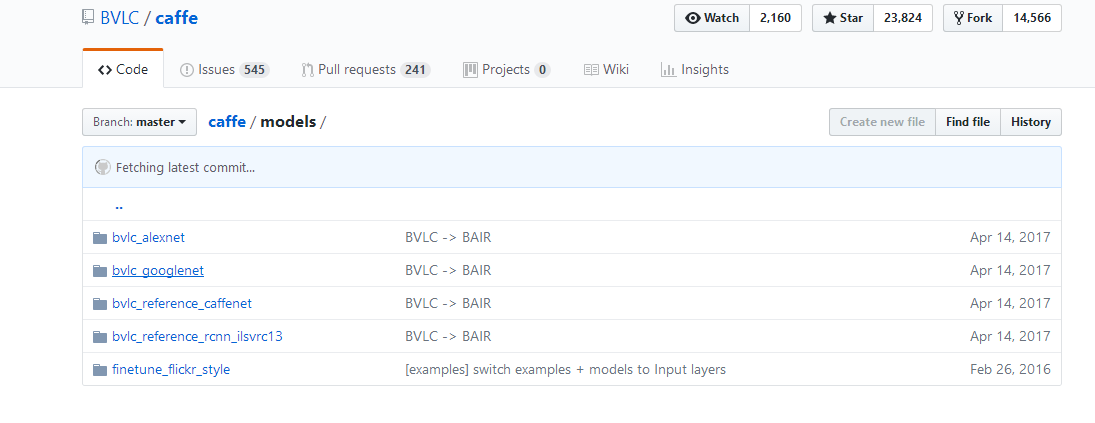
【caffe 深度學習】6.GoogleNet實現圖像識別
1.到caffe的github上去下載訓練好的GoogleNet模型 https://github.com/BVLC/caffe 訓練好的模型意思的一些參數比如權值和觀測值都已經被訓練好,都存在這個模型中。 注:deploy文件是模型結構的描述文件。我們用之前第四篇博客模型可視化的方法用draw_net.py將該模型畫出來: 網絡比較長,層數多,寬度...