【Android學習筆記】RecyclerView的用法
標簽: Android RecyclerView
介紹
由于ListView存在各種不足并且無法實現橫向滾動,Android提供了一個更強大的滾動組件——RecyclerView,不僅可以輕松實現和ListView同樣的效果,還優化了ListView中存在的各種不足之處。
基本用法
創建一個工程RecyclerViewTestProject,首先需要為項目添加RecyclerView相應的依賴庫,修改app/build.gradle文件中的dependencies閉包如下:
dependencies {
    implementation fileTree(dir: 'libs', include: ['*.jar'])
    implementation 'androidx.appcompat:appcompat:1.0.0'
    implementation 'androidx.recyclerview:recyclerview:1.0.0'
    implementation 'androidx.constraintlayout:constraintlayout:1.1.3'
    testImplementation 'junit:junit:4.12'
    androidTestImplementation 'androidx.test:runner:1.1.1'
    androidTestImplementation 'androidx.test.espresso:espresso-core:3.1.1'
}
然后修改MainActivity對應的布局文件:
<?xml version="1.0" encoding="utf-8"?>
<LinearLayout xmlns:android="http://schemas.android.com/apk/res/android"
    android:layout_width="match_parent"
    android:layout_height="match_parent">

    <androidx.recyclerview.widget.RecyclerView
        android:id="@+id/recycler_view"
        android:layout_width="match_parent"
        android:layout_height="match_parent"
        />

</LinearLayout>
接著定義一個實體類,作為RecyclerView適配器的適配類型,新建類Model如下:
package com.example.recyclerviewtestproject;

public class Model {

    private String leftString;
    private String rightString;

    public String getLeftString() {
        return leftString;
    }

    public void setLeftString(String leftString) {
        this.leftString = leftString;
    }

    public String getRightString() {
        return rightString;
    }

    public void setRightString(String rightString) {
        this.rightString = rightString;
    }
}
然后為RecyclerView指定一個我們自定義的布局,新建布局文件model_item.xml:
<?xml version="1.0" encoding="utf-8"?>
<LinearLayout xmlns:android="http://schemas.android.com/apk/res/android"
    android:layout_width="match_parent"
    android:layout_height="wrap_content"
    android:orientation="horizontal"
    android:paddingStart="?android:attr/listPreferredItemPaddingStart"
    android:paddingEnd="?android:attr/listPreferredItemPaddingEnd"
    android:minHeight="?android:attr/listPreferredItemHeightSmall"
    >

    <TextView
        android:id="@+id/left_text"
        android:layout_width="0dp"
        android:layout_height="match_parent"
        android:layout_weight="1"
        android:gravity="center_vertical|left"
        />

    <TextView
        android:id="@+id/right_text"
        android:layout_width="0dp"
        android:layout_height="match_parent"
        android:layout_weight="1"
        android:gravity="center_vertical|right"
        />

</LinearLayout>
到了這里,咱們需要為RecyclerView準備一個適配器,新建ModelAdapter類,內容如下:
package com.example.recyclerviewtestproject;

import android.view.LayoutInflater;
import android.view.View;
import android.view.ViewGroup;
import android.widget.TextView;
import androidx.recyclerview.widget.RecyclerView;

import java.util.List;

public class ModelAdapter extends RecyclerView.Adapter<ModelAdapter.ViewHolder> {

    private List<Model> modelList;

    static class ViewHolder extends RecyclerView.ViewHolder{
        TextView leftTextView,rightTextView;

        public ViewHolder(View view) {
            super(view);
            leftTextView = view.findViewById(R.id.left_text);
            rightTextView = view.findViewById(R.id.right_text);
        }
    }

    public ModelAdapter(List<Model> modelList){
        this.modelList = modelList;
    }

    //創建ViewHolder實例并返回
    @Override
    public ViewHolder onCreateViewHolder(ViewGroup parent, int viewType) {
        View view = LayoutInflater.from(parent.getContext()).inflate(R.layout.model_item,parent,false);
        ViewHolder holder = new ViewHolder(view);
        return holder;
    }

    //對RecyclerView子項數據進行賦值,會在每個子項被滾動到屏幕內的時候執行
    @Override
    public void onBindViewHolder(ViewHolder holder, int position) {
        Model model = modelList.get(position);
        holder.leftTextView.setText(model.getLeftString());
        holder.rightTextView.setText(model.getRightString());
    }

    @Override
    public int getItemCount() {
        return modelList.size();
    }

}
適配器準備好之后,咱們就可以開始使用RecyclerView了,修改MainActivity代碼如下:
package com.example.recyclerviewtestproject;

import androidx.appcompat.app.AppCompatActivity;
import androidx.recyclerview.widget.LinearLayoutManager;
import androidx.recyclerview.widget.RecyclerView;

import android.os.Bundle;
import android.widget.ListView;

import java.util.ArrayList;
import java.util.List;

public class MainActivity extends AppCompatActivity {

    private List<Model> modelList = new ArrayList<>();

    @Override
    protected void onCreate(Bundle savedInstanceState) {
        super.onCreate(savedInstanceState);
        setContentView(R.layout.activity_main);
        initData();//初始化數據
        RecyclerView recyclerView = findViewById(R.id.recycler_view);
        LinearLayoutManager layoutManager = new LinearLayoutManager(this);
        recyclerView.setLayoutManager(layoutManager);
        ModelAdapter adapter = new ModelAdapter(modelList);
        recyclerView.setAdapter(adapter);
    }

    private void initData(){
        for(int i='a';i<='z';i++){
            String leftString = ""+(char)i+(char)i+(char)i;
            String rightString = ""+(char)(i-32)+(char)(i-32)+(char)(i-32);
            Model model = new Model();
            model.setLeftString(leftString);
            model.setRightString(rightString);
            modelList.add(model);
        }
    }
}
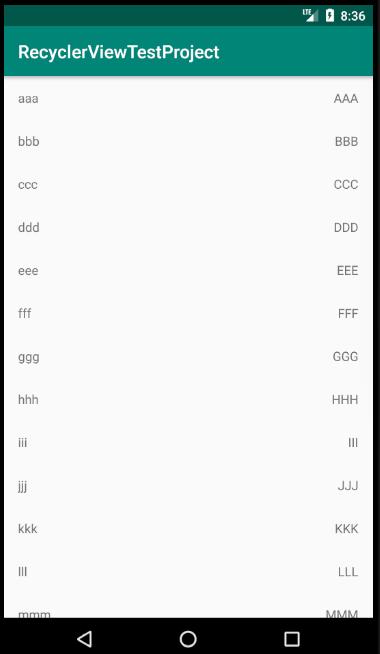
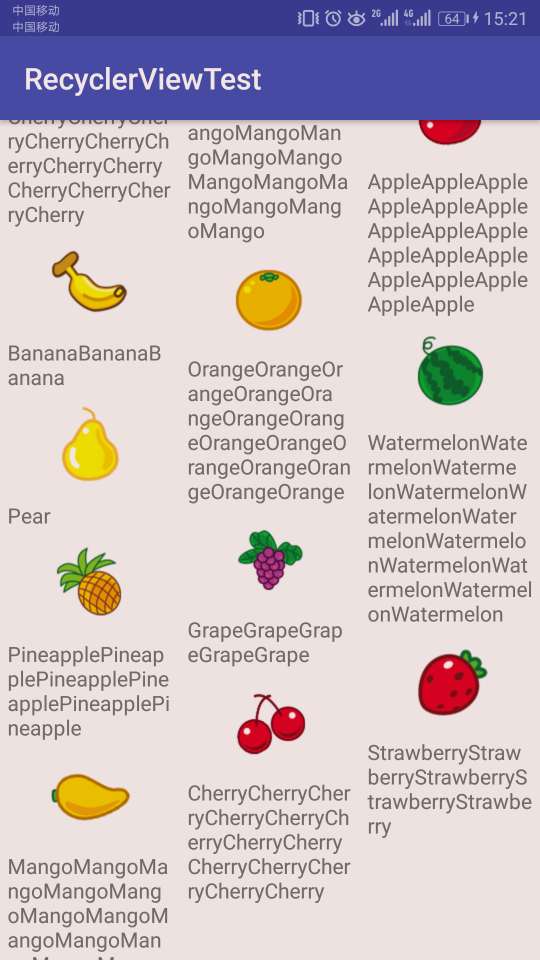
運行APP,發現效果已實現:
實現橫向滾動
首先要對model_item.xml進行修改,布局方向修改為豎直方向,寬度統一為80dp,并對TextView進行相應的修改:
<?xml version="1.0" encoding="utf-8"?>
<LinearLayout xmlns:android="http://schemas.android.com/apk/res/android"
android:layout_width="80dp"
android:layout_height="wrap_content"
android:orientation="vertical"
android:paddingStart="?android:attr/listPreferredItemPaddingStart"
android:paddingEnd="?android:attr/listPreferredItemPaddingEnd"
android:minHeight="?android:attr/listPreferredItemHeightSmall"
>
<TextView
android:id="@+id/left_text"
android:layout_width="wrap_content"
android:layout_height="wrap_content"
android:gravity="center_horizontal"
/>
<TextView
android:id="@+id/right_text"
android:layout_width="wrap_content"
android:layout_height="wrap_content"
android:gravity="center_horizontal"
/>
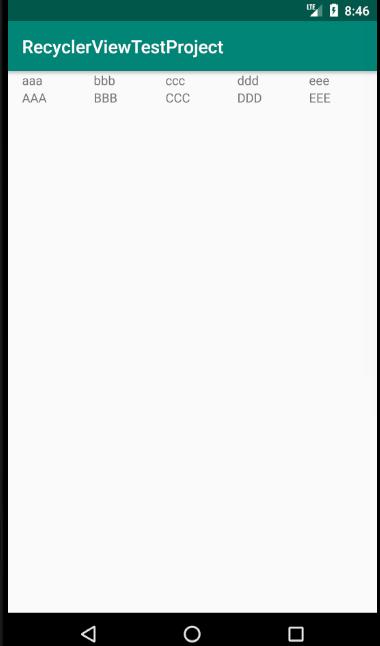
</LinearLayout>修改完之后,原來的left_text就變成了上面的文本,原來的right_text就變成了下面的文本。
接著修改MainActivity中的代碼,設置布局為橫向排列:
package com.example.recyclerviewtestproject;

import androidx.appcompat.app.AppCompatActivity;
import androidx.recyclerview.widget.LinearLayoutManager;
import androidx.recyclerview.widget.RecyclerView;

import android.os.Bundle;
import android.widget.ListView;

import java.util.ArrayList;
import java.util.List;

public class MainActivity extends AppCompatActivity {

    private List<Model> modelList = new ArrayList<>();

    @Override
    protected void onCreate(Bundle savedInstanceState) {
        super.onCreate(savedInstanceState);
        setContentView(R.layout.activity_main);
        initData();//初始化數據
        RecyclerView recyclerView = findViewById(R.id.recycler_view);
        LinearLayoutManager layoutManager = new LinearLayoutManager(this);
        layoutManager.setOrientation(LinearLayoutManager.HORIZONTAL);//設置布局為橫向排列
        recyclerView.setLayoutManager(layoutManager);
        ModelAdapter adapter = new ModelAdapter(modelList);
        recyclerView.setAdapter(adapter);
    }

    private void initData(){
        for(int i='a';i<='z';i++){
            String leftString = ""+(char)i+(char)i+(char)i;
            String rightString = ""+(char)(i-32)+(char)(i-32)+(char)(i-32);
            Model model = new Model();
            model.setLeftString(leftString);
            model.setRightString(rightString);
            modelList.add(model);
        }
    }
}
運行APP,效果如下:
實現瀑布流布局
使用StaggeredGridLayoutManager可以實現瀑布流布局。
由于瀑布流寬度是由布局的列數來自動適配的,直接讓layout_width屬性值為match_parent即可;修改Layout_margin屬性值為5dp,讓子項間保留空隙;修改model_item.xml文件如下:
<?xml version="1.0" encoding="utf-8"?>
<LinearLayout xmlns:android="http://schemas.android.com/apk/res/android"
    android:layout_width="match_parent"
    android:layout_height="wrap_content"
    android:orientation="vertical"
    android:layout_margin="5dp"
    android:paddingStart="?android:attr/listPreferredItemPaddingStart"
    android:paddingEnd="?android:attr/listPreferredItemPaddingEnd"
    android:minHeight="?android:attr/listPreferredItemHeightSmall"
    >

    <TextView
        android:id="@+id/left_text"
        android:layout_width="wrap_content"
        android:layout_height="wrap_content"
        android:gravity="center_horizontal"
        />

    <TextView
        android:id="@+id/right_text"
        android:layout_width="wrap_content"
        android:layout_height="wrap_content"
        android:gravity="left"
        />

</LinearLayout>
然后修改MainActivity代碼,讓right_text的長度隨機,這里我想讓它變為4列瀑布流,使用如下代碼就可以了:
package com.example.recyclerviewtestproject;

import androidx.appcompat.app.AppCompatActivity;
import androidx.recyclerview.widget.LinearLayoutManager;
import androidx.recyclerview.widget.RecyclerView;
import androidx.recyclerview.widget.StaggeredGridLayoutManager;

import android.os.Bundle;
import android.widget.ListView;

import java.util.ArrayList;
import java.util.List;
import java.util.Random;

public class MainActivity extends AppCompatActivity {

    private List<Model> modelList = new ArrayList<>();

    @Override
    protected void onCreate(Bundle savedInstanceState) {
        super.onCreate(savedInstanceState);
        setContentView(R.layout.activity_main);
        initData();//初始化數據
        RecyclerView recyclerView = findViewById(R.id.recycler_view);
        //參數1:布局的列數;參數2:布局的排列方向
        StaggeredGridLayoutManager layoutManager = new StaggeredGridLayoutManager(4,StaggeredGridLayoutManager.VERTICAL);
        recyclerView.setLayoutManager(layoutManager);
        ModelAdapter adapter = new ModelAdapter(modelList);
        recyclerView.setAdapter(adapter);
    }

    private void initData(){
        for(int i='a';i<='z';i++){
            String leftString = ""+(char)i+(char)i+(char)i;
            String s = ""+(char)(i-32)+(char)(i-32)+(char)(i-32);
            String rightString = getRandomText(s);
            Model model = new Model();
            model.setLeftString(leftString);
            model.setRightString(rightString);
            modelList.add(model);
        }
    }

    //生成隨機長度字符串
    private String getRandomText(String s){
        Random random = new Random();
        int num = random.nextInt(20)+21;
        StringBuilder sb = new StringBuilder();
        for(int i=0;i<num;i++){
            sb.append(s);
        }
        return sb.toString();
    }

}
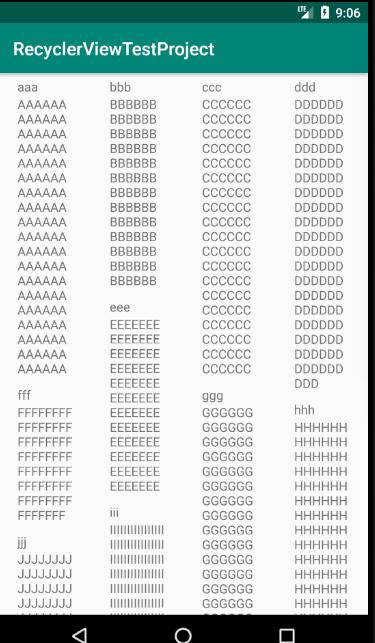
運行APP,效果如下:
實現網格布局
在瀑布流的基礎代碼上,只需要修改MainActivity代碼如下就可以了:
package com.example.recyclerviewtestproject;

import androidx.appcompat.app.AppCompatActivity;
import androidx.recyclerview.widget.GridLayoutManager;
import androidx.recyclerview.widget.LinearLayoutManager;
import androidx.recyclerview.widget.RecyclerView;
import androidx.recyclerview.widget.StaggeredGridLayoutManager;

import android.os.Bundle;
import android.widget.ListView;

import java.util.ArrayList;
import java.util.List;
import java.util.Random;

public class MainActivity extends AppCompatActivity {

    private List<Model> modelList = new ArrayList<>();

    @Override
    protected void onCreate(Bundle savedInstanceState) {
        super.onCreate(savedInstanceState);
        setContentView(R.layout.activity_main);
        initData();//初始化數據
        RecyclerView recyclerView = findViewById(R.id.recycler_view);
        //參數1:Context變量;參數2:網格布局的行列數
        GridLayoutManager layoutManager = new GridLayoutManager(this,3);
        recyclerView.setLayoutManager(layoutManager);
        ModelAdapter adapter = new ModelAdapter(modelList);
        recyclerView.setAdapter(adapter);
    }

    private void initData(){
        for(int i='a';i<='z';i++){
            String leftString = ""+(char)i+(char)i+(char)i;
            String s = ""+(char)(i-32)+(char)(i-32)+(char)(i-32);
            String rightString = getRandomText(s);
            Model model = new Model();
            model.setLeftString(leftString);
            model.setRightString(rightString);
            modelList.add(model);
        }
    }

    //生成隨機長度字符串
    private String getRandomText(String s){
        Random random = new Random();
        int num = random.nextInt(20)+21;
        StringBuilder sb = new StringBuilder();
        for(int i=0;i<num;i++){
            sb.append(s);
        }
        return sb.toString();
    }

}
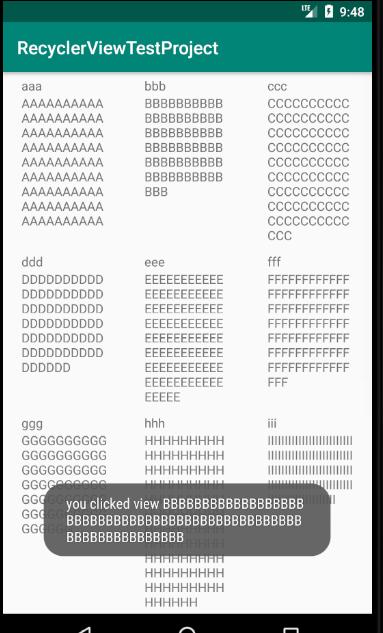
運行APP效果如下:

可以看到,每一行的三個元素,高度是一致的,具體高度取決于高度最高的元素。
RecyclerView的點擊事件
RecyclerView的點擊事件實現起來比ListView更復雜,所有的點擊事件都是由具體的View去注冊。
現在咱們嘗試下為RecyclerView注冊點擊事件,修改ModelAdapter代碼如下:
package com.example.recyclerviewtestproject;

import android.view.LayoutInflater;
import android.view.View;
import android.view.ViewGroup;
import android.widget.TextView;
import android.widget.Toast;

import androidx.recyclerview.widget.RecyclerView;

import java.util.List;

public class ModelAdapter extends RecyclerView.Adapter<ModelAdapter.ViewHolder> {

    private List<Model> modelList;

    static class ViewHolder extends RecyclerView.ViewHolder{
        View modelView;//新增
        TextView leftTextView,rightTextView;

        public ViewHolder(View view) {
            super(view);
            modelView = view;//新增
            leftTextView = view.findViewById(R.id.left_text);
            rightTextView = view.findViewById(R.id.right_text);
        }
    }

    public ModelAdapter(List<Model> modelList){
        this.modelList = modelList;
    }

    //創建ViewHolder實例并返回
    @Override
    public ViewHolder onCreateViewHolder(ViewGroup parent, int viewType) {
        View view = LayoutInflater.from(parent.getContext()).inflate(R.layout.model_item,parent,false);
        final ViewHolder holder = new ViewHolder(view);
        //為子項整體添加點擊事件
        holder.modelView.setOnClickListener(new View.OnClickListener() {
            @Override
            public void onClick(View view) {
                int position = holder.getAdapterPosition();
                Model model = modelList.get(position);
                Toast.makeText(view.getContext(),"you clicked big view "+model.getRightString(),Toast.LENGTH_SHORT).show();
            }
        });
        //為子項中的控件添加點擊事件
        holder.leftTextView.setOnClickListener(new View.OnClickListener(){
            @Override
            public void onClick(View view) {
                int position = holder.getAdapterPosition();
                Model model = modelList.get(position);
                Toast.makeText(view.getContext(),"you clicked view "+model.getLeftString(),Toast.LENGTH_SHORT).show();
            }
        });
        //為子項中的控件添加點擊事件
        holder.rightTextView.setOnClickListener(new View.OnClickListener(){
            @Override
            public void onClick(View view) {
                int position = holder.getAdapterPosition();
                Model model = modelList.get(position);
                Toast.makeText(view.getContext(),"you clicked view "+model.getRightString(),Toast.LENGTH_SHORT).show();
            }
        });

        return holder;
    }

    //對RecyclerView子項數據進行賦值,會在每個子項被滾動到屏幕內的時候執行
    @Override
    public void onBindViewHolder(ViewHolder holder, int position) {
        Model model = modelList.get(position);
        holder.leftTextView.setText(model.getLeftString());
        holder.rightTextView.setText(model.getRightString());
    }

    @Override
    public int getItemCount() {
        return modelList.size();
    }

}
運行APP,效果如下:
智能推薦

Android RecyclerView 基本用法&進階
一、本章我們來介紹一下:RecyclerView RecyclerView是support.v7包中的控件,可以說是ListView和GridView的增強升級版。官方描述:A flexible view for providing a limited window into a large data set。 整體上看RecyclerView架...

android 中RecyclerView 嵌套了 GridView 的用法
提醒一下 RecyclerView 安卓自帶的當中是沒有的,所以需要導入包的。 android.support.v4.widget.SwipeRefreshLayout 中的v7,v4都已經變成 androidx了。希望大家注意 android 由于升級 所以build.gradle中是添加, 如果版本較低的話,添加 項目結構 ,寫的比較復雜,沒有嵌套 需求,本...
Android 5.0新控件—RecyclerView的基本用法
未經本人授權,不得轉載!否則必將維權到底 RecyclerView是Google在API 21下support.V7包里的控件,用來替代ListView。 官網對RecyclerView的描述為:A flexible view for providing a limited window into a large data set。 個人翻譯(英文水平有限…):RecyclerVie...

Recyclerview的用法
前言 簡單的介紹下Recyclerview的用法 內容 Android5.0 RecyclerView特點、用法、及自定義動畫 RecyclerView派生于ViewGroup,是一種更先進的柔性版的ListView。這個小工具是一個容器,用于顯示,它能非常有效地維護了數量有限而滾動大的數據集。相對于ListView來說RecyclerView使用起來更加靈活但...
Android初學筆記 — RecyclerView
Android初學筆記 — RecyclerView A recycler view enables displaying a list of data items It is recommended: when the size of your data is very large and requires scrolling. when the data frequently ch...
猜你喜歡
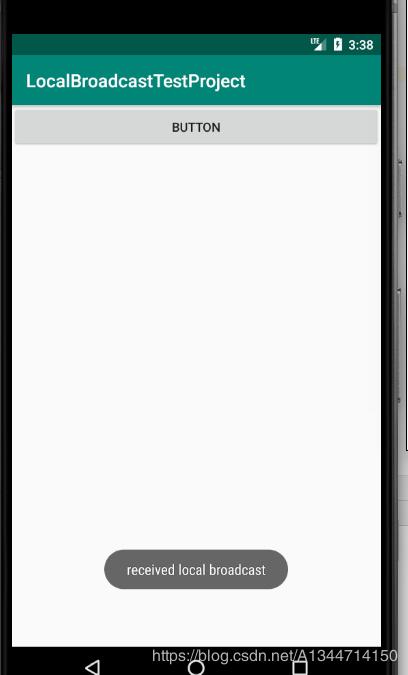
【Android學習筆記】本地廣播的用法
介紹 為了解決廣播的安全性問題,Android引入了一套本地廣播機制,使用這個機制發出的廣播只能在應用程序的內部進行傳遞,并且廣播接收器也只能接收來自本應用程序發出的廣播,這樣所有的安全性問題就不復存在了。 基本使用 先創建工程LocalBroadcastTestProject,編寫MainActivity的界面布局文件: 然后編寫本地廣播接收器代碼,實現onReceiver()方法: 最后編寫M...
安卓學習之路-RecyclerView的簡單用法
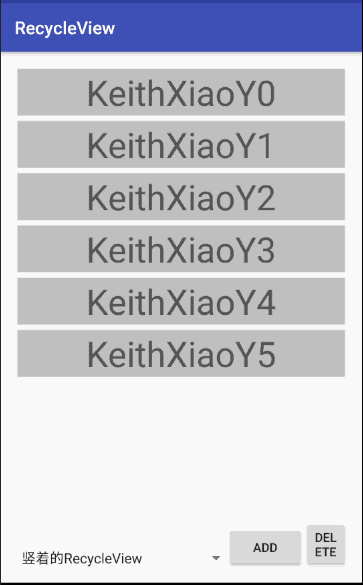
日常嘮嗑 唔,今天早上想了很多,主要是想自己能不能通過面試得到工作。于是乎就跑到力扣看了看,好吧,我好像對算法啥的還是小白啊,瞬間就有點慌,擔心會被問到(同學告訴我這是一定會問到的),小小的沮喪了一下,不過還是想著,無論如何,遇到困難遇到不會的,那就學吧,抓緊時間學習才是正道啊,一味地抱怨沮喪只會讓自己走歪。 好吧,嘮嗑完了回歸正題。其實RecyclerView我之前有簡單的提一下,但是還是重新來...
android學習筆記“RecyclerView”一個更強大的滾動控件
滾動控件RecycleView 雖然ListView強大,并且非常常用,但是它也存在缺點和不足,如果我們不使用一些技巧來優化的話性能會很低,最重要的是它不能橫向滾動。所以今天的主角誕生了RecycleView,RecycleView是一個增強版的ListView,不僅可以達到ListView的效果,還優化了ListView中存在的不足。既可以設置橫向滾動,也可以設置縱向滾動。目前Android官方...


freemarker + ItextRender 根據模板生成PDF文件
1. 制作模板 2. 獲取模板,并將所獲取的數據加載生成html文件 2. 生成PDF文件 其中由兩個地方需要注意,都是關于獲取文件路徑的問題,由于項目部署的時候是打包成jar包形式,所以在開發過程中時直接安照傳統的獲取方法沒有一點文件,但是當打包后部署,總是出錯。于是參考網上文章,先將文件讀出來到項目的臨時目錄下,然后再按正常方式加載該臨時文件; 還有一個問題至今沒有解決,就是關于生成PDF文件...