深度學習21天實戰caffe學習筆記《3 :準備Caffe環境》
- cuda7.5下載:地址 https://developer.nvidia.com/cuda-downloads
文件: cuda_7.5.18_linux.run - 登錄界面前按Ctrl+Alt+F1進入命令提示符 【禁用nouveau驅動】
- 執行命令: sudo vi /etc/modprobe.d/blacklist-nouveau.conf
輸入以下內容
blacklist nouveau
options nouveau modset=0
最后保存退出(:wq)
執行命令: sudo update-initramfs -u
再執行命令: lspci | grep nouveau 查看是否有內容
如果沒有內容 ,說明禁用成功,如果有內容,就重啟一下再查看
sudo reboot
重啟后,進入登錄界面的時候,不要登錄進入桌面,直接按Ctrl+Alt+F1進入命令提示符。重啟后,登錄界面時直接按Ctrl+Alt+F1進入命令提示符
安裝依賴項:
sudo service lightdm stop
sudo apt-get install g++
sudo apt-get install Git
sudo apt-get install freeglut3-dev假設cuda_7.5.18_linux.run位于 ~ 目錄,切換到~目錄: cd ~
執行命令: sudo sh cuda_7.5.18_linux.run
安裝的時候,要讓你先看一堆文字(EULA),我們直接不停的按空格鍵到100%,然后輸入一堆accept,yes,yes或回車進行安裝。安裝完成后,重啟,然后用ls查看一下:
ls /dev/nvidia*
會看到/dev目錄下生成多個nvidia開頭文件(夾)
或者輸入命令: sudo nvcc –version 會顯示類似以下信息dl@dl-Z170X-Gaming-3:~$ nvcc --version nvcc: NVIDIA (R) Cuda compiler driver Copyright (c) 2005-2015 NVIDIA Corporation Built on Tue_Aug_11_14:27:32_CDT_2015 Cuda compilation tools, release 7.5, V7.5.17- 1
- 2
- 3
- 4
- 5
- 1
- 2
- 3
- 4
- 5
配置環境變量
執行命令: sudo vi /etc/profile
文件底部添加以下內容:export PATH=/usr/local/cuda-7.5/bin:$PATH export LD_LIBRARY_PATH=/usr/local/cuda-7.5/lib64:$LD_LIBRARY_PATH- 1
- 2
- 1
- 2
編譯samples
安裝成功后在~目錄下可以看到一個NVIDIA_CUDA-7.5_Samples文件夾,切換到目錄
輸入sudo make, 大概等個十多分鐘后就會把全部的samples編譯完畢。生成的可執行文件位于
NVIDIA_CUDA-7.5_Samples/bin/x86_64/Linux/release 目錄下
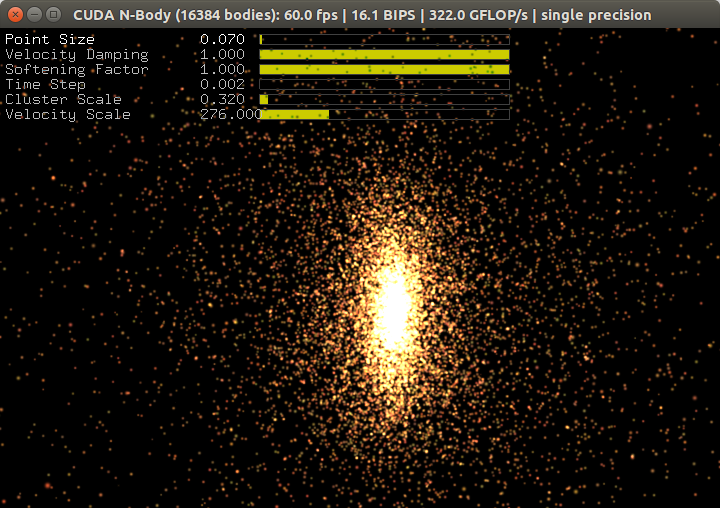
比如運行 ./nbody可以看到以下demo
cuda安裝過程中遇到的問題
Q1
–
- 在執行命令: sudo apt-get install g++ 時出現以下錯誤
g++ : Depends: g++-4.8 (>= 4.8.2-5~) but it is not going to be installed 是因為ubuntu 14.04的源過舊或不可訪問導致,可以通過更新源解決。
首先,備份原始源文件source.list
sudo cp /etc/apt/sources.list /etc/apt/sources.list_backup然后
sudo gedit /etc/apt/source.list
在文件尾部添加以下內容deb http://archive.ubuntu.com/ubuntu/ trusty main restricted universe multiverse deb http://archive.ubuntu.com/ubuntu/ trusty-security main restricted universe multiverse deb http://archive.ubuntu.com/ubuntu/ trusty-updates main restricted universe multiverse deb http://archive.ubuntu.com/ubuntu/ trusty-proposed main restricted universe multiverse deb http://archive.ubuntu.com/ubuntu/ trusty-backports main restricted universe multiverse deb-src http://archive.ubuntu.com/ubuntu/ trusty main restricted universe multiverse deb-src http://archive.ubuntu.com/ubuntu/ trusty-security main restricted universe multiverse deb-src http://archive.ubuntu.com/ubuntu/ trusty-updates main restricted universe multiverse deb-src http://archive.ubuntu.com/ubuntu/ trusty-proposed main restricted universe multiverse deb-src http://archive.ubuntu.com/ubuntu/ trusty-backports main restricted universe multivers最后 sudo apt-get update
Q2
W: GPG 錯誤:http://archive.ubuntukylin.com:10006/ubuntukylin xenial InRelease: 由于沒有公鑰,無法驗證下列簽名: NO_PUBKEY 8D5A09DC9B929006
W: 倉庫 “http://archive.ubuntukylin.com:10006/ubuntukylin xenial InRelease” 沒有數字簽名。
N: 無法認證來自該源的數據,所以使用它會帶來潛在風險。
N: 參見 apt-secure(8) 手冊以了解倉庫創建和用戶配置方面的細節。
W: 以下 ID 的**沒有可用的公鑰:
8D5A09DC9B929006 - 1
- 2
- 3
- 4
- 5
- 6
- 1
- 2
- 3
- 4
- 5
- 6
solution:
sudo apt-key adv --keyserver keyserver.ubuntu.com --recv-keys 8D5A09DC9B929006
- 1
- 2
- 1
- 2
注意最后的一串**就是報錯信息里的, 每個人的不一樣
Q3
1080Ti顯卡安裝完CUDA之后要安裝顯卡驅動,否則提示找不到顯卡設備
sudo service lightdm stop
sudo chmod 777 NVIDIA-Linux-x86_64-378.13.run
sudo ./NVIDIA-Linux-x86_64-367.27.run
sudo service lightdm start - 1
- 2
- 3
- 4
安裝caffe
- 下載caffe:執行命令: sudo git clone https://github.com/BVLC/caffe.git
安裝依賴項:
sudo apt-get install libatlas-base-dev
sudo apt-get install libprotobuf-dev
sudo apt-get install libleveldb-dev
sudo apt-get install libsnappy-dev
sudo apt-get install libopencv-dev
sudo apt-get install libboost-all-dev
sudo apt-get install libhdf5-serial-dev
sudo apt-get install libgflags-dev
sudo apt-get install libgoogle-glog-dev
sudo apt-get install liblmdb-dev
sudo apt-get install protobuf-compiler編譯caffe
cd ~/caffe
sudo cp Makefile.config.example Makefile.config
make all配置運行環境
sudo vi /etc/ld.so.conf.d/caffe.conf
添加內容:
/usr/local/cuda/lib64- 更新配置
sudo ldconfig - caffe測試,執行以下命令:
cd ~/caffe
sudo sh data/mnist/get_mnist.sh
sudo sh examples/mnist/create_mnist.sh
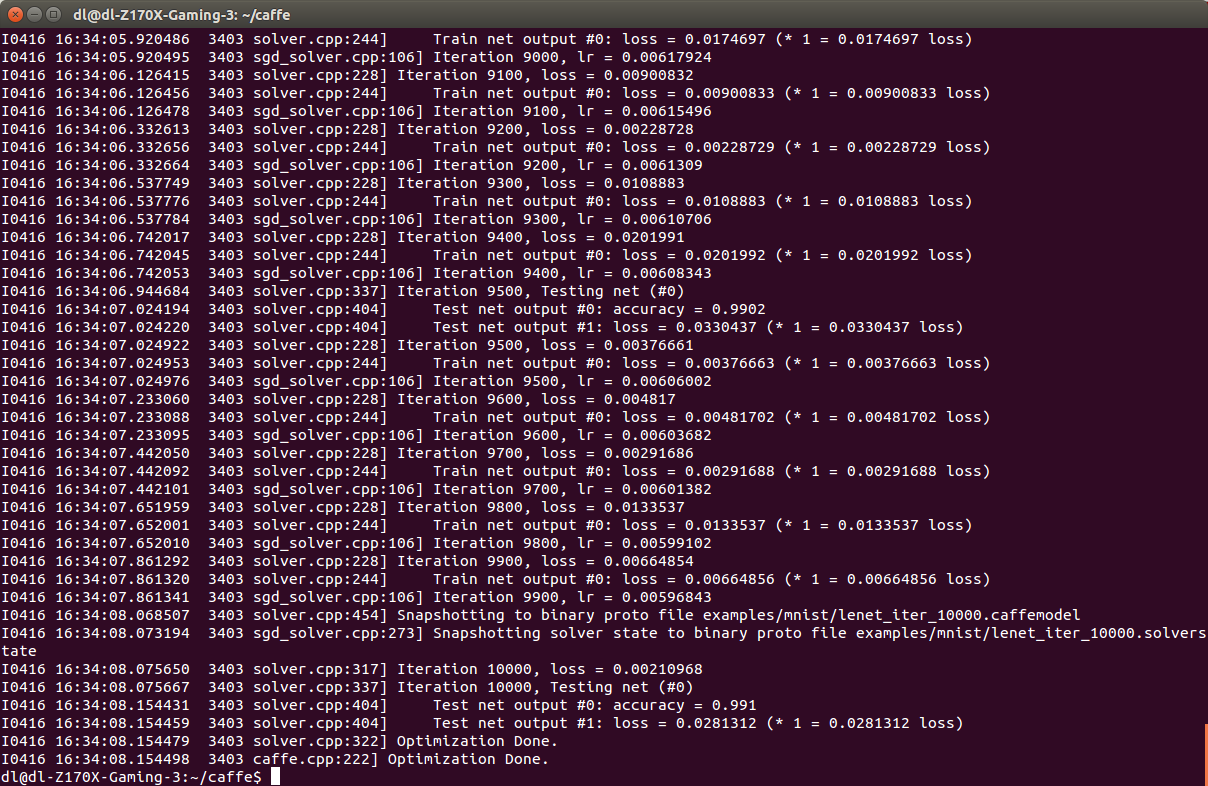
最后測試:
sudo sh examples/mnist/train_lenet.sh
運行結果如下:
其他依賴項
我們查看caffe目錄下 Makefile.config 內容如下:
## Refer to http://caffe.berkeleyvision.org/installation.html
# Contributions simplifying and improving our build system are welcome!
# cuDNN acceleration switch (uncomment to build with cuDNN).
USE_CUDNN := 1
# CPU-only switch (uncomment to build without GPU support).
# CPU_ONLY := 1
# uncomment to disable IO dependencies and corresponding data layers
# USE_OPENCV := 0
# USE_LEVELDB := 0
# USE_LMDB := 0
# uncomment to allow MDB_NOLOCK when reading LMDB files (only if necessary)
# You should not set this flag if you will be reading LMDBs with any
# possibility of simultaneous read and write
# ALLOW_LMDB_NOLOCK := 1
# Uncomment if you're using OpenCV 3
OPENCV_VERSION := 3
# To customize your choice of compiler, uncomment and set the following.
# N.B. the default for Linux is g++ and the default for OSX is clang++
# CUSTOM_CXX := g++
# CUDA directory contains bin/ and lib/ directories that we need.
CUDA_DIR := /usr/local/cuda
# On Ubuntu 14.04, if cuda tools are installed via
# "sudo apt-get install nvidia-cuda-toolkit" then use this instead:
# CUDA_DIR := /usr
# CUDA architecture setting: going with all of them.
# For CUDA < 6.0, comment the *_50 lines for compatibility.
CUDA_ARCH := -gencode arch=compute_20,code=sm_20 \
-gencode arch=compute_20,code=sm_21 \
-gencode arch=compute_30,code=sm_30 \
-gencode arch=compute_35,code=sm_35 \
-gencode arch=compute_50,code=sm_50 \
-gencode arch=compute_50,code=compute_50
# BLAS choice:
# atlas for ATLAS (default)
# mkl for MKL
# open for OpenBlas
BLAS := mkl
# Custom (MKL/ATLAS/OpenBLAS) include and lib directories.
# Leave commented to accept the defaults for your choice of BLAS
# (which should work)!
# BLAS_INCLUDE := /path/to/your/blas
# BLAS_LIB := /path/to/your/blas
# Homebrew puts openblas in a directory that is not on the standard search path
# BLAS_INCLUDE := $(shell brew --prefix openblas)/include
# BLAS_LIB := $(shell brew --prefix openblas)/lib
# This is required only if you will compile the matlab interface.
# MATLAB directory should contain the mex binary in /bin.
# MATLAB_DIR := /usr/local
# MATLAB_DIR := /Applications/MATLAB_R2012b.app
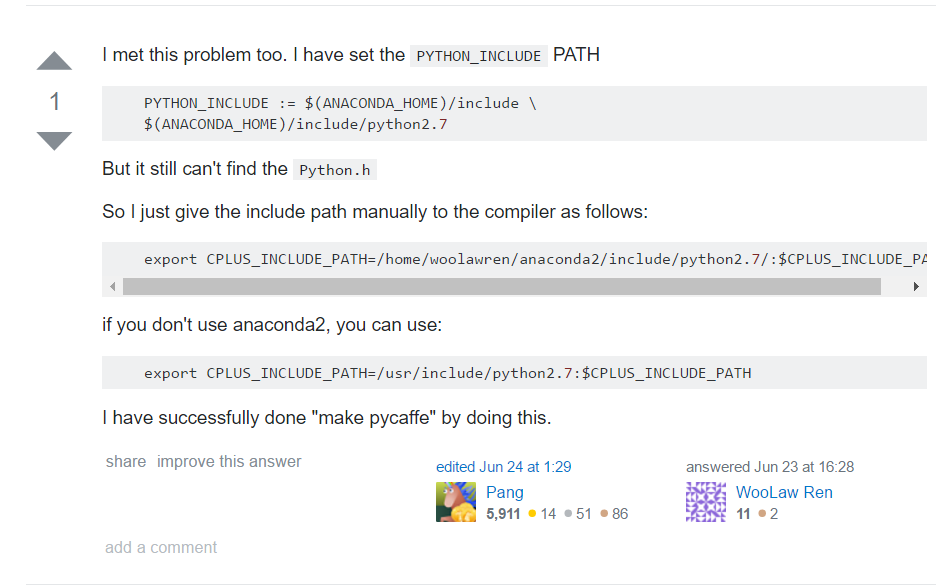
# NOTE: this is required only if you will compile the python interface.
# We need to be able to find Python.h and numpy/arrayobject.h.
PYTHON_INCLUDE := /usr/include/python2.7 \
/usr/lib/python2.7/dist-packages/numpy/core/include
# Anaconda Python distribution is quite popular. Include path:
# Verify anaconda location, sometimes it's in root.
# ANACONDA_HOME := $(HOME)/anaconda
# PYTHON_INCLUDE := $(ANACONDA_HOME)/include \
# $(ANACONDA_HOME)/include/python2.7 \
# $(ANACONDA_HOME)/lib/python2.7/site-packages/numpy/core/include \
# Uncomment to use Python 3 (default is Python 2)
# PYTHON_LIBRARIES := boost_python3 python3.5m
# PYTHON_INCLUDE := /usr/include/python3.5m \
# /usr/lib/python3.5/dist-packages/numpy/core/include
# We need to be able to find libpythonX.X.so or .dylib.
PYTHON_LIB := /usr/lib
# PYTHON_LIB := $(ANACONDA_HOME)/lib
# Homebrew installs numpy in a non standard path (keg only)
# PYTHON_INCLUDE += $(dir $(shell python -c 'import numpy.core; print(numpy.core.__file__)'))/include
# PYTHON_LIB += $(shell brew --prefix numpy)/lib
# Uncomment to support layers written in Python (will link against Python libs)
# WITH_PYTHON_LAYER := 1
# Whatever else you find you need goes here.
INCLUDE_DIRS := $(PYTHON_INCLUDE) /usr/local/include
LIBRARY_DIRS := $(PYTHON_LIB) /usr/local/lib /usr/lib
# If Homebrew is installed at a non standard location (for example your home directory) and you use it for general dependencies
# INCLUDE_DIRS += $(shell brew --prefix)/include
# LIBRARY_DIRS += $(shell brew --prefix)/lib
# Uncomment to use `pkg-config` to specify OpenCV library paths.
# (Usually not necessary -- OpenCV libraries are normally installed in one of the above $LIBRARY_DIRS.)
# USE_PKG_CONFIG := 1
BUILD_DIR := build
DISTRIBUTE_DIR := distribute
# Uncomment for debugging. Does not work on OSX due to https://github.com/BVLC/caffe/issues/171
# DEBUG := 1
# The ID of the GPU that 'make runtest' will use to run unit tests.
TEST_GPUID := 0
# enable pretty build (comment to see full commands)
Q ?= @- 1
- 2
- 3
- 4
- 5
- 6
- 7
- 8
- 9
- 10
- 11
- 12
- 13
- 14
- 15
- 16
- 17
- 18
- 19
- 20
- 21
- 22
- 23
- 24
- 25
- 26
- 27
- 28
- 29
- 30
- 31
- 32
- 33
- 34
- 35
- 36
- 37
- 38
- 39
- 40
- 41
- 42
- 43
- 44
- 45
- 46
- 47
- 48
- 49
- 50
- 51
- 52
- 53
- 54
- 55
- 56
- 57
- 58
- 59
- 60
- 61
- 62
- 63
- 64
- 65
- 66
- 67
- 68
- 69
- 70
- 71
- 72
- 73
- 74
- 75
- 76
- 77
- 78
- 79
- 80
- 81
- 82
- 83
- 84
- 85
- 86
- 87
- 88
- 89
- 90
- 91
- 92
- 93
- 94
- 95
- 96
- 97
- 98
- 99
- 100
- 101
- 102
- 103
- 104
- 105
- 106
- 107
- 108
- 109
- 110
- 111
- 1
- 2
- 3
- 4
- 5
- 6
- 7
- 8
- 9
- 10
- 11
- 12
- 13
- 14
- 15
- 16
- 17
- 18
- 19
- 20
- 21
- 22
- 23
- 24
- 25
- 26
- 27
- 28
- 29
- 30
- 31
- 32
- 33
- 34
- 35
- 36
- 37
- 38
- 39
- 40
- 41
- 42
- 43
- 44
- 45
- 46
- 47
- 48
- 49
- 50
- 51
- 52
- 53
- 54
- 55
- 56
- 57
- 58
- 59
- 60
- 61
- 62
- 63
- 64
- 65
- 66
- 67
- 68
- 69
- 70
- 71
- 72
- 73
- 74
- 75
- 76
- 77
- 78
- 79
- 80
- 81
- 82
- 83
- 84
- 85
- 86
- 87
- 88
- 89
- 90
- 91
- 92
- 93
- 94
- 95
- 96
- 97
- 98
- 99
- 100
- 101
- 102
- 103
- 104
- 105
- 106
- 107
- 108
- 109
- 110
- 111
可以看到諸如
# cuDNN acceleration switch (uncomment to build with cuDNN).
# USE_CUDNN := 1

# Uncomment if you're using OpenCV 3
# OPENCV_VERSION := 3

# BLAS choice:
# atlas for ATLAS (default)
# mkl for MKL
# open for OpenBlas
BLAS := atlas
都是使用默認的設置,我們可以安裝其他依賴項提高caffe運行效率
opencv3.0安裝
github上有人寫好完整的運行腳本自動下載OpenCV,編譯,安裝,配置等
Caffe + Ubuntu 15.04 + CUDA 7.5 新手安裝配置指南 作者 Xin-Yu Ou(歐新宇) 可以到他的網盤中下載
PS:為了方便大家使用,我提供一個百度云盤,用于分享部分安裝過程中需要用到的軟件包和鏈接地址(所有軟件包僅供學術交流使用,請大家盡量去官網下載。)。百度云盤鏈接:http://pan.baidu.com/s/1qX1uFHa 密碼:wysa在Install-opencv-master文件夾中包含安裝各個版本opencv腳本
切換到目錄執行:
sudo sh Ubuntu/dependencies.sh
安裝依賴項執行opencv3.0安裝腳本
sudo sh Ubuntu/3.0/opencv3_0_0.sh
等待安裝完成即可修改Makefile.config
# Uncomment if you're using OpenCV 3

OPENCV_VERSION := 3
(可選)opencv3.1已經發布,如果要安裝最新的opencv3.1,我們可以先執行
sudo sh get_latest_version_download_file.sh
獲取最新的地址,然后更新opencv3_0_0.sh中的下載地址,同時需要修正文件名等arch=$(uname -m) if [ "$arch" == "i686" -o "$arch" == "i386" -o "$arch" == "i486" -o "$arch" == "i586" ]; then flag=1 else flag=0 fi echo "Installing OpenCV 3.0.0" mkdir OpenCV cd OpenCV echo "Removing any pre-installed ffmpeg and x264" sudo apt-get -y remove ffmpeg x264 libx264-dev echo "Installing Dependenices" sudo apt-get -y install libopencv-dev sudo apt-get -y install build-essential checkinstall cmake pkg-config yasm sudo apt-get -y install libtiff4-dev libjpeg-dev libjasper-dev sudo apt-get -y install libavcodec-dev libavformat-dev libswscale-dev libdc1394-22-dev libxine-dev libgstreamer0.10-dev libgstreamer-plugins-base0.10-dev libv4l-dev sudo apt-get -y install python-dev python-numpy sudo apt-get -y install libtbb-dev sudo apt-get -y install libqt4-dev libgtk2.0-dev sudo apt-get -y install libfaac-dev libmp3lame-dev libopencore-amrnb-dev libopencore-amrwb-dev libtheora-dev libvorbis-dev libxvidcore-dev sudo apt-get -y install x264 v4l-utils ffmpeg sudo apt-get -y install libgtk2.0-dev echo "Downloading OpenCV 3.0.0" wget -O opencv-3.0.0.zip http://sourceforge.net/projects/opencvlibrary/files/opencv-unix/3.0.0/opencv-3.0.0.zip/download echo "Installing OpenCV 3.0.0" unzip opencv-3.0.0.zip cd opencv-3.0.0 mkdir build cd build cmake -D CMAKE_BUILD_TYPE=RELEASE -D CMAKE_INSTALL_PREFIX=/usr/local -D WITH_TBB=ON -D BUILD_NEW_PYTHON_SUPPORT=ON -D WITH_V4L=ON -D INSTALL_C_EXAMPLES=ON -D INSTALL_PYTHON_EXAMPLES=ON -D BUILD_EXAMPLES=ON -D WITH_QT=ON -D WITH_OPENGL=ON .. make -j8 sudo make install sudo sh -c 'echo "/usr/local/lib" > /etc/ld.so.conf.d/opencv.conf' sudo ldconfig echo "OpenCV 3.0.0 ready to be used"
安裝opencv3遇到的問題
- 在執行
sudo sh Ubuntu/3.0/opencv3_0_0.sh
出現有個地方一直卡住了,顯示在下載一個文件: ippicv_linux_20141027.tgz
因為墻的原因,這個文件無法下載下來 [其他文檔] ippicv_linux_20141027.tgz 處下載文件 ippicv_linux_20141027.tgz
下載后拷貝到opencv/3rdparty/ippicv/downloads/linux-8b449a536a2157bcad08a2b9f266828b/ 目錄下即
- http://stackoverflow.com/questions/25726768/opencv-3-0-trouble-with-installation
安裝BLAS——選擇MKL
- 首先下載 MKL(Intel(R) Parallel Studio XE Cluster Edition for Linux 2016)
網址: https://software.intel.com/en-us/intel-education-offerings
Caffe + Ubuntu 15.04 + CUDA 7.5 新手安裝配置指南 作者 Xin-Yu Ou(歐新宇) 可以到他的網盤中下載, 需要自己申請*** 下載完成后: parallel_studio_xe_2016.tgz
執行以下命令:
$ tar zxvf parallel_studio_xe_2016.tar.gz$ chmod a+x parallel_studio_xe_2016 -R
$ sh install_GUI.sh
環境配置:
$ sudo gedit /etc/ld.so.conf.d/intel_mkl.conf
然后添加以下內容/opt/intel/lib/intel64 /opt/intel/mkl/lib/intel64配置生效: sudo ldconfig -v
安裝MKL完成修改Makefile.config
 # BLAS choice:
    # atlas for ATLAS (default)
    # mkl for MKL
    # open for OpenBlas
    BLAS := mkl
cuDNN安裝
cudnn下載
下載地址:https://developer.nvidia.com/cudnn
或者到網盤: http://pan.baidu.com/s/1bnOKBO 下載
下載相應文件cudnn-7.0-linux-x64-v4.0-rc.tgz, 放到~根目錄下切換到~目錄,執行命令
sudo tar xvf cudnn-7.0-linux-x64-v4.0-rc.tgz cd cuda/include sudo cp *.h /usr/local/include/ cd ../lib64 sudo cp lib* /usr/local/lib/ cd /usr/local/lib sudo chmod +r libcudnn.so.4.0.4 sudo ln -sf libcudnn.so.4.0.4 libcudnn.so.4 sudo ln -sf libcudnn.so.4 libcudnn.so sudo ldconfig- 1
- 2
- 3
- 4
- 5
- 6
- 7
- 8
- 9
- 10
- 1
- 2
- 3
- 4
- 5
- 6
- 7
- 8
- 9
- 10
修改Makefile.config
# cuDNN acceleration switch (uncomment to build with cuDNN).
USE_CUDNN := 1
cudnn版本問題
在make工程的時候出現以下錯誤:
...

NVCC src/caffe/layers/deconv_layer.cu
NVCC src/caffe/layers/cudnn_conv_layer.cu
src/caffe/layers/cudnn_conv_layer.cu(81): error: argument of type "cudnnAddMode_t" is incompatible with parameter of type "const void *"
          detected during instantiation of "void caffe::CuDNNConvolutionLayer<Dtype>::Forward_gpu(const std::vector<caffe::Blob<Dtype> *, std::allocator<caffe::Blob<Dtype> *>> &, const std::vector<caffe::Blob<Dtype> *, std::allocator<caffe::Blob<Dtype> *>> &) [with Dtype=float]"
(157): here

...

20 errors detected in the compilation of "/tmp/tmpxft_00002703_00000000-16_cudnn_conv_layer.compute_50.cpp1.ii".
make: *** [.build_release/cuda/src/caffe/layers/cudnn_conv_layer.o] Error 1
make: *** Waiting for unfinished jobs....
解決方案:
更換V3版本cudnn Caffe 工程的一些編譯錯誤以及解決方案
$ cd lib64/
$ sudo cp lib* /usr/local/cuda/lib64/
$ cd ../include/
$ sudo cp cudnn.h /usr/local/cuda/include/
$ cd /usr/local/cuda/lib64/
$ sudo rm -r libcudnn.so libcudnn.so.7.0
$ sudo ln -sf libcudnn.so.7.0.64 libcudnn.so.7.0
$ sudo ln -sf libcudnn.so.7.0 libcudnn.so
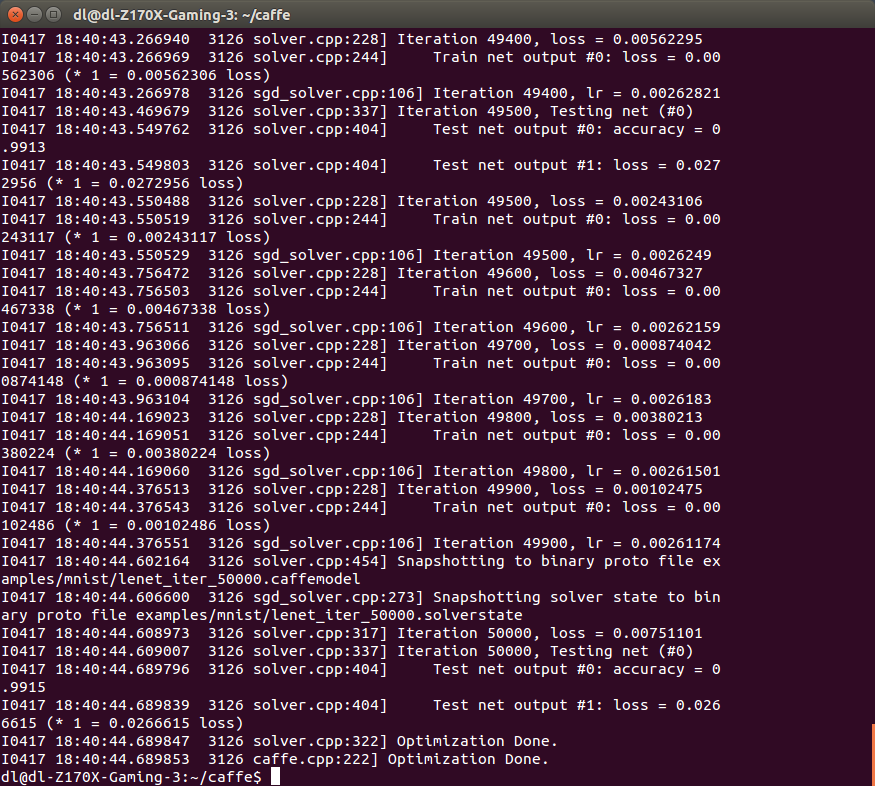
$ sudo ldconfig重新編譯測試caffe
編譯
sudo make clean
sudo make allsample測試: ( 比不使用cudnn快很多)
sh data/mnist/get_mnist.sh
sh examples/mnist/create_mnist.sh我們可以將迭代次數增加到50000次
sudo gedit examples/mnist/lenet_solver.prototxt
修改max_iter: 50000
最后:
sh examples/mnist/train_lenet.sh
編譯Python接口
依賴項
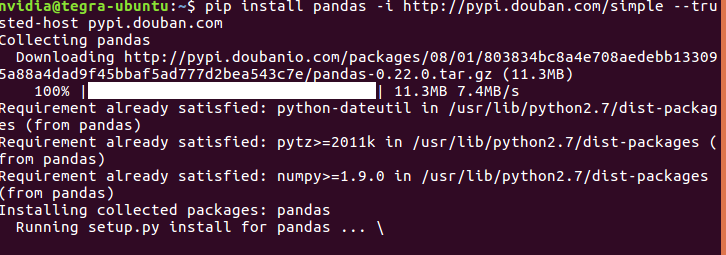
sudo apt-get install -y python-numpy python-scipy python-matplotlib python-sklearn python-skimage python-h5py python-protobuf python-leveldb python-networkx python-nose python-pandas python-gflags cython ipython- 1
- 1
sudo vi ~/.bashrc
添加: export PYTHONPATH=/home/dl/caffe/python:$PYTHONPATH
sudo ldconfig
sudo make pycaffe -j8- 1
- 2
- 3
- 4
- 1
- 2
- 3
- 4
編譯matlab接口
- 安裝matlab2014
sh /usr/local/MATLAB/R2014a/bin/matlab - Makefile.config 中修改 : MATLAB_DIR := /usr/local/MATLAB/R2014a
- sudo make matcaffe -j8
其他
- Vi編輯命令 常用vi編輯器命令行
A:當前行的尾部追加內容

i:游標前插入內容

I:游標后插入內容

o:在鼠標所在行的下面添加內容

O:在鼠標所在行的上面添加內容

ESC:退出編輯模式

Ctrl-T:移動到下一個tab

Backspace:向后移動一個字符

Ctrl-U:刪除當前

cw:刪除游標所在的字符,然后進入編輯模式

cc:刪除游標所在的行,然后進入編輯模式

C:刪除從游標所在的位置到行尾的字符,然后進入編輯模式

dd:刪除當前行

ndd:刪除第n行

D:刪除當前行游標所在的位置后面的字符

dw:刪除郵編所在的字符

d}:刪除當前段剩余的字符

d^:刪除游標前到行首的字符

c/pat:刪除游標后面到第一次匹配字符間的內容

dn:刪除游標后面到下一個匹配字符間的內容

dfa:刪除當前行游標到匹配字符間的內容(匹配的字符也將被刪)

dta:刪除當前行游標到匹配字符間的內容(匹配的字符不被刪)

dL:刪除從游標到屏幕的最后一行之間的內容

dG:刪除從游標到文件末尾之間的內容
J:連結上下兩行的內容

p:在游標后面插入buffer中的內容

P:在游標前面插入buffer中的內容

rx:用x替換字符

Rtext:用text從游標開始處進行替換

u:撤銷最后的改變

U:還原當前行的內容

x:向后刪除游標所在位置的字符

X:向前刪除游標前面的字符

nX:刪除前面的n個字符,游標所在的字符將不會被刪

.:還原最后的改變

~:反轉字母的大小寫

y:拷貝當前行到新的buffer

yy:拷貝當前行

"xyy:拷貝當前行的buffer名為x的buffer

ye:拷貝當單詞的末尾
搜狗輸入法安裝
Ubuntu14.04安裝搜狗輸入法im-config 然后 ibus選取fcitx
fcitx-config-gtk3
參考資料
智能推薦
《21天實戰caffe》 讀書筆記(六)
第六天 運行手寫體數字識別例程 1、MNIST數據集 MNIST數據集包括60000個訓練集和10000個測試集,每張圖都已經進行尺寸歸一化、數字居中處理,固定尺寸為28像素*28像素。 MNIST數據集可以在Caffe源碼框架的data/mnist下用get_mnist.sh腳本下載。 MNIST原始數據為4個文件,數據格式描述見下圖。 下載到的原始數據集為二進制文件,需要轉換為LEVELDB或...
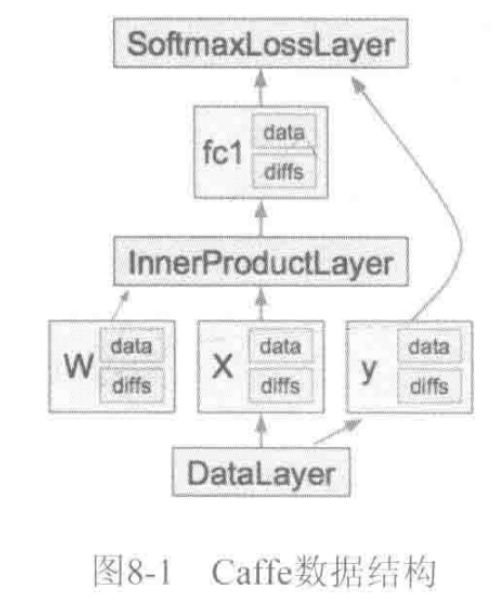
《深度學習——實戰caffe》——caffe數據結構
caffe中一個CNN模型由Net表示,Net由多個Layer堆疊而成。 caffe的萬丈高樓(Net)是由圖紙(prototxt),用blob這些磚塊筑成一層層(Layer),最后通過SGD方法(Solver)進行簡裝修(train)、精裝修(finetune)實現的。 Blob數據結構介紹 Blob提供了統一的存儲器接口,TensorFlow中的Tensor也有對應的Blob數據結構。 Caf...
深度學習caffe實戰筆記(4)Windows caffe平臺下跑cifar10
上一篇博客介紹了如何用alexnet跑自己的數據,能跑自己的數據按理說再跑cifar10應該沒問題了啊,但是想想還是要把cifar10的記錄下來,因為cifar10數據格式是屬于特殊的數據格式,需要用caffe環境把數據轉換文件編譯出來,這也是后面Siamese網絡所必須的一個步驟,說到Siamese網絡,,,,我要再哭5分鐘。好,五分鐘時間到,我們開始train。另外,如果是Ubuntu系統,跑...

《深度學習——實戰caffe》——繪制網絡模型
python/draw_net.py, 這個文件,就是用來繪制網絡模型的。也就是將網絡模型由prototxt變成一張圖片。 在繪制之前,需要先安裝兩個庫 1、安裝GraphViz 注意,這里用的是apt-get來安裝,而不是pip. 2 、安裝pydot 用的是pip來安裝,而不是apt-get 安裝好了,就可以調用腳本來繪制圖片了 draw_net.py執行的時候帶三個參數 第一個參數:網絡模型...
caffe實戰(一):caffe環境搭建
前言:對于深度學習的初學者來說,Caffe框架絕對是一個坑,搭建環境就花了我將近半個月的時間,在網上找了很多帖子,也沒有什么特別好用的,所以打算根據我的安裝經歷寫下這篇帖子,希望對大家有些幫助,少走一些彎路。 一,工具: window 10+VS2013+Anaconda 2+python 2.7 注:這是我個人的配置,僅供參考,當然VS最好是用2013及以上版本。 二,Caffe環境配置 其他軟...
猜你喜歡
caffe訓練之數據準備
在caffe框架下進行深度學習模型訓練,數據準備是極為關鍵的一環。在其網絡結構中,數據層的輸入格式一般為lmdb格式,而我們常用的圖像數據類型為jpg或者png等,這就需要對數據進行類型轉換。本文將對這一過程的具體步驟進行描述,并針對本人在實踐過程中遇到一些問題,給出解決方案。 1. 數據準備(Wind...
caffe中web_demo的運行調試(一)環境準備
在學習caffe的時候,想要運行caffe源碼下的web_demo,打開以后發現這個例子需要大量的python依賴庫支持,而在ubuntu系統下,有python2+python3,它們之間的插件庫老是愛沖突,于是先把環境準備好。 查看python,numpy,scipy,matplotlib等版本 查詢的版本預覽 matplotlib==1.5.1 numpy==1.11.0 pytz==2014...
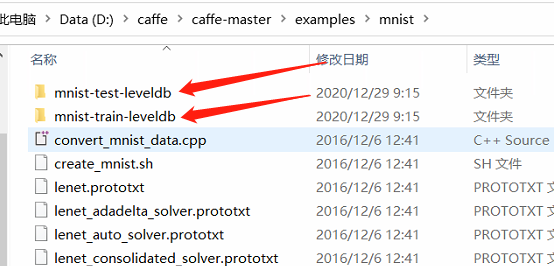
caffe 環境搭建完畢后的MNIST數據測試 路徑修改 數據集準備
一、數據集的準備 D:\caffe\caffe-master\examples\mnist 路徑下放下面的兩個文件夾。文件獲取地址:https://download.csdn.net/download/kekezhu0000/13976631 一定要比對好了自己的項目路徑,再進行對應的修改 二、caffe.exe路徑: 三、我的執行文件train_lenet.bat路徑是這樣子的:D:\caffe...
caffe學習(三):caffe開發環境安裝(Ubuntu)
以前我在Windows10下搭建了caffe環境(打開鏈接),但是caffe本身并不是Windows下開發的,而是在Linux下開發的。雖然大神將caffe移植到了Windows,但與之伴隨有很多兼容性的問題,所以還是決定到Ubuntu下進行安裝了。 嚴格意義上說,這篇文章不是教程,只是我個人安裝caffe環境的經歷總結。caffe的安裝是出了名的麻煩,會遇到很多問題,甚至都有人收費來給人安裝ca...
深度學習--【1】Ubuntu下caffe環境搭建,CPU
在Windows下安裝caffe遇到好多奇奇怪怪的問題,于是轉戰Ubuntu,比windows下要簡單很多。 本篇博文主要講解快速搭建caffe環境: 電腦系統:ubuntu 16.04 1、安裝caffe所需要的依賴庫 Caffe的所有依賴包都可以使用apt-get大發搞定。 #在Ubuntu下如果沒有使用root賬號,則每個命令前需要加sudo。 $ sudo apt-get install ...