UIKit 框架之UICollectionViewController
1.自定義單元格
#import <UIKit/UIKit.h>

@interface myCollectionViewCell : UICollectionViewCell
@property(nonatomic,strong) UIImageView *myImageView;
@property(nonatomic,strong) UILabel *nameLabel;
@end
#import "myCollectionViewCell.h"
@implementation myCollectionViewCell
-(void)layoutSubviews
{
self.myImageView.frame=CGRectMake(0, 0, self.contentView.frame.size.width,80);
[self.contentView addSubview:self.myImageView];
self.nameLabel.frame = CGRectMake(0,80 , self.contentView.frame.size.width, 40);
[self.contentView addSubview:self.nameLabel];
[self.nameLabel setBackgroundColor:[UIColor cyanColor]];
}
@end2.設置UICollectionViewFlowLayout
- (BOOL)application:(UIApplication *)application didFinishLaunchingWithOptions:(NSDictionary *)launchOptions {
    UICollectionViewFlowLayout *collectionViewFlowLayout=[[UICollectionViewFlowLayout alloc]init];
    //每行內部cell item的間距
    collectionViewFlowLayout.minimumInteritemSpacing=10.0;
//     每行的間距
    collectionViewFlowLayout.minimumLineSpacing=20.0;
    collectionViewFlowLayout.scrollDirection = UICollectionViewScrollDirectionVertical;
    collectionViewFlowLayout.sectionInset = UIEdgeInsetsMake(0.0, 0.0, 0, 0.0);
    //它定義了每一個item的大小。通過設定itemSize可以全局地改變所有cell的尺寸,如果想要對某個cell制定尺寸,可以使用-collectionView:layout:sizeForItemAtIndexPath:方法
    collectionViewFlowLayout.itemSize=CGSizeMake(110, 120);
    collectionViewFlowLayout.estimatedItemSize=CGSizeMake(110, 120);
    //由屬性scrollDirection確定scroll view的方向,將影響Flow Layout的基本方向和由header及footer確定的section之間的寬度
    collectionViewFlowLayout.scrollDirection=UICollectionViewScrollDirectionVertical;
    //Header和Footer尺寸 同樣地分為全局和部分。需要注意根據滾動方向不同,header和footer的高和寬中只有一個會起作用。垂直滾動時section間寬度為該尺寸的高,而水平滾動時為寬度起作用
    collectionViewFlowLayout.headerReferenceSize=CGSizeMake(100, 40);
    collectionViewFlowLayout.footerReferenceSize=CGSizeMake(100, 40);
    CollectionViewController *cvc=[[CollectionViewController alloc]initWithCollectionViewLayout:collectionViewFlowLayout];
    UINavigationController *nvc=[[UINavigationController alloc]initWithRootViewController:cvc];
    self.window.backgroundColor=[UIColor whiteColor];
    self.window.rootViewController=nvc;
    [self.window makeKeyAndVisible];

    return YES;
}
3.實現代理方法
//
// CollectionViewController.m
// collectionVC
//
// Created by City--Online on 15/6/2.
// Copyright (c) 2015年 CYW. All rights reserved.
//
#import "CollectionViewController.h"
#import "myCollectionViewCell.h"
@interface CollectionViewController ()
@end
@implementation CollectionViewController
static NSString * const reuseIdentifier = @"Cell";
- (void)viewDidLoad {
[super viewDidLoad];
[self.collectionView registerClass:[myCollectionViewCell class] forCellWithReuseIdentifier:reuseIdentifier];
[self.collectionView registerClass:[UICollectionReusableView class] forSupplementaryViewOfKind:UICollectionElementKindSectionHeader withReuseIdentifier:@"Header"];
[self.collectionView registerClass:[UICollectionReusableView class] forSupplementaryViewOfKind:UICollectionElementKindSectionFooter withReuseIdentifier:@"Footer"];
}
- (void)didReceiveMemoryWarning {
[super didReceiveMemoryWarning];
}
- (NSInteger)numberOfSectionsInCollectionView:(UICollectionView *)collectionView {
return 2;
}
- (NSInteger)collectionView:(UICollectionView *)collectionView numberOfItemsInSection:(NSInteger)section {
if (section==0) {
return 6;
}
else
{
return 4;
}
}
- (UICollectionViewCell *)collectionView:(UICollectionView *)collectionView cellForItemAtIndexPath:(NSIndexPath *)indexPath {
myCollectionViewCell *cell =[collectionView dequeueReusableCellWithReuseIdentifier:reuseIdentifier forIndexPath:indexPath];
cell.backgroundColor = [UIColor colorWithRed:arc4random()%256/ 255.0 green:arc4random()%256 / 255.0 blue:arc4random()% 256 / 255.0 alpha:1];
cell.myImageView=[[UIImageView alloc]initWithImage:[UIImage imageNamed:@"1.png"]];
cell.nameLabel=[[UILabel alloc]init];
cell.nameLabel.text=[NSString stringWithFormat:@"%ld %ld",indexPath.section,indexPath.row];
return cell;
}
#pragma mark <UICollectionViewDelegate>
// Uncomment this method to specify if the specified item should be highlighted during tracking
- (BOOL)collectionView:(UICollectionView *)collectionView shouldHighlightItemAtIndexPath:(NSIndexPath *)indexPath {
return YES;
}
// Uncomment this method to specify if the specified item should be selected
- (BOOL)collectionView:(UICollectionView *)collectionView shouldSelectItemAtIndexPath:(NSIndexPath *)indexPath {
return YES;
}
// Uncomment these methods to specify if an action menu should be displayed for the specified item, and react to actions performed on the item
- (BOOL)collectionView:(UICollectionView *)collectionView shouldShowMenuForItemAtIndexPath:(NSIndexPath *)indexPath {
return NO;
}
- (BOOL)collectionView:(UICollectionView *)collectionView canPerformAction:(SEL)action forItemAtIndexPath:(NSIndexPath *)indexPath withSender:(id)sender {
return NO;
}
- (void)collectionView:(UICollectionView *)collectionView performAction:(SEL)action forItemAtIndexPath:(NSIndexPath *)indexPath withSender:(id)sender {
}
- (UICollectionReusableView *)collectionView:(UICollectionView *)collectionView viewForSupplementaryElementOfKind:(NSString *)kind atIndexPath:(NSIndexPath *)indexPath
{
if ([kind isEqualToString: UICollectionElementKindSectionFooter]) {
UICollectionReusableView *footer=[collectionView dequeueReusableSupplementaryViewOfKind:kind withReuseIdentifier:@"Footer" forIndexPath:indexPath];
footer.backgroundColor=[UIColor yellowColor];
UILabel *label=[[UILabel alloc]initWithFrame:CGRectMake(0, 0, 100, 40)];
label.text=@"label";
label.textAlignment=NSTextAlignmentCenter;
[footer addSubview:label];
return footer;
}
else
{
UICollectionReusableView *Header=[collectionView dequeueReusableSupplementaryViewOfKind:kind withReuseIdentifier:@"Header" forIndexPath:indexPath];
Header.backgroundColor=[UIColor blueColor];
return Header;
}
}
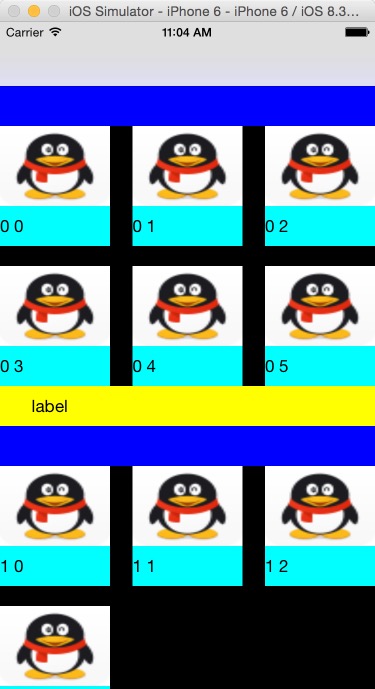
@end4.運行結果圖
智能推薦
Swift — UIKit 之(5)—— TableViews
文章目錄 0. 本篇重點 1. Table Views 2. 新建工程Tabbed App 3. 準備主界面 3.1 刪除 Second View 3.2 添加一個 TableViewController,并關聯到 TabBar 3.3 再加一個 TableViewController,并關聯到 TabBar,命名為“自定義Cell” 4. 第一個頁面“初步&r...
SwiftUI封裝UIKit之UIDatePicker
本文價值與收獲 看完本文后,您將能夠作出下面的界面 [email protected] 看完本文您將掌握的技能 UIDatePicker基礎使用 掌握SwiftUI使用UIDatePicker方法 代碼 推薦 基礎文章推薦 《SwiftUI是什么,聽聽大牛們如何說》 經典教程推薦 onevcat 大神的《SwiftUI 與 Combine 編程》 更新近百篇SwiftUI教程《...

UIKit框架(8)屏幕適配(二)
AutoLayout介紹 AutoLayout的功能要比AutoResizing強大的多。 當對一個UIView對象使用了AutoLayout布局后,意味著放棄了通過對象的frame進行修改視圖的位置、尺寸。 AutoLayout使約束條件,通過自動布局引擎,計算view對象的f...
Swift — UIKit 之(4)—— TabBar|ToolBar|NavigationBar
文章目錄 0. 本篇主要內容 1. TabBar [0] 長啥樣 [1] 建立項目 [2] 添加一個 TabBarController [3] 添加一個 NavigationController 2. ToolBar [4] 在TabBar的第一個界面(櫻桃)添加一個ToolBar [5] 在ToolBar下面添加一個View并拉滿 [6] 為該界面綁定一個控制類 [7] 綁定事件 [8] 編寫代...

UIKit框架(11)導航控制器UINavigationController
介紹多控制器管理中非常重要的一個控制器UINavigationController 它負責管理多個控制器,能夠輕松完成控制器間的切換 如:iOS系統上的設置 父類是UIViewController,但其功能并非是管理view,而是管理多個控制器 控制器棧式管理: 當切換時,將一個控制器入棧,當返回...
猜你喜歡
UIKit框架-自定義視圖-分段控制器
自定義分段控制器 實現簡單點擊事件 效果圖 1.創建工程、創建UIView子類YYJTopView; 2.YYJTopView.h文件聲明一個數組用于接受內容; 3.YYJTopView.m文件實現數組seter方法,常見標題按鈕 4.實現按鈕點擊方法 這里按鈕的狀態不用UIControlStateSelected而用UIControlStateDisabled,是因為當按鈕處于selected狀...

uikit框架開發前期配置及定制主題方法。
要使用npm命令需要先安裝nodejs。 安裝方法網上有很多,在此就不一一例舉了。 1. 安裝Gulp 首先需要在全局范圍安裝gulp 用git下載Uikit。 這需要安裝git,進http://github.com/uikit/uikit直接下載后解壓就可以。 下載之后會自動生成uikit文件夾。 而后進入uikit目錄 2. 安裝node依賴的模塊。 執行npm install安裝node依賴...
Swift — UIKit 之(1)—— 基本組件總覽
參考資料:Apple官方KeyNote文件 文章目錄 1. 常見的系統視圖 2. 標簽(UILabel) 3. 圖像視圖(UIImageView) 4. 文本視圖(UITextView) 5. 滾動視圖(UIScrollView) 6. 表格視圖(UITableView) 7. 工具欄(UIToolBar) 8. 導航欄(UINavigationBar) 9. 標簽欄(UITabBarContro...
Swift — UIKit 之(6)—— Model 的 CRUD(文件版)
文章目錄 0. 本篇重點 1. 項目整體框架 1.1 新建一個 Single View App 1.2 在 Main.storyboard 中添加一個 Navigation Controller 1.3 更改根界面 1.4 給詳細頁面的 ViewController 更名(第三個界面,最右邊) 1.5 為“列表”界面添加 UIViewTableController 并關聯 ...
