springcloud 學習筆記
標簽: java spring spring boot spring cloud
1. Eureka 注冊中心
Spring cloud 封裝了Netflix開發的Eureka來實現服務的注冊和發現
1.引入依賴
<dependency>
    <groupId>org.springframework.cloud</groupId>
    <artifactId>spring-cloud-starter-netflix-eureka-server</artifactId>
</dependency>
2.書寫配置文件
server:
  port: 7001

eureka:
  instance:
    #hostname: eureka7001.com #eureka服務端的實例名稱
    hostname: localhost #eureka服務端的實例名稱
  client:
    register-with-eureka: false     #false表示不向注冊中心注冊自己。
    fetch-registry: false     #false表示自己端就是注冊中心,我的職責就是維護服務實例,并不需要去檢索服務
    service-url:
      #集群指向其它eureka
      #defaultZone: http://eureka7002.com:7002/eureka/
      #單機就是7001自己
      defaultZone: http://${eureka.instance.hostname}:${server.port}/eureka/
    #server:
    #關閉自我保護機制,保證不可用服務被及時踢除
    #enable-self-preservation: false
    #eviction-interval-timer-in-ms: 2000
3.書寫啟動類
Eureka 注冊中心需要在啟動類上添加
@@EnableEurekaServer在服務提供者和消費者的啟動類上添加
@EnableEurekaClient同時在配置文件中添加上相關配置
package com.javacode;


import org.springframework.boot.SpringApplication;
import org.springframework.boot.autoconfigure.SpringBootApplication;
import org.springframework.cloud.netflix.eureka.server.EnableEurekaServer;

@SpringBootApplication
//標志為本類是eureka服務端
@EnableEurekaServer
public class EurekaApp {
    public static void main(String[] args) {
        SpringApplication.run(EurekaApp.class, args);
    }
}
4. 服務提供者和消費者配置
- 添加相關的maven依賴
<dependency>
    <groupId>org.springframework.cloud</groupId>
    <artifactId>spring-cloud-starter-netflix-eureka-client</artifactId>
</dependency>
- 修改yml配置文件
spring:
  application:
    #在eureka注冊中心注冊的服務的名字
    name: cloud-payment-service
eureka:
  client:
    #表示是否將自己注冊進EurekaServer默認為true。
    register-with-eureka: true
    #是否從EurekaServer抓取已有的注冊信息,默認為true。單節點無所謂,集群必須設置為true才能配合ribbon使用負載均衡
    fetchRegistry: true
    service-url:
      #單機版
      defaultZone: http://localhost:7001/eureka
      # 集群版
      #defaultZone: http://eureka7001.com:7001/eureka,http://eureka7002.com:7002/eureka
  #實例的展示名字
  instance:
      instance-id: payment8001
      #訪問路徑可以顯示IP地址
      prefer-ip-address: true
      #Eureka客戶端向服務端發送心跳的時間間隔,單位為秒(默認是30秒)
      #lease-renewal-interval-in-seconds: 1
      #Eureka服務端在收到最后一次心跳后等待時間上限,單位為秒(默認是90秒),超時將剔除服務
      #lease-expiration-duration-in-seconds: 2
- 啟動類上添加相應的注解
添加
@@EnableEurekaClient
package com.javacode;

import org.mybatis.spring.annotation.MapperScan;
import org.springframework.boot.SpringApplication;
import org.springframework.boot.autoconfigure.SpringBootApplication;
import org.springframework.cloud.netflix.eureka.EnableEurekaClient;

/**
 * @author eleven
 * @apiNote 啟動類
 * @date 2020年10月24日14:48:09
 */
@SpringBootApplication
@EnableEurekaClient
@MapperScan("com.javacode.mapper")
public class PaymentApp {
    public static void main(String[] args) {
        SpringApplication.run(PaymentApp.class, args);
    }
}
- 啟動
先啟動EurekaServer、后啟動EurekaClient
5. Eureka集群注冊
單機模擬情況下不能都是用localhost,要修改hosts文件
C:\windows\system32\driver\etc\hosts添加127.0.0.1 eureka7001.com
127.0.0.1 eureka7002.com
eureka:
  instance:
    #hostname: eureka7001.com #eureka服務端的實例名稱
    hostname: eureka7001.com #eureka服務端的實例名稱
  client:
    register-with-eureka: false     #false表示不向注冊中心注冊自己。
    fetch-registry: false     #false表示自己端就是注冊中心,我的職責就是維護服務實例,并不需要去檢索服務
    service-url:
      #集群指向其它eureka
      #defaultZone: http://eureka7002.com:7002/eureka/
      #單機就是7001自己 多個就是用 , 隔開
      defaultZone: http://eureka7002.com:7002/eureka/
    #server:
    #關閉自我保護機制,保證不可用服務被及時踢除
    #enable-self-preservation: false
    #eviction-interval-timer-in-ms: 2000
提供服務的配置文件需要修改為集群版本的,(貌似不修改也能行)
eureka:
  client:
    fetch-registry: true
    service-url:
      defaultZone: http://erueka7001.com:7001/eureka,http://erueka7001.com:7002/eureka
    register-with-eureka: true
成功截圖
成功之后微服務會注冊到所有的配置中心
備用圖片地址


[外鏈圖片轉存失敗,源站可能有防盜鏈機制,建議將圖片保存下來直接上傳(img-PlKkAh5L-1607163635929)(C:\Users\eleven\Desktop\筆記\img\eureka.png)]
[外鏈圖片轉存失敗,源站可能有防盜鏈機制,建議將圖片保存下來直接上傳(img-84E3b1pd-1607163635935)(C:\Users\eleven\Desktop\筆記\img\eureka2.png)]
6. 使用RestTemplate 調用遠程服務
1. 單機版
- 書寫RestTemplate配置類
package com.javacode.config;

import org.springframework.cloud.client.loadbalancer.LoadBalanced;
import org.springframework.context.annotation.Bean;
import org.springframework.context.annotation.Configuration;
import org.springframework.web.client.RestTemplate;

/**
 * @author eleven
 */

@Configuration
public class ApplicationConfig {

    @Bean
    public RestTemplate getRestTemplate(){
        return new RestTemplate();
    }
}
- 直連服務
這里因為是單機版的所以可以直接寫死URL 或者是用服務的名稱(具體有沒有用還沒有做實驗)
package com.javacode.controller;

import lombok.extern.slf4j.Slf4j;
import org.springframework.beans.factory.annotation.Autowired;
import org.springframework.web.bind.annotation.*;
import org.springframework.web.client.RestTemplate;
import com.javacode.util.R;
import com.javacode.entity.Payment;

@Slf4j
@RestController
@RequestMapping("/order")
public class OrderController {

    @Autowired
    private RestTemplate restTemplate;

    private static final String PAYMENT_URL = "http://localhost:8001";

    @PostMapping
    public R create(@RequestBody Payment payment){
        String url = PAYMENT_URL + "/payment";
        return new R<>(restTemplate.postForObject(url, payment, R.class));
    }

    @GetMapping("/{id}")
    public R getById(@PathVariable String id){
        String url = PAYMENT_URL + "/payment/" + id;
        Payment payment = restTemplate.getForObject(url, Payment.class);
        return new R<>(payment);
    }

}
2. 集群版
- 修改RestTemplate配置文件
使用
@LoadBalanced注解讓RestTemplate擁有負載均衡的能力,即可通過微服務的名稱調用集群中的微服務,默認的負載均衡模式為 輪詢,即你一次我一次 。假設有三個微服務的話 123 ,輪詢模式就是 1 2 3 1 2 3這種模式調用
package com.javacode.config;

import org.springframework.cloud.client.loadbalancer.LoadBalanced;
import org.springframework.context.annotation.Bean;
import org.springframework.context.annotation.Configuration;
import org.springframework.web.client.RestTemplate;

/**
 * @author eleven
 */

@Configuration
public class ApplicationConfig {

    /**
     * 使用@LoadBalanced 讓RestTemplate開啟負載均衡
     * @return
     */
    @Bean
    @LoadBalanced
    public RestTemplate getRestTemplate(){
        return new RestTemplate();
    }
}
- 控制器
因為現在是eureka 集群,所以服務提供者不再是暴露的端口號,而是暴露的服務名稱 也就是
provider中的spring.application.name,也可以在eureka控制臺找到
package com.javacode.controller;

import lombok.extern.slf4j.Slf4j;
import org.springframework.beans.factory.annotation.Autowired;
import org.springframework.web.bind.annotation.*;
import org.springframework.web.client.RestTemplate;
import com.javacode.util.R;
import com.javacode.entity.Payment;

@Slf4j
@RestController
@RequestMapping("/order")
public class OrderController {

    @Autowired
    private RestTemplate restTemplate;

    //private static final String PAYMENT_URL = "http://localhost:8001";
    private static final String PAYMENT_URL = "http://CLOUD-PAYMENT-SERVICE";

    @PostMapping
    public R create(@RequestBody Payment payment){
        String url = PAYMENT_URL + "/payment";
        return new R<>(restTemplate.postForObject(url, payment, R.class));
    }

    @GetMapping("/{id}")
    public R getById(@PathVariable String id){
        String url = PAYMENT_URL + "/payment/" + id;
        Payment payment = restTemplate.getForObject(url, Payment.class);
        return new R<>(payment);
    }

}
7. 服務發現 Discovery
對于注冊進eureka里邊的微服務,可以通過服務發現來獲取該服務的信息
- 在controller中添加相關的代碼
import org.springframework.cloud.client.discovery.DiscoveryClient;

public class Test{

    @Autowired
    private DiscoveryClient discoveryClient;

    @GetMapping("/discovery")
    public Object discovery(){
        //獲取所有在eureka中的服務名稱
        List<String> services = discoveryClient.getServices();
        services.forEach(System.out::println);
        List<ServiceInstance> instances = discoveryClient.getInstances("cloud-payment-service");
        for (ServiceInstance instance : instances) {
            log.info("serviceId:" + instance.getServiceId()+ "\tHost:" +
            instance.getHost() + "\tUri:" +instance.getUri());
        }
        return discoveryClient;
    }
}
- 在啟動類上添加相應的注解
添加
@EnableDiscoveryClient注解
package com.javacode;

import org.mybatis.spring.annotation.MapperScan;
import org.springframework.boot.SpringApplication;
import org.springframework.boot.autoconfigure.SpringBootApplication;
import org.springframework.cloud.client.discovery.EnableDiscoveryClient;
import org.springframework.cloud.netflix.eureka.EnableEurekaClient;

/**
 * @author eleven
 * @apiNote 啟動類
 * @date 2020年10月24日14:48:09
 */
@SpringBootApplication
@EnableEurekaClient
@EnableDiscoveryClient
@MapperScan("com.javacode.mapper")
public class PaymentApp {
    public static void main(String[] args) {
        SpringApplication.run(PaymentApp.class, args);
    }
}
8. Eureka的自我保護機制
如果在Eureka Server的受壓看到了以下提示則說明Eureka進入了保護模式
EMERGENCY! EUREKA MAY BE INCORRECTLY CLAIMING INSTANCES ARE UP WHEN THEY’RE NOT. RENEWALS ARE LESSER THAN THRESHOLD AND HENCE THE INSTANCES ARE NOT BEING EXPIRED JUST TO BE SAFE.
簡單來說就是**某時刻某一個服務不可用了,Eureka不會立刻清理該服務,依舊會對改微服務的信息進行保存,(屬于CAP里邊的AP思想)**
[外鏈圖片轉存失敗,源站可能有防盜鏈機制,建議將圖片保存下來直接上傳(img-1xjEaKv4-1607163635938)(C:\Users\eleven\Desktop\筆記\img\Eureka保護模式.png)]
1. 自我保護介紹
Q&A
為什么會產生Eureka自我保護機制
為了防止EurekaClient可以正常運行,但是與EurekaServer網絡不通情況下,EurekaServer不會立刻將EurekaClient服務剔除
什么是自我保護機制
默認情況下,如果EurekaServer在一定時間內沒有接收到某個微服務實例的心跳,EurekaServer將會注銷該實例((默認90秒)。但是當網絡分區故障發生(延時、卡頓、擁擠)時,微服務與EurekaServer之間無法正常通信,以上行為可能變得非常危險了——因為微服務本身其實是健康的,此時本不應該注銷這個微服務。Eureka通過“自我保護模式”來解決這個問題——當EurekaServer節點在短時間內丟失過多客戶端時(可能發生了網絡分區故障),那么這個節點就會進入自我保護模式。
在自我保護模式中,Eureka Server會保護服務注冊表中的信息,不再注銷任何服務實例。font>
它的設計哲學就是寧可保留錯誤的服務注冊信息,也不盲目注銷任何可能健康的服務實例。一句話講解:好死不如賴活著
綜上,自我保護模式是一種應對網絡異常的安全保護措施。它的架構哲學是寧可同時保留所有微服務(健康的微服務和不健康的微服務都會保留)也不盲目注銷任何健康的微服務。使用自我保護模式,可以讓Eureka集群更加的健壯、穩定。
2. 如何關閉Eureka的自我保護
erueka:
  server:
      #關閉自我保護機制,保證不可用服務被及時踢除
      enable-self-preservation: false
      eviction-interval-timer-in-ms: 2000
2. zookeeper 注冊中心
1. 引入依賴
<!-- SpringBoot整合zookeeper客戶端 -->
<dependency>
    <groupId>org.springframework.cloud</groupId>
    <artifactId>spring-cloud-starter-zookeeper-discovery</artifactId>
    <!--先排除自帶的zookeeper3.5.3,解決jar包沖突問題-->
    <exclusions>
        <exclusion>
            <groupId>org.apache.zookeeper</groupId>
            <artifactId>zookeeper</artifactId>
        </exclusion>
    </exclusions>
</dependency>
<!--添加zookeeper3.4.9版本-->
<dependency>
    <groupId>org.apache.zookeeper</groupId>
    <artifactId>zookeeper</artifactId>
    <version>3.4.9</version>
</dependency>
2. 書寫配置文件
server:
  port: 8004


spring:
  application:
    name: cloud-provider-payment
  cloud:
    zookeeper:
      connect-string: localhost:2181
3. 書寫啟動類
package com.javacode;

import org.springframework.boot.SpringApplication;
import org.springframework.boot.autoconfigure.SpringBootApplication;
import org.springframework.cloud.client.discovery.EnableDiscoveryClient;

/**
 * @author eleven
 *
 */
@SpringBootApplication
@EnableDiscoveryClient
public class PaymentApp4 {
    public static void main(String[] args) {
        SpringApplication.run(PaymentApp4.class,args);
    }
}
X. 雜七雜八
- 啟動zookeeper
windows 啟動 zkServer.cmd 再啟動 zkCli.cmd
linux ./zkServer.sh start再啟動zkCli.sh
- 查看zookeeper節點
ls / 根節點
get /zookeeper
- zookeeper是臨時節點一短時間沒有心跳包直接剔除
3. Ribbon 負載均衡
Spring cloud ribbon 是基于Netflix Ribbon實現的一個負載均衡工具
簡單的說,Ribbon是Netflix發布的開源項目,主要功能是提供客戶端的軟件負載均衡算法和服務調用。Ribbon客戶端組件提供一系列完善的配置項如連接超時,重試等。簡單的說,就是在配置文件中列出Load Balancer(簡稱LB)后面所有的機器,Ribbon會自動的幫助你基于某種規則(如簡單輪詢,隨機連接等)去連接這些機器。我們很容易使用Ribbon實現自定義的負載均衡算法。
1. 介紹
LB負載均衡(Load Balance)是什么
就是將用戶的請求平攤的分配到多個服務上,從而達到系統的HA(高可用)。常見的負載均衡有軟件Nginx,LVS,硬件F5等。Ribbon本地負載均衡客戶端和Nginx服務端負載均衡區別
Nginx是服務器負載均衡,客戶端所有請求都會交給nginx,然后由nginx實現轉發請求。即負載均衡是由服務端實現的。
Ribbon本地負載均衡,在調用微服務接口時候,會在注冊中心上獲取注冊信息服務列表之后緩存到VM本地,從而在本地實現RPC遠程服務調用技術。
Q&A
Ribbon是一個軟負載均衡的客戶端組件
服務消費者向注冊中心注冊,在調用服務的時候插敘可用的服務列表,根據設置的負載均衡策略來調用相關的服務
2. 示例
- 也可以不用加這個依賴
spring-cloud-starter-netflix-eureka-client這個依賴中自己就繼承了一個ribbon 2.2.1
<dependency>
    <groupId>org.springframework.cloud</groupId>
    <artifactId>spring-cloud-starter-netflix-ribbon</artifactId>
    <version>2.2.1.RELEASE</version>
    <scope>compile</scope>
</dependency>
getForEntity 返回一個 ResponseEntity 其中的 StatusCode 符合Http請求的狀態碼,根據狀態碼返回不同的信息即可
@GetMapping("/entity/{id}")
public R getEntityById(@PathVariable String id){
    String url = PAYMENT_URL + "/payment/" + id;
    ResponseEntity<Payment> entity = restTemplate.getForEntity(url, Payment.class);
    if(entity.getStatusCode().is2xxSuccessful()){
        return new R<>(entity);
    }
    return new R<>();
}
3. 負載均衡
-
ribbon就是 負載均衡 + restTemplate
-
IRule 接口中選個一個有效的服務無需調用服務
[外鏈圖片轉存失敗,源站可能有防盜鏈機制,建議將圖片保存下來直接上傳(img-1phBu8Jl-1607163635944)(C:\Users\eleven\Desktop\筆記\img\Irule.png)]
| 類名 | 名字 | 解釋 |
|---|---|---|
| com.netflix.loadbalance.RoundRobbinRule | 輪詢 | 輪著來 |
| com.netflix.loadbalance.RandomRule | 隨機 | |
| com.netflix.loadbalance.RetryRule | 先按照輪詢 | |
| WeightResponseTimeRule | 對輪詢的拓展,按照響應時間 | |
| BestAvaliableRule | ||
| AvaliabilityPilteringRule | 先過濾掉故障實例 | |
| ZoneAvoidanceRule |
1. 負載均衡規則替換
- 配置規則不能放在@ComponentScan能掃描的下邊,需要另起一個,否則會被所有的Ribbon客戶端共享
- 書寫負載均衡規則
package com.rules;

import com.netflix.loadbalancer.IRule;
import com.netflix.loadbalancer.RandomRule;
import org.springframework.context.annotation.Bean;
import org.springframework.context.annotation.Configuration;

/**
 * @author eleven
 */

@Configuration
public class MyRule {

    //有原來的輪詢變為了隨機
    @Bean
    public IRule myRule(){
        return new RandomRule();
    }
}
- 服務消費者主啟動類添加相應注解
package com.javacode;

import com.rules.MyRule;
import org.springframework.boot.SpringApplication;
import org.springframework.boot.autoconfigure.SpringBootApplication;
import org.springframework.cloud.netflix.eureka.EnableEurekaClient;
import org.springframework.cloud.netflix.ribbon.RibbonClient;

@SpringBootApplication
@EnableEurekaClient
//建議此處大寫,小寫有時候不好用
@RibbonClient(name = "CLOUD-PAYMENT-SERVER",configuration = MyRule.class)
public class OrderApp {
    public static void main(String[] args) {
        SpringApplication.run(OrderApp.class, args);
    }
}
2. 負載均衡原理
- 負載均衡算法: rest接口第幾次請求數%服務器集群總數量=實際調用服務器位置下標,每次服務重啟動后rest接口計數從1開始。
[外鏈圖片轉存失敗,源站可能有防盜鏈機制,建議將圖片保存下來直接上傳(img-dRTlXYFT-1607163635947)(C:\Users\eleven\Desktop\筆記\img\ribbon輪詢.png)]
3. 手寫負載均衡輪詢算法(模仿)
4. Fegin 聲明式客戶端
- Feign是一個聲明式WebService客戶端。使用Feign能讓編寫Web Service客戶端更加簡單。它的使用方法是定義一個服務接口然后在上面添加注解。Feign也支持可拔插式的編碼器和解碼器。Spring Cloud對Feign進行了封裝,使其支持了Spring MVC標準注解和HttpMessageConverters。Feign可以與Eureka和Ribbon組合使用以支持負載均衡
1.Fegin 和OpenFegin的區別
| fegin | OpenFegin |
|---|---|
| Feign是Spring Cloud組件中的一個輕量級RESTful的HTTP服務客戶端Feign內置了Ribbon,用來做客戶端負載均衡,去調用服務注冊中心的服務。Feign的使用方式是:使用Feign的注解定義接口,調用這個接口,就可以調用服務注冊中心的服務 | OpenFeign是Spring Cloud在Feign的基礎上支持了SpringMVC的注解,如@RequesMapping等等。OpenFeign的@FeignClient可以解析SpringlMVc的@RequestMapping注解下的接口,并通過動態代理的方式產生實現類,實現類中做負載均衡并調用其他服務。 |
org.springframework.cloud spring-cloud-starter-feignk/artifactId> | org.springframework.cloud spring-cloud-starter-openfeign |
2. 引入依賴
<dependency>
    <groupId>org.springframework.cloud</groupId>
    <artifactId>spring-cloud-starter-openfeign</artifactId>
    <version>${fegin.version}</version>
</dependency>
3. 書寫啟動類
package com.javacode;

import org.springframework.boot.SpringApplication;
import org.springframework.boot.autoconfigure.SpringBootApplication;
import org.springframework.cloud.openfeign.EnableFeignClients;

/**
 * @author eleven
 */
@SpringBootApplication
//開啟Feign
@EnableFeignClients
public class OrderFeignApp {
    public static void main(String[] args) {
        SpringApplication.run(OrderFeignApp.class, args);
    }
}
4. 書寫服務接口
此處
@GetMapping()處理器映射器中要填寫的名字是實際的訪問地址,即調用的其他服務的路徑
package com.javacode.service;

import com.javacode.entity.Payment;
import com.javacode.util.R;
import org.springframework.cloud.openfeign.FeignClient;
import org.springframework.stereotype.Component;
import org.springframework.web.bind.annotation.GetMapping;
import org.springframework.web.bind.annotation.PathVariable;
import org.springframework.web.bind.annotation.PostMapping;
import org.springframework.web.bind.annotation.RequestBody;

/**
 * @author eleven
 */
@Component
@FeignClient(value = "CLOUD-PAYMENT-SERVICE")
public interface PaymentFeignService {

    @PostMapping
    public R createPayment(@RequestBody Payment payment);

    /**
     *
     * @param id 要查詢的id
     * @return
     */
    @GetMapping("/payment/{id}")
    public R getPaymentById(@PathVariable("id") String id);
}
5. OpenFeign超時控制
- OpenFeign默認等待1秒鐘,超時報錯
ribbon:
  #指的是建立連接后從服務器讀取到可用資源所用的時間
  ReadTimeout: 5000
  #指的是建立連接所用的時間,適用于網絡狀況正常的情況下,兩端連接所用的時間
  ConnectTimeout: 5000
6. OpenFeign自帶的日志
package com.javacode.config;

import feign.Logger;
import org.springframework.context.annotation.Bean;
import org.springframework.context.annotation.Configuration;

/**
 * @author eleven
 * @apiNote Feign自帶的打印日志的功能
 */
@Configuration
public class FeignConfig {

    @Bean
    Logger.Level returnLevel(){
        //開啟全部日志
        return Logger.Level.FULL;
    }
}
yml文件添加
logging:
  level:
    # feign日志以什么級別監控哪個接口
    com.javacode.config.FeignConfig: debug
X. 錯誤集錦
- Caused by: java.lang.IllegalStateException: PathVariable annotation was empty on param 0.
引發原因:@PathVaable 沒寫括號里邊的值
@GetMapping("/{id}")
public R getPaymentById(@PathVariable("id") String id);
5. Hystrix 斷路器(服務降級)
1. 概述
Hystrix是一個用于處理分布式系統的延遲和容錯的開源庫,在分布式系統里,許多依賴不可避免的會調用失敗,比如超時、異常等,Hystrix能夠保證在一個依賴出問題的情況下,不會導致整體服務失敗,避免級聯故障,以提高分布式系統的彈性。
"斷路器”本身是一種開關裝置,當某個服務單元發生故障之后,通過斷路器的故障監控(類似熔斷保險絲),向調用方返回一個符合預期的、可處理的備選響應(FallBack),而不是長時間的等待或者拋出調用方無法處理的異常,這樣就保證了服務調用方的線程不會被長時間、不必要地占用,從而避免了故障在分布式系統中的蔓延,乃至雪崩。
服務雪崩
多個微服務之間調用的時候,假設微服務A調用微服務B和微服務C,微服務B和微服務C又調用其它的微服務,這就是所謂的T扇出”。如果扇出的鏈路上某個微服務的調用響應時間過長或者不可用,對微服務A的調用就會占用越來越多的系統資源,進而引起系統崩潰,所謂的“雪崩效應”.
對于高流量的應用來說,單一的后端依賴可能會導致所有服務器上的所有資源都在幾秒鐘內飽和。比失敗更糟糕的是,這些應用程序還可能導致服務之間的延遲增加,備份隊列,線程和其他系統資源緊張,導致整個系統發生更多的級聯故障。這些都表示需要對故障和延遲進行隔離和管理,以便單個依賴關系的失敗,不能取消整個應用程序或系統。
2. Hystrix中的重要概念
1. 服務降級
- 服務器繁忙不讓客戶端等待立即返回一個提示 fallback
什么情況會導致服務降級?
- 程序運行異常
- 超時
- 服務熔斷觸發服務降級
- 線程池/信號量打滿 也會導致服務降級
2. 服務熔斷
- 類似保險絲 達到最大訪問的時候直接拒絕訪問沒然后調用服務降級的方法并返回友好提示
3. 服務限流
- 同一時間訪問量過大的話,防止擁擠,將請求按照隊列的方式進行,將超出最大訪問量的放在隊列中等待執行
3. 相關配置
1. 引入pom依賴
<!--hystrix-->
<dependency>
    <groupId>org.springframework.cloud</groupId>
    <artifactId>spring-cloud-starter-netflix-hystrix</artifactId>
</dependency>
<!--eureka client-->
<dependency>
    <groupId>org.springframework.cloud</groupId>
    <artifactId>spring-cloud-starter-netflix-eureka-client</artifactId>
</dependency>
2. 書寫啟動類
package com.javacode;

import org.springframework.boot.SpringApplication;
import org.springframework.boot.autoconfigure.SpringBootApplication;
import org.springframework.cloud.netflix.hystrix.EnableHystrix;

/**
 * @author eleven
 * @apiNote 帶熔斷的啟動類
 */

@SpringBootApplication
@EnableHystrix
public class PaymentHystrixApp {
    public static void main(String[] args) {
        SpringApplication.run(PaymentHystrixApp.class, args);
    }
}
3. 書寫測試類模擬一個正常一個超時的
@RestController
@Slf4j
public class PaymentController {

    @Autowired
    private PaymentService paymentService;

    @GetMapping("/ok/{id}")
    public String getOkStr(@PathVariable String id){

        return paymentService.paymentInfo(id);
    }

    @GetMapping("/timeout/{id}")
    public String getTimeoutStr(@PathVariable String id){
        //sleep(3)
        return paymentService.paymentTimeout(id);
    }
}
4. 服務降級
1. 服務超時控制
在可能會出現錯誤的方法上可以加上
@HystrixCommand注解,設置出錯的處理方法
- 添加fallback處理方法
@HystrixCommand(fallbackMethod = "paymentTimeoutHandler",commandProperties = {
    @HystrixProperty(name="execution.isolation.thread.timeoutInMilliseconds",value = "3000")
})
public String paymentTimeout(String id) {
    try{
        TimeUnit.SECONDS.sleep(5);
    }catch(Exception e){
        e.printStackTrace();
    }
    return "線程池" + Thread.currentThread().getName() + "payment_Timeout:" + id;
}

public String paymentTimeoutHandler(String id){
    return "線程池" + Thread.currentThread().getName() + "timeoutHandler,id:" + id + "\tO(∩_∩)O哈哈~";
}
- 主啟動類添加相應的注解
@EnableCircuitBreaker
import org.springframework.boot.SpringApplication;
import org.springframework.boot.autoconfigure.SpringBootApplication;
import org.springframework.cloud.client.circuitbreaker.EnableCircuitBreaker;
import org.springframework.cloud.netflix.hystrix.EnableHystrix;

/**
 * @author eleven
 * @apiNote 帶熔斷的啟動類
 */

@SpringBootApplication
@EnableHystrix
@EnableCircuitBreaker
public class PaymentHystrixApp {
    public static void main(String[] args) {
        SpringApplication.run(PaymentHystrixApp.class, args);
    }
}
客戶端超時處理
- 配置配置文件
feign:
  hystrix:
    enabled: true
- 設置超時的處理方法
    @GetMapping("/timeout/{id}")
    @HystrixCommand(fallbackMethod = "timeoutHandler",commandProperties = {
            @HystrixProperty(name="execution.isolation.thread.timeoutInMilliseconds",value = "1500")
    })
    public String getTimeout(@PathVariable String id ){
        return paymentHystrixService.getTimeoutStr(id);
    }

    public String timeoutHandler( String id){
        return "支付系統繁忙,請稍后再試";
    }
- 客戶端啟動類需要添加注解
@EnableHystrix
import org.springframework.boot.SpringApplication;
import org.springframework.boot.autoconfigure.SpringBootApplication;
import org.springframework.cloud.netflix.hystrix.EnableHystrix;
import org.springframework.cloud.openfeign.EnableFeignClients;

/**
 * @author zhaojinhui
 * @date 2020/11/5 23:16
 * @apiNote
 */
@SpringBootApplication
@EnableFeignClients
@EnableHystrix
public class FeignHystrixOrderApp {
    public static void main(String[] args) {
        SpringApplication.run(FeignHystrixOrderApp.class,args );
    }
}
問題
此時出錯的話都會有fallback方法進行兜底,但是解決方案和業務邏輯混合在了一起,耦合度較高
2. 解決耦合,設置全局通用的fallback
@DefaultProperties(defaultFallback="")
在類上直接添加上這個標簽會后,配置好相應的方法,如果出現錯誤的方法沒有明確指明fallbak的話就會調用通用的fallback方法,否則就會調用配置的fallback,可以將該方法的返回類型設置為Object,防止報錯。
想要使用默認的話就可以在方法時直接加上
@HystrixCommand注解即可
package com.javacode.controller;

import com.javacode.service.PaymentHystrixService;
import com.netflix.hystrix.contrib.javanica.annotation.DefaultProperties;
import com.netflix.hystrix.contrib.javanica.annotation.HystrixCommand;
import com.netflix.hystrix.contrib.javanica.annotation.HystrixProperty;
import lombok.extern.slf4j.Slf4j;
import org.springframework.beans.factory.annotation.Autowired;
import org.springframework.web.bind.annotation.GetMapping;
import org.springframework.web.bind.annotation.PathVariable;
import org.springframework.web.bind.annotation.RequestMapping;
import org.springframework.web.bind.annotation.RestController;

/**
 * @author zhaojinhui
 * @date 2020/11/5 23:21
 * @apiNote
 */
@RestController
@Slf4j
@RequestMapping("/order")
@DefaultProperties(defaultFallback = "paymentTimeoutHandler")
public class OrderHystrixController {

    @Autowired
    private PaymentHystrixService paymentHystrixService;

    @GetMapping("/ok/{id}")
    public String getOk(@PathVariable String id ){
        return paymentHystrixService.getOkStr(id);
    }

    @GetMapping("/timeout/{id}")
//    @HystrixCommand(fallbackMethod = "timeoutHandler",commandProperties = {
//            @HystrixProperty(name="execution.isolation.thread.timeoutInMilliseconds",value = "1500")
//    })
    @HystrixCommand
    public String getTimeout(@PathVariable String id ){
        return paymentHystrixService.getTimeoutStr(id);
    }

    public String paymentTimeoutHandler(){
        return "全局默認配置fallback,支付系統超時";
    }

    public String timeoutHandler( String id){
        return "支付系統繁忙,請稍后再試";
    }
}
3. 針對Feign接口做統一的降級處理
- 新創建一個類實現Feign服務接口
實現Feign的接口類,在這個類中統一的做服務調用失敗的處理,如果服務正常了就走Feign的服務,異常了就調用本類的服務了 注意,一定要 添加@Component 注解,否則spring掃描不到
package com.javacode.service.impl;

import com.javacode.service.PaymentHystrixService;
import org.springframework.stereotype.Component;

/**
 * @author zhaojinhui
 * @date 2020/11/8 18:03
 * @apiNote
 */
@Component
public class PaymentFallBackService implements PaymentHystrixService {
    @Override
    public String getOkStr(String id) {
        return "-------PaymentFallBackService處理正常----";
    }

    @Override
    public String getTimeoutStr(String id) {
        return "-------PaymentFallBackService處理超時錯誤----";
    }
}
- 在Feign接口上添加fallBack,配置出錯去找上邊寫的那個類
import com.javacode.service.impl.PaymentFallBackService;
import org.springframework.cloud.openfeign.FeignClient;
import org.springframework.stereotype.Component;
import org.springframework.web.bind.annotation.GetMapping;
import org.springframework.web.bind.annotation.PathVariable;

/**
 * @author zhaojinhui
 * @date 2020/11/5 23:18
 * @apiNote
 */
@Component
@FeignClient(value = "CLOUD-PAYMENT-SERVICE",fallback = PaymentFallBackService.class)
public interface PaymentHystrixService {
    @GetMapping("/ok/{id}")
    public String getOkStr(@PathVariable("id") String id);

    @GetMapping("/timeout/{id}")
    public String getTimeoutStr(@PathVariable("id") String id);
}
5. 服務熔斷
一段時間內,請求失敗率達到一定次數之后,就會觸發熔斷,
//=====服務熔斷
@HystrixCommand(fallbackMethod = "paymentCircuitBreaker_fallback",commandProperties = {
    @HystrixProperty(name = "circuitBreaker.enabled",value = "true"),// 是否開啟斷路器
    @HystrixProperty(name = "circuitBreaker.requestVolumeThreshold",value = "10"),// 請求次數
    @HystrixProperty(name = "circuitBreaker.sleepWindowInMilliseconds",value = "10000"), // 時間窗口期
    @HystrixProperty(name = "circuitBreaker.errorThresholdPercentage",value = "60"),// 失敗率達到多少后跳閘
})
public String paymentCircuitBreaker(Integer id)
{
    if(id < 0)
    {
        throw new RuntimeException("******id 不能負數");
    }
    String serialNumber = UUID.randomUUID().toString().replaceAll("-", "");

    return Thread.currentThread().getName()+"\t"+"調用成功,流水號: " + serialNumber;
}
public String paymentCircuitBreaker_fallback(Integer id)
{
    return "id 不能負數,請稍后再試,/(ㄒoㄒ)/~~   id: " +id;
}
-
再有請求調用的時候,將不會調用主邏輯,而是直接調用降級fallback。通過斷路器,實現了自動地發現錯誤并將降級邏輯切換為主邏輯,減少響應延遲的效果。
-
原來的主邏輯要如何恢復呢?
對于這一問題,hystrix也為我們實現了自動恢復功能。
當斷路器打開,對主邏輯進行熔斷之后,hystrix會啟動一個休眠時間窗,在這個時間窗內,降級邏輯是臨時的成為主邏輯,
當休眠時間窗到期,斷路器將進入半開狀態,釋放一次請求到原來的主邏輯上,如果此次請求正常返回,那么斷路器將繼續閉合,主邏輯恢復,如果這次請求依然有問題,斷路器繼續進入打開狀態,休眠時間窗重新計時。
6. 服務限流
7. 圖形化頁面 dashboard
- 引入相關的pom依賴
<dependencies>
    <dependency>
        <groupId>org.springframework.cloud</groupId>
        <artifactId>spring-cloud-starter-netflix-hystrix-dashboard</artifactId>
    </dependency>

</dependencies>
- 配置文件
server:
  port: 9001
- 啟動類
import org.springframework.boot.SpringApplication;
import org.springframework.boot.autoconfigure.SpringBootApplication;
import org.springframework.cloud.netflix.hystrix.dashboard.EnableHystrixDashboard;

/**
 * @author zhaojinhui
 * @date 2020/11/8 21:10
 * @apiNote
 */
@SpringBootApplication
@EnableHystrixDashboard
public class DashBoardApp {
    public static void main(String[] args) {
        SpringApplication.run(DashBoardApp.class, args);
    }
}
- 訪問地址
localhost:9001/hystrix
6. Gateway 網關
1. Zuul
在SpringCloud Finchley正式版之前,Spring Cloud 推薦的網關是 Netflix提供的Zuul:
1、Zuul 1.x,是一個基于阻塞 I/O 的API Gateway
2、Zuul 1.x基于Servlet 2.5使用阻塞架構它不支持任何長連接(如WebSocket)Zuul的設計模式和Nginx較像,每次V/О操作都是從工作線程中選擇一個執行,請求線程被阻塞到工作線程完成,但是差別是Nginx用C++實現,Zuul用Java 實現,而M本身會有第—次加載較慢的情況,使得Zuul的性能相對較差。
3、Zuul 2.x理念更先進,想基于Netty非阻塞和支持長連接,但SpringCloud目前還沒有整合。Zuul 2.x的性能較Zuul 1.x有較大提升。在性能方面,根據官方提供的基準測試,Spring Cloud Gateway的RPS(每秒請求數)是Zuul的1.6倍。
4、Spring Cloud Gateway建立在Spring Framework 5、Project Reactor和Spring Boot 2,之上,使用非阻塞API。5、Spring Cloud Gateway還支持WebSocket,并且與Spring緊密集成擁有更好的開發體驗
為什么使用Gateway
Zuul底層是阻塞式的,傳統的Web框架,比如說: struts2,springmvc等都是基于Servlet API與Servlet容器基礎之上運行的。但是
在Servlet3.1之后有了異步非阻塞的支持。而WebFlux是一個典型非阻塞異步的框架,它的核心是基于Reactor的相關API實現的。相對于傳統的web框架來說,它可以運行在諸如Netty,Undertow及支持Servlet3.1的容器上。非阻塞式+函數式編程(Spring5必須讓你使用java8)
Spring WebFlux是Spring 5.0 引入的新的響應式框架,區別于Spring MVC,它不需要依賴Servlet API,它是完全異步非阻塞的,并且基于Reactor來實現啊應式流規范。
2. gateway
1. Route 路由
路由是構成網關的基本模塊,它由ID,目標URI,一系列斷言和過濾器組成,如果斷言為true則匹配該路由
2. Predicate 斷言
參考java8中的
java.util.function.Predicate,可以匹配HTTP請求中的所有內容(例如請求頭或請求參數),如果請求與斷言相匹配則進行路由
3. Filter 過濾器
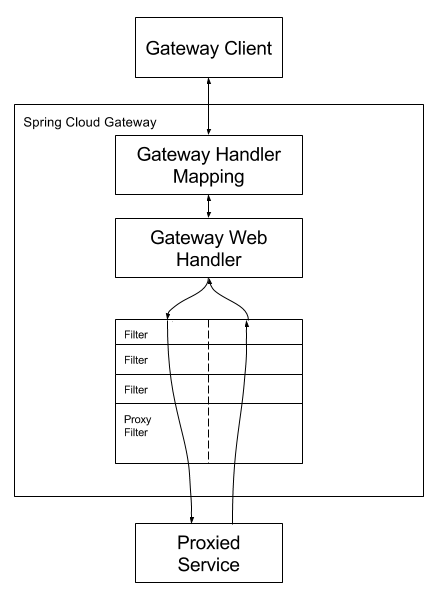
指的是Spring框架中的GatewayFilter的實例,使用過濾器,可以在請求唄路由之前或之后對請求做出修改
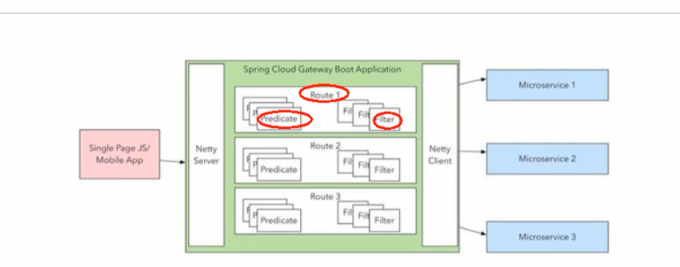
客戶端向Spring Cloud Gateway發出請求。然后在Gateway Handler Mapping 中找到與請求相匹配的路由,將其發送到GatewayWeb Handler。
Handler再通過指定的過濾器鏈來將請求發送到我們實際的服務執行業務邏輯,然后返回。
過濾器之間用虛線分開是因為過濾器可能會在發送代理請求之前(“pre”)或之后(“post”)執行業務邏輯。
3. 搭建gateway網關
1. 引入相關依賴
<!--gateway-->
<dependency>
    <groupId>org.springframework.cloud</groupId>
    <artifactId>spring-cloud-starter-gateway</artifactId>
</dependency>
2. 書寫配置文件
#啟動端口9527
server:
  port: 9527
#設置服務名稱
spring:
  application:
    name: cloud-gateway
  cloud:
    gateway:
      discovery:
        locator:
          enabled: true #開啟從注冊中心動態創建路由的功能,利用微服務名進行路由
      routes:
        - id: payment_routh #payment_route    #路由的ID,沒有固定規則但要求唯一,建議配合服務名
          #uri: http://localhost:8001          #匹配后提供服務的路由地址
          uri: lb://cloud-payment-service #匹配后提供服務的路由地址
          predicates:
            - Path=/payment/get/**         # 斷言,路徑相匹配的進行路由

        - id: payment_routh2 #payment_route    #路由的ID,沒有固定規則但要求唯一,建議配合服務名
          #uri: http://localhost:8001          #匹配后提供服務的路由地址
          uri: lb://cloud-payment-service #匹配后提供服務的路由地址
          predicates:
            - Path=/payment/lb/**         # 斷言,路徑相匹配的進行路由
            #- After=2020-02-21T15:51:37.485+08:00[Asia/Shanghai]
            #- Cookie=username,zzyy
            #- Header=X-Request-Id, \d+  # 請求頭要有X-Request-Id屬性并且值為整數的正則表達式
#注冊進eureka
eureka:
  instance:
    hostname: cloud-gateway-service
  client:
    #服務提供者provider注冊進eureka服務列表內
    service-url:
      register-with-eureka: true
      fetch-registry: true
      defaultZone: http://eureka7001.com:7001/eureka
GateWay中的路由配置有兩種配置方式
- 書寫在配置文件中的
cloud:
    gateway:
      discovery:
        locator:
          enabled: true #開啟從注冊中心動態創建路由的功能,利用微服務名進行路由
      routes:
        - id: payment_routh #payment_route    #路由的ID,沒有固定規則但要求唯一,建議配合服務名
          uri: http://localhost:8001          #匹配后提供服務的路由地址
          #uri: lb://cloud-payment-service #匹配后提供服務的路由地址
          predicates:
            - Path=/payment/get/**         # 斷言,路徑相匹配的進行路由
- 代碼中注入RouteLocator的Bean
package com.javacode.config;

import org.springframework.cloud.gateway.route.RouteLocator;
import org.springframework.cloud.gateway.route.builder.RouteLocatorBuilder;
import org.springframework.context.annotation.Bean;
import org.springframework.context.annotation.Configuration;

/**
 * @author zhaojinhui
 * @date 2020/11/22 21:39
 * @apiNote
 */
@Configuration
public class GateWayConfig {
    @Bean
    public RouteLocator buildRoute(RouteLocatorBuilder routeLocatorBuilder){
        RouteLocatorBuilder.Builder routes = routeLocatorBuilder.routes();
        routes.route("path_route_atguigu",
                r -> r.path("/guonei")
                        .uri("http://news.baidu.com/guonei")).build();
        return routes.build();
    }
}
3. 啟動類
package com.javacode;

import org.springframework.boot.SpringApplication;
import org.springframework.boot.autoconfigure.SpringBootApplication;
import org.springframework.cloud.netflix.eureka.EnableEurekaClient;

/**
 * @author zhaojinhui
 * @date 2020/11/22 21:15
 * @apiNote
 */
@SpringBootApplication
@EnableEurekaClient
public class Gateway9527App {
    public static void main(String[] args) {
        SpringApplication.run(Gateway9527App.class, args);
    }
}
4. 通過微服務名實現動態路由
- 默認情況下Gateway會根據注冊中心注冊的服務列表,
以注冊中心上微服巳名為路徑創建動態路由進行轉發,從而實現動態路由的功能 lb的含義是LoadBlance
修改配置文件
#啟動端口9527
server:
  port: 9527
#設置服務名稱
spring:
  application:
    name: cloud-gateway
  cloud:
    gateway:
      discovery:
        locator:
          enabled: true #開啟從注冊中心動態創建路由的功能,利用微服務名進行路由
      routes:
        - id: api-budget #payment_route    #路由的ID,沒有固定規則但要求唯一,建議配合服務名
          #uri: http://localhost:8001          #匹配后提供服務的路由地址
          uri: lb://BUDGET-SERVICE-API-ZJH #匹配后提供服務的路由地址
          predicates:
            - Path=/api-budget/**        # 斷言,路徑相匹配的進行路由
        - id: api-reimbursement #payment_route    #路由的ID,沒有固定規則但要求唯一,建議配合服務名
          #uri: http://localhost:8001          #匹配后提供服務的路由地址
          uri: lb://FK-REIMBURSEMENT #匹配后提供服務的路由地址
          predicates:
            - Path=/api-reimbursement/**         # 斷言,路徑相匹配的進行路由
            #- After=2020-02-21T15:51:37.485+08:00[Asia/Shanghai]
            #- Cookie=username,zzyy
            #- Header=X-Request-Id, \d+  # 請求頭要有X-Request-Id屬性并且值為整數的正則表達式
        - id: api-ear #payment_route    #路由的ID,沒有固定規則但要求唯一,建議配合服務名
          uri: lb://ZHZ-WEB-API #匹配后提供服務的路由地址
          predicates:
            - Path=/api-ear/**         # 斷言,路徑相匹配的進行路由
            #- After=2020-02-21T15:51:37.485+08:00[Asia/Shanghai]
            #- Cookie=username,zzyy
            #- Header=X-Request-Id, \d+  # 請求頭要有X-Request-Id屬性并且值為整數的正則表達式
#注冊進eureka
eureka:
  instance:
    hostname: cloud-gateway-service
  client:
    #服務提供者provider注冊進eureka服務列表內
    service-url:
      register-with-eureka: true
      fetch-registry: true
      defaultZone: http://10.138.228.199:30771/eureka/
5. Predicate的使用
6. Filter使用
1. 自定義全局過濾器GlobalFilter
- 主要的兩個接口
implements GlobalFilter,Ordered - 可以使用
@Order注解代替 - 可以用來做全局日志處理和鑒權
package com.javacode.filter;

import lombok.extern.slf4j.Slf4j;
import org.springframework.cloud.gateway.filter.GatewayFilterChain;
import org.springframework.cloud.gateway.filter.GlobalFilter;
import org.springframework.core.Ordered;
import org.springframework.core.annotation.Order;
import org.springframework.http.HttpStatus;
import org.springframework.stereotype.Component;
import org.springframework.web.server.ServerWebExchange;
import reactor.core.publisher.Mono;

/**
 * @author zhaojinhui
 * @date 2020/11/22 22:30
 * @apiNote
 */
@Component
@Order(0)
@Slf4j
public class MyGateWayFilter implements GlobalFilter {

    @Override
    public Mono<Void> filter(ServerWebExchange exchange, GatewayFilterChain chain) {
        log.info("***********come in MyGlobalFilter");
        String uname = exchange.getRequest().getQueryParams().getFirst("uname");
        if(uname == null){
            log.info("用戶名未空");
            exchange.getResponse().setStatusCode(HttpStatus.NOT_ACCEPTABLE);
            return exchange.getResponse().setComplete();
        }
        return chain.filter(exchange);
    }

}
7. Config
1. 簡介
微服務意味著要將單體應用中的業務拆分成一個個子服務,每個服務的粒度相對較小,因此系統中會出現大量的服務。由于每個服務都需要必要的配置信息才能運行,所以一套集中式的、動態的配置管理設施是必不可少的。
SpringCloud提供了ConfigServer來解決這個問題,我們每一個微服務自己帶著一個application.yml,上百個配置文件的管理./(ToT)/~~
- Spring Cloud COnfig為我服務架構中的微服務提供種種花的外部配置支持,配置服務器為各個不同的微服務應用的所有換種提供了一個中心化的外部配置
config服務端和客戶端介紹
- 服務端也稱為分布式配置中心,它是一個獨立的微服務應用,用來連接配置服務器并為客戶端提供獲取配置信息,加密/解密信息等訪問接口
- 客戶端則是通過指定的配置中心來管理應用資源,以及與業務相關的配置內容,并在啟動的時候從配置中心獲取和加載配置信息配置服務器默認采用git來存儲配置信息,這樣就有助于對環境配置進行版本管理,并且可以通過git客戶端工具來方便的管理和訪問配置內容
2. 引入依賴
<!--添加消息總線RabbitMQ支持-->
<dependency>
    <groupId>org.springframework.cloud</groupId>
    <artifactId>spring-cloud-starter-bus-amqp</artifactId>
</dependency>
<dependency>
    <groupId>org.springframework.cloud</groupId>
    <artifactId>spring-cloud-config-server</artifactId>
</dependency>
3. 書寫配置文件
server:
  port: 3344

spring:
  application:
    name:  cloud-config-center #注冊進Eureka服務器的微服務名
  cloud:
    config:
      server:
        git:
          uri: [email protected]:2496290990/springcloud-config.git #GitHub上面的git倉庫名字
          ####搜索目錄
          search-paths:
            - springcloud-config
      ####讀取分支
      label: master
#rabbitmq相關配置
rabbitmq:
  host: localhost
  port: 5672
  username: guest
  password: guest

#服務注冊到eureka地址
eureka:
  client:
    service-url:
      defaultZone: http://localhost:7001/eureka

##rabbitmq相關配置,暴露bus刷新配置的端點
management:
  endpoints: #暴露bus刷新配置的端點
    web:
      exposure:
        include: 'bus-refresh'
錯誤集錦
-
org.eclipse.jgit.api.errors.TransportException: [email protected]:xxxxxxxx.git:
請嘗試以下的配置文件
將ssh方式改為http
spring:
application:
 name:  cloud-config-center #注冊進Eureka服務器的微服務名
cloud:
 config:
   server:
     git:
       uri: https://github.com/2496290990/springcloud-config.git #GitHub上面的git倉庫名字
       username: [email protected]
       ####搜索目錄
       search-paths:
            - springcloud-config
          password:
          force-pull: true #重要
      ####讀取分支
      label: master
4. 書寫啟動類
package com.javacode;

import org.springframework.boot.SpringApplication;
import org.springframework.boot.autoconfigure.SpringBootApplication;
import org.springframework.cloud.config.server.EnableConfigServer;
import org.springframework.cloud.netflix.eureka.EnableEurekaClient;

/**
 * @author zhaojinhui
 * @date 2020/11/22 23:00
 * @apiNote
 */
@SpringBootApplication
@EnableConfigServer
@EnableEurekaClient
public class Config3344 {
    public static void main(String[] args) {
        SpringApplication.run(Config3344.class, args);
    }
}
5. 書寫config客戶端3355
1, pom依賴
<?xml version="1.0" encoding="UTF-8"?>
<project xmlns="http://maven.apache.org/POM/4.0.0"
         xmlns:xsi="http://www.w3.org/2001/XMLSchema-instance"
         xsi:schemaLocation="http://maven.apache.org/POM/4.0.0 http://maven.apache.org/xsd/maven-4.0.0.xsd">
    <parent>
        <artifactId>cloud</artifactId>
        <groupId>com.java-code</groupId>
        <version>1.0-SNAPSHOT</version>
    </parent>
    <modelVersion>4.0.0</modelVersion>

    <artifactId>cloud-config-server3355</artifactId>

    <dependencies>
        <!--添加消息總線RabbitMQ支持-->
        <dependency>
            <groupId>org.springframework.cloud</groupId>
            <artifactId>spring-cloud-starter-bus-amqp</artifactId>
        </dependency>
        <dependency>
            <groupId>org.springframework.cloud</groupId>
            <artifactId>spring-cloud-starter-config</artifactId>
        </dependency>
        <dependency>
            <groupId>org.springframework.cloud</groupId>
            <artifactId>spring-cloud-starter-netflix-eureka-client</artifactId>
        </dependency>
        <dependency>
            <groupId>org.springframework.boot</groupId>
            <artifactId>spring-boot-starter-web</artifactId>
        </dependency>
        <dependency>
            <groupId>org.springframework.boot</groupId>
            <artifactId>spring-boot-starter-actuator</artifactId>
        </dependency>

        <dependency>
            <groupId>org.springframework.boot</groupId>
            <artifactId>spring-boot-devtools</artifactId>
            <scope>runtime</scope>
            <optional>true</optional>
        </dependency>
        <dependency>
            <groupId>org.projectlombok</groupId>
            <artifactId>lombok</artifactId>
            <optional>true</optional>
        </dependency>
        <dependency>
            <groupId>org.springframework.boot</groupId>
            <artifactId>spring-boot-starter-test</artifactId>
            <scope>test</scope>
        </dependency>
    </dependencies>


</project>
2. 書寫bootstrap.yml
server:
  port: 3355

spring:
  application:
    name: config-client
  cloud:
    #Config客戶端配置
    config:
      label: master #分支名稱
      name: config #配置文件名稱
      profile: dev #讀取后綴名稱   上述3個綜合:master分支上config-dev.yml的配置文件被讀取http://config-3344.com:3344/master/config-dev.yml
      uri: http://localhost:3344 #配置中心地址k

  #rabbitmq相關配置 15672是Web管理界面的端口;5672是MQ訪問的端口
  rabbitmq:
    host: localhost
    port: 5672
    username: guest
    password: guest

#服務注冊到eureka地址
eureka:
  client:
    service-url:
      defaultZone: http://localhost:7001/eureka

# 暴露監控端點
management:
  endpoints:
    web:
      exposure:
        include: "*"
6. 分布式配置中心的動態刷新問題
- 當github上的配置文件內容調整時,刷新3344(服務端) 會立即得到相應,但是3355(客戶端)并不會得到任何響應,除非3355重啟或者重新加載
1. 修改客戶端3355
- pom添加
actuator模塊
<dependency>
    <groupId>org.springframework.boot</groupId>
    <artifactId>spring-boot-starter-actuator</artifactId>
</dependency>
- 暴露監控端點
# 暴露監控端點
management:
  endpoints:
    web:
      exposure:
        include: "*"
- controller層添加注解
@RefreshScope
import org.springframework.beans.factory.annotation.Value;
import org.springframework.cloud.context.config.annotation.RefreshScope;
import org.springframework.web.bind.annotation.GetMapping;
import org.springframework.web.bind.annotation.RestController;

/**
 * @auther zzyy
 * @create 2020-02-21 18:08
 */
@RestController
@RefreshScope
public class ConfigClientController
{
    @Value("${config.info}")
    private String configInfo;

    @GetMapping("/configInfo")
    public String getConfigInfo()
    {
        return configInfo;
    }
}
此時配置完成之后github修改 3355客戶端還是不會自己修改的,必須手動的發post請求請求刷新
發送post請求到3355
Post http://localhost:3355/actuator/refresh
弊端
如果有多個服務的話,就會導致每個服務都需要去手動刷新,每個微服務都需有一個請求,因此引出BUS消息總線的概念,廣播,一次通知處處生效
8. Bus
9. spring cloud stream
1. 引入相關的依賴
需要使用什么的消息中間件只需要把第二個依賴換成相關的消息中間件即可
<dependency>
	<groupId>org.springframework.cloud</groupId>
	<artifactId>spring-cloud-stream</artifactId>
</dependency>
<dependency>
	<groupId>org.springframework.boot</groupId>
	<artifactId>spring-boot-starter-activemq</artifactId>
</dependency>
2. 需要一個注解
package com.javacode.activeMq.impl;

import com.javacode.activeMq.mq.ActiveMqMessage;
import org.springframework.cloud.stream.annotation.EnableBinding;
import org.springframework.cloud.stream.messaging.Source;


/**
 * @author zhaojinhui
 * @date 2020/12/5 17:40
 * @apiNote
 */
@EnableBinding(Source.class)
public class MessageProvider implements ActiveMqMessage {
    @Override
    public String send() {
        return null;
    }
}
10. spring cloud sleuth
X. 雜七雜八
- linux解壓
#解壓 tar.gz壓縮包
tar -zxvf xxx.tar.gz
#解壓 tar 壓縮包
tar -xvf xxx.tar
- 關閉centos7防火墻
systemctl stop firewalld
智能推薦

SpringCloud學習筆記
SpringCloud學習筆記 ESB企業服務總線:用來連接各個服務節點,為了集成各種不同的服務。 1.系統架構演變 目標: 了解項目架構的演變歷程。 小結: 集中式架構 垂直拆分 分布式架構 SOA面向服務架構 微服務架構 2.微服務架構說明 目標: 了解SOA與微服務架構的區別以及說出微服務架構的特點。 分析: &emsp...
SpringCloud學習筆記-Eureka
注冊中心-Eureka Spring Cloud 封裝了 Netflix 公司開發的 Eureka 模塊來實現服務注冊和發現。Eureka 采用了 C-S 的設計架構。Eureka Server 作為服務注冊功能的服務器,它是服務注冊中心。而系統中的其他微服務,使用 Eureka 的客戶端連接到 Eureka Server,并維持心跳連接。這樣系統的維護人員就可以通過 Eureka Server ...
SpringCloud學習筆記------Feign
feign有假裝的意思 為什么要叫假裝? Feign可以把Rest的請求進行隱藏,偽裝成類似SpringMVC的Controller一樣。你不用再自己拼接url,拼接參數等等操作,一切都交給Feign去做。 快速入門 先用起來,我們在使用的時候揭開它神秘的面紗吧 導入依賴 pom.xml 引入: Feign的客戶端 寫一個Controller dao層 啟...
SpringCloud學習筆記
介紹 Spring Cloud是一系列技術的有序整合。它利用Spring Boot的開發便利性巧妙地簡化了分布式系統基礎設施的開發。 Spring Boot擅長的是集成,把世界上最好的框架集成到自己項目中,Spring Cloud也是一樣,把非常流行的微服務的技術整合到一起。 Spring Cloud從架構層面上降低了對大型系統構建的要求和難度,使我們以非常低的成本(技術或者硬件)搭建一套高效、分...
SpringCloud 學習筆記
SpringCloud 學習筆記 文章目錄 SpringCloud 學習筆記 1 簡介 1.1 什么是 SpringCloud 1.2 SpringCloud 能干什么 2. 微服務 2.1 什么是微服務 2.2 微服務與微服務架構 2.3 微服務架構的四個核心問題 2.4 微服務優缺點 2.5 微服務技術棧有哪些? 2.6 為什么選擇 SpringCloud 作為微服務架構 1. 選型依據 2....
猜你喜歡
SpringCloud - Nacos學習筆記
Nacos學習筆記 nacos簡介 Nacos使用 Nacos Server安裝 Nacos啟動 Nacos關閉 單機模式支持mysql 集群部署 配置管理 客戶端使用方式 動態刷新 命名空間與分組 命名空間 分組 自定義擴展的 Data Id 配置 服務注冊發現 nacos簡介 Nacos 支持幾乎所有主流類型的“服務”的發現、配置和管理: Spring Cloud Du...
SpringCloud Gateway學習筆記
SpringCloud Gateway是Spring cloud的一個全新項目,是基于Spring5.0、Spring Boot 2.0和project Reactor等技術開發的網關,它旨在為微服務架構提供一個簡單有效的統一的API路由管理方式。 SrpingCloud Gateway作為spring cloud生態系統的網關,目標是替代Zuul,為了提升網關的性能,SpringCloud Ga...
springcloud 學習筆記
1. Eureka 注冊中心 Spring cloud 封裝了Netflix開發的Eureka來實現服務的注冊和發現 1.引入依賴 2.書寫配置文件 3.書寫啟動類 Eureka 注冊中心需要在啟動類上添加@@EnableEurekaServer 在服務提供者和消費者的啟動類上添加@EnableEurekaClient 同時在配置文件中添加上相關配置 4. 服務提供者和消費者配置 添加相關的mav...


freemarker + ItextRender 根據模板生成PDF文件
1. 制作模板 2. 獲取模板,并將所獲取的數據加載生成html文件 2. 生成PDF文件 其中由兩個地方需要注意,都是關于獲取文件路徑的問題,由于項目部署的時候是打包成jar包形式,所以在開發過程中時直接安照傳統的獲取方法沒有一點文件,但是當打包后部署,總是出錯。于是參考網上文章,先將文件讀出來到項目的臨時目錄下,然后再按正常方式加載該臨時文件; 還有一個問題至今沒有解決,就是關于生成PDF文件...